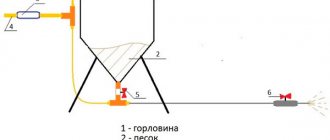
When you need to lift or move something very heavy and bulky from one place to another, and even alone, you can’t do without an auxiliary device.
In certain cases, a manual mechanical or electric winch can come to the rescue. But we recommend making a mini faucet with your own hands.
It can be used for a variety of tasks: to lift a car engine or to move some large piece of driftwood to a suitable place.
The design is suitable for garages and construction sites, and is also suitable for simply lifting heavy objects. Let's consider a homemade mini crane in 3 versions, with different lifting drives.
Assembling a goose tap with your own hands is not at all difficult. All the necessary drawings with dimensions can be easily found on the Internet.
The main thing to remember is that the garage crane must be reliable (made of metal), stable and have sufficient load capacity.
Structurally, a homemade crane consists of three main elements:
- a support (usually with wheels so that you can move it freely around the garage);
- vertical stand with a drive mechanism (jack, mechanical or electric winch, etc.);
- retractable telescopic boom.
Below you can see three different lift options.
Design features and operating principle
The hydraulic valve is made of durable metal and has a stable design. The main principle of the mechanism structure: stable support with low dead weight. This helps you lift loads of up to three tons with ease, but a maximum of two meters above the ground.
Garage crane is used for:
- removing the engine;
- lifting beams, bridges;
- movement of dimensional units.
The crane contains a hydraulic drive and operates through a system of communicating vessels. The method allows you to make the rise smooth.
Stationary
The stationary crane is installed in large car repair shops and is securely attached to a monolithic foundation. The mechanism has a boom with a rotating system and is equipped with a manual drive. Allows you to work on only one vehicle at a time.
It is important to calculate the installation location in advance, since it will not be possible to dismantle the structure without loss.
An integral advantage of a stationary crane is its large lifting capacity. It is provided by a monolithic support, which creates rigidity of the system.
Portable
The hydraulic rolling crane has wheels on its base. The support is provided by the lower metal beams, which results in loss of load capacity readings. It is better to choose a faucet with a massive triangular support. By design they are divided:
- on cast solid supports with limited boom reach, but good load capacity;
- telescopic or folding - they have an increased boom reach, but reduce the load capacity by several times.
Important! Folding units need to strictly follow the instructions for lifting the permitted load. The arrow cannot withstand and, if the permitted standards are not observed, it breaks off.
How to use
The telescopic boom of the mechanism can be installed in several positions. The goose is maneuverable and can be controlled by 1 person. The equipment lifts quite heavy loads due to the installed jack; no additional accessories or devices for moving heavy loads are needed.
In order to raise the car engine, you need to open the hood and roll up the crane. It is installed so that the “legs” are placed under the machine, and the chain with the hook hangs over the engine.
The engine has eyes, cables are hooked onto them, and a chain with a hook is connected to them. Having installed the pry bar, pump the jack. He raises the boom, and the engine goes up with it.
Main types of equipment
The average garage has a reduced square footage and requires careful selection of equipment. Before installation, it is recommended to carefully study the need for individual mechanisms, their types, pros and cons. A hydraulic valve is determined by two criteria.
By type of drive
There are also two subtypes of hydraulic drive:
- automated design with hydraulic cylinders;
- combined, with hydraulic cylinders and manual winches.
A significant drawback of the first is oil cylinders. They need frequent regular replacement, so this design is considered extremely unprofitable for constant use. The combined system will last longer. However, some of the work with winches will have to be taken on by mechanics.
According to the design of the support
Hydraulic cranes are divided into mobile and stationary, they can be folding and prefabricated cast (goose). For ordinary garages, it is more rational to choose a mobile structure with folding parts.
Removing an injection engine from a car without disassembling
To remove the injection engine from the car, you need a lifting device with a lifting capacity of at least 300 kg and slings (chain)
Installing an injection engine on a car
Installation of the engine and all removed parts is carried out in reverse order.
On these machines, VAZ 2101 to 2107, the principle of engine removal is the same. If you decide to remove the engine yourself at home, without any equipment, and don’t know how to do it correctly, then this article is for you.
The engine has to be removed to overhaul it, or to replace it with another engine.
You look at the engine and the first feeling is that it is difficult to remove the engine from the car, but in fact everything is very simple, two men can easily remove the engine themselves at home and also put it in place. I will give an example of removing an engine from a VAZ 2106, although this principle is suitable for VAZ2101 to 2107.
The engine can be removed entirely, but this is much more difficult, or you can remove it without the head, this is much easier. If you decide to repair the engine yourself, then the second option is preferable, since you have to disassemble the engine anyway and why drag out the extra weight. I will describe the removal of the engine with its partial disassembly, in the engine compartment of the car.
The reason for removing the engine was that the splines on the oil pump drive gears on this six were torn off, and the driver drove on without oil pressure, and the engine jammed.
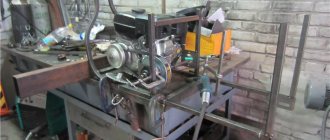
DIY crane assembly technology
If you have certain skills, assembling the mechanism yourself will not be difficult. To do this, it is important to draw up a preliminary design drawing, choose materials wisely and strictly follow the assembly instructions.
Schemes and drawings
Below are sample drawings of a hydraulic crane. You need to make accurate calculations yourself, based on the parameters of a particular garage.
Material selection
To build a garage lift yourself, it is recommended to first purchase all the required materials:
- 3 steel corners with parameters 7.5x7.5x0.8 centimeters.
- “Worm” gearbox, the minimum load capacity of which starts from 300 kilograms, and the additional indicator is 60 kilograms.
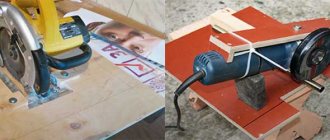
- A strong steel plate one centimeter thick. If you have an old metal cutting machine, you can take it from it; you won’t need outside help for this.
- About 10 matching bolts.
- 2 dense metal chains with a diameter of two to three centimeters. The crane is designed to work with very heavy materials - you should carefully monitor the quality of the metal.
- Hook.
- Steel cable with a diameter of 5 millimeters.
- 2 keys with different parameters in the shape of an asterisk.
Step-by-step construction instructions
The process of assembling and installing a homemade garage crane does not look complicated:
- steel corners must be installed on parallel walls;
- fasten the steel plate to them using M8 bolts;
- fix the “worm” gearbox on the plate;
- install a larger key on the drive shaft;
- drill a hole in a pre-designated place, insert a chain into it and close it into a ring;
- fix a smaller key on the output shaft of the gearbox;
- drill 2 more holes in the plate;
- pass the second chain through the holes, where one end is on a small key, and a hook is installed on the second.
Installing a faucet yourself has a number of important advantages. For example, the cost of a homemade mechanism is almost two times lower than a purchased one.
Necessary materials
The tap is made from a profile 7 m long. It is best to use a material whose wall thickness is 7 mm. The mechanism must be durable, so you should choose a profile with a cross section of 80x80 mm.
To make a lifting device, you will also need several pipes. Suitable products are 700 mm, the cross-section of which ranges from 76 to 99 mm.
To build a crane you will need a jack, you can take it from a VAZ. It is best to use a device that is designed to lift loads weighing up to 5 tons. To construct the mechanism, 4 plates with a thickness of 8 mm are required.
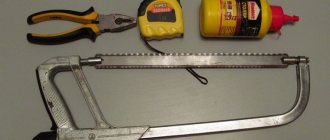
To assemble a crane yourself, you need to have the following set of tools:
- drill;
- inverter for welding;
- spanners;
- Bulgarian
Assembling the mechanism is not complicated, so it can be easily done on your own. A gantry crane or any other device can be painted after assembly.
Lighting
If you've ever had a car repaired, you know how important it is to have good lighting, but there are a few caveats. For ceiling lighting, you can use any lamps - 220V, 12V, fluorescent, LED or incandescent.
But the so-called portables, or as they should be called correctly, portable light sources must be low-voltage, namely the supply voltage according to clause 6.1.17 of the PUE
they should not exceed 50V, and when working in difficult conditions, for example, high humidity, confined spaces, etc. - no more than 12 volts.
At the same time, carriers are often used when working from an inspection hole or lying under a car - this means that you need to use low-voltage lamps, but where can you get these 12V? There are two options:
- Find a step-down transformer 220/12, mount it in the electrical panel and connect the carriers to it.
- Buy a ready-made box with a step-down transformer, an example of marking in the catalogs of online stores for such a box is YATP 0.25 220/12, which means it stands for: YATP - Box with a step-down transformer 220/12 - from voltage 220V to 12V, 0.25 - with a power of 250 volt-amperes (watt, if you use incandescent lamps or other devices with cosФ=1). There are both more and less powerful options - it all depends on your needs.
In the nuclear power plant box there is an automatic switch that turns off the primary circuit, in some cases there is also a separate circuit breaker for the secondary circuit, and there is a socket for connecting lamps to it; in some versions there may be terminal blocks.
In addition to a portable lamp, it is possible to install stationary lighting in the inspection hole; it also needs to be connected to a 12V safety low voltage line.
The box with the step-down transformer must be mounted on the surface, so that there are no 220V circuits in the inspection hole at all.
Hydraulic puller
In some cars, for example, Mercedes Vito, Renault Master, Toyota Hiace, the use of an inertial puller is difficult. This is due to the lack of space to accommodate it. In this case, a hydraulic injector puller comes to the rescue, capable of dismantling in the most inaccessible places.
When dismantling fuel injectors with this device, the connection of a hydraulic hose is required, therefore, in the absence of equipment that provides pressure, purchasing a puller is not advisable. To carry out the operation, it is recommended to contact a service center.
Installation of lifting mechanism
The main element of the crane is the lifting mechanism, which can be manual or automatic. The tefler consists of a cable and a winch installed on the side of the rack. The cable moves due to the rotation of the rollers. Additional fixation of the elements is not required; it is enough to secure the lift to the rack.
A self-made crane can be equipped with lifting equipment that is used in elevators. Such mechanisms are highly reliable and able to withstand massive objects.
To simplify repair work, it is possible to connect an electric drive to the lifting element. To automate the design, a motor with a power of 300-500 W is suitable. The electric drive is mounted to the base of the crane beam.
The design, equipped with an electric drive, is widely used in large-scale garage repairs and car disassembly for spare parts when a complex of work is required. According to the principle of operation, manual and automated cranes do not have significant differences.
Experienced car owners say that a crane beam is rarely needed in the garage, but if it is needed, there is nothing to replace it with. It is used for removing and installing the engine, and less often for moving other loads. Purchased mechanisms are expensive and take up a lot of space, so the best solution for a private craftsman is a do-it-yourself beam crane made from scrap materials.
In order to make a garage lift with your own hands, you will need:
- For racks - pipe with a cross-section of 100x100, length 2350 mm - 2 pcs.
- For the cross rod - a round pipe with a diameter of 100 mm and a length of 4150 mm.
- For supports – round pipe with a diameter of 110 mm and a length of 600 mm – 2 pcs.
- For bases and diagonal supports - corner 100x100 mm.
- M 16 bolts for attaching supports to rods.
- Wheels (for example, from a warehouse cart) – 4 pcs.
- Manual winch with a lifting capacity of up to 1 ton.
- Cable and rollers (for example, from an elevator door drive).
A beam crane is necessary for moving various loads
Crane beam device
The mechanism is a U-shaped structure (bridge) with a lifting mechanism. In large auto repair shops, both parts may be movable. The bridge moves on rails, the lift moves on a span beam. In garages, to save space, rails are not laid, and the bridge is equipped with wheels.
The crane beam device consists of supports, a span beam and a lifting mechanism. The supports are welded from metal pipes and channel bars. A manual or, less commonly, electric winch is used as a lifting mechanism.
Girder cranes are of the "floor operated" type, as opposed to those that are handled from a cab. To make the mechanic's work easier, the garage crane can be equipped with an electric winch
. This will increase manufacturing and maintenance costs, but if it is necessary to frequently dismantle engines and other heavy units, it will pay for itself. In rural areas where there are power outages, insufficient power or voltage surges, you should give preference to a manual winch. Especially if we are talking about a personal garage and not a private workshop.
Above we looked at what a beam crane consists of: supports, a span beam and a hoist. Manufacturing takes place in several stages:
- Weld the vertical supports in the shape of an inverted T with two diagonal supports.
- Weld the span pipe to form a U-shaped structure.
- Install the wheels.
- Weld a winch to one of the side supports.
- Install the lifting mechanism: fix the rollers, stretch the cable and hang the hook.
Ready-made drawings can be found online, but it’s easier to make it yourself by adjusting the product to the size of the garage.
Important How to make a hydraulic wood splitter yourself: for a tractor, drawings and dimensions, video
Crane drawing
If for some reason this type of lift is not suitable, you can make a goose garage crane with your own hands - it will take even less time. The gooseneck crane has an L-shape, where the vertical stand is equipped with a jack rather than a winch. It is rolled under the car from the front and the engine is lifted by pumping a hydraulic jack. The boom moves upward and lifts the load.
Another interesting solution that will help save space is a suspended crane beam. Unlike the supporting structure described above, the span beam is attached to the ceiling by means of a rail (I-beam). This option requires sufficient ceiling height and strength of the building.
All devices must be tested with a load 20% greater than the maximum intended load.
How to make wiring and electrical panel in the garage (installation nuances)
Let's start with the fact that when organizing electrical wiring, one of the main documents that should be followed is the PUE 7th edition (in the Russian Federation this version is relevant).
And to be more precise, the main 2.1 (electrical wiring). It describes the basic requirements for laying cables and other nuances. It is worth noting that there are documents that are more relevant than the PUE, but they are mainly for specific types of buildings, such as for frame houses SP 31.105 and others. And so, let's list the main nuances that should be taken into account when installing wiring in the garage.
How to use
The telescopic boom of the mechanism can be installed in several positions. The goose is maneuverable and can be controlled by 1 person. The equipment lifts quite heavy loads due to the installed jack; no additional accessories or devices for moving heavy loads are needed.
In order to raise the car engine, you need to open the hood and roll up the crane. It is installed so that the legs are placed under the machine, and the chain with the hook hangs over the engine.
The engine has eyes, cables are hooked onto them, and a chain with a hook is connected to them. Having installed the pry bar, pump the jack. He raises the boom, and the engine goes up with it.
After the repair of the machine is completed, the motor is lowered into place and the hook is removed. The crane is rolled away from the car. If necessary, it can be disassembled.
Transportation
Relocation of a tower crane is carried out:
- Divided into assemblies and mechanisms. The method is typical for non-mobile lifts with a fixed tower and heavy-duty rotary cranes.
- Loading the unit onto a vehicle in one piece without disassembling. This method is used to transport mobile, quickly mounted devices.
When transporting non-mobile cranes, the installation time of which reaches up to 2 weeks, use:
- tractor units;
- 1-axle trailers.
Mobile units transport:
- tractor units;
- dolly trolleys;
- tractors with a ball pin hitch;
- trailers.
The lift is turned when moving using safe handles and a drawbar. When driving a road train along streets and highways, overall dimensions must comply with GOST 13556-76.
Standard dimensions:
- Load moment - up to 170 tm.
- The length of the module without a tractor is up to 28 m.
- Height and width - no more than 4.2 m.
- Clearance - no less than 0.35 m.
- Wheel load:
- for 4-wheeled trolleys - no more than 5 t;
- for 2 coaxial bogies - no more than 4.3 tf.
Thus, the KB-503 crane is transported folded on 4 dollies when attached to KrAZ-255V, KrAZ-214V tractors. Install separately from the tap:
- boom mechanism with trolley;
- intermediate tower sections;
- head;
- 2 wheeled trolleys;
- counterweight.
Permissible slope:
- longitudinal - 5%;
- transverse - 3%.
The route must be coordinated in advance with the traffic police. Self-erecting lifts do not require a permit. Transportation speed can reach more than 80 km/h. The driving speed of non-mobile devices when driving on a flat highway is 15 km/h.
Important: What tuning of the T-25 tractor can you do yourself?
If it is necessary to relocate the lift over short distances, it is transported without disassembly along temporary inventory and crane tracks. When moving from the territory of the plant where the crane was produced to an industrial facility, they use the services of the railway. To facilitate loading and unloading of lifting modules, open railway platforms are used. Their dimensions must correspond to the dimensions of the rolling stock.
Then you need to move under the car
Removing engine mounting elements
First you will need to unscrew all the bolts securing the clutch housing from the power unit.
16. Removing the clutch housing
Then you should proceed to the engine mounting elements.
To do this, you will have to unscrew the bolts securing the motor mounts. First, the nut is unscrewed from the bolt on the front support. Since the power plant continues to rest on this support, in order to be able to pull out the bolt, the engine should be lifted slightly using a pry bar and the bolt removed. Next, holding the unit with a pry bar, insert a wooden block into the gap between it and the subframe. After this, it will be possible to unscrew the engine bracket mounting bolts.
| 17. Removing the front engine mount | 18. Lifting the engine with a pry bar, remove the bolt | 19. To unload the bracket, we place a block |
| 20. Using the “17” head, unscrew the 3 bolts securing the bracket | 21. Bracket mounting bolts when removed | 22. Remove the bracket with support |
In the same way, the rear right support becomes loose, followed by installing it on a wooden block and removing the bracket.
| 23. Using a 17 key, unscrew and remove the bolt | 24. Unscrew the 2 bolts securing the rear support bracket | 25. Remove the rear support |
26. Removing the rear mounting bolt of the clutch housing is possible only after dismantling the rear support. The photo shows a removed engine Removing the left engine mount
| 27. Place a block | 28. Using a key set to “13”, unscrew the nuts securing the left support bracket to the gearbox |
| 30. Take out the support |
The lifting mechanism is hooked onto these eyelets. To remove the motor, you need to move it all the way to the left so that the gearbox input shaft comes out of the flywheel. It is quite possible that for this you will have to tilt the engine a little, and at the same time moving it to the left.
After the shaft comes out of the flywheel and clutch discs, the power unit is carefully lifted up by the lifting mechanism. It is better to do this together - one will lift the motor, and the second will guide it so that it does not cling anywhere.
Garage shield device
When installing an electrical panel with your own hands, you need to clearly understand its structure. The incoming electrical cable must be connected to the input circuit breaker, which acts as a switch. It is advisable to use a two-pole circuit breaker as an input circuit breaker. In this way, two cable conductors are disconnected at once. This is done for safety purposes when carrying out repair and installation work inside the panel or in the garage. The fact is that in garage cooperatives, there is often no proper control over the state of electrical equipment and it is possible that on the incoming line the neutral and phase conductors will be swapped.
If the incoming zero is connected bypassing the machine, a situation may arise when, when the machine is turned off, a high potential will be present at the panel components. This is true if single-phase voltage is supplied to the garage. When supplying three-phase voltage, it is optimal to use a four-pole circuit breaker.
After the introductory machine, an electricity meter is connected. Usually this is a household meter, for example, Mercury 201. The phase and neutral conductors coming out of the meter are connected to an RCD (residual current device). The presence of an RCD is necessary to protect people from electric shock. When a person touches a bare live conductor, a leakage current begins to flow through his body. To prevent the leakage current from reaching a life-threatening value, the RCD turns off the voltage supply.
Correct operation of the RCD is impossible without the presence of grounding in the panel. Grounding must be installed in the garage, regardless of the presence of a grounding conductor in the input cable.
From the output terminals of the RCD, the phase is supplied to group circuit breakers, from which voltage is supplied to each electricity consumer separately. The neutral conductor is connected to a metal bus. All neutral conductors from cables going to consumers are connected to the same bus. This bus connects all the grounding conductors present.
All elements of the shield circuit are mounted on a metal plate called a DIN rail. The design of the DIN rail is such that it allows you to quickly attach all elements to it or, conversely, dismantle them. For the zero and ground buses, there are also options for mounting on a DIN rail.
A possible option for placing all components inside the shield.
After installing the components inside the shield, all parts are covered with a protective screen from the shield kit to prevent accidental contact with live parts. The screen must have windows through which switches are made and readings from the electricity meter are taken.
Portal about construction
02/11/2019 admin Comments No comments
In a modern garage it is impossible to do without electricity. Electricity in the garage is required not only to illuminate the room and work area, but also to connect the battery charger and power tools. Often, electrically driven machines for car repairs and a welding machine are also installed in the garage.
To correctly and safely connect the input cable and distributed consumers, you need to equip an electrical panel in the garage. A meter for metering consumed electricity is also installed in the housing. In stores they sell ready-made structures, which are called garage shields. However, if you have certain skills and follow safety rules, it is quite possible to make an electrical panel for your garage with your own hands.
General information
The single-handle faucet replaced the outdated “herringbone” and other similar designs. This type of faucet is easy to use and maintain, durable and reliable.
The stylish appearance of the single-handle faucet will transform the interior of the bathroom. Even the most ordinary bathroom will take on an elegant and modern look if you install a single-lever faucet in it.
Important Volgograd all-terrain vehicle-breaker Okhotnik M for adventure lovers
The water temperature and flow rate in the single-jaw mixer are adjusted using 1 handle. This allows you to create pressure from very weak to very powerful, depending on the case.
Washing and cleaning single lever faucets is easy. This can be done using regular cleaning products and a soft sponge. At the same time, the faucet will always have an elegant and shiny appearance.
Single-handle mixer device
Single-grip cranes also need minor repairs. To repair such a device yourself, you need to know how to disassemble a single-lever mixer, what elements it consists of, etc.
The main components of a single-jaw mixer are:
- control handle (lever);
- spout that regulates the stream;
- frame;
- fastening element;
- ball or cartridge element;
- gaskets made of rubber or silicone;
- circular nut;
- elastic tubes (hoses) for supplying water.
The main difference between single-lever taps of different designs is the mixing chamber. It can be a hollow ball made of stainless steel or a cartridge made of especially durable ceramics.
Through 2 holes, hot and cold water is supplied to the mixing chamber. There is an additional passage for the jet to exit. Water circulation, pressure and temperature adjustment of the stream inside the chamber are carried out using the working handle.
The ball mixing chamber is subject to minor repairs, cleaning, etc. during operation. The ceramic cartridge chamber must be replaced in case of malfunction. Special filters through which water will be supplied from the water supply will help extend the service life of such faucets.
Self-disassembly of single-lever taps is carried out to eliminate such malfunctions as:
- cartridge leakage;
- weak water supply when the ball mixer is turned on at full power;
- Push-button switch malfunction;
- simultaneous supply of water to the shower head and spout.
What type of shield can be installed in the garage?
Electrical panels are produced in a metal or plastic case. You can use a plastic case, but given the presence of a large number of metal objects in the room, it would be safer to buy a metal box. This reduces the likelihood of mechanical damage to the housing.
If the garage is not heated, a large amount of moisture accumulates in the air. To prevent corrosion of the installed elements, the climatic design of the shield must be U3 (for installation in unheated rooms and operation at temperatures from minus 40 to plus 40 degrees).
The housing must be equipped with a locking device, and on its outer side there must be a bolt for connecting the grounding device.
Connection diagram inside the shield
A typical version of the garage panel diagram is presented.
The ratings of the circuit breakers are selected so that in case of a short circuit in the line or the permissible load on the cable is exceeded, the load is disconnected before the conductors heat up to the melting temperature of the insulation. The RCD parameters indicate a leakage current of 30 mA, this corresponds to a safe value to prevent electric shock.
Automatic machines rated 16 A are used on lighting lines or sockets for connecting hand-held power tools. A line with a 32 A automatic machine is designed to use a more powerful load, for example, a welding machine or a heat gun.