PTF functionality
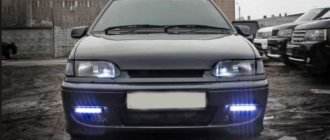
Any experienced car enthusiast, as well as an inexperienced one, is well aware of the role played by fog lights (FTL). In conditions of a white curtain, standard head lighting does not cope with its task of ensuring good visibility on the road, and all due to the fact that the fog is a suspension of water droplets, through which standard optics cannot penetrate. In addition, almost all of the light from such lanterns is reflected from the curtain. Thus, you get a whole white wall, which significantly complicates the view.
Anti-fog optics have their own emission spectrum that can penetrate such a wall. In addition, the luminous flux spreads horizontally and is directed downwards, which allows for good illumination of the road. Is it possible to install LEDs in fog lights? An interesting question that requires attention.
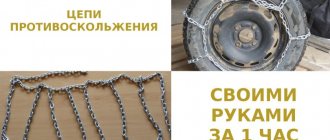
How to make protection for foglights (PTF) and headlights with your own hands
Do-it-yourself protection of foglights (PTF) and headlights
How to make protection for foglights (PTF) and headlights with your own hands
Due to the fact that the fog lights are located close to the ground, stones from the road often break the fragile glass of the headlights. Apart from this, almost everyone is familiar with the quality of Russian fog lamps, which after a while, due to the ingress of water, become like an aquarium. Let's try to protect the PTF from gravel and water.
How to protect your fog lights yourself:
- Protection of headlights from stones
- Protecting headlights from water
- Protection of fog lamps from stones
The first method is to protect the fog lamp with armored film. A popular method of protecting headlights, bodywork and bumpers.
Advantages - the film on the headlight is not noticeable, but disadvantages - cost and protection only from small stones.
The second method is to protect the foglight with transparent plastic or plexiglass.
In the first case, we use PET (which is used to produce removable tinting).
The technology is usual: we cut out a fog light stencil from paper, and then we cut out PET using it.
Now we need to figure out how to secure the purchased templates.
The advantages are serious protection of the fog lights from stones, but the disadvantages are that due to a poor fit to the headlight, dirt may collect between the film and the headlight, or even worse, the headlight light will be distorted.
In the case of plexiglass, which can be taken from Gazelle headlights, the situation is similar.
Using a cardboard template for the fog lights, we cut out the plexiglass with a hacksaw; it is possible to leave the antennae for fastening beforehand. If you need to slightly change the shape of the sheet, this can be done using a technical hair dryer.
All that remains is to secure our protection in front of the foglights to the antennae with tape, or better yet, with small screws.
All advantages and disadvantages are similar with PET.
3rd method - protecting the foglight with an iron mesh.
You can use any mesh, even the one used on top of the state. numbers.
It is possible to attach the mesh to a strip of brass or tin, which must take the shape of the contour of the fog lamp.
Place the mesh on the base and secure the edges with solder or glue. We cut off the excess mesh and process the edges.
You can fix it using any convenient method, but with the possibility of quick removal, so that when washing the headlight you can simply remove the mesh.
Advantages - affordable and excellent headlight protection, in which the headlight light is not distorted. Cons: They look like an amateur.
Protecting fog lamps from water
The weak point of all fog lights of the Auto VAZ 2110 is the rubber cover on the back. At some point it moves and water gets into the headlight. Because of water, fog lights become unusable and you have to repair them or buy new ones.
Measures to protect fog lights from water come down to two points:
Treating the edges and joints of the fog lamp with sealant.
Make visors to prevent water from getting into the fog lamps
I think everything is clear about the first point, but the second point is more detailed:
You will need 2 tin cans with a capacity of 1 liter. You just need to pay attention to the fact that on one side you need to bend it so that the piece of iron does not come out of the fog.
Now water will no longer get into the PTF!
https://xenon-kiev.com.ua
legkoe-delo.ru
The main mistake of many drivers
With regard to PTF, most drivers make a grave mistake - using optics for purposes other than their intended purpose. In addition, things can simply reach the point of madness: drivers equip their vehicles with such optics in large quantities. It is not uncommon to find sedans with such lights (4 pieces or more) on their roofs at any time.
Meanwhile, the traffic rules clearly state that turning on the PTF is allowed only during the dark period of the day and in conditions of insufficient visibility (fog, smoke). Some drivers turn them on instead of low beams, which is also a gross violation of traffic rules.
Therefore, we should not forget that PTF is just additional optics, although some owners manage to convert fog lights to LEDs. Of course, it is impossible to completely abandon them, since under some circumstances they are very helpful. Their main advantage from a design point of view is their special reflector and diffuser. There is nothing like this in any other optics yet.
Paradoxically, it is the fog lamps that consume the most energy, producing a powerful luminous flux that is significantly brighter than low beams. Modern traffic regulations do not contain any instructions regarding the color range of the PTF luminous flux. Because of this, various manufacturers are conducting their own experiments.
conclusions
What do we get in the end? It is precisely that LED PTFs do not provide any big advantages over standard halogen ones. Currently I'm driving with my neighbor on. In winter, when there is a lack of current, I simply turn off the headlights (at a traffic light, for example), if I see that there is not enough current to charge the battery. At the same time, I’m not afraid of breaking my fog lights in the next hole. Again, fashionable LED lighting devices attract unnecessary attention, and when undergoing maintenance, it is advisable to remove them, since a meticulous master may ask for a certificate. Again, the factory DRLs in the headlights look much more aesthetically pleasing. If you compare homemade ones with good factory copies, then there is no economic feasibility to assemble yourself, and ready-made LED PTFs for 3-4 thousand rubles apiece are worth the money. Another thing is that they ordered from China can be 2-3 times cheaper than if bought in Russian online stores. Thus, I closed this issue for myself, and I don’t plan to make any more additional lighting devices on diodes (PTF, DRL). The only thing is that I’ll probably assemble a 100 Watt chandelier.
LEDs have been around us for a long time. They are used in flashlights and mobile phones, but LED fog lights are also incredibly popular among car owners.
A little history
Returning to the topic of installing H11 LEDs in foglights, it’s worth rewinding a few decades ago and finding out where it all began. 1907 A laboratory in which one of the famous radio engineers, Guglielmo Marconi, spends his working time. It was he who noticed the glow effect of semiconductors, which was later called electroluminescence. Almost immediately, a note on this topic appeared in one of the scientific journals, but went unnoticed.
On the territory of the USSR, 20 years later, another scientist, Oleg Vladimirovich Losev, also discovered something similar. He conducted research on a silicon carbide crystal that glowed when current was passed through it. Subsequently, the effect received the name of a genius - Losev’s glow, and its author acquired a patent. However, the very nature of this glow was never discovered by the discoverer.
Stabilizer
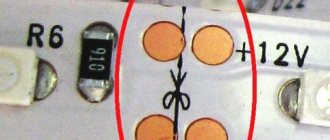
The next important component is the stabilizer that powers the LEDs. I assembled a voltage stabilizer, although a current stabilizer is preferable. Having assessed the available microcircuits, I decided to assemble a stabilizer on the lm2576-adj microcircuit; its datasheet did not promise any exorbitant characteristics, but it guaranteed operation in a fairly wide range of temperatures and supply voltage. Plus it requires a minimal number of external components. The diagram from the datasheet is as follows:
The answers came later
Long before drivers began installing H11 LEDs in the foglights of their cars, almost by the middle of the 20th century, the theory of pn junctions in relation to semiconductors was created. Based on this, in 1947 the first transistor was invented, which to this day has remained an unchanged element of radio engineering. The glow occurred when charged particles crossed a boundary consisting of two different semiconductor elements. And it is precisely the place where these two crystals come into contact that glows, which ultimately forms a kind of sandwich.
The whole difficulty lay in the production of semiconductors of the required structure. And this obstacle could not be overcome for a long time. Only since 1955 have research been successful. The first diode was produced by General Electric, although not everything is so simple here, since similar developments were also carried out in different countries of the world. But these are not yet the same H11 LEDs in the foglights of modern cars that are common today.
A revolutionary breakthrough was made by Nichia in 1995, demonstrating an ultra-bright LED, which was a full-fledged light source. From that time on, the development of semiconductor lighting devices began. And as many experts note, new light sources may completely replace traditional analogues in the near future.
Features of lamp selection
The first samples of LEDs were expensive - the price of one such copy in 1968 was $200! The cost decreased gradually, and for some time no one could even imagine that such light sources would become the main competitor to incandescent lamps. And there was no talk about cars at all. Now, many car enthusiasts are faced with a difficult choice of which LED fog lights to buy for their car.
On the market you can find a wide range of automotive optics using diodes that differ in a number of parameters:
- form;
- dimensions;
- material of manufacture;
- shade of light flux.
There are also many manufacturers, but preference should be given only to trusted companies. As for the shape, on the modern market PTFs are presented in the form of a circle, rectangle, oval, square.
There is no useful function here other than aesthetics. Therefore, the choice depends only on the requirements and tastes of car enthusiasts.
How to make protection for foglights (PTF) and headlights with your own hands
Due to the fact that the fog lights are located close to the ground, stones from the road often break the fragile glass of the headlights. Apart from this, almost everyone is familiar with the quality of Russian fog lamps, which after a while, due to the ingress of water, become like an aquarium. Let's try to protect the PTF from gravel and water.
How to protect your fog lights yourself:
- Protection of headlights from stones
- Protecting headlights from water
- Protection of fog lamps from stones
The first method is to protect the fog lamp with armored film. A popular method of protecting headlights, bodywork and bumpers.
Advantages - the film on the headlight is not noticeable, but disadvantages - cost and protection only from small stones.
The second method is to protect the foglight with transparent plastic or plexiglass.
In the first case, we use PET (which is used to produce removable tinting).
The technology is usual: we cut out a fog light stencil from paper, and then we cut out PET using it.
Now we need to figure out how to secure the purchased templates.
The advantages are serious protection of the fog lights from stones, but the disadvantages are that due to a poor fit to the headlight, dirt may collect between the film and the headlight, or even worse, the headlight light will be distorted.
In the case of plexiglass, which can be taken from Gazelle headlights, the situation is similar.
Using a cardboard template for the fog lights, we cut out the plexiglass with a hacksaw; it is possible to leave the antennae for fastening beforehand. If you need to slightly change the shape of the sheet, this can be done using a technical hair dryer.
All that remains is to secure our protection in front of the foglights to the antennae with tape, or better yet, with small screws.
All advantages and disadvantages are similar with PET.
3rd method - protecting the foglight with an iron mesh.
You can use any mesh, even the one used on top of the state. numbers.
It is possible to attach the mesh to a strip of brass or tin, which must take the shape of the contour of the fog lamp.
Place the mesh on the base and secure the edges with solder or glue. We cut off the excess mesh and process the edges.
You can fix it using any convenient method, but with the possibility of quick removal, so that when washing the headlight you can simply remove the mesh.
Advantages - affordable and excellent headlight protection, in which the headlight light is not distorted. Cons: They look like an amateur.
Protecting fog lamps from water
The weak point of all fog lights of the Auto VAZ 2110 is the rubber cover on the back. At some point it moves and water gets into the headlight. Because of water, fog lights become unusable and you have to repair them or buy new ones.
Measures to protect fog lights from water come down to two points:
Treating the edges and joints of the fog lamp with sealant.
Make visors to prevent water from getting into the fog lamps
I think everything is clear about the first point, but the second point is more detailed:
You will need 2 tin cans with a capacity of 1 liter. You just need to pay attention to the fact that on one side you need to bend it so that the piece of iron does not come out of the fog.
Now water will no longer get into the PTF!
xenon-kiev.com.ua
Another important point
As mentioned above, the luminous flux can be of different shades:
- white;
- blue;
- red;
- yellow.
Here you should think not only about personal preferences, but also about other road users. For example, H3 LEDs in blue and white fog lights will blind oncoming drivers, which is not good for anyone, since not only personal safety depends on it. Therefore, it is better to purchase optics with a yellow tint.
Undeniable popularity
Despite the variety of PTFs, which are represented by LED, halogen, xenon products, the first one is at the peak of popularity. And all due to some undeniable advantages. And the main advantage is that LEDs emit much more light per watt when compared to standard incandescent bulbs. In addition, there is virtually no heating.
This allows you to consume less energy, and accordingly, the service life is significantly increased. There is an opinion that when using fog lights with LEDs you can save on fuel, even if not as significantly as you would like. In addition, the maximum luminous flux is generated very quickly, since there is no need for ignition, which some lamps lack. And if we compare it with a xenon analogue, then LEDs cannot blind drivers of oncoming cars.
Reflector calculation
The main result of a light device is a beam of light; accordingly, it is necessary to begin the development of PTF by determining the shape of the light beam that needs to be obtained. Since the task is to make a PTF, we turn to UNECE Rules No. 48, paragraph 6.3 “Front fog lamp”, subparagraph 6.3.5 “Geometric visibility” - the boundaries of the beam in the vertical plane are 5 degrees up and down, in the horizontal plane 45 degrees outwards and 10 degrees inward. It turns out that the standard fog light should produce a “sausage” with an aspect ratio of 10 to 55.
Having decided on the required shape of the light beam, you should decide on the light source. Modern Chinese industry offers a huge selection of LEDs, of different shapes, designed for different currents. The final luminous flux is measured in lumens, the efficiency of the LED is indicated in luminous efficiency Lumen/Watt, the average for cheap ultra-bright LEDs is about 200 lumens per Watt. In my opinion, the optimal ones are 3 W LEDs, which have a good light output with a small light-emitting surface. Why you shouldn’t use LEDs of higher power - because of the large area of the light-emitting crystal, which makes it much more difficult to obtain a light beam of the required shape. I ordered 50 3 W LEDs from China. When supplied at about 3.5 Volts, they consume a current of approximately 700 milliamps and glow as brightly as possible. At this current, the LEDs get quite hot. The current cannot be exceeded, and even a short surge in current is enough to burn out the LED, that is, a voltage stabilizer (ideally a current) is required. As the LED heats up, the current consumption increases, which leads to even greater heat generation and failure of the LED. In general, the service life of LEDs is often indicated in hours of 10 thousand, 50 thousand. The meaning of this figure is similar to the half-life of radioactive elements, that is, if it is said that the service life of an LED is 1000 hours, this means that after a thousand hours the LED will produce half as many lumens .
Another important plus
It is worth highlighting one more important advantage, which strongly distinguishes LEDs and brings them to the fore. Since they do not contain a filament, they are very resistant to various types of vibrations, which simply cannot be avoided when the car is moving.
Due to the wide range of colors, LEDs are an excellent option for giving your car an original appearance. A kind of tuning without significant outside intervention.
The LEDs themselves in foglights are characterized by their small size, which allows them to adapt to the design of any vehicle. But, unfortunately, there is one drawback, which will be discussed below.
Disadvantages of LEDs
The main disadvantage of LED lighting is its high cost. Another drawback is the insufficient brightness - only 700 lm, while the minimum indicator for lamps should be 1000 lm. Only in this case can the necessary visibility of the road surface be ensured in conditions of poor visibility. And as you can see, LED lamps do not satisfy the required condition, and therefore xenon is still in a leading position among other analogues. But overly bright light is not always good for the cause. And it is no coincidence that the use of such lamps is allowed with some reservations from the law.
You should be aware of these disadvantages before deciding to install LEDs in your foglights yourself.
Installation of PTF
There are no fundamental differences regarding the installation of PTF. You can only notice that it is easiest to install LEDs in standard round-shaped optics. If the headlights have an excellent shape, then you will need a lot of patience to find a suitable option that eliminates major alterations.
It is also worth taking into account that PTFs, regardless of design, are used together with the side lights of the car. But connecting them to the ignition using a separate button is highly not recommended.
Some cars do not have fog lights installed at all, which can often be found among domestic vehicles. Therefore, many drivers try to correct this situation by installing LEDs in their foglights on their own.
But at the same time, it is necessary to adhere to certain requirements, otherwise penalties from the traffic police cannot be avoided. That is, the headlights should be located at a height of 250 mm from the ground surface (no less), and the distance to the nearest side lights should be no more than 400 mm.
As for the LED connection diagram, it is completely the same as in the case of standard fog lights.
How to make a fog lamp with your own hands (14 photos) » Trinixi
Today I want to tell you how to fix the fog light on your car.
So, let's take the broken headlight:
We remove the remains of the old glass and, if possible, the old sealant.
Next, measure the diameter of the headlight and select a glass jar or bottle of suitable diameter. An ordinary three-liter jar was almost perfect for me. I don’t think that problems can arise at this point - store shelves are replete with containers of all sizes, shapes and colors!
Now take a glass cutter and mark a line near the bottom of the jar
Of course, glass cannot be broken off along a drawn line, especially if you draw it with such a shitty glass cutter as I had. Therefore, we do 2 things at the same time: put the kettle on boil and place the jar in the refrigerator (to make it cool faster, I filled it with water from the well)
Take a cold jar, a hot kettle and pour boiling water into the jar
Immediately we hear the cracking of glass. The result is a broken bottom of the jar.
As I already said, my glass cutter was shit, so the bottom didn’t break off along a straight line, but it doesn’t matter - we remove the excess protrusions using the same glass cutter and pliers (unfortunately the process was not filmed).
Next, apply sealant to the groove of the fog lamp housing
Inserting glass
We also apply sealant on the outside
And level it evenly
This is what we got! Leave to dry
When the sealant dries, install the finished fog in place. Guess which side is the non-original glass?
From here
trinixy.ru
Hyundai Solaris
As mentioned above, it is easier to install LEDs in round standard optics, but for owners of a Hyundai Solaris, the situation is exactly the opposite. In this case, you have to dodge. But craftsmen found a good solution - installing LED fog lights on this car.
For this you will need:
- base H27 (2 pcs.);
- regular hexagonal ballpoint pen (2 pcs.);
- LED strip (1 meter).
You also cannot do without solder, soldering acid and the soldering iron itself. The entire procedure for installing LEDs in Solaris fog lights is simple, and can be described in a few words.
To begin with, you need to cut 6 pieces, each 50 mm long, from the common tape. Segments of about 65 mm in length are cut from ballpoint pens. A piece of tape should be glued to each edge, and then soldered together parallel to each other. The resulting structure is then attached to the base using glue and soldered to the base contacts. Before installing the resulting lamp in the headlight, it is better to check its functionality. If everything is in order, you can safely proceed to the direct installation of the LED PTF.
You can, of course, purchase ready-made options and not bother yourself with unnecessary work. However, it all depends on the family budget, since the cost of LED fog lights starts at about 5 thousand rubles. Therefore, for some drivers, DIY is the best option.
Operating experience
This is what the beam of light from LED PTFs looks like in comparison with standard halogen low beam headlights:
However, in the spring, the PTF could not stand the meeting with such a hole:
Public opinion
If anyone has doubts about the use of LEDs in PTFs, you can visit several forums on automotive topics.
By studying numerous reviews about LEDs in foglights, you can find out, for example, which lighting sources are best to purchase, since the market is flooded with various fakes that fail almost the next day.
At the same time, as often happens, there are supporters of a good alternative in the form of LEDs and their opponents. Many drivers note that the luminous flux is no worse than from xenon lamps. Others, on the contrary, do not see the difference, since, in their opinion, diodes do not shine much better than the same halogen bulbs.
But this happens all the time: some remain disappointed, while others see all the benefits. Perhaps it’s all about some subtleties of the headlight design or other factors. In any case, most drivers have already appreciated all the delights of LED lighting in foggy conditions. And many car enthusiasts were satisfied.
How to install lenses in VAZ headlight foglights with your own hands
This example shows how to modify VAZ fog lights to fit lenses with your own hands. It will not be possible to install the lens into the standard PTF housing; the very large dimensions of the structure will not allow them to be put in place. But it is possible to do this:
As a lens, we used lenses from the headlights of a Kirzhach car.
We managed to install them, but without the headlight housing itself, because in order to prevent water from penetrating, it was decided to cover the back of the headlights with silicone. The lens mounts are made by hand.
With halogens, the fog lights got very hot and after a while the lenses cracked. To eliminate this unpleasant moment in the future, 4300K xenon lamps are replacing halogen lamps. tests.
Let's look at the second option, when the factory headlights were replaced with Hella Micro DE fog lights. The 1st photo was made using standard lamps, and the 2nd - with xenon 4300K:
As the author writes: “The xenon light is significantly brighter, but the camera simply lowered the shutter speed on the mobile phone and therefore the brightness seems similar.”
Another example when DLAA LA 1696 lens fog lights were installed to replace the standard fog lights, and the standard halogen lights were changed to xenon 4300K (h4 bulbs).
Tests:
The last example is when the so-called “Auto VAZ 2110 lenses” were combined with xenon.
Now about the question that worries most: is it possible to install xenon in fog lights?
Fog lights are a headlight, and if so, it means there is a designation on it (similar to the main light headlights), which encodes in letter form the type of lamps used:
the presence of the letter “H” means that halogen bulbs must be used for this type of headlights.
the presence of the designation “D” indicates that gas-discharge (xenon) lamps are used for lighting.
When is xenon in fog lights allowed?
If the car is equipped with fog lights specially designed for xenon installation (for example, HellaMicroDE lensed fog lights).
If the car is equipped with xenon fog lights from the factory (class D).
conclusions
Thanks to the usual installation of xenon in the PTF, this modification of the fog light is becoming increasingly popular, and with the correct settings you can drive without fear of fines. If you are thinking about installing gas-discharge lamps in the PTF, then it is important to determine for yourself what goal you are pursuing: to improve the illumination of the road or simply to attract attention?
In the first case, you need to look towards improving the main light. Also check out the test of fog lights, perhaps xenon in the fog lights is not what you need?
In the 2nd case, we must not forget about the other participants in the movement. “Collective farm” xenon in fog lights is not the best choice, because you can also draw attention with the help of DRLs in fog lights.
xenon-kiev.com.ua