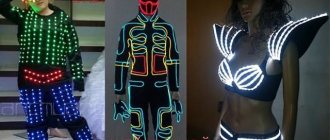
Today, in the list of children's preferences, teddy bears and hares have been replaced by a new character - a robot. Store shelves are bursting with a huge number of different models of cyborgs, androids, and transformers.
However, “smart cars” cost quite a lot. Therefore, more and more parents prefer to make a robot from available materials with their own hands.
How to make furniture from matchboxes: 12 options
Anything, any object can become a material for creativity. Often the most unusual things become such materials. Most often, everything that is no longer needed for use is used, but it would be a pity to throw it away. For example, the matches in the box have run out; no one needs an empty box. Don't rush to throw it away. It can be an excellent material for creative ideas.
- What can be made from matchboxes
- Matchbox furniture option for dolls
- Benefits of a matchbox house
- Matchbox chest of drawers: materials
- DIY match bench: instructions
Making a bed
If the baby has a little baby, then he needs to be put to bed somewhere. And any mother needs to know how to make a bed from matchboxes. To make it you will need to acquire:
- Two matchboxes;
- Glue;
- Paper;
- Paint;
- Wire;
- Two beads.
Next we proceed as follows:
- Glue two match packets together. They will serve as the base of the bed.
- We apply the base to a sheet of paper and trace it with a pencil on all sides. In this case, you should leave space for the ends and finish the backs.
- We cut out paper templates in duplicate and glue them to the base.
- Paint it in the required color.
- We string the beads on a wire and attach them to the drawers.
Important! For decoration, you can use a mattress, a blanket and a small pillow.
What can be made from matchboxes
From such a seemingly unnecessary material as a matchbox, beautiful and comfortable little things can be made.
It would seem that from such a small thing you can make a very memorable souvenir and give it to a loved one.
For those who like to pamper their loved ones with pleasant surprises, it is worth taking a matchbox into service. You can hide small sweets or notes for your loved one in it.
There are a huge number of options for using matchboxes:
- Boxes for souvenirs, gifts, accessories, decorations;
- Miniature furniture for dollhouses and models;
- Educational materials for children (blocks, puzzles, alphabet, sticks for counting and learning numbers, animals and much more);
- Boxes for storing small office supplies (paper clips, buttons, staples, etc.);
- Mini photo albums or panels;
- Handout cards;
- Mini-books and screen books;
- Confetti boxes;
- Bonbonnieres;
- Boxes for storing seeds;
- Christmas decorations;
- Containers for storing spices.
This is just a small part of what can be made from an empty matchbox. Thanks to imagination and a creative approach, interesting and irreplaceable things can turn out. Handmade crafts are very much appreciated, and receiving such little things as a gift is very nice. Time and effort are spent on their creation, efforts and a piece of the soul are invested in them, so they are protected with special trepidation, despite the fact that they do not carry monetary value.
Folding sofa for Barbie
You will need:
- A large piece of thick cardboard.
- Several dish sponges, the same size.
- Stapler.
- Black velvet material.
- Upholstery material.
- Tape and Velcro.
- Scissors, glue and ruler.
Glue the sponge to the cardboard. Cut it to size. Do the same with the rest of the sponges. You will end up with three identical pieces. Wrap them with material and secure them with a stapler from below. Then take the material a little smaller than the size of the piece and stick it to the surface from the inside, hiding the traces of fastening. Before us are three identical parts.
We process the back. Cut it out of cardboard and put the material on top. Secure with a stapler. Glue velvet material to secure it.
Place the mattresses on top of each other and apply them to the backrest. Then glue the bottom mattress and secure with tape. Attach it around the entire perimeter of the mattress and secure it at the back with glue. Then wrap the tape around the top mattress. Spread the glue over the surface, except for the middle, which will be a loop. They pull on it to unfold the sofa. There is no need to glue the tape to the wall, because it is secured at the back with Velcro.
The sofa is ready. To unfold it, unstick the Velcro and pull the loop. Then fold it carefully and use it.
Read also: graphite color IN COLOR BALANCE
Matchbox furniture option for dolls
Most often, matchboxes are used as a material to make furniture for dolls and their houses. Just imagine how much joy you can bring to your child by making this furniture together. In the modern world, stores are filled with various toys; the choice is huge. But it is precisely because of such diversity and abundance that children cease to appreciate what they have. They know that if they break or lose them, they will be given other toys.
By buying toys in stores, parents deprive their children of the desire for ingenuity and experimentation.
In times of scarcity, children knew how to appreciate what they had, because getting something was much more difficult than it is now. Therefore, it was not uncommon for toys to be made from scrap materials. Making furniture from scrap materials together with your child will benefit him. First, the child will learn to appreciate things. Since he puts in his efforts and efforts, he will not want to spoil the results of his work. Learn to be more careful about your work. Moreover, not only your own work, but also to appreciate the efforts of other people. Secondly, such creative activities develop children’s imagination, imagination and ingenuity well.
These skills will definitely be useful to the child in later life. And thirdly, it is very important for a child that they spent time with him, played with him, helped him, taught him something, explained him. Often children really miss this. Especially in the modern world, when many people prefer to sit in front of the TV, computer, etc. Children deprived of the attention of their parents grow up indifferent to the little things and feelings of other people; they are more interested in the material aspects of life.
What kind of doll furniture can be made from matchboxes:
- Crib;
- Chest of drawers;
- Desk;
- Closet;
- Chair;
- Armchair;
- Sofa.
These are just some of the options. In fact, there are many more ideas on how to use boxes. In addition to furniture, you can also build household appliances and interior items from matchboxes: TV, washing machine, microwave, suitcase, piano, paintings.
Transport
From the same set of accessories you can make a large number of types of transport. It could be a steam locomotive, an airplane, an ambulance, a fire truck, a steamship, a taxi, etc.
The diagram will help you understand the construction of the ship.
Benefits of a matchbox house
In addition to furniture, you can make an entire house out of matchboxes. This process is more labor intensive. But this is a great idea for parents, educators and educators to keep their children occupied for a while. Children under the age of 9 will benefit from this activity, since thanks to the manufacture of such a house they develop the skills and abilities necessary for later life.
During this work, children:
- Develop their imagination and creative abilities;
- Develop hard work, perseverance, patience, accuracy;
- They learn to design, combine and glue individual parts.
Before you start making such a craft, you need to visualize in advance what the house should look like in the end, and prepare a drawing. The size and design depend on the number of boxes; the more there are, the larger the size of the house and the number of additional elements.
The house can be small or, on the contrary, large, with many different rooms.
After the drawing of the future house has been made, you can begin to work. The matchboxes from which the structure is made can be glued together or, for greater strength, glued to cardboard or any other material. You can design and decorate the resulting house with wrapping paper, scrap sets, fabric, foil, sandpaper, matches, plasticine, wooden ice cream sticks, or you can paste it over with plain paper or newspaper and paint it with kvass - there are many options.
You can use cotton wool to decorate the roof by making snow. Near the finished house you can make a courtyard, in which you can also make a garden, vegetable garden, additional buildings from boxes and other materials and surround it all with a fence.
Decor
If a homemade bed is made into an existing dollhouse, then it is better to decorate it in accordance with the general style; the same principles apply here as in a real room. Bed decor includes both the design of the product itself and everything necessary for it - pillows, blankets, bed linen.
The finished bed is decorated with a wide variety of materials: glued or sewn beads, bows from unnecessary hairpins, ribbons, braid, beads, rhinestones, lace. Applications in the shape of flowers look good on products made of cardboard or paper, and for wooden products, burning, engraving, and sawing are suitable. Any of the models can be coated with regular varnish or nail polish, paints (gouache, acrylic).
Making bedding is not at all difficult - you will need a small amount of fabric (you can use scraps) and a little filling. Foam rubber is suitable for a mattress, and synthetic winterizer or cotton wool is suitable for pillows. Any thick rag can be used as a blanket.
All these elements can be knitted or crocheted - for those who love and know how to knit.
The model with a canopy and lace trim looks charming - this bed resembles the bed of a fairy-tale princess. Bedside tables made from matchboxes or soft ottomans can be a great addition.
Which decor option to choose depends only on the girl’s imagination and desires. The main thing is not to forget that children require realism - the manufactured model should be as similar as possible to a real bed.
Matchbox chest of drawers: materials
It is very easy to make a small chest of drawers from matchboxes; even a child can do it. Here is a small master class on how to do it yourself.
To make it you will need:
- 3 box of matches;
- Wire;
- Beads;
- Toothpicks;
- Glue.
You need to glue 3 boxes together, and then cover them with paper on the outside. This way they will be held together more firmly. The front of the drawers can be covered with toothpicks or matches; the excess on the sides must be cut off. Using wire and beads, make handles to make the drawers easy to open. At this stage, the chest of drawers can already be considered ready, because it is completely ready for use. But you can still decorate it to make it look more beautiful.
Any materials, objects and elements are suitable for decoration.
Of course, you can take not 3 boxes, but more. The camodic will be larger, more spacious and more interesting. A bedside table or wardrobe is made using the same principle. Everything is the same, only you will need more matchboxes.
Model construction
Some more complex models will require preliminary construction from matchboxes. Then the finished craft will come out neat and without defects.
Cars
A matchbox car is very interesting, both to create and to use in games. It is collected in stages:
- They look at samples of different designs of cars and trucks and choose the one they like. Draw a model of the future machine on a sheet of paper. The main components of the body, geometry, location of wheels, headlights are noted.
- For a truck use 2 boxes.
- The driver's cabin is made from internal elements - inserting one into the other and gluing them together.
- The outer parts are placed horizontally on top of each other, fixed with glue - this is the cargo part.
- The two resulting blanks are glued together.
- Two axles are made from wire, inserting them into the attachment points of cardboard wheels, which are fixed on them (by piercing them) with glue or plasticine.
- Lanterns are painted in front and behind. You can make them from colored paper, round rhinestones or sequins.
The car can be painted or covered with paper.
To create a passenger car you will need 3 boxes, and the assembly will be as follows:
- two boxes are placed one after the other end to end, glued together, then painted or covered with colored paper - this is the lower part of the car;
- for the top part - one box is decorated in the same design as the previous ones;
- the parts are glued together;
- models add wheels, headlights and other decorative elements, according to the same principle as in paragraphs 6.7.
You can use foil and stick it on the sides, stylizing it as a window.
To imitate wheels, you can use rubber from old boots, tires, slates, or large office erasers.
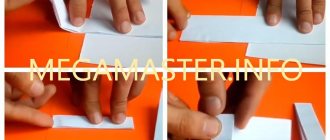
Robots
Matchbox robot is a favorite theme among children. You will need 8 elements:
- All modules are first covered with bright colored paper and the “face” of the robot is drawn.
- The leg is created from two boxes - the first is glued vertically to the middle of the second, located horizontally. You will need two blanks - for two legs.
- A body is fixed onto the glued legs - one box, and the robot’s “arms” on its sides.
- The head is glued last.
Article on the topic: When you dream of new furniture
You can add antennas from sharpened wires or soft fishing line.
DIY match bench: instructions
You can make a lot with your own hands, including a bench made from matches. Making it is no more difficult than making a chest of drawers from boxes.
To work you will need:
- Several matches (about 20 pieces);
- PVA glue;
- Decorative elements (optional).
Another match is glued to the match perpendicularly, and the same to another match. The first match we glued to will become the back legs of the bench and its back. The perpendicular match will serve as a base for the seat, so we glue the matches to it - the crossbars. The glued matches should be on both sides, and the crossbars connect them. Next, one match needs to be divided into 2 equal parts - these will be the front legs of the bench. All that remains is to glue the crossbar matches onto the back of the bench, and it is ready!
If desired, you can decorate it with interesting elements. If you take more matches, the bench will be larger. It will be possible to add armrests to it. With a well-developed imagination, you can create a real masterpiece. Using the same exact principle, you can make other furniture: table, chair, armchair, sofa.
Old tires
If you make an effort, your car tires can get a second life.
Thick rubber cuts, deforms and paints well. And the result is real masterpieces with which you won’t be ashamed to decorate your yard and garden. The versatile material can be turned into garden furniture. One tire will be enough for the table. The working surface is made of wood or glass. You need a high table with legs attached.
Tires are suitable as improvised means and for decorating crafts in the garden. Old tires can turn into colorful flower beds. It will be enough to cut off the side surface of the tire and turn it into a container for the earth.
For more complex options, you will have to make curly edges and turn out the tire. Tires are used to make swings and cute figurines of animals and fairy-tale characters.
Matchbox crafts for girls
Matchboxes are an excellent material for creating doll furniture. Armed with additional paints, glue and a brush and paper, you can make a toy desk, a dining table with chairs, various kinds of doll chests of drawers and bedside tables. Everything is limited solely by your imagination. I post the most interesting copies from my point of view on the website:
Here are the assembly diagrams for some pieces of doll furniture.
I also really liked the idea of making a suitcase for Barbie. Simply cool, and most importantly, done with your own hands in 5-10 minutes. For crafts, we will additionally need colored paper.
Another interesting idea is a camera mockup. We take a matchbox, paint it dark, and after drying, stick a circle of white paper on it approximately in the middle - this will be a photographic lens, and also attach a small paper rectangle-viewfinder closer to the corner of the box. All that remains is to equip our paper camera with a braid strap and that’s it - the original craft is ready! The photo shows one of the options.
Or you can assemble a whole toy house from matchboxes and paper.
Or you can make this funny hut:
How to assemble a crib
1. If you decide to connect the crib parts using dowels, add a footboard and secure the assembly with clamps (photo J ). To connect the parts of the crib with screws, drill guide holes in the center of the previously made counterbores, and then screw in 4.2x50 mm countersunk screws.
H from a 19 mm board , adjusting their length to the distances between the legs (Fig. 4), I from 12 mm plywood and make cutouts for legs C (Fig. 4a). Finally, cut two J .
3. Glue and additionally secure with screws the support rails H to each of the lower crossbars E with a 12 mm indentation at the top (Fig. 4). Glue and secure with small nails one of the shelves I to the top edge of the support rails. Then glue the J to the A flush against the shelf. After that, glue the remaining support rails to the middle rails, aligned at the bottom, and add a second shelf on top of them.
Matchbox crafts for kids
For children 3-5 years old, you can make cool souvenir toys. By involving a child in working on crafts, we will immediately receive a triple benefit: we will make a cool thing, occupy the child’s time with something useful, and try to instill in the child a desire for work and certain skills.
Here is my mini-gallery of the most successful ideas:
But a child can easily make such a craft on his own. All she needs is: a light matchbox, ice cream sticks and pencils or markers for drawing a face.
Photo album for mini memories
An unusual and surprising gift for friends and family is a miniature photo album. To make it you will need glue, paints, a matchbox, scrap paper or postcards, brushes, scissors, and small photographs. The container is decorated to your taste, and a small screen is placed in it for taking pictures. You can always carry such an album with you: for example, in your breast pocket.
Boxes and boxes made from matchboxes
This is a very interesting subsection of the article for me. The fact is that match boxes are simply an ideal option for creating all kinds of boxes, cases and organizers. You can invent and create whatever you want. Stock up on colored paper, foil, thread, cardboard, stationery glue and paints and get creative!
You can make these organizing boxes with a bunch of compartments for storing various small things:
Here's a larger and more serious version of the organizer:
You can also use matchboxes as cases for small gifts for New Year, Christmas or Valentine's Day. The cases can be equipped with loops for hanging on a Christmas tree or somewhere else.
Today I have exhausted my reserves of interesting material. I'll go look for new ideas.
Did you like the article? Subscribe to the channel to stay up to date with the most interesting materials
How to sew pillows and a mattress
Soft pillows will make any sofa more comfortable. For a folding sofa made of plywood, a good mattress would be a good idea.
Materials and tools:
- scraps of fabric (best with a small pattern);
- padding polyester or cotton wool;
- Ruler and pencil;
- pins;
- needle;
- threads;
- glue "Moment" (optional).
You can sew either by machine or by hand using a back stitch.
- Draw 2 squares for the pillow and 2 rectangles for the mattress on the wrong side. Important: the mattress should be slightly smaller than the seat.
- Cut out the pieces, leaving a small allowance. Along the marked line, fasten them with pins with the front side facing inward.
- Sew three sides and, after removing the pins, turn the products inside out.
- Stuff the pillow tightly with cotton wool. For a mattress, it is better to cut out a rectangle from thick padding polyester.
- Fold the edges of the fabric inward and sew the final seams by hand. For greater accuracy, they can be taped so that the stitches are not visible.
- The mattress can be sewn through at six points, making large decorative knots, and the pillow can be decorated with lace braid or tassels.
A small sofa will fit perfectly into a doll's living room. Now the dolls will be comfortable watching TV and talking in the evenings.
How to make toy furniture from waste material with your own hands step by step bookmark
Making toy furniture from cardboard is a quick process, but sometimes it can be labor-intensive. In order not to burden yourself with lengthy attempts to create magnificent furniture from store-bought materials, you should use the means at hand - working with them is easy, safe and fast.
Universal matchbox chest of drawers: a simple master class
If you have previously had no experience in creating models of various crafts, then you can start your creative activity with your child with a matchbox. To make a universal-type chest of drawers, you will need 4 match containers, glue, and finishing materials. Process step by step:
- The boxes are freed from matches and cleaned of excess dust.
- Next, you need to properly glue the blanks: they are stacked on top of each other in a row or 2 boxes in a line.
- When the product is glued, it is left to dry.
- A dried chest of drawers for dolls is decorated: colored paper or remnants of wallpaper are glued to the surface.
To make the model as realistic as possible, you can put small dots on the “boxes”. Painting each element a different color will create a fun and vibrant piece of furniture.
Fireplace from a box
Children love to repeat many things after adults, so they will probably want to install a fireplace in Barbie’s cozy home. To recreate the design of the product, you can view photos of real devices, and then get to work. For the pattern you will need a cardboard box, as well as foam tiles, glue and paints. The step-by-step process looks like this:
- Draw a window for the fireplace on the box and cut it out with a stationery knife.
- A home fireplace for dolls can be corner or rectangular - it all depends on your imagination, so you need to think through the design in advance.
- “Bricks” must be cut out of gypsum ceiling tiles to display the actual masonry. The cutting can take place with the child.
- The resulting rectangles are glued onto the surface of the fireplace.
- The final stage will be painting the product in the desired color.
To secure the paint layer, the fireplace can be varnished - odorless acrylic varnish is suitable for this.
Cardboard cabinet: how to make it yourself
The simplest option for creating a cabinet is to use a ready-made box, where parts of it will serve as doors. But this option is too light and inconspicuous, so you can make a doll cabinet from cardboard with your own hands. The creation process step by step:
- To begin with, it’s tedious to calculate the size of the model and figure out what will be stored in it. To do this, just estimate the amount of clothes the doll has.
- Use a printer to print a layout of the cabinet body, cut it out and glue it together.
- Using scissors, cut the doors for the product, as well as the shelves inside, to size.
- Attach doors and shelves with tape.
- You can decorate the cabinet with a wood look using wallpaper.
To ensure that the doll’s clothes are beautifully hung in the closet, you can attach a wire inside the product and place pre-made hangers there.
Ottomans made from egg tablets
Furniture for dolls from scrap materials is made quickly and easily: in one evening you can build several sets of bedroom sets. A good idea is to make ottomans for the doll’s bedroom from egg tablets. A child can make such a product independently. Step by step process:
- Volumetric tablets are cut into cells.
- Cut off the top so that the cell is stable when turned upside down.
- The ottoman is ready. All that remains is to cover it with paint and make it varnished.
Using the same principle, you can create a small chair or stool. The chair requires a back, which is cut from the same egg pad and attached with glue.
Matchbox chair
A group of matchboxes is used to make not only chests of drawers for dolls, but also beautiful, roomy armchairs. The simplest option is to connect 2 boxes together in the shape of the letter “L” - the chair is ready. But this model is too primitive, and to create a more believable product there is a step-by-step master class:
- To work you need 4 matchboxes, glue, finishing materials.
- The model template is simple: one of the boxes is placed vertically, and a horizontally located matchbox is glued to the bottom. Two boxes are glued to the sides, arranged with edges (these will be armrests).
Ready! To make the chair multi-colored, you can stick paper and paint the surface. If you need a tall product, then it is better to first calculate the number of boxes to increase the backrest. On the finished model, the doll can watch TV or just relax. One of the conditions is that the seat of the chair must match the dimensions of the doll.
Cardboard lampshade
A floor lamp for a toy can be made from cardboard or paper. You will also need a Chupa Chups stick and a stand (you can use a bottle cap instead). A cone is cut out of cardboard, wrapping it in the form of a cap. Cut off the top - you get a lampshade. It is covered with white or colored lace.
Another option is origami. According to the diagram, you need to fold the product, but it will be difficult to decorate it. It’s better to immediately take colored cardboard. Such a floor lamp can be placed in the kitchen, wardrobe or living room of a dollhouse.
Cardboard bed
If there is thick corrugated cardboard left in the house, you can safely use it to make a doll bed. You will need 5 parts, each of which is cut in a certain quantity. An incision is made on each element - this is a groove into which another part will be inserted.
The bed can be rectangular or square; it consists of a berth, a headboard, a bottom bar and protective bases on the sides. It is better to paint the finished product traditionally or leave it as is, imitating the appearance of wood. A makeshift bedside table is placed near the bed, and bed linen and pillows are also sewn.
Doll wardrobe made from newspapers
Newspapers are used not only for decoration, but also for creating new products. One of these innovations is the technique of twisting newspaper tubes and then making objects from them. Proper creation of tubes will allow you to obtain solid blanks for your future wardrobe.
To make doll furniture with your own hands from cardboard or other materials, you need to choose them wisely. In this case, magazine sheets and thick pages are best suited. The working process is as follows:
- A tube is twisted from each newspaper page and the tip is moistened with glue.
- When a sufficient amount of material is ready, it is glued together in the shape of the future cabinet.
- Glossy magazine pages can also be used, but after gluing they need to be coated with paint.
- The interior of the closet is decorated with hangers and holders.
In this master class, it is better to work with hot glue: it securely fixes the workpieces and dries quickly.
Coffee table for a small doll
There are several options for making a coffee table; examples will help you better understand furniture production techniques:
- cardboard and a jar lid. The latter has a gloss, so it will serve as a tabletop. The legs are made of cardboard: three elements are cut out and glued under the lid;
- bottle and plastic cap. Before you make a toy table out of cardboard, you need to choose the right bottle (it should be small). The top and bottom of the product are cut off, leaving a hollow cylinder. The lid is glued on top - the high-tech table is ready;
- discs and plugs. In the latter you need to make slots into which you need to insert a CD. Older children can easily create such a model on their own.
The advantage of homemade furniture is that every year you can come up with new products, and you won’t mind sending the old ones for recycling. After all, they were made from waste material.
Folding sofa for Barbie
To make a good and reliable folding sofa, you will need skill in working with wooden panels, a screwdriver and hinges. First, the frame of the sofa is assembled, an additional part is fixed to it, which will fold forward. If you don’t have such materials at home, you can use improvised means:
- Thick cardboard is cut into blanks according to patterns and glued together.
- The resulting parts are combined into a single product.
- It is better to treat the bend area with additional material, for example, roll-type foamed polyethylene.
To open the sofa, you need to sew a ribbon loop to it. The finished model can be aged using PVA glue, varnish and a hair dryer.
Wardrobe for a doll
If you wish, you can, of course, make such toy furniture with your own hands. To assemble the wardrobe, you need to prepare a fairly large corrugated box. First, it should be cut into pieces so that you get several sheets of cardboard. They will become the material for assembling the craft.
In this case, you can make such a cabinet from a box with your own hands for a doll, for example, according to the diagram presented below. When assembling such a toy, all elements of its design are made double. That is, two pieces of cardboard are glued together at once. At the same time, the elements are additionally “reinforced” by laying wire at the junction. This material will also be used in the future to fasten individual parts of the craft’s structure.
A photo of a cabinet made from boxes, made with your own hands using this technology, can be seen below the list. Actually, the very method of assembling such a toy looks something like this:
Shelves are cut out of cardboard (two squares per square) and glued together using wire. The latter is laid between the squares in two places closer to the edges. At the final stage, the free ends of the wire are not cut.
Cut out parts 2 and 3 and mark the places where the shelves will be located in the future. Make two holes on each mark line.
Attach 3 shelves to the part by threading the wire into the holes made. Glue is first applied to the ends of the shelves. The wire is tightly twisted on the back side of part 3 and glued with tape. The other side of the shelves is fixed to part 2 using the same technology.
Article on the topic: How to combine the color of furniture and wallpaper
Cut out two more parts 2 and 3 and glue them to the outer part of the resulting structure. First, a wire is laid above and below between the elements, on which the bottom and lid of the cabinet will subsequently be attached. They also lay wire to secure the back wall.
Glue together part 4 from two pieces and make a blind hole in this wall at the top. The same hole is pierced in part 2 from the outside. Connect both walls of the cabinet, for example, with a kebab stick 12 cm long.
Cut out the parts of the lid and bottom of the cabinet. Make holes in the resulting elements for the wire. Thread the wire through the holes and secure it. The ends of parts 2,3 and 4 are pre-coated with glue. Glue two reinforcing plates of the lid and bottom.
Attach the back wall of the cabinet to the wire. Cut out the second element of this part and glue it to the first.
At the final stage, a do-it-yourself cabinet made from cardboard boxes, assembled using this technology, is glued inside and out with bright colored paper. Sliding doors for the toy are also cut out of cardboard and made double. They are secured inside the cabinet by gluing a kebab stick on top of them in the front plane from below and from above. Door handles are made of wire or brackets.
Other DIY furniture ideas for dolls
Despite the large list of proposed furniture options, there are several more interesting and easy-to-implement ideas:
- microwave. The possibility of constructing a cardboard box immediately comes to mind, but everything is simple here - a regular children's sharpener will do for a microwave. A third-grade child will have an object in his pencil case that just needs to be refined externally;
- fridge. It’s simple to do: cut a blank out of cardboard or paper and fill it with cardboard shelves. You can hang plastic pockets for food on the door;
- washing machine. To work, you need a box of cookies and a glass of yogurt. A round slot is made in the box, a glass is inserted - this is the drum of the machine. All that remains is to decorate and draw the buttons: such equipment can be placed in the bathroom of a toy house;
- dressing table. The simplest product for evening wear can be made from matchboxes. Several parts are glued together in height, then a mirror is arranged. A piece of foil enclosed in cardboard is suitable for it. You can put an imitation of a box on the table, and also make carved elements on the sides from paper;
- bath. Setting up a restroom or bathroom is easy. Previously, we told you how to make a toilet for a doll, and a bathroom is made even faster. No stencils or diagrams are needed here. It is enough to take an old oblong container for food - it will serve as a bathroom. You can use diamond-shaped plastic beads as legs.
To make the atmosphere of a dollhouse real, it is advisable to place flowers in the rooms, hang pictures, and make rugs from fabric.
Cardboard furniture is an excellent solution for children whose imagination knows no bounds. Original, compact and bright furnishings will allow you to create handy home remedies. The combination of several materials will make the furniture functional and reliable.
Present
How can you please your loved ones if you have a matchbox, a little time and imagination.
Miniature photo album
To please and surprise family and friends, it is not at all necessary to make bulky, expensive gifts. This amazing photo album the size of a matchbox will definitely please your loved ones. And to make it, in addition to the box itself, you will need glue, scrapbooking paper and all kinds of postcards, a brush, scissors and, most importantly, tiny photographs of the characters. The box is decorated to resemble a book, and a paper accordion with photographs is placed inside. Now photos of loved ones will always be nearby.
Valentine box
Confessions of love, friendship and other good feelings are expected not only on February 14, but also on other days. To make your loved ones happy as often as possible, why not give them small souvenirs, it’s so easy. You just need to cover a matchbox with multi-colored paper, decorate it with decorative stickers, flowers and appliqués, and put a hot heart, a note of recognition or at least candy inside.
Gift packaging from a matchbox
Giving something very small, for example, earrings or a ring, can be quite difficult. For such a gift you need an appropriate box that is not only suitable in size, but also appropriate for the occasion. To make a matchbox an original box for a valuable gift, you need scrapbooking paper, glue, decorative elements and a little imagination.
Matchbox panel
The inner parts of matchboxes make a very original wedding or family gift - a colorful panel. The boxes are taken out of the boxes, glued together to create cells of different sizes and configurations, and decorated with photographs of happy moments in the characters’ lives, small pictures and three-dimensional decorative elements. A detailed master class will tell you about all the stages of creating such a unique gift, but you need to remember that real creativity is not a repetition of work already completed, but your own masterpiece based on the ideas and skills acquired.