Your child will be an adorable Gnome in these funny shoes and a cap with a bell! You like? U.S. too! Making this New Year's gnome costume with your own hands is not at all difficult. You just need to stock up on time, patience and our exciting master class with detailed step-by-step instructions and patterns.
Remember? Once upon a time we were little, and our parents sewed New Year's costumes for us themselves - they weren't sold in stores. Now times have changed, and we can buy anything for our children. Boys at a holiday party can become bunnies and wolves, pirates and knights, and some even become Spider-Man or the “Twilight Ninja.” A sea of outfits!
But they are not cheap, alas, some gnome costumes reach 5-6 thousand rubles. And we’re only buying for one exit. And if your child’s friend also comes to the holidays wearing this, the mood will be spoiled. Today we offer you not only to save money, but also to learn how to make fabulous outfits for children with your own hands. It's actually so much fun and not at all difficult! Moreover, you now have our step-by-step master class with video instructions. Let's start with the Dwarf costume for the New Year. It's easy to make, but it will transform your child!
Suit size
We made a Gnome outfit for a 4 and 5 year old boy. Below you will find patterns for two sizes: choose depending on how tall your child is. There are 98 cm and 104 cm. If you need a larger size (or smaller), then using the template of our pattern you can design your own. We wish you good luck!
Glossary of terms
Experienced seamstresses already understand all the terms used in this material. But perhaps it was you, inspired by our master class, who decided to sit down at a typewriter for the first time and don’t know many special words. This matter is fixable. We decipher the terms especially for you!
To stitch or topstitch means to join two layers of fabric. Ironing is simple: iron the allowances (edges) in different directions. Iron - iron seam allowances (edges) in one direction. The face of the fabric is the side where the pattern or surface is clearly defined. At the edge of the overlock seam , stitch (see above) the fabric the width of the foot from the edge of the allowance.
Gifts for everyone
Nice souvenirs for the New Year, made with your own hands, are always fun to prepare; it is doubly pleasant to see the joy and admiration on the faces of the recipients when they find a surprise under the Christmas tree.
The topic of choosing gifts is not alien to anyone, and even if the New Year holidays are not that close, you can always prepare for them in advance. After all, in this case you can manage to implement all your creative thoughts on time and please your dear people.
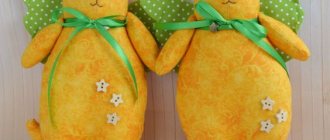
The master class will talk about making a gnome's shoe, which is supposed to be filled with New Year's crackers, Christmas tree decorations and candies.
So. Felt gnome shoe.
To work you need the following materials:
- Material (felt) red;
- Material (felt) pink;
- Material (felt) white;
- Red threads (floss);
- Red satin ribbon;
- Needle;
- Pencil;
- Safety pin;
- Shoe pattern;
- Cardboard;
- Scissors;
- Decorative elements;
- Sweets for filling a gift.
First, print out the pattern, then cut out the blanks from cardboard.
Please note that the photo indicates how many parts need to be cut out.
Pin the cut out patterns with needles to the felt of the desired colors:
Trace the contours of the pattern with a pencil and cut out parts of the shoe without seam allowances:
Now you can sew the parts together. Sew the two side pieces together at the heel:
Next, make a decorative chain stitch:
Sew the finished spread with the foot detail:
In the following photos you will see how to lay a chain stitch.
Carefully sew a white tongue element between the two side parts:
To make sewing easier and the fabric not slipping away, secure the necessary parts with needles:
Gradually removing the basting needles, you can continue stitching:
Your gift gnome shoe for the New Year's holiday is ready.
All that remains is to complete the image a little. Make a neat bow from a thin satin ribbon
And after previewing how and where it will look best, sew it to the shoe:
Now you can prepare sweets and decorative elements to fill it
Try to place the candies inside the shoe in such a way that they do not disturb its shape, but are located close to each other, filling the entire space.
How to make a Dwarf costume with your own hands: step-by-step instructions
Step 1. What materials do we need:
- Green fabric for the vest and shoes 0.5 m. The fabric must be dense to keep its shape. It's best to take velvet.
- Red fabric for a cap 0.4 m.
- Centimeter (flexible measuring tape)
- Ruler
- Scissors
- Buttons 4 pcs. for height 98 cm, 5 pcs. for height 104 cm.
- Bias binding (any color) 1.5 m.
- Tracing paper or paper
- Bells 3 pcs. (two small ones for shoes and one larger one for a cap)
- Non-woven fabric (adhesive fabric) 0.5 m.
- Weed thread for beard 1 skein
- White and red threads for leggings (one small skein each)
- Knitting needles No. 3 and stocking needles (5 pcs. for knitting in the round)
- Two sew-on buttons (for beard)
- Sewing machine, overlock (can be replaced with a zigzag)
- Every child has something in their wardrobe: a plain T-shirt, shorts.
Step 2. Vest
1. To start sewing a vest, we need to make patterns for the back and front.
2. Now fold the fabric in two layers. We pin the back to the fold, and next to it the shelf. Then cut.
3. Place notches using scissors 5 mm long. Using these notches we will combine the side seam of the front and back.
4. It's time to cut off the paper patterns. We glue the strip at the shelf; this is the place where the loops are made and the buttons are sewn on. A very necessary operation - it is to ensure that the shelf bar does not stretch. To do this, we cut out two strips from non-woven fabric, 38 cm long and 6 cm wide.
Using an iron, glue the interlining to the shelf from the wrong side.
After you have glued the strip, you need to mark the middle of the shelf, which is indicated on the paper pattern. This is 3.5 cm from the edge. We draw a vertical line and transfer this line to the face of the shelf using a needle and thread.
5. Switch to the iron. Along this crease line you need to bend our strip and iron it.
6. Using an overlocker (zigzag) we sew the shoulder, side seams of the back and front separately.
7. Using a machine, sew down the shoulder and side seams, matching the notches.
8. Using an iron, press the shoulder and side seams.
9. We process the armholes with a bias back. To do this, measure the circumference of the armhole with a centimeter. And we cut the binding taking into account the allowances: plus 3 cm to the circumference. The edges of the binding will overlap each other. We pin it on the armhole. Now you need to machine stitch the binding to the armhole to the width of the foot.
10. We bend the binding and stitch it along the front side to the edge by 1 mm. This operation will allow us to make a smooth roll.
11. Now, using a needle and thread, you need to baste the facing/trimming to the armhole! And machine stitch along the edge. Remove the basting thread. We process the second armhole in exactly the same way.
12. Finishing the neckline with trim.
The neckline is processed in the same way as the armholes. But first you need to bend the strip along the sour cream line onto the face of the shelf, then pin the trim. This way we will hide the end of the binding under the placket.
Now you need to stitch the binding to the width of the foot.
Next step. We will need to turn out the corners of the strip, baste the binding and stitch the binding to the edge.
13. Iron the finished armholes and neckline.
14. Close the bottom. To do this, we grind out the corner of the strap in the same way as we did with the neck. You need to bend the bar along the basted line to the front side, then stitch at a distance of 3 cm from the edge.
Turn it inside out and place a finishing stitch along the entire vest to the edge of the overcast seam.
15. All that remains is to punch through the loops and sew on the buttons. We transfer marks from the paper pattern where the loops should be.
We outline the length of the loops and punch them on the machine. In my case, the diameter of the button is 1.5 cm, I made the loop length 2 cm.
Sew on the buttons. Hurray, the vest is ready! Perhaps we have already done the hardest thing.
See also:
DIY Snow Maiden costume for girls
Step 3. Cap
Well, why did you take a break? Shall we move on? We will make a cap for our Gnome.
1. Transfer the cap pattern onto paper. Head circumference 49 cm.
2. Pin the pattern onto the fabric (2 layers) and cut out the cap.
3. We glue the top of the cap with non-woven fabric to keep its shape. After this, we grind the edges and overcast.
4. Next step. You need to overcast the edge of the cap: bend (iron) the edge inward and put a finishing stitch into the edge of the overcast seam.
5. Sew a large bell onto the top of the cap.
6. Now we need buttons. Sew one part of the button on the sides of the cap. They are needed for a removable beard. The beard will be attached to the cap with sewn-on buttons.
Now the cap is ready!
Step 4. Beard
1. We will have an almost real beard: we will tie it up! Cast on 60 stitches on the knitting needles. This amount is suitable for both a height of 98 cm and 104 cm. Knitted fabric stretches.
2. We knit 4 rows with facial loops.
3. We begin in every second row, at the beginning and at the end of the row, knitting two loops together.
4. Knit until there are five loops left on the knitting needles. We knit them all together.
5. Now we hide the tip of the thread.
6. Sew buttons along the edges of the beard. The second part of them, the first one is already on the cap.
You see how things got more fun. And the beard is ready!
Step 5. Shoes
1. We have to do almost magic. Create fabulous shoes with your own hands! So, let's begin. We transfer the pattern of the shoes onto paper. It consists of the sole and the shoe itself.
2. Pin the pattern onto the fabric. We will need two soles and 4 shoe parts. Cut it out.
3. We took thick fabric, it holds its shape. If your fabric is soft, I advise you to glue all the parts of the shoe with adhesive fabric.
4. Now you need to overcast the edges of the back seam of the shoes and machine stitch them so that there is a cut at the top. From the bottom of the shoe, the length of the seam is 4 cm.
5. We pin the shoe part onto the sole and grind it on a machine.
6. Then all edges need to be overcast.
7. Fold the edges of the shoe inward by 1.5 cm and sew a machine stitch into the edges of the overcast seam.
8. Be brave! We turn the shoe inside out. How beautiful it turned out.
Sew bells onto the nose.
The miracle shoes are ready!
Scandinavian New Year's gnome pattern
In the West, people have long been accustomed to decorating the interior for Christmas: bright illuminations, glowing figures of deer, red caps, Christmas wreaths. In our reality, such details appeared relatively recently, and in recent years, decorating your home has become as important as decorating a Christmas tree. The tradition of making New Year's gnomes with your own hands, with or without patterns, is quite new for post-Soviet countries. Every housewife tries to give her nest a special flavor and style during the holidays. Exclusive handmade souvenirs are highly valued, and their presence in the house speaks of the special taste and status of the owners. Tips on how to sew a New Year's gnome with your own hands, patterns and photos for inspiration can be found in our article.
Gnomes are different.
DIY New Year's gnomes are a wonderful gift for family and friends for the Christmas holidays. This product will perfectly decorate the interior of an apartment or become a favorite toy of a little fidget. A New Year's gnome with a beard will certainly become the most touching symbol of the holiday in your home if it is made with your own hands with love and trepidation.
Tips for choosing fabric
It is best to sew a suit from felt. The material does not crumble, so there is no need to trim the edges. There are several types of felt, so let's study the pros and cons of each of them:
- Acrylic. The advantages include low cost, large selection of colors for every taste. The downside is poor creasing.
- Polyester. Pros: does not fade, does not wrinkle, wears out slightly. The downside is transparency, but this can be easily fixed by folding the fabric in several layers.
- Wool. Positive properties include safety, density, environmental friendliness, while negative properties include price and limited choice of colors.
- Viscose. Advantages: holds its shape, pleasant to the touch, dense. The disadvantage is that it wrinkles quickly.
Having assessed the practical properties, you can choose felt from viscose or polyester. An outfit made from these fabrics will be comfortable and practical.
Creating accessories
After watching Disney cartoons, we can notice that the gnome has a burning flashlight and a long stick with a red bag in his hand. Making a paper lantern is easy . To do this, cut out a rectangle measuring 120x200 mm. Fold the paper in half and make cuts at equal intervals. We do not cut all the way, leaving approximately 12 mm. We unfold the workpiece, fasten it, and make a handle. You can complement the costume with a soft toy. To make a wand, we buy a plastic pointer and wrap it with tinsel. We make a bag from any piece of fabric and fill it with foam rubber, padding polyester or cotton wool.
Fabulous New Year's decor. A wonderful gnome made from an unnecessary sweater and nylon tights
Gnomes are wonderful fairy-tale characters who are associated with the New Year, magic and good mood. Today they have ceased to be “evil gnomes” who sit on chests of gold and do not give their wealth to anyone.
Now they are, rather, kind characters who bring gifts. Just the sight of them lifts your spirits! Interestingly, sewing a gnome is not particularly difficult.
For those who don’t like fiddling with patterns, we offer a simple option for sewing a gnome from a sweater and nylon tights.
For a simple gnome you will need:
- sleeve from an old sweater;
- filler (rice, buckwheat or other cereal);
- padding polyester (you can rip out an old pillow);
- nylon tights;
- a piece of fur;
- a piece of knitted fabric for a hat;
- sewing machine, scissors.
Let's get started:
- First of all, we cut off the sleeve of the sweater and tie or sew it at the bottom. Fill with cereal and sew up.
- We cut out a triangle from the fur - the gnome’s beard.
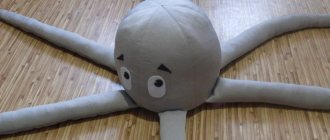
- Using light-colored nylon tights and padding polyester, we form the nose. We sew it together with the beard to a piece of a sweater filled with cereal.
- We form a cap (long one) from a piece of knitwear and sew it to the gnome.
- If desired, the cap and body of the gnome can be decorated with embroidery.
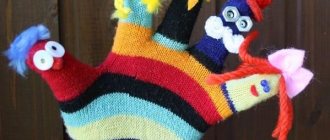
Here are some examples of magical gnomes:
- To sew such a gnome using a pattern, you can watch an introductory video on the topic:
Source: https://cpykami.ru/chudesnyj-gnomik/
Children's version
The gift gnome shoe is ready, now you can talk about how to make a gnome shoe for a child.
So that your child can wear shoes for the holiday, you will need children's socks or shoes for taking measurements.
Very easy to make, sock-like shoes for your child are made of fleece fabric.
The pattern diagram above shows the piece covering the back, foot and bottom of the rolled toe. Next is the top of the front of the shoe. Slightly lower side. You need to make two of each part for each shoe.
kolpak-vykroika
see also
- How to make a gnome costume??? Dear girls, please help! Today in the garden they announced that their son will be a gnome at the New Year's party! This is news, given our height of 136 at 6 years old))) it’s okay to get such a small gnome))) I went to the Internet, the prices there are unattractive , so I’m thinking, maybe I can kick it myself??? True, I’m a hands-on)))) with...
- Dwarf costume My first experience in sewing clothes, before that I only sewed hats for children. I didn’t finish it completely, but I really couldn’t wait to show it. I will put elastic bands in the sleeves, I will change the collar of the shirt, the badge machine did a lot of ugly things...
- Carnival gnome costume Craftswomen, please help me with advice! For the New Year's party, the child needs a gnome costume, I want to sew it myself. Since this will be my first job, I’m not planning anything complicated - pants, vest, cap, shirt. I ask for your advice on...
- A hare costume for a matinee in kindergarten. Maybe someone can make it to order? I will buy a hare costume for a kindergarten party. For a boy, no more than 110cm. The suit is comfortable and not warm, as the children will be wearing this suit for the entire matinee. Do-it-yourself stuff is welcome) Maybe someone can order it for me...
- help me make a sheep costume. Girls, needlewomen! Help! How to make a sheep costume for your one-year-old son. I’m thinking of decorating the hat, T-shirt and white pants with wool. Below on the legs, on the cap. how to make wool? Maybe loops? How?
- Selling a gnome costume Selling a carnival gnome costume from the Batik company, faux fur, shorts, vest, cap, beard. Size 110, in excellent condition. 500 rub., metro station Shchelkovskaya, Pervomaiskaya, center.
- Search for a gnome costume for a boy height 110-116 Girls, dear! I'm urgently looking for a beautiful gnome costume! Help me please! Maybe someone has a joint venture? Thank you in advance!
- Help me sew a suit! Dear needlewomen, please help me come up with and sew a Christmas tree costume for your son! There is a boy - 1.5 years old, 84-85 cm, and also this suit - trousers and a vest: and half a meter of such curly fur:...
- question about the costume Hello, please tell me how to make a spider costume for a children's party (my son is 3 years old). We bought black trousers with a silver vest. And so I think we need to somehow attach spider legs to the back, and how and...
- New Year's gnome costume Girls, please help, I need a gnome costume. Maybe someone has one, for rental on December 25th. Or advise where I can buy it.
Source: https://www.BabyBlog.ru/community/post/rukodelie/1947103