Topiary is a small tree with a lush, neat crown. Previously, this was a type of topiary cutting of garden plants. Today, topiary or maypole is one of the popular areas of needlework. Used for interior decoration. The easiest way is to make a decorative tree from paper napkins. This option is suitable even for novice craftsmen.
Creative topiaries made of corrugated paper are a stylish decoration for a living room, living room or office space.
It is believed to bring prosperity to its owners.
Do-it-yourself topiary from napkins: materials and step-by-step description
Step-by-step instructions for beginners on making topiary from napkins with your own hands - one of the simplest. MK consists of only 6 steps. Even a schoolboy can master them. To make topiary from napkins with your own hands, you will need a simple set of tools and materials.
In the East it was called a symbol of new life and prosperity.
- Scissors.
- Stapler.
- Threads.
- Scotch.
- Glue.
- A mixture of sand and cement or alabaster.
- Paper napkins (green/pink) or crepe paper.
- Thin satin ribbons in 2 colors.
- Styrofoam ball
- A small pot.
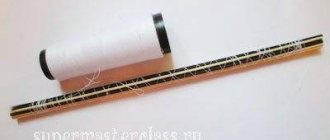
- Wooden stick.
- Decorative beads or stones.
All you need is a small amount of crepe paper and a little imagination.
Important! Before making topiary from napkins, you need to make sure that the diameter of the pot does not exceed the size of the ball. Otherwise, the craft will not look very aesthetically pleasing.
The composition will be an unforgettable gift for loved ones.
A corrugated paper topiary is not only a stylish decoration, but also a unique symbol of good luck.
Let's start making a flower tree from napkins with our own hands.
Step 1. We design the trunk. The stick can be painted green or brown. A tree trunk made from napkins can be wrapped with satin ribbons (placing them on glue). You can cover it with corrugated paper or wrap it with twine. Beads, shells, and colored glitter are glued onto the branches.
A flower purchased or made independently will help to give the composition more individuality.
Step 2. Making the “ground”. Pour sand-cement mixture or alabaster into the pots. Add water, stir. Wipe the edges of the pot. We place it on the tree, fix it so that it freezes evenly. Sprinkle the top of the “soil” with pebbles or lay decorative moss.
In addition to the opportunity to obtain a decorative element of the required color, the master creates the form himself.
Attention! You need to “plant” the trunk in the flowerpot quickly. Alabaster and similar mixtures dry out very quickly.
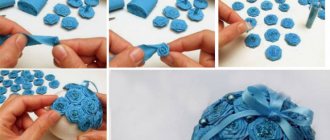
Step 3. Create flowers. To make flowers from napkins on tree branches, you need to fold the napkin in half. Then cut in half again. It turns out to be a square with 4 additions. It is secured in the center with a stapler or stitched with thread. Then you need to trim the edges of the quadrangle so that you get an even circle. After this we form a flower. To do this, lift the edges of the first layer of the circle and compress it in the center. The result is voluminous petals. We do the same with the remaining layers of the flower.
Thematic photos of finished works will offer many options.
Step 4. Making the base for the crown. You can buy a ball-base for a tree made from napkins ready-made. Such foam blanks are sold in craft stores. There are several options for making a ball yourself.
The creative process begins with choosing or making a ball.
Ball made using papier-mâché technique. It's easy to do. You need to inflate a regular balloon. Cut paper napkins into pieces. We glue each of them with PVA glue. Cover the ball with the first layer of napkins. Leave the place where the ball is tied free. Let it dry completely. Then we cover it with a second layer of napkins and let it dry again. There should be 5 layers in total. After the glue has completely dried, we pierce the ball and take it out.
Flowers made from corrugated paper are attached to a blank ball using a heat gun.
Important! Before piercing the ball, make sure that the glued layers of napkins are completely dry. Otherwise the ball will be deformed.
Ball made from newspapers. It's the easiest thing to do. To do this, newspapers, magazine sheets or any paper must be compressed into a ball. Then we string the paper ball onto the trunk and form an even ball. We wrap it on all sides with thread or tape so that it does not lose its shape.
It is recommended not to overload the composition with a large number of paper flowers.
Advice. Before you make a tree from colored napkins, you need to cover the ball of newspapers with paper napkins or corrugated paper. Otherwise, newspaper prints will be visible through the “crown”.
Step 5. We make the crown. We attach a ball to the barrel. Using a glue gun, glue the flowers all over the surface.
Given the size of the ball, it is necessary to cover the entire surface.
Step 6. Decorate the topiary from paper napkins. We glue beads, butterflies, hearts and other intended decor to the crown. From below, under the crown, we tie satin ribbons of two colors.
Options for creating flowers
In decorative trees, the ball is completely covered with flower buds or part of it is covered with twine, lace, and the flowers are attached in places. When considering paper decorative elements, you should pay attention to several simple methods given below.
An interesting option for such a tree are carnations; they are not difficult to make:
- a multi-layer napkin is folded in half twice;
- fasten in the middle with a stapler;
- cut the resulting square to a circle;
- then collect all the layers towards the center to form petals;
Advice! Add brightness to a white carnation by coloring the edges of the petals with a red or blue marker.
If you want to bring lightness and airiness to your craft, you should take a closer look at peonies:
- a thin paper napkin is unfolded to form a rectangle;
- folded like an accordion and tied in the middle;
- round the edge of both sides;
- straighten the petals and separate the layers;
- the core is decorated with beads, thick threads or painted in a contrasting shade.
Most girls prefer roses; their delicacy will help the tree look romantic.
The work process is simple:
- unfold a thick napkin in one layer;
- cut off 4 centimeters from the side (you should get a rectangle);
- roll it lengthwise so that one side peeks out a little;
- the resulting rectangle is wound around a pencil, the fold is at the bottom, collecting it into a bud;
- the edge is secured with PVA glue;
- carefully straighten the petals.
How to make a heart tree from napkins with your own hands?
Do-it-yourself maypole hearts made from napkins look very impressive. Such a gift will definitely not go unnoticed. The step-by-step MK of “heart” topiary made from napkins coincides with the previous one. Only the step to create the crown is different. There are 2 options to make a heart crown.
If a non-standard size or shape is required, then it is easy to create it with your own hands.
- Flat heart. Cut out a heart-shaped base from thick cardboard. Cover with paper flowers. You can make a hollow piece of paper in the form of a heart-shaped rim.
- Volumetric heart. Any voluminous object in the shape of a heart (packaging for tea, sweets, powder compact) is pasted over using the papier-mâché technique. The result is a three-dimensional blank on which flowers are glued.
We decorate the topiary with flowers made of corrugated paper.
Next, a maypole from paper napkins is made in the same way as the classic version of the craft.
It is not advisable to use too dark color schemes for crafts.
Varieties
Needlewomen amaze with their imagination, inventing new images of mini-trees:
- delicate and airy organza;
- coarse but aromatic from coffee beans, cinnamon;
- natural using natural materials such as moss, cones, acorns, dried leaves.
We recommend that you pay attention to the portal of author's master classes https://master-klassi.ru, where you can find a huge selection of fresh ideas for creating crafts for children and adults. Step-by-step instructions and execution diagrams can be viewed and downloaded without difficulty.
The design style depends on the occasion. New Year's topiaries are decorated with spruce paws and tinsel. To decorate the kitchen, add aroma with coffee beans, fruits, and spices. For a military-themed holiday, you can give it the shape of a star. For Valentine's Day or weddings, they make a crown with a heart and decorate it with roses, which are made from paper, satin ribbons, and felt.
Maypole made from napkins based on rose buds
A simple step-by-step tutorial will help you make your own topiary for beginners in the form of a lush bouquet of roses. The tree is made according to the classical scheme. But instead of ordinary flowers, roses are made of paper. To make roses from topiary napkins, you will need napkins of two or three colors: pink, burgundy, green.
Next we create the roses.
- Cut the napkin (pink or burgundy) into 4 parts.
- Bend each one in half. We bend the corner on the left.
- Fold the strip from right to left. We fix the “bud” from below with a thread.
- We bend the second color of the napkin diagonally. It turns out to be a triangle. We wrap the top fold again with a thin strip of 0.5 mm on the outside. Place our bud on top of the resulting triangle and roll it loosely.
- Using the same principle, we roll up new layers of petals.
When using corrugation, you must make sure that your hands are dry, otherwise the material will not retain its shape.
Attention! The size of the triangles needs to be increased with each new layer of rose.
The petals are made from green napkins. They are cut into 4 parts. Fold crosswise. A hole is made in the middle. The bud is placed on a wire and threaded through the hole in the “petals”. The rose is ready.
When performing complex elements, the instructions should be in front of your eyes.
Application
Topiary brings order and a sense of peace to gardens and is used in the design of a classical approach. It is recommended to use them symmetrically, so they form ideal lines within the garden frame.
If you want the instructions to please you even in winter, then choose evergreen plants for landscaping. Green topiary figures framed by a snow cap transform your yard into a fairy-tale landscape.
Planting is allowed not only in open ground, but also in large containers and pots. But only certain plants are suitable for this, for example:
- thuja bushes;
- boxwood
They allow you to form the ideal contour of a figure, for example, a ball or a cone.
How to make topiary from napkins with lush flowers with your own hands?
The potted arrangement can be made more lush, giving it a rich texture and large volume. To do this, take 2-3 napkins at once. Cut into 4 pieces into equal squares. 8-10 pieces are fastened together. Fixed in the center with thread or a stapler. Then a circle is cut out of a square blank and, pressing layer by layer to the center, lush flowers are formed.
You can use several colors of napkins at once to create such voluminous flowers.
A topiary created on your own is a wonderful addition to the interior.
What to pay attention to
When teaching beginning handicrafts, all master classes focus on what materials to choose, how to follow manufacturing technology, etc. However, instructions are one thing, but real life is completely different.
When starting work, you should not immediately take on the most difficult, even very beautiful option.
It is this step-by-step training that gives very quick results and allows masters to reach unprecedented heights. In addition, you should not chase expensive accessories, the use of which is by no means always justified.
Any topiary is:
- Dedication;
- Fantasy;
- Desire to learn.
Rules for caring for topiary
A tree made from napkins will last longer if you follow simple rules for caring for your decorative craft.
- Avoid exposure to direct sunlight.
- Do not let the craft get wet.
- Clean from dust.
Today there are many different techniques for making topiary, for every taste and color.
This activity will certainly involve you, and the result will give you a lot of pleasure!
To prevent dust from spoiling the appearance of the product, it needs to be “blowed” with a hairdryer from time to time. But the temperature should not be hot. You can use a vacuum cleaner (at low speed) to remove dirt and dust. Or carefully walk along the crown with a special brush to remove dust.
Flights of fancy when creating topiary should not be limited.
Topiary is called the “tree of happiness.” In the East, it is a symbol of good luck, well-being and prosperity. A lush miniature tree will be a wonderful gift for any occasion.
The craft is easy to make with your own hands, it does not require large investments and time, and it looks impressive.
Assembly of the finished product
When the individual elements of the tree of happiness are prepared, you can put them together. It’s better to start from the bottom, namely with a flowerpot:
- Crumpled newspapers are placed in flowerpots. They can simply be placed in a vessel or glued to it if you do not plan to use this pot later.
- The stick, which acts as a trunk, must be decorated with tape, which is wrapped around in a spiral and fixed with glue.
- A decorated stick is inserted into tightly packed newspapers.
- A ball already covered with flowers is placed on a stick. If the ball is foam and the decorative elements are not very heavy, then they can be attached using decorative pins.
- Now you need to close the newspapers lying in the flower pots. For this, sisal is usually used: it is wrapped around the trunk, and the “bald spots” are covered with beautiful pebbles of a suitable color. Ribbons or colored paper are also used as decoration.
There can be many options for a tree of happiness. Those who do needlework will probably come up with their own version of decorations for it. After all, there is a huge amount of materials now.
A master class on making topiary scares off many beginners due to the listing of materials such as sisal, foamiran, cold porcelain, etc. What to do with everything, and how to make a completely understandable tree from unusual materials? Or a topiary made from paper napkins. A beginner can do it with his own hands, and there is a suitable master class for beginners, with photos and explanations of how and when to make this or that part.
What are napkins for? From them you need to make flowers that will decorate the crown of the tree. The trick is to fold the napkin correctly.
How to make a paper napkin flower:
- Take a plain (but optional) napkin and cut it into strips. The stripe is equal to the height of the bud, so this indicator is determined by yourself.
- You need to roll the paper strip with your own hands, forming a bud.
- In the bud, the petals are slightly turned inside out, so you turn the layers of the napkin inside the flower a little inside out.
You can fasten the bud so that it does not unfold with glue, thread, or a sewing pin. You need to make a lot of flowers so that they cover the crown tightly.
There is another option. This MK may seem simpler to some.
Option two - how to make flowers from napkins:
- Take a stack of 70 napkins (or a little less or a little more);
- Cut this stack into equal squares;
- Each of the resulting squares needs to be folded a little less than half, and the corners should be twisted a little - you will get just the shape of a petal.
- To make one flower, you need about ten pieces, this is on average. The more petal blanks you use, the more magnificent the flower will be.
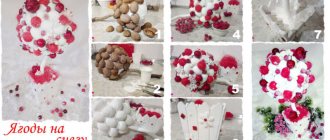
Snowy crown
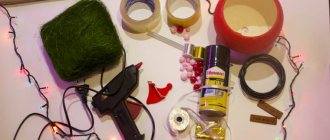
Essentially, topiary consists of white flowers framed by greenery. The use of napkins and cotton pads in creating buds and leaves gives the tree a characteristic softness, reminiscent of a snow cap. To work on the tree you will need:
- cotton pads;
- green paper napkins;
- album sheets, threads;
- pencil or tree branch;
- plastic yogurt cup;
- gypsum;
- hot glue;
- beads and seed beads for decoration;
- stapler;
- piece of fabric.
The work begins with making flowers. To do this, roll a cotton pad into a little bag.
On the narrow side, the part is fixed with a stapler or twisted with thread.
The disk turns out to the other side. The result was a miniature rose.
All flowers are made in this way.
3-4 sheets of landscape paper are formed into a ball and wrapped with thread. To make the ball smoother, it is recommended to treat it with glue. This will be the base of the tree.
A hole is made in the ball with scissors for the stick, after which the base should be threaded onto the barrel.
The ball is decorated with prepared flowers. Glue is applied to the lower part of the rose and the part is firmly applied to the surface of the base.
Flowers should be placed as close to each other as possible. The paper part should not be visible through them.
Article on the topic: Fairytale grandmother's square. Schemes and description. Ideas
In order to close the gaps between the cotton pads, the composition is supplemented with artificial foliage.
Greenery is created from napkins. The napkin is folded in four, the bottom edge is secured with thread.
The plaster mixture is diluted in a yogurt jar. The thickness of the composition should resemble sour cream. The trunk of the tree is inserted into the center of the container. The composition is left to dry.
After the gypsum has hardened, the surface is treated with glue and covered with a scattering of beads. The unsightly jar is decorated with fabric and tied with silver braid.
If desired, mother-of-pearl beads are added to the crown, and a string of pearls is wrapped around the trunk. The topiary is ready.
The above step-by-step instructions can serve as a basis for subsequent fantasy work. So, if you want to add contrast to the crown of the tree, you can paint the outer edges of the buds with a red or pink color, or make the roses multi-layered. In the latter case, several layers of cotton pads need to be glued to the existing workpiece on all sides.
Fluffy “Ball of Happiness”
The crown of a tree of happiness made from napkins can be a fluffy ball decorated with beads and bows made from decorative ribbons, with the addition of bouquets of flowers from the same napkins made using the origami technique.
For such crowns, as shown in the photo above, you need to take an even ball, PVA glue, a thin stick, and a lot of napkins.
First of all, you can prepare the ball, take napkins, tear them into pieces and glue them with PVA glue. Take the desired colors of napkins, cut them into squares, preferably 2-4 cm, the tree will look more magnificent. Now take a thin stick and wrap each piece of napkin onto the stick. Apply glue to part of the ball and send the “fluff” there. It is glued, now glue all the pieces one by one in the same way, along the way you can make rosebuds from napkins and also glue them with glue.
Work techniques
You can create products on a flat base by gluing cut out elements.
So, the simplest creation technique is as follows: draw the outline of the design on cardboard, then cut the napkin into small pieces and crumple them, and use glue to attach the prepared fragments to the design drawing.
A preschool child can cope with this task, so applications using this technique are often used in preschool institutions.
Complex work techniques include the creation of a specific base, or a combination of several types of materials.
More complex work using combined techniques is of interest to older children - in preparatory groups of kindergartens and elementary schools.
Unique works created by a child will be an original gift for a mother for International Women’s Day, a souvenir for a grandmother, the pride of the child, or home interior decoration.
Making roses for topiary (one-color)
After the base for our flower tree is ready, you can start making flowers for it. To do this, follow the step-by-step instructions below.
1. Take a napkin, straighten its edges and fold it in half twice:
2. Sew or fasten in the center. A stapler is best for this.
3. Next, you need to cut out a circle with the largest diameter.
Decorating a pot
An interesting and exciting stage in the master class is the design of pots for topiary. We will do this in decoupage style. The surface of the pot is very smooth, so it is not suitable for painting; you need to go over it with sandpaper.
- Sand the surface of the pot with sandpaper,
- Degrease with any alcohol-containing liquid,
- Then cover the pot with white acrylic paint using a sponge,
- As a result, a snow-white pot comes out,
- We cut ribbons of the required length from an orange napkin and, using a brush and PVA glue, fix them on the surface of the pot,
- After drying, we treat the pot with acrylic varnish in several layers, waiting between each of them to dry.
| 1 | 2 | 3 |
| 4 | 5 | 6 |
| 7 | 8 |
In the video below you can clearly see how to decorate a pot with your own hands using the decoupage technique: