Increasingly, you can find handmade dolls in homes. For those who are interested in making toys, a master class on making eyes will be useful.
In a store where it would seem you can buy eyes for crafts, it is difficult to find a finished part. The work doesn't take much time.
The benefits of making eyes yourself
The world of accessories is rich in its variety of ready-made elements for new creations: noses, eyes, eyelashes, mustaches. But all these products are aimed at mass factory production. Undoubtedly, in such an assortment you can select the necessary parts. But do-it-yourself toy eyes are radically unique.
The important advantages of your self-production will be the following:
- any material. You don’t need to get attached to finished products; imagination and creativity will help make the toy unforgettable;
- the desired shape, because in stores the eyes are usually round or oval. But no one forbids a doll to make heart-shaped eyes;
- suitable color, which is also presented in a rather meager assortment (yellow, blue, green, brown or black). It is rare to find iris colors that differ from the standard ones.
Choosing the material for future eyes
In fact, in this matter the main assistant is your unlimited imagination. After all, the material can be anything (or something that can be glued well). The main nuance is that the eyes should be durable and not tear after a day. More stringent quality requirements apply to children's toys: well glued or sewn, safe, not fragile. If you are considering a doll or toy that will stand on a shelf for beauty, then the choice will be wider.
To give your thoughts a boost, we can list the most popular and used materials for toy eyes (it’s not at all difficult to make them with your own hands):
- glass (transparent cabochons as a base);
- cabochons made of epoxy resin as an alternative to glass;
- wooden elements (buttons, blanks of the desired shape and size);
- eyes felted from wool;
- leather or felt patterns;
- connected eyes;
- beads;
- nuts (great option for steampunk or robot style);
- plastic or polymer clay.
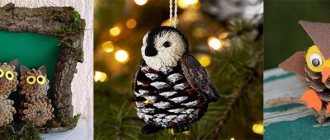
Little owls
Wood can be either the main or secondary material. We use a cut of wood as a base.
Button eyes
For small wooden owls, you can make eyes from different materials, including buttons.
Paper owl
Paper is an affordable and easy-to-work material that can be used by many.
Applications
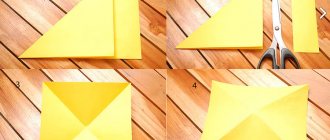
Children really enjoy making applique. This is not only an interesting activity, but also very useful. Working with your hands develops fine motor skills of the hands and fingers. For this work you need to have paper, scissors and glue.
A great activity to spend your free time. Applications can also be voluminous. But this activity is more suitable for adults.
Applications using quilling technique
Quilling is translated as paper twisting. This technique involves twisting strips of paper to create chic compositions. It is quite common and beginner handicrafts can easily master this art.
To work with the quilling technique you will need:
Classics of the genre
The most common and common are glass eyes for toys. You can create them with your own hands in a matter of minutes.
For manufacturing you will need three types of components:
- glass cabochons of the desired size and shape,
- base for attaching to the toy,
- materials for adding color to the eyes.
To connect the eye together you will need glue. Typically, experienced needlewomen recommend “Crystal,” superglue for shoes, and a glue gun. This depends on personal preferences. The set of other tools will depend on the selected materials.
It is convenient to make the fastening from the base of stud earrings. It is easy to stick to the eye on one side and it is not difficult to make a convenient loop on the other side. As another option, you can suggest gluing the finished eye to a toy or sewing it on.
And finally, there was the choice of material or materials to add color to the eyes. In this case, the uncontrollable imagination of the creator comes into play again. The easiest way is to print the picture and cut it out. Please note that the paper may be damaged when washed. The second option is to draw the iris and pupil on the flat side of the cabochon. To do this, you can use paints (acrylic, oil, you can try gouache or any fairly thick paint), nail polishes (according to reviews, you get rich colors), markers, felt-tip pens. In general, everything you can draw with.
Having prepared all the necessary tools, we begin to assemble glass eyes for toys with our own hands using glue. As you can see, there are a great many ways to create them.
Similarly, instead of glass cabochons, you can use their epoxy resin version. One of the advantages of this material is that you can make the mold yourself. That is, you will no longer be tied to size, shape or convexity.
A distinctive feature of this type of peephole (made of glass or resin) is the volume of the part and natural reflections. The doll or toy will seem to have a lively look.
What types of layouts are there?
At the moment there is no strict classification of layouts. The types of layouts and execution options are very diverse. Therefore, we will allow ourselves to create, as it seems to us, the most correct classification for a given period of time. Let us dwell on the main types (categories) of making mock-ups. Layouts can be divided into the following categories:
1. Architectural - these are models of a single architectural object or a complex of buildings.
2. Urban planning - models of urban development, for example, city blocks, districts, entire cities, transport infrastructure of cities.
3. Interior - interior layouts of any premises, for example: apartment, house, shopping centers, shops and so on.
4. Landscape - models of improvement and landscaping of any objects, for example: hotel and tourist recreation areas, forests and mountains.
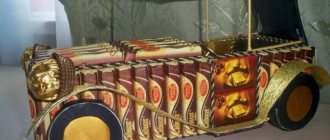
5. Technical models - models of industrial facilities (factories, workshops, production premises), as well as models of technical equipment.
6. Artistic models - models of objects of architectural and artistic heritage.
7. Models for theater and cinema - models of theater and cinema scenery, as well as models that are used as interior objects for a theater or cinema pavilion.
In addition, layouts can be divided into two types of execution:
Realistic mock-ups are made with maximum repetition of the appearance of the modeled object, including textures and colors of building facades and landscaping elements. Layouts in this version are made for sales offices, exhibitions, as gifts, and so on.
Realistic model of a village house.
Conceptual mock-ups are made from materials different from the realistic appearance of the building, but at the same time such mock-ups provide a complete understanding of the planning or architectural solution of the modeled project. Conceptual layouts often look futuristic, made from interesting combinations of modern materials, such as plexiglass (transparent and colored), transparent and mirror plastics, and the like. At the same time, conceptual layouts are also made from natural materials: wood, cardboard, paper. Such layouts look very warm and impressive.
Conceptual layout of an industrial zone.
For those who are for the environment
In an era of desire for natural materials, wooden buttons or wooden blanks of the desired shape and size (found in arts and crafts stores) are an excellent option for eyes. Add painting with paints, felt-tip pens (again at your discretion, use whatever you draw). For better protection from external factors, coat with protective varnish. And the new toy looks at the world around him with wooden eyes. You can make many details for wooden toys with your own hands: nose, brooches, buttons. By combining two or more elements, your creation will look harmonious and complete.
- buttons or wooden blanks,
- paints or markers,
- varnish to fix the design,
- needle and thread (if the eyes will be sewn on),
- glue (if the eyes will stick).
Models with two heating elements located at the top and bottom of the unit are very popular.
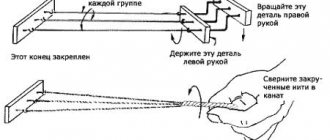
The needle is injected into the area of the crown, the end is brought out to the area where the eye is located. The thread is made two turns around the needle. The end is inserted at the closest possible distance. At the same time, the thread must be held. For a more voluminous pupil, an additional knot can be applied.
After forming one, the needle is brought out at the location of the second circuit. The second eye is done using a similar method. The seam for fastening should be placed at a close distance from the starting point, on the top of the head.
Advice! To ensure that the seam does not stand out on the head, no more than two fibers of the fabric should be captured when forming a knot.
To create large eyes, like those of cartoon characters, you need to mark out the shape and position on the toy in advance. You should immediately work out the shape of the eyes, the iris and the pupil. A fabric marker will come in handy when working.
Black floss threads are suitable for embroidering pupils. In the upper area, the needle enters one point, downwards the thread is located a little wider. To embroider the iris, you can use threads of any palette: blue, green, brown. When sewing, it is recommended to place the thread in one direction. Finally, white threads are applied. The outline can be sheathed in black to form eyelashes.
Note! It is recommended to sew with one thread.
Felt, leather. What else will you add?
To make eyes for toys with your own hands from similar materials you will need:
- scissors, preferably manicure ones, since the parts must be made carefully and usually of small size,
- glue,
- pieces of leather or felt of the desired colors (if multi-colored ones are not available, you can use paints).
You need to cut out three parts for each eye: the sclera (the largest circle or oval, this is the white of the eye), the iris (a medium-sized part), the pupil (the smallest circle, usually black, but this is your unique toy, so you can experiment).
The next step is to glue your blanks layer by layer into a single structure. Then you connect it with the toy.
It is worth noting that you need to glue very carefully, especially the edges of the patterns. To prevent the eyes from becoming disheveled in the future, carefully glue the circles around the perimeter.
In addition to leather or felt, you can use any thick fabric. The patterns, connected in three layers, give the eyes a convex shape, which looks voluminous and quite natural.
How Mockups and Thumbnails are Created
Our mock-up workshop MAKET-MDM has been producing mock-ups of varying degrees of complexity and subject matter for more than 10 years. Based on our experience of communicating with potential customers, not every one of them understands what a layout is and how difficult it is to create a scaled-down model of a project or idea. In this article we would like to explain how mockups and thumbnails are created.
So, let's begin: what is a layout, what is scale, how and who makes layouts, what types of layouts are there, but first things first.
Model (French maquette - scale model, Italian macchietta, diminutive of macchia) - a model of an object on a reduced scale or in full size, usually devoid of the functionality of the object being represented. Intended to represent an object. Used in cases where the representation of the original object is unreasonably expensive, impossible, or simply impractical (Wikipedia)
Making models and miniatures is a painstaking, time-consuming process. Both large teams of specialists and small creative teams can work on layouts; there are also miniature masters who work as a separate, independent creative person.
Photos of the process of working on the model of the ZIL Cultural Center.
Button eyes
After all, that’s what they are often called. And for good reason. After all, a variety of decorated buttons, snaps, and beads act as eyes.
For example, beads pair well with round head pins. The metal needle at the end is rounded, holding the two parts together. At first it may seem absurd to connect two balls together, but in practice it looks very original.
To make the buttons look like an eye, you can paint them and glue rhinestones on them.
Such ideas are also relevant, so you shouldn’t refuse to make eyes for toys with your own hands.
Get hooks, knitting needles, threads
Knitted toys deserve special attention. Eyes for them can be made in several ways.
First, knit voluminous balls to fit, glue pupils from a different material onto them or embroider them in a contrasting color.
Secondly, flat eye patterns are crocheted separately and then attached to the toy (again, either glued or sewn on). This option is convenient because the eye is immediately made from multi-colored threads. If you use a ready-made diagram, then the main thing is not to forget to make the parts symmetrical.
Thirdly, you can use the technique of cross stitch or satin stitch. You can achieve amazing results if you use multi-colored threads.
This is how you create your own eyes for knitted toys. A good option is that the same material is involved in the work - threads. Therefore, the creation will look holistic.
Useful embroidery tips
Adviсe:
- Embroidering French knots should be done on a ready-made toy. It should be filled with filler, and all seams should be firmly sewn. The thread itself should be placed as close to the fabric as possible (from the inside), without over-tightening the filler.
- Professional craftsmen recommend knot embroidery for toys that have a hairstyle or headdress. This will help hide the start and end seam.
- Pins are necessary for the approximate location of the pupils. When embroidering cartoon eyes, the pins must be placed in the area of the pupil, and the drawing process must begin from the head of the tool.
- It is recommended to begin the process of creating large eyes after embroidering the nose and lips on the toy. Then the facial features will be completely symmetrical.
- When embroidering using the French method, the eyes may end up looking in different directions. This will significantly spoil the attractiveness of the finished toy. To make adjustments, you need to lightly hook the fabric and pull the needle in the opposite direction.
Soft toys are loved by both adults and small children. Such products become real friends, and some favorites accompany you from childhood. Do-it-yourself toys have a special warmth. When working, several mandatory nuances arise, which include the correct creation of eyes. Popular methods and additional recommendations will help you create an original and realistic face for each toy.
They are alive
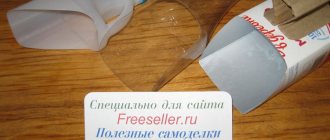
We are talking about the pupils, which can move if the toy is shaken. There are ways to make them yourself so as not to have to search in stores.
To do this you will need the following materials and tools:
- empty blister packs from tablets (don’t forget to wash them from medicines),
- as a pupil of a bead, half a pea (everything will depend on the desired size),
- glue,
- scissors,
- paper or cardboard for the main background of the eye (optional white),
- paints.
The first step is to paint the pupil black (or the color you need) and give it time to dry.
From the empty package of tablets we cut off two sections into which we place the colored pupils.
Carefully glue cardboard or paper onto the background.
Now all that remains is to carefully trim the finished eyes with scissors and glue them to the toy.
Owl wreath
This is a very beautiful and simple composition. In order to create it, you will need natural materials and a large piece of cardboard - part of pizza packaging or household appliances.
Manufacturing
Useful tips
Eyes for toys: DIY master class
Increasingly, you can find handmade dolls in homes. For those who are interested in making toys, a master class on making eyes will be useful.
In a store where it would seem you can buy eyes for crafts, it is difficult to find a finished part. The work doesn't take much time.
Selecting material for work
The material used for the work is affordable. For the most part, all the necessary elements for work are found in every home.
Plastic spoons
The easiest way to make eyes is to use oval scoops from disposable plastic spoons. This item is suitable for a large soft toy and a large doll.
The work doesn't take much time. The surface of the oval part of the spoon is sanded, which will enhance the adhesion of acrylic paint.
The part is mounted on double-sided tape and is used to attach it to the surface of the cardboard. Future eyes are ready to be decorated with acrylic paints.
The first layer is a white tone. Next, green or blue outlines of the irises are depicted.
The pupils and the outline of the iris are painted in black. White paint is used for the highlights, and flesh-colored paint is used for the eyelids. The work is done.
The photo shows how felt is an excellent material for making eyes for crafts. These details are used to complete the look of handmade dolls.
- You need to stock up on: a piece of felt, cardboard, Moment adhesive base, small scissors, a simple pencil.
The desired eye shape is drawn on cardboard - this will be one cardboard template. The inside of the eye is drawn in a smaller size - this is the second template.
Eye stencils for crafts are cut out along the contour. A pupil is cut out on one of the templates. A blank is cut out of white felt to form the shape of an eye along the contour of a large template.
Using the dimensions of a smaller template made of green or blue felt, the inner part of the eye is formed for crafts. Two felt parts are connected to each other with glue.
Contours are drawn with a black felt-tip pen. The eyelashes are glued “instantly”. The work is done.
Epoxy resin
Beautiful eyes are made using epoxy resin. The starting material is diluted in accordance with the instructions. For tint, ink from gel pens is added. Any color can be selected.
It is necessary to prepare empty transparent containers for pills and baked plastic pupils. The black pupils are placed in a container of tablets and filled with epoxy resin.
You can use a toothpick to direct the pupil to the desired location. The parts are left in this state for 48 hours until completely dry.
After time, the container is cut strictly along the contour. You can match the eyelashes to your eyes.
Yarn and glue
You can quickly and easily make a part using yarn and glue. You don't need a lot of thread. A strand of yarn is laid out in a spiral to form a circle. This is the base of the eye.
There is a small black circle on top. Everything is covered with a drop of Moment glue. It is suitable for work because of its transparency. Leave to dry. The last step is to remove the excess strands of yarn with scissors.
Buttons and fabric
Round or oval buttons are also used to make eyes for crafts. The design is done with acrylic paints. Beads are painted using the same principle.
- To make the eyes, leather and fabric are used according to the method of working with felt.
Paper and glass stones
Volumetric eyes for handmade crafts are made of paper and glass stones.
A paper blank of the iris is made. The desired color is selected. Before you print out eye irises for crafts, you need to make sure that the diameter of the workpiece will not be larger than the glass stone.
Decoupage glue is applied to the flat part of the stone. The iris blank is applied with the front side to the surface of the stone with glue. Leave until dry.
It is important to use decoupage glue when working. It will not affect the transparency of the stone and will not distort the design.
A thin layer of glue is again applied to the dried surface. Threads of yarn are laid out on it, everything is covered with a white sheet.
You need to press it onto the paper with your finger so that everything sticks well. It takes some time to dry.
Excess paper and threads are cut off along the contour of the stone. You can use the eye blank for crafts.
Clay
Flat eyes are made from polymer clay. The material is rolled out and the desired eye shape is squeezed out of it. The parts are baked. Later they are painted with acrylic paints.
Before making eyes for crafts in volume, the clay is formed into balls and divided in half. Next, the material is baked and the iris is painted, and a black pupil is applied.
Crochet
Needlewomen crochet eyes. Such parts are used for knitted and soft toys.
Eyes for garden crafts
For garden crafts, plastic lids are used, which are decorated with paints.
You must first cut out the shape of the eyes from foam plastic, and only then apply the entire design. But since garden crafts are left outside for the winter, the old eyes will need to be replaced with new ones in the spring.
- It is possible to make decorative eyes for crafts in different ways using available materials and imagination.
Photo of a peephole for crafts
Did you like the article?
MK. EYES FOR DOLLS. TWO OPTIONS
There are now a lot of tutorials on the Internet for making eyes for dolls. I decided to add my own version of the eyes.
- We will need:
- 1.Colored plastic
- 2.Sharp knife or scalpel
- 3.Sandpaper
- 4.Acrylic paints
- 5.Clear nail polish
First we will need cyan and blue plastic to make the iris.
Roll out a flat cake from blue plastic, and roll a “sausage” from blue plastic,
which we will wrap in a flatbread...
... and roll it well on the table to get a cylinder.
Bake the workpiece in the oven, but set the temperature a little lower than indicated in the instructions, since the plastic is thin and can burn quite quickly. I set the temperature to 120°, because... The diameter of my workpiece was 12mm.
How to make eyes for nylon dolls from ordinary buttons
Dear lovers of nylon dolls, once upon a time I was asked to do a master class on how I draw eyes for dolls. I finally got it together) I hope you find my method of creating button eyes useful.
I use the following materials and tools:
- buttons
- acrylic paints
- toothpicks
- nail polish (white and clear)
- tassels
- pencil
- stencil ruler
These are the buttons I use for doll eyes. If the button has a protruding leg, then you can bite it off with wire cutters.
Cover the buttons with white nail polish. For 2–3 layers. Dry it well.
Using a stencil ruler, draw a circle with a simple pencil, which we will then paint.
We take acrylic paints. Use the main color (green, blue, brown) to paint the circle...
...without allowing the main color to dry, we take white paint and, starting from the center, highlight our iris. Due to the fact that the main color has not yet dried, it mixes with white.
The upper left part of the iris can be made a little darker, and the lower right part a little lighter. In the process, you have to work alternately with dark and white paint to achieve the desired effect.
Dry the paint and draw rays on the iris.
On blue eyes it will be blue and white, on brown eyes it will be yellow and brown.
Draw a pupil in the center with black paint. Since the white base is varnish, we can easily correct the contour of the iris by carefully wiping off the excess with a wet cotton swab wrapped around a toothpick.
Use a thin brush or toothpick to add white highlights.
Small eyes for dolls are drawn in the same way. Only the squirrel can be left out. Draw an iris over the entire surface of the button.
Dry the paint well and cover the eyes with clear varnish. At least 3-4 layers. Dry each layer well.
Glue the eyelids and eyelashes onto the finished eyes. E. Lavrentieva and other masters have a detailed MK by century. I see no point in repeating myself.
- Here are other eyes for example:
Now you know how to draw eyes on a doll, or rather how I do it. I hope my master class is useful to you!
SHARE! "Cross" will not give bad advice!