Manufacturing process
To make a folding knife correctly, that is, to eliminate the mistakes of beginners who decide to create such a product with their own hands, you need to work consistently and step by step. Below is the procedure for working with all the components of the design of a folding knife; it does not depend on the type of materials and equipment used, so you need to follow it exactly.
Preparing parts
First of all, the blade is sawed out and brought to an ideal shape, according to the drawing. The handle parts are then produced and sanded using a belt sander or a file and sandpaper. The next step is to drill holes in them to secure the decorative trims.
Knife handle linings can be made at the very end, when all parts are fastened with temporary bolts, the structure is checked for play, flaws are sharpened, and the metal surface is sanded with fine-grained sandpaper. Observe safety precautions when cutting and grinding parts, wear safety glasses and a respirator. To facilitate the process of making a blade, you can use Soviet detailed drawings and manuals for making folding knives (for example, from Do-It-Yourself magazines).
We align the drawing with the workpiece. We cut out the blade. Then we cut out the handle. We make the necessary holes for fastenings. We grind all the workpieces.
Hardening
Only the blade needs to be hardened; the metal frame of the knife handle does not need this. This procedure will allow the product to hold an edge for a long time, have flexibility, and at the same time be very durable. Since the knife blade is a small metal plate, you do not need a forge to heat it, but a regular gas or kerosene burner will do. A professional approach involves measuring the heating temperature, as well as bringing it to the level required for a particular type of steel. Having the necessary equipment, all the necessary information on the grade of steel used can be found on the Internet or in textbooks - there are special tables that indicate the quenching and tempering temperatures.
At home, you can use your eye, that is, heat the blade of a homemade knife until it turns evenly red, after which you need to dip it in oil, remove it, and let it cool. Waste machine or vegetable waste will do. The second stage of hardening is tempering. It is necessary to relieve stress on the steel so that it is not brittle. To do this, you can use a regular oven, heated to 200-250 degrees Celsius. The blade is placed in it for 1 hour, after which the oven is turned off. The steel should cool slowly, so you can remove it after about 1 hour, when it has cooled to room temperature.
Heating up the steel
Assembly
Assembling the knife is carried out after preliminary grinding of each part with fine sandpaper, as well as polishing the metal parts, preferably with GOI paste. It is necessary to select mounting bolts of the correct diameter for quality reasons, because they support the entire structure of the folding knives. If a pin lock mechanism is used, it is advisable to make the pin itself from titanium or a metal with similar properties. The fully assembled knife must be re-sanded at the attachment points. Decorative overlays are prepared in advance; if necessary, grooves are made on their inside for the heads of the fastening bolts, after which they can be attached with glue. The final processing of the product consists of polishing the metal parts and varnishing the decorative elements, if this has not been done previously.
We select the mounting bolts We check for the presence of backlashes We check the operation of the mechanism
Sharpening
The primary sharpening procedure must be carried out using special equipment to create the desired cross-sectional shape of the blade. The most popular types of sections are: flat-concave wedge, flat-concave wedge, wedge-shaped. The last option is conventionally called double-sided sharpening, and is the easiest to implement, so it can be done even without a sharpening device, using a regular file and a sharpening stone.
Bring the knife to the desired sharpness
Preparing all the details
At this stage, you need to make a hole and cut threads where the screws will be installed in the handle. You also need to warm up the holding lever and bend it to fit it into the handle.
Since ejection of the blade is ensured by a spring, we wind it around the axis of rotation of the blade - after this, it is necessary to cut out a seat for the spring in the PCB on the inside of the handle.
To do this you will need a drilling machine. We attach the spring itself to the blade with one end, and to the handle with the other, having previously drilled holes.
We weld a bolt to the trigger lever - this is the same “handle” that will activate the rotation of the blade. Cut off the excess part of the bolt. Next, you need to install the resulting “handle” into the handle of the knife - you need to carve a round groove for it.
Another spring in the handle supports the lever—for it, a stop is machined and installed, which we attach to pins or nails. With a simplified version of manufacturing - a folding knife, a trigger mechanism is not needed.
Blade hardening
If the blade is made of N690 steel, then its hardening temperature is 1071 degrees Celsius.
Since few people can boast of having an industrial oven, such an operation can be done with a torch “by eye”.
At this temperature, the steel has a yellow glow. Alternatively, you can use a magnet to determine the desired temperature regime - if the workpiece is not attracted to the magnet, then you can stop heating. Cooling is carried out in mineral/vegetable oil. By the way, in addition to the blade, it is also worth hardening the lever.
Blade hardening.
To stabilize the stresses in the metal, we conduct a tempering process - the temperature is 200-300 degrees Celsius, holding time is 1 hour. A regular home oven is suitable for this operation. We leave the blade to cool in a closed heating chamber.
You can check the quality of the result with a file - there will be no scratches on properly hardened and tempered steel. After this, the blade can be ground, polished and sharpened - seal the finished blade with electrical tape.
It is necessary to install springs, a lever and a blade into the handle - we connect the halves of the handle with screws. To make the handle smooth, you can “recess” the screws by pre-drilling grooves for the heads. After this, the handle can be sanded and polished with a special nozzle - the aluminum surface will look impressive.
It is clear that to assemble a simple folding knife, you do not need to mount a spring. Despite all the convenience of switchblade and folding knives, they have one serious drawback - if dirt gets inside the handle, and therefore the mechanism, the tool may fail.
So switchblades and folding knives made by yourself require careful handling - only in this case will they last a long time.
Source: https://vashnozh.ru/izgotovlenie/kak-sdelat-vykidnoj-nozh
Selection of tools and materials
Do-it-yourself folding table
There can be two approaches to this matter - amateurish and serious. Which one is better for? Let's figure it out:
- With an amateurish approach to the matter, there is no particular need to be puzzled by the selection of steel with the necessary characteristics. The material at hand is taken and a knife is made from it. This option is suitable for those who have not yet tried their hand at making knives, and for those who do not have extra money or the desire to bother searching.
- If you take the matter seriously, you need to sift through a certain amount of specialized literature on grades of various alloys, metalworking techniques, as well as on hardening and creating workpieces from good tool steel. Let’s not talk about damask steel here—we’re not going to forge a saber. By the way, not every blacksmith can master this task.
The required set of tools also directly depends on the approach to the matter. Perhaps you will get by with pocket artillery in the form of a file, a hand drill, emery and a hacksaw. But if you work for results, it would be nice to have:
- stationary drilling machine;
- grinder;
- sharpening machine;
- bench vice and a set of clamps.
@wideopenspaces.com
To make a template, you will need paper, a pencil, thick cardboard or hardboard, and for annealing, hardening and tempering - some kind of forge and oven, as well as waste or vegetable (preferably olive) oil.
Drawing up a drawing
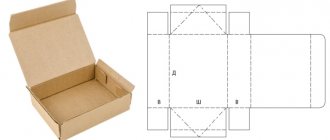
The drawing of a folding knife is drawn up on paper, then transferred directly to metal or cardboard. It is recommended to create a blade template before starting metalwork in order to see clearly how the finished product will turn out and, if necessary, make changes immediately. You may encounter the following technical problems: the blade does not sink deep enough into the handle, the butt sticks out, and the like. When drawing up a sketch, you need to decide on the shape of all the parts, as well as the locking mechanism. Using the template, the initial adjustment of all knife parts is carried out.
There are a lot of blade and handle shapes; which one to choose depends on the aesthetic taste of the master. Homemade folding knives have three types of locking mechanisms:
- With fixation on the butt - a cut is made in the heel of the blade, and a spacer (rocker arm) is mounted in the handle; when you press it, the lock opens. Having locksmith equipment, it will not be difficult to make such a lock for a folding knife.
- Linear - steel is inserted between the handle plates, in which a figured cut is made in the form of a horizontal strip and bent inward. Thus, the mechanism acts as a spring - it holds the blade in the closed position. Linear lock is the simplest option, suitable for manufacturing using hand tools.
- Pin - a spring mechanism with a movable pin is mounted between the handle linings, which fixes the blade in the open position. This is the most difficult mechanism to implement.
It is best to use ready-made diagrams and drawings of folding knives, otherwise it will be difficult to create a truly high-quality product with your own hands. Such templates already take into account all the nuances; a sketch from them can be immediately transferred to the material. If a sketch is created from scratch, you must make a layout from cardboard, on which each detail is brought to its ideal shape.
Making a drawing
What is it and why is it needed
How to make a knife with your own hands: how to make a homemade blade. the best ideas and tips for combining steel for a knife (video + 150 photos)
The drawing provides a complete description of the product, indicating dimensions, shape, and recommended material. The information is reflected in a frame in the lower right corner of the image or in a separate description. You should not ignore the recommendations. Behind them stands many years, and sometimes centuries, of experience of the craftsmen. For example, the design of a switchblade is quite complex, and its implementation will require skills in working with metal and a special set of tools.
An important factor in manufacturing is compliance with the proportions and dimensions of the product - and without a drawing it is almost impossible to achieve accuracy. A photo provides only a visual image of a knife, and making a copy from a photo is not easy, because it is necessary to take into account the features of individual elements, the pairing of straight lines with ovals and curves. You can make your own life-size sketches of knives. The image must be drawn to scale. In this case, during manufacturing it is enough to transfer the lines to the blanks for the blade and handle elements. The tool and processing method are chosen by the home craftsman himself at his discretion, taking into account the available capabilities.
The finished drawing can be downloaded. The file found on the Internet is opened in a graphics editor, the dimensions are checked and printed at a scale of 1:1. Most of the drawings are made in accordance with all the rules of the Unified System of Design Documentation (ESKD). But it is difficult to use some amateur drawings or a sketch of a knife in artistic form without indicating the dimensions. If you don’t have the ability to accurately convey the design features and make a drawing, you need to ask those who do this professionally to make templates for knives.
You can realize your ideas by sketching life-size knives, without relying on a ready-made model. In this case, it is necessary to follow the general rules for drawing up a drawing. For example, design the shape of the blade, handle, based on personal ideas and preferences. You can use your favorite models as a prototype for your own product. By combining individual elements, an original drawing is created.
Transformable models are popular today. But having found, for example, drawings of folding knives, you should be aware of the difficulties of their manufacture, since the desire to independently assemble a complex mechanism will require serious metalworking skills. Appropriate tools and materials are required.
Why make a folding
At the same time, it can well be used for self-defense, and with the help of such a tool you can cut packaging, rope, cable, it will come in handy on a picnic and on a tourist trip. If you have the skills and tools, you can make a switchblade with your own hands.
This version of the blade will require the manufacture of an internal mechanism for frontal ejection of the blade. For beginner knife makers, it is possible to simplify the task and make a simple folding knife with your own hands. Let him not throw himself away spectacularly. But it will be quite convenient to carry it with you.
Homemade switchblade.
Materials for production
DIY folding chair: drawing, materials, manufacturing
Even if you are not planning to make a hunting knife, understanding the materials used for manufacturing will help you out when purchasing a knife. Let's look at what types of steel are used for knives of this type.
- Carbon steel should be designated grade 65 G. It is endowed with the required rigidity, holds an edge excellently, and has high corrosion resistance.
- Another stainless steel that is often used to make affordable hunting knives is 65x13 steel. Suitable for a tourist, however, for a true lover of hunting, who often cuts up solid prey, it is poorly suited, since it instantly loses the sharpness of the blade.
- Steel 95x18 is the optimal solution in terms of price and quality ratio. There is ease of sharpening - sharpening a blade made of 95X18 steel is quite simple. A knife made of this steel can be edited even on an ordinary stone.
- Chrome tungsten steel ХВ5, called diamond steel, or steel ШХ-15 are also excellent for knives, but require constant care because they are subject to rust.
- Tool steel grade R6M5 performed very well. It is used to make pendulum saw blades, and it is not that difficult to get.
- Bulat steels have a rather “floating” quality. In the entire Russian Federation, only a few blacksmiths can produce high-quality damask steel.
- Modern steels made using powder metallurgy methods have the rarest properties that outshine even the famous damask steel. Products made from these metals are usually very expensive.
Many different materials are used to create knife handles, ranging from plastic to mammoth tusks. The optimal material is wood. The wooden handle can be adjusted to any configuration and palm size.
Sequencing
If you are making a knife for the first time, it would be best to follow the sequence described below, then things will go much easier.
The process begins with the blade - it is cut out and brought to full compliance with the layout. Next, parts of the handle are made, they are finalized, and then holes are drilled into them for fastening the linings.
The locking mechanism is made after the main parts of the handle are ready. Then comes the turn of decorative overlays. The blade is sharpened in the final stages after heat treatment. Below I will briefly describe how to harden a blade.
Handmade switchblades
Small handmade switchblade knives are produced by the following companies:
- Kizlyar,
- Nozhemir,
- Knives Fursach,
- Sander,
- Workshop "Bulat".
Their cost starts from 4,000 rubles, since natural and expensive materials are used for the handle (expensive wood, bone, horns). Often there are decorations on it. Good grade steel (Damascus, alloy, damask steel) also increases the price.
Hand forged knife, Bulat workshop
A switchblade made by Zonov looks simpler than one made by a professional, and costs from 1,500 rubles. In production, simple materials are usually used, that is, stainless steel, aluminum and plastic for the handle. The blades of such products are narrow, with a triangular tip. You can find a knife on thematic forums of amateurs and some online trading platforms.
And here is more information about German bayonet knives.
“Dismissals” of good quality are practical, sometimes help in everyday life, and look impressive in a collection. But such knives last a long time only with careful care of the working mechanisms. You need to not only wash the blade and handle, but also clean the springs, blocking elements with a brush, and periodically lubricate them with gun oil.
Wooden scabbard
When wondering how to make a knife sheath, many opt for the wooden option. Wooden scabbards are reliable, practical and very beautiful. The wooden knife sheath is decorated with paintings. It is used for storing blades at home.
Pros and cons of the material
To make this type of protection, hardwood is used. It can be:
- oak;
- beech;
- nut.
Working with such breeds is very difficult. However, the resulting device will be reliable. In addition, it is possible to decorate it with decor, paints, wood painting (burning) and so on. If you plan to wear the sheath on a belt, you need to additionally create a loop for fastening made of leather material.
Required materials and tools
Wooden products do not have liners. It will be impossible to remove them and clean them. Therefore, to maintain safety, the inside of the wood is treated with wax or other waterproof compound. To make a sheath you will need the following materials and tools:
- wood for work (hardwoods are recommended);
- pencil;
- ruler;
- exemplary blade;
- chisel;
- sandpaper;
- wood glue;
- wax for impregnation.
Sandpaper for cleaning should be of medium abrasiveness.
Manufacturing stages
How to make a knife sheath with your own hands step by step:
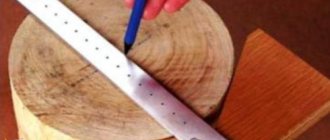
- Take two pieces of wood. First we work with one of them. We apply the knife to it to the depth at which the blade is planned to enter the sheath.
- We outline the outline. Then we increase the perimeter by 2 mm for ease of use of the object.
- Using a chisel, we make indentations corresponding to the size of the blade.
- We repeat the same steps in mirror order with another piece of wood.
- Leaving about 5 mm for the thickness of the cover itself, we cut the rest of the wood along the contour.
- The core is sanded with sandpaper and treated with wax.
- The two halves are glued together using wood glue.
Making a sketch
Cutting out the core for the blade
Connecting the elements
Making a design sketch
Burn it out with a soldering iron
Design option
Post-processing
The prepared products must be carefully treated with sandpaper to avoid splinters when using the cover. Before you make a wooden knife sheath, you should think about impregnating it. It is advisable to treat them externally with wax.
We process the coating with sandpaper to remove splinters
Polishing
Polishing is not only about giving the blade an aesthetic appearance, but also protecting it from corrosion. The smooth surface prevents water from accumulating in the recesses, which leads to the appearance of characteristic rusty spots on the knife.
Polishing can be roughly divided into 3 stages:
- Processing with coarse abrasive with large grain size.
- Processing with thinner stone.
- Finish polishing with fine grain.
As a result, we will get a shiny blade, but it will not yet have a mirror image. To achieve a mirror-like result, you will need to change a few more abrasives, gradually reducing their grain size, and eventually switch to a piece of leather with goya paste.
The whole process is quite simple - apply three abrasives along the blade until the entire surface becomes homogeneous, then reduce the grain size. This stage is one of the longest in the entire production, but at the same time the most exciting.
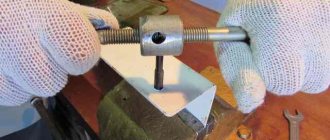
Drilling holes for attaching the handle
To form a handle from two wooden plates, you will need to drill 2 holes in the shank for rivets. This procedure must be carried out before heat treatment. It is even advisable to assemble the entire structure for a kind of test to make sure there are no defects.
We select the diameter of the drill based on the size of the purchased rivets. To speed up the process of drilling hard or thick metal, the location of future holes can be marked with a center punch. You can use any available drill.
Making a forge
Heat treatment is not an easy and very traumatic stage of knife manufacturing, during which all previous efforts can be ruined if done incorrectly. To heat treat a blade, it must be heated to a temperature that leads to structural changes in the metal; usually 750 degrees is enough.
Forge for hardening.
Of course, you can use a special burner that will produce the required temperature. But it is not recommended to do this, since the steel heats up unevenly, which can lead to defects in the future.
Therefore, to perform heat treatment at home, you will need a forge. They are also available for sale - this is not our method. Making a forge with your own hands is not difficult; a large number of instructions, articles, training videos, and diagrams can be found freely available on the Internet. The main materials used for manufacturing are sand and gypsum.
How to determine the temperature in such an oven without a special thermometer? There is an old proven method: we place ordinary kitchen salt in a steel container in a forge; if it begins to melt, then the temperature is quite suitable for hardening the blade.
When using complex alloys and grades of steel that are difficult to heat treat, it is better to seek the help of specialists.
Sharpening issues
Depending on the purpose, whatever the profile of the blade, the knife is first sharpened on a coarse whetstone, and then on a finer-grained one. The sharpening angle for folding knives is about 15-20 degrees. A larger angle is good for a camping knife used to chop brushwood. Do not forget about the rule: the smaller the angle you give, the sharper the blade will be, but at the same time it will become dull faster. You're not going to shave with a folding knife, are you? Then do not make the sharpening angle less than ten degrees. In a word, try it, choose for yourself which sharpening is more suitable for your needs.
Subscribe to our Social networks
How to make a knife from wood
A wooden knife is not exotic, but a completely practical tool in a serious kitchen. It delicately cuts soft pastries, filled pies, and cheeses. They find it convenient to make sandwiches. This knife will not damage the non-stick coating of the pans.
Wooden knives for the kitchen PHOTO: rukikryki.ru
Materials and tools
The knife is made from a dry board of hard wood, such as linden or beech. It is desirable that there are no knots and the piece of board is straight-layered. You will also need mineral oil.
It is good if a belt sander, jigsaw or laser programmable machine is available.
Manufacturing instructions
The process is also gradual. First, the shape of the future knife is drawn, then the drawing is transferred to the board using the template. The workpiece is cut out from the design either manually or on a programmable laser machine. The future blade is formed on the belt grinding device
The work requires extreme caution and attention. The final operation consists of hand sanding with sandpaper.
A clean workpiece should be soaked in mineral oil. You need to let it soak into the wood well.
More complex product
Everything became clear about how to make a hunting knife or a table knife. However, they talked about simpler materials that did not have a particularly attractive appearance. In order to make a truly high-quality and expensive product, you should choose a more complex version of the knife and resort to working with other types of wood.
The best option, which combines many positive qualities, is karambit made of wood. The product has a curved shape, both blades and handles, and is held with a reverse grip. This item looks quite attractive (both steel and wood).
It is extremely difficult to make such a knife at home. A whole set of tools is needed. If you have a good workshop at home, you can take on this process and learn how to make a karambit knife.
It’s worth noting right away that such a product can also be made from plywood, but karambit made from wood will be more attractive and expensive.
First you need to find a piece of high-quality wood that will be optimal in size. After this, cut out a blank that will correspond to the approximate dimensions of the element. A sketch is also depicted on the workpiece in order to have a rough idea of the size of the craft.
Then, using a blade, chisel, or file, you must painstakingly and slowly give the workpiece the required shape. There is no need to rush, because haste is fraught with consequences.
The product will be monolithic. After the workpiece has received approximate outlines, it is necessary to move on to recessing the blade. It has a narrowed shape and many gaps. It is necessary to provide grooves for the fingers on the handle so that the finished attribute is comfortable to hold in the hand.
Since wooden karambit is a high quality product, you can decorate it with various patterns. They should first be cut out with a blade and then burned out.
The entire product should be varnished. The question of how to make a knife from wood with your own hands has been fully answered.
The list of modern kitchen knives includes products not only made from the usual steel. They are made from ceramics and wood. We will also make a wooden knife with our own hands in this master class. This is a very convenient knife for slicing soft and delicate products: cheese, butter, baked goods, such as filled pies. When slicing, such a knife allows you to avoid damaging the surface of a baking sheet or pan with a non-stick coating. It is very convenient for them to prepare sandwiches by spreading butter on bread or toast.
Materials
To work you will need:
- board;
- mineral oil for wood processing;
- sheets of paper;
- rags;
- band saw or jigsaw;
- Sander;
- sandpaper.
Step 1
. First of all, you need to prepare a model of the knife. You can do this by drawing it entirely manually or using graphics programs.
Step 2
. According to the applied layout, you will need to cut out a blank for the knife. You can do this using a special laser machine. A similar service is provided by woodworking workshops. There is also an option to work manually. To do this, you will need to glue the template to the surface of the board and cut out the base with a jigsaw or band saw.
Step 3
. You will need to process the resulting workpiece with a grinding machine. The main part of the work is sharpening the wooden blade. In terms of labor intensity, the process is comparable to sharpening a steel knife blade.
On the one hand, the wood is sharpened much faster, on the other hand, the slightest flaws can negate the work and you will have to sharpen it again, but on a different base.
Work gradually, constantly checking the thickness and bevel angle of the blade. When working, adjust the speed of rotation of the sanding belt of the machine and the force of your own pressing.
Step 4
. Once the wood blade has been sharpened, take sandpaper and continue sanding the knife by hand. If you also used laser cutting, sand down the characteristic scorched edges. If not, just sand all surfaces smooth.
Step 5
. Wipe the resulting knife with a rag, getting rid of the smallest particles of dust and debris formed during work.
Step 6
. Treat the knife with mineral oil. To do this, apply oil to the surface of the knife with a paper towel or a clean rag and leave it to soak for 40 - 45 minutes. After this, remove the excess and thoroughly polish the surface with a clean rag.
Types of knives
There are differences between types of knives in the geometric shape of the blade. The purpose of a particular knife depends on the shape. With some weapons it is more convenient to make piercing movements, and with others it is more convenient to make slashing movements.
Hunting knives have the following types of blades:
- straight edge at top;
- the upper edge (Drop Point) smoothly descending towards the centrally located tip;
- an upwardly extending edge and a blade located at the top relative to the axis of the tip (Trailing Point);
- a blade in the form of a Bowie knife, which has a straight, sharp upper edge with a steep descent at the tip (Clip Point);
- with a straight spine and a bent cutting edge (Skinner);
- with a double-sided wedge-shaped blade, like a dagger.
According to the type and size of the design, hunting knives are divided into the following groups:
- Classic. Standard length - from 10 to 13 cm. Blade width - 3-3.5 cm. Weight - from 120 to 180 g. Blades of any type are allowed, except double-sided sharpened. The purpose of classic knives is long-term work on cutting carcasses and skinning.
- Big ones. Size - from 13 to 17 cm. The blade can have any shape. Weight - from 180 to 300 g. A large mass must be accompanied by an appropriate guard and a thick handle. Large knives are used for slashing. They are not very suitable for other purposes.
- Foldable. Sizes vary. Folding knives are equipped with one or two blades. They perform best when performing small, short-term work.
In order for the blade to gain sufficient rigidity, grooves are made in the metal. They also have another name - valleys. The presence of fullers not only increases the rigidity of the blade, but also reduces the weight of the knife.
The best option for a hunter is to have two knives. One is designed for finishing off large game and cutting up carcasses. It should be long and heavy. The second is for cutting small game and utility work (for example, cutting branches in the forest).
How to make a knife from wood
We looked at how steel blades are made, and now we will learn about how to make a wooden knife. As in the case of a steel knife, you need to prepare a template, select a piece of board made of durable wood and a tool. You will need a jigsaw or a wood saw, a grinder or a set of sandpaper of various grits.
Minimum kit for making a wooden knife PHOTO: eastwoodscarpentry.co.uk
| Image | Process description |
| To begin, take a piece of board made of durable and hard wood. Draw the outline of the future knife by hand or using a template | |
| Using a machine, using a jigsaw or a hacksaw, we cut out the knife blank | |
| We also draw the contour of the profile onto the narrow part. We remove everything unnecessary | |
| You should get a knife like this. But it is still, so to speak, “raw” | |
| Grinding using a grinder with a special disc | |
| You can round the edge of the handle using a hand router | |
| We sharpen the blade on a belt sander. This work must be done very carefully, since with strong pressure or incorrect movement the workpiece can easily be damaged. Then you'll have to start over | |
| Let's polish again | |
| Cover the knife with liquid metal and leave to dry for at least 12 hours. Anyone who wants can skip this step. | |
| After the liquid metal has dried, grind the workpiece again | |
| After sanding, use mineral oil. | |
| Use a swab to saturate the knife well with mineral oil. | |
| It should look like in the photo | |
| And, of course, we test the knife |
Such a wooden knife, of course, will not replace a full-fledged metal kitchen model, but it can easily cut vegetables, fruits, cake, cheese or butter.
Preparatory stage
To make an automatic switchblade yourself, you need to take a strip of metal and transfer a sketch of the intended product onto it. Then, using sandpaper or a special machine, you will need to process the future blade.
If there is no suitable device, then you shouldn’t even start manufacturing quite complex products. Alternatively, you can use a needle file, a file or a hand drill for finishing. In addition, old kitchen knives are sometimes used as points.
After processing the blade and giving it the required shape, the part is clamped into a yew and grinding begins. Initially, rough finishing is done with a diamond file, then finishing is done using a fine-grained stone. The excess metal is sawed off, a hole is drilled in the center in the prepared part, and the end of the product is also sanded.
Basic operations for making knives
The manufacturing process includes several stages. Let's look at how to make hunting knives with your own hands (photos will help you evaluate the labor intensity of the process).
The knife is ready. All that remains is to place it in a reliable sheath. Making hunting knives can be a good business.
The cost of throwing knives varies online. But if you decide to master this science, you will need not one knife, but at least five. Calculate for yourself how much money it will cost you. Is it possible to make a throwing knife yourself? There is nothing complicated here! I outlined for you the most popular models and indicated all sizes. Download the drawings of throwing knives and I’ll teach you how to use them.
Throwing knife designs: "Cobra"
(Chrysostom). The only model in the company's line of throwing knives. There used to be more. The reason is simple: the CEO of the company is a professional knife thrower. He spent several years developing this model. Cobra is well balanced, inexpensive and colored red (easy to find in the grass).
The drawing shows the main dimensions of the Cobra throwing knife. Blade thickness 5.00 mm. Weight 145 gr.
This is what Cobra looks like live
Throwing knife drawings: “Gadfly”
(Chrysostom). A distinctive feature of the line of knives with the “Rosarms” brand is the handle wrapped with cord, steel EI-107, leather sheath.
This is what “Gadfly” looks like live
Throwing Knife Blueprints: "Strike"
Same . The large throwing knife “Udar” (290 mm) is designed for long-distance throwing.
This is what “Udar” looks like live
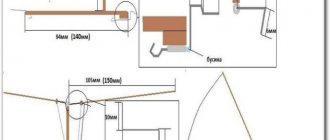
How to use drawings?
Print it out, stick it on thick cardboard and cut along the outline. Then place it on a metal plate and outline it with a marker. Then everything depends on whether you have a tool. You can cut it out with a hacksaw, and select the rounded parts with a grinder.
You can also select slopes on a throwing knife with a grinder, make them with a file, or use a belt grinder. Don't put on much beauty. If you have already bought polished factory metal in a store, then you know that after several throws the knife becomes covered with scratches and loses its original appearance.
The most important! Remove all the burrs from the blade and do not sharpen it so that bread can be cut - there is no point, and when you throw with a grip on the blade, you may end up without fingers.
PS In the summer we are opening a knife throwing school with step-by-step video lessons. For subscribers of our store - free. You can subscribe. You will also receive a gift for subscribing there. Good luck!
Every hunter understands that you cannot do without a special knife - with the help of it you can chop a splinter for a fire, repair equipment, and process prey. Thus, this device is truly universal. And you can make it this way yourself to your taste.
Materials and tools: 1. Emery stone.2. Diamond needle file.3. Drill.4. Drills.5. Files.6. Abrasive stones.7. Current rectifier.8. Soldering iron.9. Grinding wheel.10. Metal for a knife. It is advisable to select high-speed tool steel.11. Wood for making a handle.12. Rivets.13. The plate is brass or bronze.
Work order: Any work begins with a drawing. Moreover, in this case, you will need two drawings - the knife itself and a separate blade with a shank.
Next stage
A knife is a tool that is needed in any household. On store shelves you can find such knives for a variety of needs. These can be kitchen, dining, multifunctional or hunting products. Choosing a knife to serve effectively and for a long time is not very easy. But almost every home craftsman can make a homemade product that will not be inferior in quality to the factory one. On hunters' websites and forums you can see photos of handmade knives that amaze with their diversity. In addition, on the Internet you can find a lot of tips and tricks for making homemade cutting devices.
Drawing and layout
Before starting metal processing, everything is done on paper, and then a template is made from cardboard. Why such formalities, you ask. The fact is that such flaws as, say, the butt sticking out in the folded position or insufficient immersion of the blade into the handle will be revealed at the initial stage. It is easier to remake a cardboard template than a metal product.
If you're not a designer-designer, borrow drawings from the Internet. Locking mechanisms for folding knives are classified into:
- The pin one is one of the most difficult to perform. A spring mechanism with a pin is placed between the linings of the knife handle.
- With a lock on the butt. The heel of the blade is sawn through, and a rocker is installed in the handle, when pressed, the knife opens. To make such a lock you need to have certain locksmith skills and a set of tools.
- Linear is the easiest lock option to implement. Its essence is that a flat strip of concave steel, mounted between the linings, keeps the knife from opening. In essence, this strip plays the role of a flat spring. To make such a lock, you do not need any special tools or any specific skills.
Preparatory stage
To make an automatic switchblade yourself, you need to take a strip of metal and transfer a sketch of the intended product onto it. Then, using sandpaper or a special machine, you will need to process the future blade.
If there is no suitable device, then you shouldn’t even start manufacturing quite complex products. Alternatively, you can use a needle file, a file or a hand drill for finishing. In addition, old kitchen knives are sometimes used as points.
After processing the blade and giving it the required shape, the part is clamped into a yew and grinding begins. Initially, rough finishing is done with a diamond file, then finishing is done using a fine-grained stone. The excess metal is sawed off, a hole is drilled in the center in the prepared part, and the end of the product is also sanded.
The procedure for making a folding knife with your own hands
Once the cardboard model of the future knife is ready and all its elements meet the standards, you can begin manufacturing the device itself. At this stage, the material for the future knife and tools that may be useful in the process of its manufacture should already be prepared. As already mentioned, stainless steel is considered the optimal material for making a knife blade, since it will not rust, even if moisture gets inside the folder.
For drilling holes in hardened steel, it is best to use ceramic or glass drills.
It is very important to drill at low speeds and apply a little force. If you approach the process of drilling holes in a workpiece irresponsibly, you can simply erase the drills without achieving the desired result.
In order to prevent steel from sinking, it is necessary to constantly monitor the level of its heating and often cool the part.
As for dies, it is better to use titanium for them, since, even with a small thickness, this material has high strength indicators
In addition, titanium is lightweight and does not corrode, which is also important for a folding knife. When processing titanium and giving it the desired shape, it is also recommended to work at low speeds with an angle grinder; you can even use a hand hacksaw for metal
In order to make a folding knife, the next thing you need to do is cut out the contours of the corkscrew spring, which will be located at the bottom of the die. At the intended end of the die, it is necessary to drill holes with a diameter of no more than 2.5 millimeters; there should be 3-4 such holes. After making the holes, you need to connect them and insert a hacksaw blade there. The next step will be sawing through the stopper line, but when performing this procedure it is necessary to leave a small margin, which will be removed during the process of setting up and checking the finished knife.
As for the lower die, it often has the same dimensions as the upper one, but there is one difference; in the lower die it is necessary to make a special recess for the hole for opening the knife. Another difference between the top and bottom dies is the diameter of the screw holes. In the lower die, such holes must be made for the screw thread, while the diameters of the holes in the upper die must have the diameter of the screw. After all the parts have been cut out and all the holes drilled, you need to make or select two small washers. Bronze or fluoroplastic washers are considered the most optimal. Such washers will act as a bearing and be mounted on the axis of rotation of the knife.
The next stage in the manufacture of the knife will be its direct assembly. This must be done one by one:
- insert the axle into the lower die;
- install the locking pin;
- install the washer;
- place the blade and assemble the knife together.
If any inaccuracies arise during the assembly process, but they need to be eliminated, for example, if the parts of the knife do not mate, then they need to be adjusted in place. After the knife is assembled, you need to install the corkscrew ball. To do this, in the area of the corkscrew spring it is necessary to drill a hole with a diameter of 0.1-0.2 millimeters, that is, it must be smaller than its ball. The average size of a bearing ball is 1.5-2 millimeters. The ball is pressed into the locking plate using a vice, and it should protrude to the surface by approximately half a millimeter.
After the ball is installed, it is necessary to determine the place of its contact with the wedge; to do this, just close and open the knife several times. After this, a mark will remain on the blade of the knife; at a distance of 0.3 millimeters from the edge of the mark, it is necessary to make a small hole into which the ball will enter when the knife is closed. In order to set and check the functionality of the knife lock, it is initially recommended to assemble the device without the top die. If everything works properly, you can completely assemble the knife and check its operation while folded.
Now the knife is ready. As it becomes clear, it is possible to make a folding automatic knife with your own hands; it will take a little time and patience.
“Do it yourself folding knife” read 2248 times
History of development from stone to modern
Man first began to use a knife immediately after he stopped walking on all fours and began to get food with improvised means. The tools that people began to use for hunting and farming were fragments of bones or stones. The first ones were much easier to make, due to the fragility of the animal’s bones, but such products dulled unusually quickly, and not all components of the skeleton were suitable for the role of a sharp instrument.
To make a knife from stone, primitive man had to put in a lot of effort. However, the laboriousness of the process was compensated by its relative strength and the ability to sharpen the edge of a stone blade. Another advantage of a stone knife over a bone one was the durability of the tool. Bone weapons were fragile and often broke during hunting, so this type gradually passed into economic use and construction.
At the time of human mastery of metalworking, edged weapons began to be made from bronze and copper. They were significantly superior to stone samples in terms of durability. The blades were made from a single piece of metal. Swords, daggers, and knives of those times became indispensable weapons for the soldiers of the Roman Empire, with the help of which troops conquered new territories.
The Iron Age is the age of experimentation and new technologies. Knives acquired different shapes and lengths; at this time, sickle-shaped and wave-shaped blades were invented. In Rus' at that time, edged weapons were included in the attributes of the nobility and merchants. The Vikings used wood to make sword hilts so that the steel, frozen in the cold, would not burn the hand.
In the Middle Ages, people began to use steel - an alloy of iron and carbon - in the production of swords. These times were considered bloody; history knows many large-scale wars and battles. As a result, the emphasis in forges was not on quality, but on quantity. And in comparison with ancient times, the characteristics of the samples of edged weapons of the Middle Ages were much inferior to the ancient prototypes.
During the Renaissance, the experience of blacksmiths, passed down from generation to generation, together with new technologies of that time, resulted in steel cutting products of quite high quality. But just at this time, firearms began to be used in battles, and interest in blades began to gradually fade away.
During the Industrial Revolution, the production of bladed weapons became widespread, moving from handicraft to factory production.
In factories, the manufacturability of the process reduces costs, which means that the product becomes cheaper and is already available to almost everyone. Soon, folding knives and world-famous centers for their production appeared - Russian Zlatoust, English Sheffield, German Solingen and Swedish Eksilstun.
About the handles
Dried wood is used to make handles. Walnut, beech, maple, pear, cherry, birch and mahogany are suitable for this purpose. You can purchase the necessary material in a specialized store or donate some old furniture. The handles can be mounted or overhead.
In the first case, a hole is drilled in a wooden block for the shank. Installation is carried out using adhesives. Many craftsmen weld a bolt to the shank. This makes it possible to drill through the block. The handle is secured with a screw-on nut.
Folding knife mockup
So, if a person is interested in the question of how to assemble a folding knife, then this can be done even without special skills. The main thing in this process is to take into account all the established parameters and adhere to all the rules for performing such a process. The first thing to do, starting with making a knife, is to sketch the future device on paper. You can also use special graphic editors. The best option for cutting out a template for the future knife blade is cardboard, since it is more durable than paper. Moreover, you can cut out all the components of the future knife from cardboard, and then fasten the cardboard blade and handle with a screw and nut; to do this, you need to cut a hole in the cardboard for the axle. This approach will help you understand how proportional the elements of the knife are, and how the device being manufactured will close.
In addition, making a cardboard model of the knife will help to correctly match the shape of the heel of the blade, and this part, as you know, is extremely important for the comfortable and practical use of the knife. You can find out what the supporting part of the heel should look like by watching a DIY folding knife video. The video will help you make sure that the heel of the blade is really made correctly and has the required bevel angle; an angle of 7-9 0 is considered optimal. After this, you need to sketch a linear knife lock; as you know, it is based on three points that form a triangle. Each point of the linear lock has its own purpose:
- for installing the pivot pin;
- for mounting a corkscrew pin;
- the contact zone of the supporting planes of the heel of the blade and the pressure plate, that is, the stopper.
It is worth noting that it is the lateral pressure force of the stopper that fixes the blade in the closed position; there are no other elements performing this function in this knife design
That is why it is extremely important to mount a small steel ball from the bearing into the stopper; it will become an additional retainer for the closed blade and, accordingly, will secure the use of the knife. It is very important to choose the correct location of the ball lock, since it depends on the functioning of the entire knife lock
Having marked the location of the ball retainer on a cardboard mock-up of the blade and locking spring, you need to make sure that it will fit tightly there and will not interfere with folding the knife. After this, you need to decide on the fasteners that will tighten the dies together. It is not recommended to use fasteners with large heads or place them too close to the edge of the handle. This is due to the fact that subsequently it may be necessary to install a spacer or tubular racks between the fasteners.
Peculiarities
If you decide to make a switchblade knife with your own hands for the first time, try making a simple sample first. An example would be a product made from a straight razor. Such an instance is created from scrap materials, does not require special qualifications, and has a minimum of details. But the finished product will look good on par with store-bought counterparts, having all the necessary functionality.
Collar: This is the simplest of them, consisting of a rotating ring, suitably shaped and mounted on the end of a handle, which is operated immediately after opening and closing. To close it, press it against the outside wall with your finger. This is the most commonly used method, even because it allows one-handed opening. Frame Lock: This is similar to the previous one, but in this case it is all an external handle that falls down to prevent it from closing. The release is extended by a split with a finger Lock or pump: It has a hinge plate in the middle with a hook that fits into a groove on the back of the blade. The closure is activated by moving a pin through a button on the side of the handle. These other accessories are not necessary or difficult to use for their very small size.
Before starting work, you need to cut out blade and handle templates from cardboard or plywood. This will allow you to focus on the expected final sample. This is followed by adjusting all the dimensions of the homemade blade. It will fit comfortably in your hand and will be inexpensive in terms of cost. Regardless of what kind of knife you plan to make: front-facing, folding or regular, you can use durable fabric, wood, horn or wood mushroom to decorate the handle.
Second blade, shorten the multi-functional belt, stretch the thin ropes, pull the bicycle chain, pull the tassels and other scissors from the nail, corkscrew the toothpick to increase the microchip glass to remove the wooden splinter from the fingers of the pen pen. Then there are more advanced multi-function devices with technological accessories such as.
However, for these latest models, it is recommended not to wash under tap water directly, as this involves electrical current, even in very small quantities. Next, wipe the handle and blades with a damp cloth and brush the inside of the crevices with a toothbrush or blow it with compressed air.
About making the blade
During the manufacturing process of the blade, excess is removed from the metal blank. Near the shank itself, the corners need to be slightly rounded; with this design the blade will be stronger. A novice master should be prepared for the fact that the sharpening procedure will be quite lengthy. It is carried out on sharpening stones with different grain sizes.
First, sharpening is done on a coarse-grained wheel. Often beginners ruin the blade. The reason is the incorrect angle. If the knife is intended for heavy and rough work, the blade should be sharpened at an angle of 30 degrees, 20 for medium, 10-15 degrees for fine. According to the masters, sharpening is a very important element of the work, on which the cutting properties of the blade will depend.
With concave triggers, which are the easiest to make, the knife will be ineffective. With a “flat wedge” sharpening, the blade will have average cutting performance. However, this will become possible with a two-millimeter blade. If a hacksaw blade is used as a raw material, then its thickness in this case will not be enough. It is recommended to equip the knife with a sharpening in the form of a concave lens. The blade will be effective for through cuts.