A modern magnetic board is an excellent educational, informational, demonstration or advertising tool. In the production of these functional items, different design solutions are used, so in addition to simple white rectangles, you can purchase products with colored or combined surfaces to suit every taste.
General principles for creating a do-it-yourself drawing board
For many craftsmen, it is enough to familiarize themselves with the known technological fundamentals of creating a product, and they create the specific design of a magnetic marker board with their own hands. Let's consider the main points of manufacturing the product:
- The dimensions of a magnetic marker board for home use usually do not exceed 0.6x1.2 m, standard options are 0.3x0.4 m and 0.5x0.7 m. Office designs are twice as large.
- Any sheet material is suitable as a base: plywood, chipboard, fiberboard, MDF, OSB, thin metal, plastic, etc. In the simplest case, you can use part of a wall or the surface of a refrigerator as a base.
- To create a magnetic board you will need a sheet of thin galvanized or painted metal. It is possible to use a special magnetic coating applied, for example, to plywood. In this case, a magnetic primer is first applied, and chalk paint is applied on top of it. To do without primer, special magnetic chalk paint is used. The cost of 0.5 liters of Tikkurila Magnetic brand composition is several thousand rubles, while magnetic soil is three times cheaper.
- If you only need to draw on the board and do not need magnetic properties, you need slate paint. It can be purchased both imported and domestically produced. At the same time, the price forces you to make the composition yourself from black acrylic paint, adding baby powder or grout for tile joints. The quality of the coating suffers somewhat, but the result is a completely acceptable surface for home use.
- The base of the slate board for drawing with chalk can also be covered with a special black chalk self-adhesive film. It is not difficult to glue it, and the coating is inexpensive. The only possible problem is purchasing the right amount of material, and not a whole roll. To draw with a marker, use a special white self-adhesive film. It is better not to use regular self-adhesive tape, as the marker is difficult to erase from it.
- Structurally, a magnetic chalk board can be tabletop, on the wall or placed on the floor. If you coat the two halves of the board with different compounds, you can draw on it with both a marker and chalk. When using a base made of cork or chipboard, you can also use buttons.
- A wooden frame of the required size can be ordered from a framing workshop. It's even easier to purchase a suitable picture frame from a craft store. It is convenient to cover the perimeter of a homemade board with a plastic corner. It is not difficult to cut a frame from a regular wooden plinth if you have a miter box.
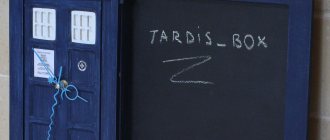
Phone controlled car
If you want to feel like a spy and control a toy spy car, I suggest you assemble it yourself.
The machine is completely controlled from the phone, it is made on the ESP32-CAM platform.
The body can be cut from a piece of plywood or plastic. Assembly will not raise any questions, everything connects easily.
And thanks to the camera, you can watch your pets, tracking all their actions, but I don’t think that after that they will love you very much.
If you want to repeat the project, I suggest you read the full list of components in the article below, where you can also find the firmware code: Wi-Fi machine with camera on ESP32-CAM.
Metal mesh board
•Choose a metal mesh with a suitable mesh size. It is best to use reinforcing mesh for the screed with 10x10 cm cells. Give it the desired size and cut off the protruding rods with a grinder or circular saw.
•Degrease the mesh with solvent and coat with paint.
•Screw two self-tapping screws into the wall and hang the product on them. Sheets with notes can be attached to the rods using ordinary clothespins.
Advice! Screed meshes have a large area. From one such structure you can make several boards at once. Spray paint will help save time. Place the grids on top of each other, moving one of them slightly relative to the other, and paint them at the same time. Pre-spread plastic to protect surrounding surfaces and wear a respirator.
DIY slate (chalk) board
•Select a writing board base. It is most convenient to take sanded plywood. Give the backing the required size by cutting it with a hacksaw. The size of the product can vary from 36x14 to 200x100 cm - it all depends on your preferences.
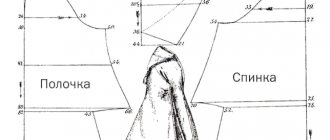
•Make a frame. For this, flat wooden slats are suitable, which need to be cut so that the inner perimeter of the frame is approximately 4 cm less than the perimeter of the base. Saw the slats at an angle of 45 degrees using a miter box and a hacksaw and fasten with wood glue or liquid nails.
•If the base is uneven, it must be cleaned with sandpaper. When the surface is ready, coat the base and frame with 2-3 coats of primer. Apply each subsequent layer after the previous one has dried.
•When the primer is dry, take a short-nap roller and apply 3 coats of chalkboard paint onto the substrate. It is convenient to write with chalk on such paint, and it is easy to erase what you have written. Please note: the composition is tinted in a variety of shades. Your chalkboard doesn't have to be black!
•Paint the frame. After drying, a frame made of flat slats can be attached to the base with glue, and a product made of thicker slats can be attached with nails.
•Fix two metal loops on the back side of the board with screws. Pull a rope through them and tie the ends into a knot. Now you can place the whiteboard on the wall by hanging it on a nail or other fastener. And if the weight of the board does not exceed 450 g, self-adhesive fasteners for pictures will help you.
Advice! If you don’t want to waste time, use a ready-made solution - a decorative MDF slate panel. Attach it to the lathing, screws or glue, and you will have a huge space for writing and drawings. In addition, any slate surface can be turned into a writing board with a marker. To do this, just purchase a chalk-based marker.
Option one. Transparent board
First you need to decide on the dimensions of the future product. Depending on the purpose, the sizes can be any. A magnetic marker board 90x120 centimeters is suitable for teaching schoolchildren and drawing small diagrams. For young children, you can make a smaller board. For placement in a large office and for holding lectures, the dimensions of the product should be from 150 cm on the narrow side.
The hardware store sells melamine in various sizes. This material has a durable plastic coating on one side, which will ensure the durability of the product. It is better to choose sheets with a smooth surface, as they are easier to wipe and the inscriptions will be easier to read.
If you want to make a clear marker board, you can purchase plexiglass or Lexan. The latter option is thinner and more resistant to damage, weighs less, does not crumble, and has a beautiful glossy finish.
If you decide to make a magnetic marker board with your own hands, please note that the material is very thin - only 6 mm thick. You can hang the board on the wall, but if you plan to move it, you will need to glue a backing sheet. To use magnets, it is best to choose a sheet of steel and add plywood or cork board.
Please note that such a board should be placed on a flat wall. If the surface is not level enough, the board will not be stable and writing on it will not be very convenient. Also, for convenience, you can attach a shelf for markers and rags to the finished product.
Now stores sell glider boards divided by day of the week. Automotive self-adhesive strips 3-6 mm wide are ideal for marking. If you make a magnetic marker board with your own hands, you can decorate it as you wish and depending on the purpose of use.
Magnetic marker and chalk board made of OSB, galvanized and film
To make a wall-mounted magnetic marker board, you will need the following materials:
- OSB 1x1.2 m 6 mm thick;
- galvanized sheet of appropriate size;
- plastic corners for the frame;
- hanging fastener;
- self-tapping screws for hangers;
- black film for chalk drawing;
- white marker film;
- glue “liquid nails”;
- double sided tape.
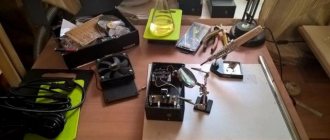
The set of necessary tools is shown in the photo. The procedure is as follows:
- cut out the OSB sheet of the required size;
- cut out a galvanized sheet of the same size;
- glue the metal onto the OSB using double-sided tape;
- glue a black film onto the metal for drawing with chalk or a white film for drawing with a marker;
- we cover the board around the perimeter with a plastic corner using “liquid nails”;
- turn the board over, drill out recesses for hardware, secure the hangers with self-tapping screws;
- We hang a magnetic marker board on the wall.
The board manufacturing technology is presented in more detail in the following video.
Tools and materials
To make a magnetic board with your own hands, you will need the following tools and materials:
- thin sheet of metal;
- dye;
- brushes;
- reliable double-sided tape;
- plastic corners;
- plywood;
- fittings for mounting the structure on the wall.
Some companies offer special coatings for boards. It is completely black and vinyl-like. This option is great for magnets with a vinyl base. Ordinary boards hold up very poorly on such boards. It is better to use a universal and cheaper option, namely a metal tin sheet.
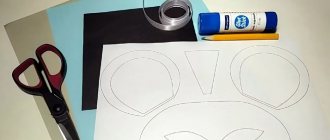
How to make a magnetic board with your own hands: step-by-step master class
1. Cover the surface of the hardboard or thin board with acrylic primer. We wait until the layer dries properly.
2. Apply primer with a magnetic effect on top of regular primer. In total, you need to apply at least 5-6 layers of this primer with intermediate drying of each. If you apply fewer layers, the magnets will not stick to the surface.
3. Let's start decorating the frame. Sand it with a sponge and remove dust with a damp cloth. Paint the frame with white acrylic paint. For this, it is best to use a flat synthetic or bristle brush.
4. We decorate the frame with a decorative cord, but first tie a beautiful sea knot at one end. Fold the cord into a loop. The short end should be under the long one. We make the same loop, but in the opposite direction. In the process we intertwine the loops with each other.
5. Attach the sea knot to the frame using a hot glue gun. We also glue the cord, adjusting and fixing its tension as we work.
6. You can also make your own original magnets without much difficulty. To do this, simply glue small magnets inside the seashells.
You can make such a board of any shape and size, as well as any color. Many people use special paint for Tikkuril school boards - there is black, green, and other colors.
The shape of the board can be made in the shape of any animal - an elephant, for example, or in the shape of a racing car. An interesting idea is a pole-shaped magnetic board for posting announcements and posters. The main thing here is that the color and shape match the overall design of your apartment.
I would also like to note that there is now a special magnetic primer and magnetic paint on sale. Use them to make your work easier.
Canister vessel for flammable mixtures
Hello readers, many times I have seen canisters for sale converted into a portable bar, looking at prices of about 100 €, I decided to make something similar for myself.
We took the first canister found in the basement and decided to make it for beer for quick loading into the trunk and a trip to the lake.
Using cardboard, we figured out how to arrange everything inside
Then the canister was made as a gift for my father-in-law
And one more for myself.
There are two more blanks available as gifts for friends on their birthdays.
Useful tips
- Markers should be washed using a dry sponge or soft cloth. It is better to use special markers designed for marker boards. After erasing the inscriptions, light streaks may remain on the surface. They are removed with alcohol. To avoid streaking, you can coat the melamine surface with wax, which is used for polishing cars.
- It is better to cut the material with a saw for laminated materials or plywood.
- To make sawing easier, you can draw a line using a ruler and a knife. Then the material will not break during the cutting process. To prevent crumbling and grinding, you can apply adhesive tape to the cut line.
By making your own magnetic marker board, you can save a lot of money. This product will fully meet your wishes and requirements.
Step-by-step instruction
The manufacturing process is as follows:
- Measure and, if necessary, cut sheets of metal and plywood. They must match exactly in size.
- Paint the metal base to prevent it from rusting. You can use any colors, but black or white is considered the best option. Once dry, you can even draw on a light base with some types of markers.
- When the paint dries, securely glue the sheet of metal to the plywood. To do this, use a large amount of double-sided tape.
- Secure the corners along the edges with tape or with universal glue, which is suitable for wood, metal, and plastic.