Crafts from napkins
Paper napkins make magnificent crafts. One popular option is to roll napkins into small balls and soak them in gouache of different colors. From such elements you can put together a three-dimensional picture. The technology is the same as when working with beads.
Even a small master can make voluminous figures from such lumps. The photo shows a small composition on a fire theme. The frame of a machine or structure is assembled from matchboxes or cardboard boxes. On top it is tightly covered with balls of napkins, painted in the desired color.
Crafts reflecting fire-fighting themes, made by a child together with an adult, help to learn the basic rules of fighting fire. They can be made from different materials and in different ways. It is important to inspire the little master to be creative, and he will receive the necessary information during the process of work.
The design and purpose of the porch
The veranda for the home has become such a common household item that few people think about its role. The main purpose of the extension is to make visiting the home more comfortable for a person.
Since the porch is the center of the building’s facade, it needs to be made as attractive as possible. It is often erected after the construction of the house, so care should be taken to ensure that it matches the style of the mansion. For this purpose, a project for the porch of a country house is being drawn up.
Note: the more harmonious the overall picture is, the more worthy the veranda itself will look.
Photo of the front porch of a private house - classic design
More complex crafts
As you gain certain skills, you can move on to more complex crafts. Already at school age, interest in other technologies appears. Attention is paid to quality of execution, volume and layout.
Volume projects
Volumetric crafts are created in different ways:
- Volumetric figure. An example would be a campfire, a common cause of fire. Logs (cylinders of thick paper) are laid out on a sheet of cardboard; a bunch of “flames” cut out from colored paper in red, yellow and orange are collected in the center.
- Three-dimensional pictures are made in the form of a double-leaf postcard made of thick paper. On the inside of one of the halves, various figures are glued to the bent edge: an image of a fire, trees, which are pressed by the second flap, but when it is turned away, they take a vertical position. On the second half, a drawing or appliqué is made. When positioned vertically, it creates the main background of the picture.
Complex crafts are available for older children. The photo shows the three-dimensional composition “Fire Extinguishing”. In it, each element is made in different ways. For example, in the photo the fire truck is made of Lego, the firefighters are made of plasticine, and the burning house is made of wood rods laid in the form of a log house.
How to make a small cardboard house for dolls?
The easiest dollhouse to make is considered to be one made from cardboard . The best material for creating such structures would be cardboard boxes from household appliances or thick art cardboard. This material will allow you to create high-quality, strong structures and will not overshadow children's play experience.
While working on creating a house you will need:
- cardboard;
- stationery knife with a new blade;
- scissors;
- glue;
- scotch;
- decorative materials: remains of wallpaper, linoleum, self-adhesive paper, fabric;
- paints - gouache or acrylic;
- brushes
A small house is made according to the following instructions:
- To make a two-story house with 2 rooms on the ground floor, you need to take two boxes of the same thickness, which are sequentially connected to each other using glue. A smaller box is placed on a more elongated box so that their two sides form a single wall of the house.
- The elongated box that forms the first floor is divided into two parts using a cardboard rectangle that acts as a partition.
- To form the roof, you need to take a rectangle. Using a ruler and a knife, a non-through cut is made in the middle. Then the rectangle is “broken” and bent at an angle. Using glue, the corner roof is attached to the top floor of the house.
- The glued structure is placed on a large sheet of cardboard and outlined with a pencil.
- The resulting figure is cut out and glued to the back of the structure, forming the back wall of the house.
- Window openings are cut on the walls.
Origami rocket with colored fire
This origami rocket looks interesting from one-sided colored paper, and it is the fire that remains bright, and the frame itself is white. Place the rectangle with the white side up, bend the part back to a square. Shape the corners and sides to create a kind of house. Turn the workpiece over, form the side walls with a ladder, turn it around again and spread the colored fire down.
Dollhouse: second floor and stairs
To build the second floor platform and the stairs leading to it, we will need packaging corrugated cardboard, scissors, a stationery knife, glue and paint.
We will make the stairs from two zigzag cardboard strips. These are the guides of our stairs. The steps themselves are ordinary cardboard rectangles the width of the stairs.
We glue the side of the ladder to one of the walls of the dollhouse in the place where we plan to climb to the second floor.
We make the second floor platform from a piece of cardboard and railing, also from narrow strips of cardboard. In our version, the second floor landing is planned as a curtain wall. Those. the second floor will only partially overlap the first.
All that remains is to connect our platform and stairs. We glue the platform with its ends to the walls of the dollhouse. Additionally, we install a vertical stand for reliability. We glue the stand to the side wall of the stairs.
Rocket made from cardboard tubes
If you want to assemble a larger and stronger model, take a sheet of cardboard and cylindrical bushings. A base made from any rolled paper or paper towels will do. Cut out the main parts and make side cuts to connect them, like a simple 3D puzzle. Before assembly, paint and decorate the rocket with gouache and PVA or acrylic paints.
Preliminary marking of the installation site
After determining the shape and type of structure, it is necessary to prepare all materials for work. In order not to overpay for extra purchased material, you need to carefully consider the design and make an accurate drawing.
To do this, you need to calculate all the indicators:
- It is necessary to make calculations of the total height of the structure. This can be done. by measuring the distance between the floor of the lower and upper floors.
- Number of steps and their height. In practice, steps are made from 15 to 20 centimeters in height. But you can take the average value of 17−18 cm. You can measure the number of steps by dividing the total height of the stairs by the height of each step. If the result is an uneven number, you can reduce the height of the bottom step.
- The top of the step. Here, too, there are certain norms. It is customary to make the top 22-40 centimeters.
- The width of the staircase itself. There are no specific rules. It is necessary to take into account the available space in the room and the cost of materials.
- The length of the stairs is measured by multiplying the width of each step by their number. If the structure is very long, then you can reduce the width of the tread or divide it into two flights.
Don't forget about the clearance above the stairs. When a person of average height walks along it, he should not bend down or hit his head on the ceiling.
Gallery: DIY cardboard house (25 photos)
The easiest dollhouse to make is the one made from cardboard.
Then you need to move on to the decorative interior and exterior decoration of the structure.
Interior and exterior finishing
To make a house beautiful and interesting, it needs to be decorated correctly. The first step is to strengthen the structure by finishing the exterior of the building. To do this, you can use self-adhesive paper or cover the case with plain white paper using double-sided tape. This treatment of the walls will strengthen the joints of the structure and extend its durability.
To make a house beautiful and interesting, it needs to be decorated correctly.
After this, you should move on to the interior decoration:
- every room is covered with wallpaper;
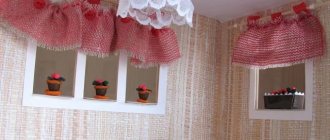
- pieces of fabric are attached to both sides of the window to imitate curtains, an openwork strip is cut out of thick paper, which plays the role of a cornice and is glued parallel to the top side of the window;
- you can put the remains of linoleum on the floor;
- the roof is decorated with carved stripes, imitating a pier; a triangle-shaped brush is made in the corner part;
- Inside the rooms you can put furniture for dolls made of cardboard and decorated with the same materials at hand.
Making a dollhouse with your own hands together with your child will not only immerse him in an interesting creative process, activate his imagination, but also develop accuracy and gain skills in working with cardboard, paper and glue.
Staircase with steps in a dollhouse: step-by-step instructions
In order for the floors in the dollhouse to be connected to each other, it is necessary to make a staircase. This is very easy to do; you just need to measure the height of the room and determine the length of the desired staircase.
In the process of making a staircase you will need:
In order for the floors in the dollhouse to be connected to each other, it is necessary to make a staircase
- A long rectangle, 2-4 centimeters thick, is cut out of cardboard. You need to cut a zigzag from the top long side of the rectangle. All zigzag elements must make an angle of 90 degrees.
- Then a second similar element is made.
- The width of the stairs is determined.
- Rectangles are cut out, the length of which corresponds to the width of the staircase, and the width to the length of the zigzag side. The number of such rectangles is determined by the number of sides of the zigzag.
- Then each rectangle is glued to the side of the zigzag, fixing both main elements together.
- After all the rectangles are glued to the vertical and horizontal sides of the zigzag, you will get steps with an angle of 90 degrees.
Lesson for Beginners
Hover your mouse over the image to turn on the light. This is how a dollhouse with lighting wins.
Did you play around? Now let's get to work!
Difficulty: medium
- battery box
- small light bulb with socket
- microswitch
- postings
- AA or AAA AA batteries
Where can I get all this stuff? In the Chip and Dip chain of stores.
How to choose parts
Let’s say right away: this lesson is for beginners, for girls who do not understand these “electrical intricacies”, for pure humanists. Those who have already made lighting in a dollhouse and are thinking about how they can improve something will not find anything interesting here. What kind of light bulbs are needed? No need to take them out of the lanterns, they are too large for dollhouses. Here, for comparison, is the light bulb from the flashlight and the one we need. Do you see how much smaller it is? Of course, it requires a special cartridge. If you do not know how to solder, then you will need a cartridge with eyes, into which you will then insert the wires and twist them. In the store, immediately find out whether the light bulb fits this socket; there are several types of them. Boxes for AA batteries. They come with 1, 2, 3, 4 and 8 batteries. We will use AA batteries (they are larger) or AAA batteries (they are smaller). How many batteries you need depends on how many volts (V) the light bulb is.
And now a little educational program
Without these volts and watts there is still nowhere. But we will try to explain everything as simply as possible. It is important to understand that voltage (denoted by the letter V) and wattage (denoted by the letter W) are not the same thing.
The number of watts is the power, that is, how bright the light bulb will shine. And volts are voltage, that is, how many batteries you need. Pen-type batteries, both AA and AAA, have a voltage (voltage) of 1.5 V. So that you do not get confused, we provide this list of how many batteries are needed for which light bulb.
- Three volt light bulb - 2 batteries
- Six volt light bulb - 4 batteries
- Twelve volt light bulb - 8 batteries
From this it can be seen that the total amount of volts of the batteries must correspond to the number of volts of the light bulb.
Now you know which box you need: for 2, 4 or 8 batteries. We clarify that the box is needed with wires coming out of it.
Haven't you found, say, a box for 8 batteries? It's OK. You can buy 2 or 4 and combine them into a chain. How? There are 2 wires coming out of the box: one red (this is + ), the other black (this is - ). We strip the ends of the wires and intertwine them, the red wire from one box with the black wire from the other. We wrap the connection point with electrical tape. This is equivalent to a single box.
Master Class. Steps for an exhibition of children's works
Irina Sdobaeva
Master class. Steps for an exhibition of children's works
A guide for demonstrating children's work.
Dear colleagues, I want to share with you a manual for the exhibition of crafts and for mathematics classes, which I made in a short time from the covers of sketchbooks.
To work , we need to take two covers from a set of colored cardboard, a cover from a sketchbook, a stapler, scissors, a pencil, a ruler, glue and colored tape.
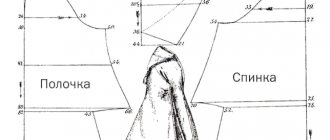
1. Using a ruler and pencil, divide the cardboard into strips 5 cm wide as shown in the figure.
2. Fold it like a fan. These are future steps .
3. Now let's take care of the sides of our ladder. Let's draw our cardboard as shown in the following picture.
4. Erase the extra lines and cut out two such parts. Try to get left and right. (But this is not important)
.
5. The 1 cm edges are bent for gluing. Now the parts of the step need to be glued together . I used the starter. It seemed to me that it was faster and more convenient.
6. Cover the back and bottom of the craft with a second cover of colored cardboard. Our ladder is almost ready, it stands steadily on the table.
Withstands clay crafts.
7. the steps with white sheets from the album and secured the edges with colored tape. I left the sides colored. (you can also paste it over)
Our steps are ready to use in class.
Thank you for your attention.
I will be glad if you like it and find it useful for work .
Photo report on the exhibition of children's works "Autumn Vernissage" On October 17-22, 2016, an exhibition of children's works "Autumn Vernissage" was organized at the preschool kindergarten No. 10. Children aged 4 took part in it. Photo report of the exhibition of children's works "New Year's Kaleidoscope" In December 2015, children of secondary groups "A", "B" together with teacher L. A. Komarova prepared the exhibition "New Year's Kaleidoscope". Photo report of the exhibition of children's creative works "Insects" Photo report of the exhibition of children's creative works on the topic "Insects" Conducting conversations with children of the older group on various topics, I found out that children. Master class on making a stand for displaying children's works on fine art Good day, colleagues! I have been working as a teacher for a short time, just a month with a “tail”, everything is new, unusual, this is my first pedagogical one. Master class on designing an exhibition of children’s works “Chickens” Good afternoon, dear colleagues! I would like to share with you my idea of how to arrange an exhibition of children’s works in the reception room of a kindergarten for parents. Master class “Stands for children’s works from waste material” Good day. Today I and my children (second youngest group) were sculpting with plasticine. We have wonderful meadows with flowers. Design of an exhibition of children's works “Oh, oh, our harvest is not bad!” “Oh, oh – our harvest is not bad!” “We brought a basket of vegetables from the garden. We will need them for salads and borscht!” T. Shorygina Autumn is one thing. Design of the exhibition of children's works “Caution with fire!” Currently, there are a lot of fires happening all over the world, forests are burning. Not only people suffer from this, but also forest inhabitants and beauty. Design of the exhibition of children's works “Spring has come!” Spring came! The city begins to revive: the sun begins to appear in the sky more and more often, the sky becomes brighter, we hear more and more often. Exhibition stand for children's works. Master class This time I want to bring to your attention a version of my exhibition stand for children's work. This stand is convenient because it contains drawings and applications.
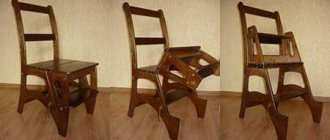
Types of wooden stairs
The first thing to consider when developing a project drawing is the size of the staircase area. Also, when choosing a design, you need to take into account the cost of materials, the ease of use of the structure (during descent and ascent), especially if it is installed for daily use. It is also necessary to pay attention to the aesthetics of this structure, since it must fit into the style and interior of the rooms. Wooden stairs are divided into two types - marching and spiral. In order to choose for yourself which one is better to install, you need to understand the pros and cons of each of them.
Spiral staircases made of wood
Screw structures have a rather complex shape, but their main advantage is that they take up minimal space, which is especially important in a small house. It should be noted that such stairs are installed quite rarely when compared with marching ones. This is due to the fact that they are difficult to install and operate. Especially if you are lifting large equipment.
Nevertheless, such designs have many fans. Spiral staircases can become a real elegant element of the interior. Plus it's compact.
When installing screw structures, you need to make accurate calculations, since making a small mistake during installation can subsequently lead to many injuries.
Marching structures
Such structures are characterized by higher stability and strength than screw ones. Although screw structures take up much less space than mid-flight ones, they are installed less frequently.
Mostly in private houses, structures with one or two flights are installed. But in principle there could be more. They also come in many different designs.
To save space, marching structures are installed on two flights, and the second part can be rotated to the first from 90 to 180 degrees. When planning, the main goal is to create comfortable conditions for using such a structure.
Sometimes, for convenience, curved flight stairs are installed. Smooth turning is ensured by installing corner steps. Such steps can also be installed on two-flight structures instead of a platform between them.
Single-flight wooden
The single-flight design is the most popular option among owners of private houses and beyond. The staircase can be located either in the middle of the room or near the wall.
The area under the single-flight structure is also put to good use. For example, if you install a partition and put a small door, you will get a functional utility room for storing things and tools.
It should also be noted that the advantage is the greater strength of such structures, since they have additional support in the form of walls.
Rotary step design
A single-flight staircase with rotating lower steps is usually installed to highlight the interior or due to the specific layout of the room. For example, if there is a window installed on the wall near the future staircase and you don’t want to cover it with a two-flight structure.
With the right approach not only to the design, but also to the interior of the room, turning steps will add elegance to the room. At the same time, their functionality is not lost at all.
Two-flight simple
A staircase, which has two flights and a turning platform between them, is often used when there is a need to install such a structure above the front door, thereby significantly saving space. Moreover, it is very compact, and a closet for storing things under it can also be made.
Making a drawing of a staircase
Professionals advise starting to make a drawing with a detailed plan of the first floor and indicating the area where it will be installed. The plan must include the exact dimensions of the opening, taking into account the given scale.
It must contain detailed information about the width, slope, plane of the structure and the thickness of the materials used.
Rotating blades, as a result of which the shape of the steps changes, must also be drawn in detail, while all proportions must be respected. A separate diagram shows circular lifting angles.
Design calculation
Calculation of parts must be carried out with special care, otherwise errors will result in discomfort and bruises.
The calculation must be carried out according to the following rules:
- According to accepted standards, the minimum step length should be about 150 mm with a height of 300 mm. You should not violate these parameters, as this may result in a decrease in the level of security. Maximum figures vary around 140-160 mm in length and 280-300 in height.
- A significant factor is the angle of inclination. Naturally, the higher this indicator, the less space the staircase takes up. Acceptable values vary from 23º to 45º. The most popular tilt angle is from 25º to 35º. An inclination angle of more than 45º is too sharp, so you can only climb the stairs backwards. But if the slope is less than 23º, it is more logical to install a ramp.
Calculation of steps
For the production of steps, wood with a denser texture is often used - tanned beech. Brittle rocks should be avoided, as they are not able to withstand the high loads placed on them.
The thickness of the finished elements should not be less than 50 mm if the height of the structure should not exceed 2 m. If the height of the structure is increased, then the thickness of the steps should be at least 60 mm. The number of steps is determined by dividing the height of the opening by the rise up.
The material used must be thoroughly dried and processed. It should be taken into account that if the wood is unevenly dried after installation, the wood gradually begins to lose moisture and deform, taking on the shape of a propeller.
Moreover, a damaged step must be replaced immediately after the defect appears, otherwise one step may pull other elements with it, compromising the strength of the structure. That is why professionals advise purchasing already planed material.
Drawings of spiral wooden staircases
Due to its efficiency and low cost, wood structures are especially popular. As a plan, you can use ready-made drawings developed by professionals.
Drawings of spiral metal staircases
As for the advantages of this type of device, it is undoubtedly fire resistance, the ability to combine various materials, modern design, ease of installation and durability.
Many modern home owners who follow fashion trends and their homes install spiral staircases not only inside, but also outside.
This is due to the fact that metal materials are least resistant to various climatic influences and withstand bad weather.
How to make a cardboard house for children with your own hands?
Many children dream of having their own little house where they can retire and enjoy playing. This item brings a feeling of coziness and comfort to the game, which is why it is popular among children. In order not to purchase expensive structures, a toy orphanage can be glued together from ordinary cardboard.
For this you will need:
- ready-made template or drawn diagram;
- stationery knife;
- ruler;
- PVA glue;
- heat gun;
- colored paper.
The layout of the gaming house is assembled according to the following instructions:
- The cardboard material depicts a diagram of the house or its details.
- Then the drawn elements are cut out. If there are fold lines, draw a ruler along them so that grooves are formed. Then the sheet is folded along the grooves.
- All seams are taped. If there are partitions inside the house, they must be glued immediately using a heat gun.
- After assembling the entire structure, it should be strengthened. To do this, a paper strip is glued to each glued seam. Such elements should be glued not only to the outside of the building, but also to the inside.
After the house is completely assembled, you can move on to decorating it. Home decoration can be done using various materials. Most often, colored paper, paints, fabric, and wallpaper are used for this. It is best to place such a house in the corner of the room, since in this place its dimensions will not interfere with free movement around the room.
Scheme
The first step is to draw a diagram of the house. If this step is skipped, the design may turn out sloppy or uneven. As a basis, you need to take a cross scan, in the center of which there will be a base - the floor, and the cross itself will be formed by the walls of the structure. If the child is large and it is necessary to make a house in his full height, it is better to depict each detail separately.
The first thing you need to do is draw a diagram of the house
To build a large orphanage, you can use ready-made diagrams. The simplest of them is the development of a house with an angular roof. It should be enlarged to the desired size and transferred to cardboard sheets. If desired, each element of the house can be drawn separately, maintaining all the presented proportions.
Main types of circular and spiral staircases
To begin with, in order to have a clearer idea of what such stairs look like, as well as the features of their designs, let's look at the main types of flights. There are four types in total.
With simple steps
The first type is a staircase constructed from simple wedge-shaped steps:
- a wall is used as a reliable support for the wide end of the step;
- a pipe is used as a support for the narrow end of the step.
A variety of building materials can be used to make a support pipe:
- brick;
- wide channel;
- directly the pipe itself of the required diameter, etc.
Console type
The main difference from the first type is that to arrange a staircase of this type there is no need to be close to the wall, since only a pole is used to support the steps, which protrude in a cantilever.
Without support pillar
If the first two types in their design necessarily have a support pillar made of one or another building material, then this type of circular staircase is suitable for it.
The steps are attached in a special way to the strings of the stairs. which smoothly transform into handrails. Characteristics of this type:
- beautiful;
- stylish;
- original;
- not easy to make.
Traditional type
In this case, we are talking about the presence of a conventional support rod that runs inside the stairs. This design is rightfully considered traditional. However, you need to remember that in this case the entire load falls on the support pillar.
Therefore, it must be made only from high-quality, durable material, for example, from a pipe whose diameter is at least five centimeters.
Paper staircase to doll's apartment. Master Class
Hello, dear friends! A staircase is still a very necessary thing in a house, even if the house is a doll house. Climbing to the top floor of a bunk bed or hammering a nail into a wall is simply impossible without a ladder.
This “good” ladder is made of paper , but with the texture of walnut wood. The size of the ladder is chosen just such that it can be used as an alternative to a ladder made from ice cream sticks for a doll bunk bed (author - Timofeevna). However, I think it will be useful not only for dolls and babies. In the toy world of my five-year-old son, the earthworm Uncle Korney, Cheburashka and the crocodile Gena enjoy using ladders made of paper and cardboard.