A thermometer is a necessary tool with which many measure the temperature of the air in the house, water, and also the body. There are various models of devices on sale, differing in appearance, measurement method (mercury, infrared, electronic), and also in cost.
But if you wish, you can make a thermometer from scrap materials with your own hands. The process will require patience and endurance, and you will also need ingenuity.
Liquid thermometer
Manual for relay games “Always 36.6”
Yulia Butova
A manual for relay games “Always 36.6” I bring to your attention
a manual for relay games - a thermometer.
Making a thermometer does not require much effort - you need thick cardboard, gouache and varnish (colorless, which can be replaced with tape).
1. We make a stencil of the desired size and shape and transfer it to cardboard.
2. Cut out the required number of thermometers (I have them-
.
3. We paint the thermometers on both sides with gouache.
4. After the paint has dried, coat the thermometers with varnish, preferably in two layers; you can carefully glue them with tape.
Options for games with thermometers:
Relay race for girls “Nurses”
Girls of the senior and preparatory groups play. Four participants from each group. They must take the temperature and distribute vitamins (these are small balls)
“wounded”
fighters, these are children of junior groups, four children per team. The team of nurses who completes the task the fastest wins.
Relay race with thermometers
Four teams - 2 - doctors and 2 - patients. The child doctor runs and puts a thermometer on the child patient and returns to the end of his team.
Two captains - doctors compete for speed.
In general, such thermometers can be used in many other games and competitions that your imagination suggests.
Master class “Candy heart for your loved one!” February 14th is approaching “Valentine's Day”. This holiday has been celebrated in Russia not so long ago. This is another opportunity for us to be surprised. Bottle ottomans. Good evening (or day) to all those who visited my blog! I bring to your attention a very simple way to “transform” plastic bottles.
Source
Inner vessel material
The advantage of a thermos made from two plastic bottles is its phenomenal impact resistance. They can even play football. This is where the advantages end. Do not pour boiling water into a plastic bottle.
Firstly, it is deformed, and secondly, harmful substances are released. The maximum water temperature should not exceed approximately 80 degrees.
To compensate for this disadvantage, you can use a glass bottle. It is better to pour boiling water into it in two stages. First, pour a small amount and shake, and then add the remaining amount. Otherwise there is a chance that it will burst.
DIY cardboard thermometer
The period of senior preschool and primary school age is a favorable time for the formation of ideas about measurement. Children aged 5 to 8 years old learn about the purpose of various measuring instruments and devices (ruler, protractor, clock, scales, thermometer), actively master the techniques of making various measurements, and consciously use concepts denoting units of measurement. Sometimes it is difficult to explain the principle of operation of a particular device, so models that help the child understand how the measuring device works come to the aid of parents and teachers.
We will tell you step by step how to make a thermometer out of cardboard. Such a paper thermometer can be used in classes on familiarization with the environment in kindergarten or in mathematics and natural history lessons in primary school when keeping a weather calendar. You can also hang a hand-made cardboard thermometer on the wall in a child’s room. Thanks to the model, it will be easier for the child to understand what zero is, what negative and positive numbers mean, and to establish a connection between the instrument readings and changes in nature or in bodily sensations.
- light cardboard or semi-cardboard;
- thick threads of red and white;
- needle with a large eye;
- ruler,
- automatic pen or bright felt-tip pen;
- pencil.
- Cut out a strip of cardboard measuring 12x5 cm.
- We mark the scale with a pencil from – 35 degrees to +35 degrees Celsius, then trace it with a pen or felt-tip pen. If you have a printer, you can download an image of the scale from the Internet or create it yourself, and then print it on paper and stick the printout onto cardboard for durability. This model will be more aesthetically pleasing.
- We tie the ends of the red and white threads together.
- We thread a red thread into the needle, piercing it at the very bottom of the thermometer scale. Then we thread the white thread and pierce the top point of the scale with a needle. On the back of the paper thermometer, straighten the ends of the threads. The model for measuring air temperature is ready!
Principle of operation
Before you rush to make a good thermometer yourself, it is important to understand the principle of its operation. It is also important to know the layout of the future product and understand all the circuits that will be present in it. Nowadays, many people choose electronic devices that vary in shape and size.
Let's consider the principle of operation of modern thermometers using the example of these devices.
The performance parameters of the material directly depend on the ambient temperature. Based on this, the electronic circuit of the future thermometer itself is designed. Typically, its device contains a thermocouple. This is an electronic device that consists of 2 metals that have been welded to each other. On their surface there is a special contact pad connected to the measuring circuit. When the contacts are heated or cooled, a thermoelectromotive force is generated. Its appearance and changes are controlled and recorded by the device’s electronics board.
The new advanced devices use a silicon-type diode instead of the conventional temperature-sensitive component.
A semiconductor radio element distinguishes the dependence of the current-voltage characteristic on the influence of temperature values. Simply put, under the condition of direct triggering, the voltage drop across the junction changes based on the heating level of the semiconductor part.
All data that was processed by such a thermometer is ultimately displayed on the display. In this way, the user can find out all the information he needs about the temperature. Modern digital models of thermometers make it possible to record temperature changes in the range from -50 to 100 degrees Celsius.
How to make a thermometer from cardboard with your own hands: step-by-step description
Children between the ages of 5 and 8 can already be taught about different dimensions. It is during this period that the child develops a concept of such a phenomenon as temperature, and he can already be introduced to various devices and measuring instruments, for example, a thermometer, scales, clocks, protractors and rulers. At the same time, the child remembers not only how to measure, but also in what units it should be done. At this age, children can already consciously use certain concepts. In order for the child to better understand how a particular device works, parents can make a toy model from available materials. So, how to make a thermometer from cardboard?
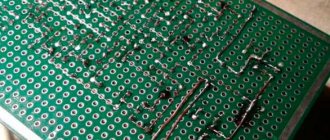
Simple electronic
In order to make an electronic thermometer, a slightly more complex design is required. The temperature indicator in it is an ammeter with a sensitivity of 50 μA, and the sensor is an STZ-19 type thermistor with a unary resistance rating of 10 kOhm. The latter has many analogues from various manufacturers, in case it is not possible to find the original of the indicated marking.
So, to create an electronic thermometer, you will need:
| Designation on the diagram | Name | Analogs |
| VT1, VT2 | Transistors KT315A | KT3102 (A, B, C, D) |
| S1 | Power switch | |
| R1 | 68 ohm resistor | |
| R2 | Variable resistor 680 Ohm | |
| R3 | Variable resistor 22 kOhm | |
| R4, R5 | Resistors 6.2 kOhm | |
| R6* | -//- 9.1 kOhm | |
| R7* | -//- 910 Ohm | |
| R8 | Thermistor STZ-19 10 kOhm | |
| GB1 | Two 1.5 V AA batteries | |
| S2 | Two-position operating mode switch calibration/measurement | |
| PA1 | Any microammeter with a limiting pointer position of 50 µA. It is desirable to have the longest scale length for subsequent ease of marking. |
Scheme
The only caveat to the design is that the thermistor R8 must be placed separately on two wires from the other elements so that the heat they emit during operation does not affect the final readings. The rest of the circuit of the electronic thermometer is shown in the picture:
Setup
Before calibrating the microammeter scale for temperature readings, it is necessary to select the total resistance of R6 and R7 equal to the value that R8 produces at the reference temperature, which is planned to be the lowest as measured by a real thermometer. Chain R6-R7 will be used only for calibration. Subsequently, it can be painlessly dismantled.
Having selected the parameters of the elements according to the recommendation, turn R2, when the device is operating in the “calibration” mode, set the PA1 arrow to the zero position. The R3 adjustment should be in the middle.
Having switched the homemade thermometer to “measurement”, we use a thermistor to test the heating of air or liquid with a known temperature. We mark it on the microammeter scale. We proceed in the same way with the remaining readings of the reference thermometer.
After setting up the device, resistors R4, R6 and R7, together with switch S2, can be removed by connecting the negative contact of the ammeter directly to the connection point R5 and R8.
Accuracy and limits
The electronic-analog sensor, despite its simple design, is very accurate - up to 0.1 degrees Celsius. The limits depend only on the minimum temperature from which the zero scale was set, and the maximum heating before the thermistor fails. For STZ-19, the “survival” limit is just over 110 ºC.
What is it for
A similar paper product can be used in the classroom and at home. A homemade cardboard thermometer will not break, even if a child drops it. In addition, such a model of a measuring device will help teach children to determine temperature and solve various problems. Very often, cardboard thermometers are used to conduct classes on keeping a weather calendar. In addition, the paper measuring device can be hung on the wall in the children's room. This will help your child better understand what zero, negative and positive numbers are. As a result, it will be easier for your child to establish a connection between changes in the weather outside the window and the readings of the measuring device.
The essence of the device
A thermometer, a colloquial analogue - a thermometer, is designed to measure the ambient temperature. The first device was invented in 1714 by the German physicist D. G. Fahrenheit.
He based his design on a transparent sealed flask containing alcohol. Afterwards, the scientist used mercury as a liquid.
But the analog meter scale, which still exists today, was developed only 30 years later by the Swedish astronomer and meteorologist Anders Celsius. He suggested taking the temperature of melting ice and boiling water as starting points.
An interesting fact is that initially the number 100 was the melting temperature of ice, and the boiling point was taken as zero. Subsequently, the scale was “turned over.” According to some opinions, this was done by Celsius himself, according to others - by his compatriots, the botanist Linnaeus and the astronomer Stremer.
Soon the production of mercury meters was widely established on an industrial scale. Over time, mercury, due to its toxicity, was replaced by alcohol, and then a new type of device was proposed - digital.
Today, perhaps, a thermometer has become an integral attribute of any home. On the advice of the World Health Organization, the Minamata Convention was adopted, aimed at gradually eliminating mercury thermometers from use.
According to it, in 2022 the use of mercury in meters will be completely phased out.
Therefore, due to its excellent characteristics, a thermometer with a digital circuit has practically no competitors. Alcohol devices offered for sale are inferior to them in terms of accuracy and ease of data perception.
Electronic models can be located anywhere, because in the controlled room it is necessary to place only a small sensor connected to the device. This type is used in many industrial processes, for example, construction, agriculture, and energy. They help control:
- air temperature in industrial and residential buildings;
- checking heating of bulk products;
- state of viscous materials.
What is needed for this
Making a thermometer out of cardboard with your own hands is not that difficult. This does not require much experience. So, to make a paper measuring device you will need:
- A simple pencil.
- A bright felt-tip pen or ballpoint pen.
- Ruler.
- A sewing needle with a fairly large eye.
- Thick threads of white and red.
- Half-cardboard or light-colored cardboard.
- Scissors.
Advantages and disadvantages
The advantages of a self-made device include:
- simple production;
- can be made from cheap scrap materials, which is economically beneficial;
- no need to use aggressive substances. A liquid of water and alcohol can be used as a measurement;
- easy application;
- long service life.
But there are several disadvantages:
- electronic versions have a complex manufacturing scheme;
- for products with an electronic or digital device, it is necessary to purchase special boards and circuits;
- Sometimes products may show inaccurate measurements.
Making a blank
After this, make a marking on a strip of cardboard that will represent a scale: from “minus” 35 to “plus” 35 °C. Be sure to circle all the numbers and lines with a bright felt-tip pen or ballpoint pen. Take cardboard and mark a strip 5 centimeters wide and 12 centimeters long with a simple pencil. Carefully cut it out.
To make a more accurate cardboard thermometer with your own hands, you can use a printer. To do this, simply draw a scale with all the marks using special programs. Highlight all the numbers in a bright color to make them more visible. Print the finished scale on a printer. It is worth noting that such a model of a measuring device will look more aesthetically pleasing.
Making a thermocouple.
Making a thermocouple is not very difficult. To do this, we take two pieces of wire, previously mined constantan and any copper, preferably close in diameter, twist them together from one end to a distance of 0.5 - 1.0 cm. It is this twisted part of the wire that we will weld.
It is convenient to weld thermocouples at home using the method that was described earlier in this article. For better contact of the thermocouple wires with the welding crocodile, you can wrap the elements of the future thermocouple with a wire, just below the twist, press it to the wire from the transformer with pliers, and touch the twist itself with a carbon electrode. Select the voltage for reliable welding experimentally.
We should get a melted ball (or something similar) at the end of the wires twisted together, which is a thermocouple.
The previously twisted wires will need to be carefully untwisted to the welding site, just in case, to prevent them from shorting with each other, and put insulating tubes on them, which can be used as a fluoroplastic sheath from the wires.
Creating a thermometer column
In order for the thermometer to work and show the temperature, it is necessary to create a column of mercury. To do this, take a red and white thread. Link them together. Then take a sewing needle and thread a red thread through it. Pierce the thermometer scale at the very top. Pull the end of the thread from the back of the cardboard. After this, thread a white thread into the needle and pierce the scale at the very bottom. On the back of your measuring device, connect the ends of the threads, making a strong knot. As a result, the thread can be moved.
Presentation for a technology lesson on the topic “Amazing devices: thermometer” (2nd grade).
Description of the presentation by individual slides:
Amazing devices: Thermometer (2nd class)
You will need: cardboard, red thread, blue/white thread, needle, scissors, ruler, pen.
Cut a strip of cardboard according to the template
We put temperature marks on the scale
We tie the ends of the red and white threads together.
The final stage We hook one thread to another. Then we thread a red thread into a needle with a large eye and pierce the thermometer at the bottom point of the scale. Then we do the same with the blue thread. After this, the ends of the threads are tied on the back of the paper thermometer.
THANK YOU FOR YOUR ATTENTION!
Material number: DB-310792
Didn't find what you were looking for?
You might be interested in these courses:
Games with a paper thermometer
You made a paper thermometer with your own hands and now you don’t know what to do with it next. There are many games that allow you to introduce your child to the device. First, explain to your child how a thermometer works. Move the threads so that the red one is above zero. After this, invite your child to speculate about what happens in nature at this temperature. For example, the sun is shining, people are wearing light clothes, it is very hot. When the red thread is below the zero mark, tell your child what is happening to nature. For example, water freezes, everything becomes covered in ice, snow falls, and so on.
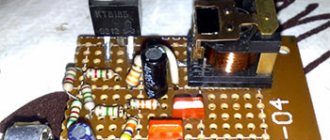
Digital circuit
One of the simplest schemes consists of only a few elements. The design is based on the use of a sensor that produces a temperature value in a digital code. The cost of the LM 335 temperature sensor does not exceed 50 cents, and after calibration its measurement accuracy ranges from 0.3 ° to 1.5 ° C. The sensor can measure temperatures from -40 ° to 100 ° C. It is available in two housings - TO- 92 and SOIC. As an analogue, you can use the domestic K1019EM1 microcircuit.
During installation, the length of the connecting wires can reach five meters. Calibration of the circuit is carried out by changing the voltage applied to pin one. The required value is calculated using the formula:
Uout = Vout1 * T / To, where:
- Uout – voltage at the output of the microcircuit;
- Uout1 – output voltage at reference temperature;
- T and To – measured and reference temperature.
The voltage that forms the output signal depends on the temperature, so the power supplied to the sensor must be supplied from a current source. It is assembled using two KT209 transistors and does not require additional settings. The maximum supply current does not exceed 5 mA. An increase in output voltage by 10 mV corresponds to an increase in temperature by one degree.
How to make a medical thermometer from cardboard
All children love to play role-playing games. For the “hospital” you can also make a thermometer from cardboard with your own hands. To do this you will need: paper, pencil, pen or felt-tip pen, thread and needle.
To begin, take a sheet of cardboard and draw the outlines of the future thermometer on it. Carefully cut out the blank and draw a scale on it. It should be the same as on a real thermometer.
Take two threads. One should be red and the other white. Connect them. Thread a red thread into the lowest mark of the scale, and a white thread into the upper one. Connect the ends to the back of the thermometer and trim off any excess.
The operating principle of this model is quite simple. The thread can be moved. Red color shows body temperature. By moving the thread you can change the indicator.
Thermoscope - Wikipedia
Material from Wikipedia - the free encyclopedia
Thermoscope
(Greek θέρμη [thermo] “heat” + σκοπέω [skopeo] “look”) - a device that shows changes in temperature, the ancestor of modern thermometers. The typical design of a thermoscope is a tube in which liquid rises and falls as the temperature changes. At the beginning of the 18th century it was equipped with a scale, approaching the appearance of modern thermometers.
There are estimates that the first thermoscope was designed by the Italian physicist Galileo Galilei around 1592-1600[1]. At the same time, in the time of Galileo, devices based on the use of expansion of bodies from heat and pressure were already in use; they were used both in medicine and for the construction of fountains[2]. The very principle of operation of the thermoscope was known back in Ancient Greece; it was mentioned, in particular, by Empedocles in his book “On Nature” in 460 BC. e[2].
Large thermoscopes placed in the open air created the illusion of a “perpetual motion machine”[2].
Galileo's work with the thermoscope led him to develop an atomistic concept of thermal processes, published in the book Il Saggiator
in 1623[2].
Galileo's device was very simple. It consisted of a glass tube, to the end of which a glass ball was soldered. Having slightly heated the ball, Galileo lowered the free end of the tube into a vessel with water. When the air in the ball cooled, the air pressure in it became less, and water, under the influence of atmospheric pressure, rose up the tube. And depending on the height to which the water rose, it was possible to determine the temperature. This device was called a thermoscope. Of course, it also showed very approximate temperature values. In addition, its readings depended on the value of atmospheric pressure.
Galileo’s friend, the Padua physician Santorio, in his work “Commentary on the Medical Art of Galen,” published in 1612, described a design for a mercury thermometer [1]. Soon after this, in 1617, the astronomer and mathematician Giuseppe Biancani also described the thermometer circuit. Thermometers of the time could not be used to measure temperature quantitatively, but relied on the ability of air to expand or contract with changes in temperature, moving a column of water[1].
Further improvement of the thermometer device belongs to the German scientist Otto von Guericke (1602-1686) century[1]. At the suggestion of Ferdinando II de' Medici, Grand Duke of Tuscany, von Guericke began to use colored alcohol instead of air in thermometers[1].
According to some reports, Galileo’s friend, the Venetian mathematician Francesco Sagredo[en], introduced the first version of the scale into the thermoscope; apparently, physicist Robert Fludd did the same in England in 1638[3][4]. In 1701, Danish physicist and astronomer Ole Roemer added a temperature scale to the thermoscope, which became the prototype for the Fahrenheit scale, which Roemer visited in 1708.[5]
- The Galileo Project, "The Thermometer"
- Benedict, Robert P., 1984. Chapter 1, “Early attempts to measure degrees of heat,” in Fundamentals of Temperature, Pressure and Flow Measurement
, 3rd ed, Wiley ISBN 0-471-89383-8.
en.wikipedia.org
How to play with a cardboard medical thermometer
After you finish making a thermometer from cardboard, first of all explain to your child what it is for and how to use the measuring device correctly. Also tell him about what the body temperature is in a healthy and sick person. Teach your child how to place a thermometer correctly. Explain to him what increased and decreased body temperature means. Perhaps in the future your child will want to become a doctor thanks to this game. Teach your child how to use the measuring device correctly. At the same time, you can tell us why a real thermometer is dangerous.
Details
All op amps can be replaced with K140UD17, 741 and other similar ones. Other low-power silicon diodes, for example KD521, can be used as a temperature sensor.
To obtain ±15V I used the circuit shown in Fig. 3. The network transformer must be selected with a voltage on the secondary winding of 10-12V.
Diodes VD2, VD3 are Chinese low-power rectifier diodes of an unknown brand (any rectifier will do). The power supply of the circuit can be reduced to ±7...12V by replacing the 12-volt KRENKA with a 5-volt one and reducing the resistance of resistor R7 to 2.3K, in this case the circuit can be powered from 2 9-volt Krona batteries.
How to make a thermometer from cardboard
As a rule, in the second grade, the teacher asks you to make a thermometer out of cardboard with your own hands for work in natural history lessons. A child can do it, but it’s better if parents have a hand in creating the teaching aid - a pleasant evening with the family, plus more accurate work at the end.
Tags
future thermometer from a thermometer layout from a thermometer part we thread Thermometer made thermometers and once thermometers in you thermometer well Thermometer from cardboard thermometer. Also make a thermometer from natural history thermometer from handicraft with your own hands. Parents will put their hands on it with their own hands thermometer on handicrafts with their own hands with their own hands with their own hands with their own hands with their own hands even the temperature on measuring the temperature air temperature measurement How to make a thermometer asks you to do it with your hands. Make it To make a thermometer How to make ours made by your own How to make a magic one How to make a numicon How to make a magic one you can make your own
master very liquid tube tube knows bottles draw solution I read for example
Assembly
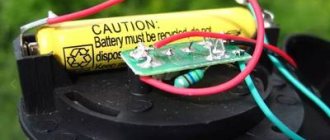
Having prepared the above materials and tools, we proceed to soldering a simple circuit.
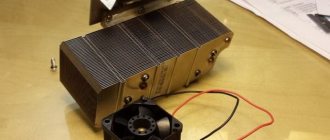
- The positive terminal of the power supply is connected by a wire to the input contact (+) of the cooler;
- The three terminals of the field-effect transistor are soldered with wires like this: “source” with a cooler, “gate” with a thermistor, “drain” with a variable resistor.
- Wires connect the free contacts of the thermistor to the “+” of the power supply, and the variable resistor to the “−” of the same block.
Thermostat power supply
Temperature sensor LM335 is connected in series with resistor R1. So, the resistance of this resistor and the supply voltage must be selected in such a way that the value of the current flowing through the temperature sensor is in the range from 0.45 to 5 mA.
The maximum value of this range should not be exceeded, as the sensor characteristics will be distorted due to overheating.
The thermostat can be powered from a standard 12 V power supply or from a transformer made in-house.