Today I will tell you how to make a DIY coconut microphone that records studio-quality sound. This microphone has an audio card and MEMS microphones, so when connected to a computer or laptop, the sound recording is studio-quality.
The reason I made this desktop microphone was cost; mine turned out to be 12.5 times cheaper than the store-bought one.
First way
Making a microphone out of old headphones is the most economical way out of the situation. Upon completion of the work, you will be able to receive not only a new device, but also breathe life into “junk” that no one needs. First you will have to do some soldering work.
- Take a two-core wire and solder it to the Jack plug. To do this, use a well-heated soldering iron and solder. Carefully treat the surface of the wire intended for soldering with rosin, then apply a little solder and wait until it hardens. Make sure the wires are securely connected and proceed to the next step.
- On the headphones, find the black box with the “answer” button and carefully disassemble its body.
- Once you have access to the inside, look for the small microphone provided by the developer for taking calls. Use the soldering iron again and connect the bare end of the two-core wire to the microphone.
- Apply a small amount of solder in such a way as not to damage the device.
- Reassemble the box in reverse order - now you have a full-fledged headset. Of course, you can move the microphone out of the plastic case, but then the headset will look sloppy.
If you strictly followed the instructions and did not overdo it with solder, which could cause a short circuit at the solder points, then when you connect the headset to the laptop, you will hear light clicks. This means that the microphone is working normally.
DIY microphone stand
As a rule, expensive and high-quality microphones are bought for serious work or a hobby, be it professional sound recording, broadcasting or hobby vocals.
In the vast majority of cases, for comfortable work and for maximum access to the sound source, you have to additionally purchase a special stand for such microphones. Now we will tell you how to make a tabletop microphone stand at home.
How to make an amplifier
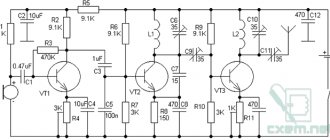
The simplest unregulated preamplifier can be made using 2 capacitors and 1 BC547 transistor.
To assemble the circuit using the surface-mounting method, you need:
- connect the negative output of the electret capsule directly to the emitter of the transistor, and the negative output to the collector through 2 resistors of 1 kOhm each, connected in series;
- Solder a ceramic capacitor parallel to the positive and negative outputs of the capsule (capacitance is not important);
- parallel to the second resistor and the emitter of the transistor, solder a 47 mF electrolytic capacitor (the minus should be on the emitter);
- Wires leading to the output plug are soldered to the collector and emitter of the transistor.
If you couldn’t find BC547, no problem. It can be replaced by the domestically produced transistor KT3102, which is easier to find.
Manufacturing procedure
To make it easier for you to navigate, look on the Internet for photos of a homemade microphone or a standard electret microphone (“lapel”).
- To make a microphone body, you need to cut off the tip from the syringe body with a knife. You can erase the markings on the syringe with a solvent;
- Insert a wire through the cone of the syringe and tie a knot at its end to secure the microphone in the body;
- Solder the electret capsule to the wire from the node side - connect the shielded braid to its body;
- Install the capsule into the body, and secure the cone with the eye of a stationery clip;
- Solder the second end of the wire to the plug, additionally connecting the left and right channels together;
- Make a narrow round hole in a piece of foam rubber for the microphone. You can cut off any excess corners with a knife - this way you will get a decent windproof cap.
That's it, your homemade microphone is ready! You managed to create a sensitive measuring microphone with your own hands, which is also good for communication.
A little theory
The audibility of a conversation is influenced by quite a few factors, mainly atmospheric ones:
- wind;
- the sound of rain, leaves;
- the position of the overheard interlocutors - whether they are facing each other or located parallel;
- the volume of the conversation itself.
It has been established that the volume of a normal conversation of 60 decibels, after traveling a distance of 100 m, is attenuated by an average of 40 dB. To hear what they are saying, directional microphones with high threshold sensitivity were invented.
There are 4 types of such devices:
- Parabolic , the most famous, where the sound is captured by an antenna in the form of a parabola with a diameter of 20 to 50 cm and focused at its center, where it is picked up by a microphone standing there. The larger the antenna, the higher the sensitivity of such a device. Despite the simplicity of the design, it also has disadvantages. It is too bulky and noticeable and has poor selectivity.
- Microphones using the traveling wave principle or tubular consist of a tube with a diameter of up to 30 mm, in which slits are cut in a circular manner along the entire length. Sound waves entering the slots are then summed up by a microphone. The longer the tube, and its length can reach up to a meter, the higher the selectivity and sensitivity. Sometimes they are mounted in an umbrella or cane.
- Phased array It is a plate, in certain places of which up to a dozen microphones are mounted. Or sound guides, the signals of which are added up in an acoustic adder. Devices of this type are compact and can be placed under clothing or disguised as a case. Disadvantage - cannot pick up sound from long distances.
- Gradient, presented for sale by first-order devices. Professional, secretive, miniature. Consists of two microphones standing next to each other. The sound signal is not summed, but subtracted in the direction of arrival of the signal. Higher order systems are not for sale.
There is also such a rare variety as organ or resonant microphones . The design consists of up to a dozen tubes of various lengths and diameters. Each of them captures sound in its own range, and then it is summed. But this is a cumbersome and low-effective technology that is not very popular.
Whatever the type of device, the signal from the microphone goes to the amplifier, and from there to the headphones or recording device.
Small details
When testing the first pair of microphone capsules, it turned out that their frequency responses differed too much. In anticipation of market day, I even assembled a small stand for testing microphones without the use of soldering. I bought a few more capsules for $0.4 so that I had plenty to choose from. But the very first pair taken from this purchase turned out to be consistent in frequency response. I didn't experiment anymore.
January 21, 2012 (13:24) in Audio - Video, Budget photography, Do it yourself
Schemes for tangram for February 23
Which boy doesn't like to play soldiers and war games? Especially on such a holiday - Defender's Day.
Let's combine this game with development!
I know from experience that it is not so easy to persuade children to solve logic problems. This is both useful and necessary... but they are bored(((
Therefore, at one time I had to show miracles of ingenuity during classes with my son. He adored cars and soldiers, but was indifferent to other topics. And in order to interest him, I “translated” everything into the language of war and technology.
For example, he would never assemble bunnies and houses from a tangram. And most of the diagrams in this puzzle are exactly like this(((So I specially for him remade the standard diagrams into pictures from a military theme.
And lo and behold, things worked out!
Now I have converted the diagrams for the Tangram, which I drew by hand, for the computer and am sharing them with you.
The file at the link below contains 14 diagrams of figures of soldiers, weapons and military equipment, which must be assembled from Tangram parts.
6 soldiers, 3 pistols, 5 pieces of equipment.
The complexity varies - there are some that are quite simple, and there are some that are complex that you will have to think about.
Assembly steps
To assemble the device, you will need to perform the following steps:
- cut off the ends of the marker body so that you get a hollow tube;
- solder a two-wire wire to the capsule;
- wrap the capsule with 2-3 turns of electrical tape (this is needed for better fixation in the case) and insert it into the tube so that the wire comes out on the other side;
- Solder the opposite end of the wire to the 3.5 mm plug.
How to make soundproofing
If you plan to use the microphone to record voice, soundproofing will not hurt. It is made from special foam plates, which can be bought at a hardware store, and plywood.
For this:
- a rectangular box without 1 wall is made from plywood;
- The inside is covered with foam rubber plates.
During recording, the microphone is placed inside the box. A person is also located there. As a result, 80-90% of extraneous sounds do not make it onto the audio track.
If you don’t want to make a box, you can cover one of the corners of the room with foam rubber plates. Sound insulation will be somewhat worse.
Master class on making a paper microphone at home for children
Children also want to play with the microphone. But you shouldn’t trust them with it – they might break it. Therefore, it is better to make an imitation of a paper product.
To do this you need:
- make a tube out of cardboard;
- crumple a ball from sheet A4 and wrap it with colored film or paper;
- stick the ball onto the end of the tube;
- Glue a thick thread simulating wire to the opposite end.
What will you need?
Lamp on a clamp - can be purchased at any electronics store. Attention: the mass of the lamp must match the mass of your microphone, otherwise the microphone on a weak clamp will easily fall under its own weight.
The holder depends on the type of microphone you have: for a dynamic microphone, the holder can be purchased at a price of 250 rubles, for a condenser (spider type) - at a price of 500 rubles.
It is possible to find and purchase an adapter for a microphone holder for easier installation on a clamp.