Currently, pheasants are gaining increasing popularity as poultry for breeding. They are not only beautiful in appearance, but also have tasty and nutritious meat. One of the important conditions for the successful keeping of these individuals is the creation of an enclosure for pheasants. This structure must correspond to all the characteristics and preferences of these birds. Therefore, you need to know how to choose the right dimensions for making a pheasant enclosure, what material is best used for these purposes, and what tools are required for the job.
General requirements
Pheasants are very large birds that are not able to stay in a fenced area, like chickens, for example. Due to their impressive size, they require a fairly large area.
These birds do not like crowding, so the pheasant enclosure must be built taking into account that each individual has enough space to move. It is also worth paying attention to the fact that pheasants are very shy, so this fact should be taken into account when constructing an enclosure.
A properly designed pheasant enclosure looks like this:
- It is located on the sunny side, on sandy dry soil.
- The top of the structure is covered with a nylon mesh or made of ropes.
- Inside the enclosure it is necessary to place stairs, decorative driftwood, greenery and bushes.
- There should be grass in the grazing area. If it is not present on the site, then it must be sown.
- Additional heating systems should also be located inside the structure.
- For golden or diamond breeds of pheasants, individual houses must be placed inside the enclosure.
- The back of the enclosure should be closed so that the birds can have privacy and rest.
- Separate zones should be allocated for adult birds and young animals.
Options
A standard pheasant enclosure is a wooden or metal frame covered with mesh around the perimeter. Often a wooden shelter is added to one side of the enclosure where the birds can hide, or the back wall is made entirely of boards.
Some poultry farmers prefer to use a polycarbonate greenhouse as an aviary, the front and back walls of which are covered with chain-link mesh. Installation of such a structure takes a minimum of time, it is very convenient for birds, and it is always dry and light enough.
The enclosure may not have a roof at all (a mesh is stretched), or it may be made of slate or tiles. If the enclosure is without a roof, then small gable slate canopies are installed inside the enclosure, where pheasants can take shelter in bad weather, or small booths are placed.
Aviary dimensions
The size of the structure will depend on 2 main indicators: what kind of bird breed will be bred, as well as how many pheasants will be kept in the house. We offer a standard calculation of the size of an enclosure for pheasants. You will have to create the following structure with your own hands:
- But one adult must have at least 1.5 m² of territory. A pair of birds will require at least 10 m² of space.
- The height of the structure must be at least 2.5 m. Thanks to this, the chicks will be able to acquire flight skills while being in conditions of limited movement.
For example, to keep 10 pheasants, you will need a poultry house with a total area of at least 15 m² and a height of at least 2.5 m.
Conditions of detention
Pheasants require birds when it comes to maintenance conditions. They are much more difficult to breed than geese or chickens. These birds are very shy and will leave at the slightest threat. Some breeders have cut the wings of young birds to prevent them from escaping, but these birds are much worse; they take and gain weight poorly. Therefore, the only solution is to build an enclosure in which the pheasants can fly away if threatened.
Volumes depend only on the number of birds. An aviary requires at least 2 m2 for one bird and 9 m2 for a pair. There are no strict height requirements, but the bird must fly upward safely and the breeder must enter the cage and perform all activities inside.
Birds tend to forget about folding eggs. Therefore, if you choose pheasants that are built on tree slots, make sure that you can easily find the slot without additional devices.
The volordinary system should mimic the natural racing environment. However, gold and diamond prospectors prefer to hide in low bushes and trees. It is advisable to spill sand on the floor where birds can get rid of parasites. Each enclosure must have a separate caramel and apartment. And during the nesting period, it is important to add various twigs, reeds and grass so that the females can create a cozy environment for hatching.
In winter, birds should be transferred to a separate warm mirror with thick walls or an additional heat source. There must be a mandatory separate fence for families in your salon, otherwise the constant struggle will turn there.
How to build a pheasant enclosure
Making a poultry house for the birds described is not a particularly costly or troublesome undertaking. However, the shelf life and quality of a home-made pheasant enclosure will depend on how good the materials are for its manufacture, as well as how correctly the sequence of all actions will be followed during construction.
Necessary materials
To build a standard enclosure, you will need the following materials:
- Varnished or galvanized mesh. Thanks to this special coating, the material provides the enclosure with additional protection and is also protected from rust. The size of the mesh cells should be no more than 1.5 x 5 cm. Otherwise, tits and sparrows can get through the large holes into the pheasant enclosure, photos of which you can see in this article, and steal food. It is also very common for ferrets, weasels and other pests to sneak into poultry houses. Pheasant chicks can also get out through a large net, after which they will become easy prey for predators.
- Rope or nylon mesh. With its help, the ceiling in the poultry house is installed. The cells of a nylon or rope net should be no more than 2.5 cm. On average, the shelf life of such material is from 5 to 7 years, after which the roof will need to be replaced.
- Slate, tiles or metal sheets for the roof. If you are installing a gable roof, you will additionally need to use rafters. And for a single-pitched roof type, sheathing will be required.
- Metal or wooden beam for the frame. You can also use concrete pillars, which will make the frame more durable, but the costs will be higher. In addition, wooden boards will be required for the construction of houses, poles, separate recreation areas, as well as perches.
- Sand and cement. These materials are necessary to pour the foundation. Sand is laid on top of the finished foundation as the base soil.
- Staples, nails. They are necessary to secure the frame and mesh.
- Slaked lime, paint and varnish.
- Gravel, which is used as an additional soil layer.
Please note that when purchasing materials, you must take into account the size of the pheasant enclosure. As for the financial costs of making a small enclosure, which will contain from 5 to 8 individuals, they amount to about 3000-4000 rubles.
Step by step instructions
Excavation:
- Select a plot measuring 30 x 6 meters.
- Mark a trench for the foundation measuring 25.2 x 4 meters. Check diagonals.
- Dig a trench 20 cm deep and wide.
- Mark places in the trench for piles in increments of 2.1 meters in length and 2 meters in width.
- Drill holes with a drill with a diameter of 15 cm and a depth of 1.5 meters.
Reinforcement and concrete works:
- Tie 28 reinforcement frames of piles from three vertical rods with a diameter of 10 mm and 5 triangular clamps with sides of 10 cm each.
- Insert reinforcement cages into the drilled holes.
- Install foundation formwork from 40 mm thick boards along the dug trench to a height of 20 cm from the ground. Cover the sides of the boards facing the inside of the trench with film.
- Make rectangular clamps measuring 15 x 35 cm from reinforcement with a diameter of 6 mm.
- Tie the reinforcing frame of a strip foundation (crossbar) with a rectangular section of 15 x 35 cm, placing 3 reinforcing bars with a diameter of 12 mm on the bottom side of the frame, and 2 reinforcing bars with a diameter of 10 mm on the top side. The pitch of the clamps on the frame is 30 cm.
- Tie the vertical pile rods protruding from the wells to the crossbar frame.
- Prepare embedded parts for installing frame columns in the form of square plates made of sheet iron 8 x 120 x 120 mm with “whiskers” welded to them on one side of 4 reinforcing bars with a diameter of 10 mm and a length of 300 mm. The free ends of the “whiskers” should be bent by 50 mm.
- Mark on the formwork the places where the embeds will be installed in increments of 2.1 meters along the long sides and 2 meters along the short sides of the formwork.
- Using a concrete mixer with a pear volume of at least 180 liters, prepare concrete with a composition of 1: 2: 3 (cement: sand: crushed stone). Fill the piles and strip foundation formwork with concrete, vibrating the concrete mixture.
- Install the embeds into the fresh concrete mixture, placing them all in the same horizontal plane.
- After three days, remove the formwork. Remove and remove the plant soil inside the foundation. Bring sand inside the foundation. Compact the sand cushion 15 cm thick with a vibrating plate. Bring sand onto the compacted sand bed and level it flush with the foundation.
Welding work:
- Cut profile pipes 3 x 80 x 80 mm into racks 2 meters long.
- Mark the axes of the racks on the embedded parts of the foundation.
- Weld the racks to the mortgages.
- Weld the top trim of the racks from a 3 x 80 x 80 mm pipe around the perimeter.
- Make half-trusses from a 2 x 50 x 50 pipe, 1.5 meters high, 4.5 meters long with additional racks inside and braces.
- Install the half-trusses onto the top frame of the posts, placing each one above the post.
- Connect the half-trusses together with crossbars made of a 2 x 25 x 50 mm pipe, placing it “edge”.
- Weld inserts from a 2 x 50 x 50 pipe between the frame posts to install window and door frames, supports for covering the frame with metal profiles, polycarbonate, OSB-3.
- Make window and door frames from pipes 2 x 50 x 50 mm. Provide openings for feeders at the bottom of the doors.
- Install window and door frames into the frame on metal hinges. Doors must open into sections.
- Weld the frames of the section partitions.
Roof:
- Cover the roof with a metal profile.
- Cut windows measuring 0.7 x 2 meters in metal profile sheets.
- Cover the windows with polycarbonate, sealing the joints.
Walls:
- Sheathe the bottom of the walls from the outside with sheets of metal profiles to a height of 1 meter on three sides of the frame.
- Sheathe the bottom of the walls and partitions with OSB sheets (OSB-3).
- Install mesh on the top of the walls and partitions.
- Cover the side wall slopes and blind transoms above the windows and doors with polycarbonate.
Windows, doors, ceiling:
- Cover installed windows and doors with polycarbonate.
- Attach a polycarbonate ceiling to the semi-trusses.
- Spring the doors.
Additional work:
- Make and install feeders, houses, perches.
- Install water supply in sections and install nipple drinkers.
- Perform work on lighting the enclosure.
Laying the foundation and preparing the soil
The top layer of soil must be cleaned and removed, after which a layer of slaked lime should be sprinkled on the cleaned area, which should be no more than 2 cm. This procedure is required in order to disinfect the future poultry house.
Next, you need to prepare the foundation. To do this, the necessary markings are made on the ground, and a ditch is dug along the perimeter of the future poultry house, the depth of which should be no more than 70 cm. After which, a solution should be prepared for which cement and sand are mixed in a ratio of 1:4.
You need to lay the beams in the dug ditch and pour the prepared solution on top. It should be noted that the width of the beam should not be too small compared to the width of the ditch itself. The drying period for the foundation ranges from 2 to 7 days. This will depend on weather conditions.
Protecting wooden parts from rotting
Wooden supports, beams, boards must be protected from adverse weather conditions (moisture, snow, sudden temperature fluctuations). After installation of the structures, the wood is painted with moisture-proof resin-based paints. Wooden materials can be impregnated with impregnation or varnished.
It is recommended to pre-treat the wood with a primer, which protects the surface from the development of mold and fungi and improves the adhesion of the paint to the base.
Installation of the main frame
Posts for the frame are installed on the finished foundation and carefully fixed into the ground. These supports must be immersed in the ground to a depth of at least 40 cm. It is important to ensure that the front support posts are buried a little deeper, and the rear ones less, for example, 60 and 50 cm, respectively. Support posts are installed in the center of the enclosure, with the help of which the mesh will be protected from sagging.
After this, the mesh should be pulled over the installed frame and secured with brackets. It is important to note that all sharp ends of the brackets must be bent, since frightened pheasants can be seriously injured.
Lathing
Speaking about how to make an enclosure for pheasants, it should be noted that after installing the main frame and covering it with mesh, it is necessary to install the roof of the house.
If you are planning a single-pitched roof with a slate covering, then the sheathing must be stretched over the entire area. To do this, beams are attached along the entire perimeter on top of the installed support pillars, after which one additional beam is fixed transversely to the central support, and the other is fixed longitudinally.
Metal sheets or boards should be nailed to these beams. Slate must be laid on top of the resulting sheathing, which is fixed using special slate nails.
Calculation of financial costs
To build a pheasant house measuring 3x3x2.5m, with a pitched slate roof and a wooden back wall, you will need:
- beams 50x50 mm 3 m long. You will need 10 pieces for the frame, 8 for pouring the foundation and 6 for the sheathing. Price ≈ 1080 rub.
- boards 10 cm wide, 6 m long, 20 pcs. Price ≈ 1500 rub.
- 8-wave slate 6 pcs. Price ≈ 1440 rub.
- 27 m of galvanized chain-link mesh. Price ≈ 1620 rub.
- cement 2 bags ≈ 480 rub.
- sand 4 bags ≈ 200 rub.
Building a full-fledged farm takes a lot of time and effort, so compact enclosures are most often built
Having calculated the above costs, we find that the approximate cost of a pheasant farm will be about 6320 rubles.
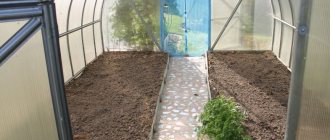
Floor preparation
To successfully keep pheasants in an enclosure, the area should be covered with clean river sand, which is mixed with gravel. Grass is sown on top of this layer, driftwood is installed, as well as a ladder. You can also build a hut from tree branches and install bird houses for rest.
Additionally, boxes filled with ash are also installed, where birds can clean themselves of dust and bathe. At the same stage, feeders and drinking bowls for individuals are built. Green plants can also be placed in the enclosure.
DIY bird cage
If it is not possible to build a spacious enclosure, then you can get by with a cage - it is slightly smaller in size. The cage can be built either from improvised means or from ready-made elements of a fence, lattice, or mesh. For convenience when carrying the cage, you can make handles on the sides. If you want to leave the opportunity to stack several cages on top of each other, then the doors in the cages should be made from the front, and not from the top.
Cages are also used for catching pheasants. In this type of cell, as a rule, one wall is completely movable, with a quickly closing mechanism. Simple cages are also used to transport birds. Such cells are usually small in size. They can be bought ready-made.
Important! If the aviary or cage is not made correctly and is not protected from predators, then a cat, dog, ferret, mink, marten, fox can get into it, and then your bird will die.
Aviary treatment
In order to prevent rotting of the wooden frame, the wood must be additionally processed. For these purposes, it is best to use an antiseptic made from bitumen and diesel fuel. It is prepared as follows:
- Bitumen must be placed in a bucket.
- Heat the product to a boil, then remove from heat.
- Add diesel fuel to the liquid in small portions.
The amount of diesel fuel is uncertain, but it should be enough so that the cold bitumen still has a liquid consistency. In this case, you need to pay attention to the fact that it is hot antiseptic that is used to treat wooden products, since it is much better able to penetrate into the structure of the wood, to a depth of almost 7 cm.
After processing, wooden products must dry, which will take 24-36 hours. After this, the structure is treated with oil paint.
Please note that the use of nitro paints and nitro varnishes in this structure is strictly prohibited.
Before applying oil paint, the wooden frame must be primed so that there are no drips left on it. Small gaps are needed on the back wall of the enclosure, which should be entirely made of wood. These birds are not afraid of drafts; on the contrary, they love fresh air.
Features of aviary care
The basic rule of any poultry house is cleanliness. No matter how equipped and modern the pheasant enclosure is, if there is dirt in it, the pets will feel very bad, and there will be a risk of various diseases and viruses. The rules for caring for a poultry house are as follows:
- Water bowls, feeders, houses and perches should be washed regularly and treated with special disinfectants, for example, sodium hydroxide or slaked lime.
- Sand must be replaced at least once every two months.
- Particles of down and feathers, droppings should be removed from the house daily.
- Sometimes small rodents make their way into the enclosure through a damaged or sagging mesh. To protect the poultry house from such enemies, it is best to use mousetraps.
- In order to prevent parasites in the poultry house, the inside of the boards is covered with a lime layer. Lime is absolutely safe for birds, but it can also prevent the growth of bacteria.
- Disinfection and general cleaning of the entire poultry house should be carried out annually in the summer.
In conclusion, it is worth noting that the construction of an enclosure for pheasants is considered a very labor-intensive process. But even a person inexperienced in this matter can cope with the construction of the said poultry house.