Home › Types of bicycles
Drift triking is an extreme sport on a tricycle. It's more of a passion than a direction. However, drifting is very dangerous, and it is not always possible to find a tricycle for it. And high-quality and branded models are very expensive.
Bikes for drifting and their differences
The main differences between these bicycles can be identified:
- Unusual design;
- The presence of three wheels;
- Low seat position;
- Use only for drifting - controlled skidding.
Design Features
Features of drift bikes:
- The front wheel is small. Unlike regular bicycles, this product has a medium front wheel. Its diameter is approximately 20 inches. It is the same as on BMX trial models;
- The rear wheels are six times smaller than the front. The size of their width can exceed the diameter at most twice. The important thing is that they are made of hard and smooth material. It is worth considering that the rear rollers do not have rubber tires;
- Low seat. These bikes have a very low seat position. The rider can adjust and set the most comfortable position for the seat. In a homemade bicycle, you can use a regular car tire as a seat;
- As a support for the legs, you can use a special support, which is installed on the front fork near the axis of the front wheel. This support can also be used to control the bicycle while moving.
No pedals needed
And for lifting, it is best to use the assistance of a car. To do this, you simply need to hook the bike using a cable to the back of the car. If you pedal on a drift trike, you can accelerate to a maximum of 25 km/h. This is a very low speed.
In order to perform exciting stunts on a three-wheeled trike, you need to accelerate to 60 km/h. Many cyclists on a special drift track on this bike make peculiar movements in the form of snakes, or fall on their side. It's certainly dangerous, but it's worth it.
Drift cars with engine
A drifting machine called the Big Wheel Drift Trike is manufactured by an American company called SFD Industries. This company mainly specializes in the production of spare parts for bicycles.
Design features of the drift machine:
- Engine. Compact gasoline engine. Its power is 6.5 hp;
- Front wheel. The front wheel size is 26 inches;
- Rear wheels. They are very small. The diameter of each wheel is 3.5 inches. In addition, they are dressed in special replaceable plastic tubes. This is necessary so that the rollers do not wear out when sliding.
It is also worth noting that the cost is very high. The average price of a trike with engine can reach up to $2,000. If you pay an additional $200, you can purchase a trike with a more powerful motor. And with an additional payment of another $200, the entire throttle system will be replaced.
The relation of law to whim
In Russian legislation, a trike for drifting refers to ordinary bicycles. The traffic rules do not differentiate between tricycles and two-wheelers. Therefore, this vehicle does not need to be registered. As for driving licenses, they are also not needed.
Homemade drift trike
They mostly use regular children's tricycles or BMX cross-country bikes. Before production begins, drawings of the future model should be developed.
Drift trike - drawings
In order to correctly and accurately assemble the entire structure, it is necessary to make a drawing. On the drawing you need to accurately outline the entire structure of the bicycle and indicate the approximate dimensions. The pictures below show sample drawings. Of course, you can make it yourself and specify your dimensions.
How to make a drift bike - detailed instructions
After making the drawings, you can start making a drift bike.
Step-by-step manufacturing instructions:
- First you need to prepare the basis of the entire structure. Any old tricycle or beat-up BMX with 20-inch wheels will work just fine. You only need the front part along with the wheel, fork, handlebars and a piece of the frame with the down tube of the front triangle. The seat tube and upper rear seatstays need to be sawed off to the very base. But the lower feathers must be left in place;
- A board or ordinary plywood is installed on the lower stays. It is best to install the material stronger so that it can withstand heavy loads;
- Making the frame. Strong pipes with a diameter of 16 and 30 mm are suitable for this;
- After the frame is ready, the rear wheels should be made. For these elements, you can use ready-made small wheels from carts, or make them yourself, for example, cut them out of wood. The rear wheels must have the following parameters: the width and diameter must be 2.5 inches each. It is advisable to put a piece of PVC pipe on the rear wheels. With the help of this material, the rollers will glide better and their movements will be smooth and fast;
- To create a foot rest, you can weld two pieces of pipe to the fork legs;
- At the end, you should make a comfortable seat. You can use a plastic chair or a car tire for it.
You will also need the following tools to assemble the entire structure:
- Hammer;
- Hacksaw or grinder;
- Pipe bender It is needed during frame assembly. Using this tool, you can bend the pipes in the corners in the form of arcs to secure the entire structure well;
- Welding machine. This tool is useful for welding pipes and fork legs.
Where is the best place to buy spare parts?
In principle, to independently assemble this bicycle you will not need any supernatural and expensive spare parts. Many people have everything they need at home.
Parts such as pedals or wheels can be purchased at bicycle parts stores. But boards and pipes are best purchased at construction stores.
Reviews from cyclists – is it worth it?
Repair and service
A self-made bicycle will not require any special repairs. If, suddenly, something breaks, you can always do it yourself. For example, change the wheels or change the protection on the tires.
If the bike is for drifting, a branded one, then in this case everything will be more complicated. If breakdowns or malfunctions occur on this bicycle, it is best to contact a specialized bicycle repair center.
Buying a trike and accessories
If you don’t have the desire or ability to make a trike, you can buy one. You can purchase this product in bicycle supply stores or order it through websites on the Internet. Very often, stores sell branded and high-quality trike models.
Review of the best models
- Big Wheel Drift Trike. These models are popular in drifting.
This is probably the best invention in the field of drifting. The entire structure is made of the most modern elements. The frame is made of light alloy steel. In addition, an engine with a power of 6.5 hp is installed at the front. The rear wheels have a PVC coating, which ensures perfect gliding during skidding. In addition, the front fork has a comfortable footrest. However, there is one drawback, which is the cost - it is very high. But it is really worth it, with such qualities and functions; - Verrado is a tricycle for drifting. This is an electric tricycle from Local Motors.
The model appeared not so long ago, but is gaining great popularity among branded tricycles. The construction of this tricycle is very durable and high quality. Thanks to the front wheel from a BMX bike, the tricycle is stable on skids. At the rear there are two 5-inch wheels, with a special protective coating made of PVC material. An electric motor is installed behind the seat, which ensures precise and smooth movement. The motor power is 500 watts. The battery has a long service life, one charge lasts for 12 kilometers; - Triad drift bike. This model is made of high quality material.
The entire structure is very strong and durable. The frame is made of steel and is designed for heights from 160 to 180. The rear wheels have special protection, which ensures perfect gliding on the road during a skid. The entire structure has a fairly small mass of about 10 kilograms, so skidding on it is very simple and convenient.
Drifting is an exciting and at the same time dangerous activity that requires great responsibility and care.
To get started, you should purchase a three-wheeled trike. Of course, branded models are very expensive, so it’s not always possible to afford a high-quality and branded three-wheeled trike.
In this case, you can make it yourself. The manufacturing process is not that complicated, the most important thing is patience and good imagination. Then you can make a high-quality and durable drift bike.
DIY drift trike. Detailed instructions Link to main publication
Source: https://veloinsider.ru/vidu/drift-trajk-svoimi-rukami-podrobnaya-instrukciya.html
Recommendations
The joints of the frame parts must be reinforced with gussets made of sheet steel. To make the design more correctly, it is advisable not to limit yourself to simple drawings, but to use large-scale models.
It is immediately necessary to provide attachment points:
- engine;
- shock absorber;
- seats;
- fuel tanks;
- pendants
It is advisable to install the engine so that there is a free flow of air around it. This rule is important even when water cooling is used.
You should definitely take care of the appearance of the vehicle. An elegant, attractive appearance is often created through chrome surfaces and individual parts. To make using a tricycle more comfortable, it can be equipped with fog lights, speaker systems, and so on.
The front part is often made on the basis of silent blocks. The rear main rail is equipped with fasteners that support the body. It is advisable to use tractor generators as a source of energy in electric tricycles. The gearbox and axle shafts can be bored to size on a good lathe. The installation of an electric motor capable of pumping additional air will help prevent overheating of cylinders made of aluminum.
Craftsmen never cease to amaze with their ideas; each homemade product is unique and one of a kind.
Drift Trike - drifting accessible to everyone
My friends and I are promoting pit bikes and motocross throughout the entire post-Soviet space. The reason for all this was the fact that today’s youth are completely bogged down in all sorts of gadgets, and have completely forgotten how to have fun in real life.
A very creative team of active guys gathered around me. We shoot videos, have crazy parties, travel, get involved in all sorts of adventures and try to live to the fullest. After all, a pit bike is an affordable motocross, with its own pleasant nuances. It's easy to transport, cheap to repair and a lot of fun.
The concept of building a drift trike came from a similar principle. Drifting is a lot of fun and cool.
But for this you need to build an expensive drift car, and not everyone can afford it, and even to learn how to drift, you need large empty asphalt areas, of which we have very few.
But there is a way out of every situation. The goal was to combine drift, pit bike and bmx to make it as accessible, simple and fun as possible.
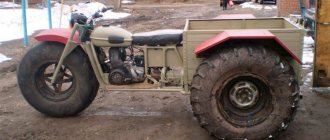
I would like to say a special thank you to the engineer of our team, Andrey Murashev, who was very competent in implementing our idea. The basis was taken fork, stem, and front wheel from bmx. Next, Andryukha calculated and made a frame so that the engine from a pit bike would fit, and the center of gravity would be as low as possible.
The engine chosen was 125cc with a semi-automatic gearbox. The rear wheels were used from a go-kart with some modifications. It is very important that we selected spare parts and materials ourselves to be confident in quality and reliability.
In fact, the project was quite risky, because there were 2 options for the development of events: either it would be very cool, or nothing would work out and the money would be wasted.
But those who don’t take risks... then I think you know =)
And then the moment came when all the work was completed! We loaded the trike into my car and drove to our Vidnovskaya parking lot, where scrapers and onlookers hang out in the evenings.
As soon as we settled down and unloaded, our drift trike attracted the attention of everyone around us. The first attempts at skating were extraordinary, the smile never left our faces.
How easy and interesting it was to ride sideways. From the outside it looked very unusual; people around me filmed it on their mobile phones and asked what it was.
The ride was so exciting that we, like children, reluctantly shared this toy. As a result of 5 hour-long rides without a break, no production problems were revealed.
The drift trike is so economical that we couldn’t even get 5 liters of gasoline.
A week later we found ourselves at the Slammest low car exhibition, taking place in Sokolniki, with our drift trike. Participants and passers-by were delighted with our invention. Everyone who passed by was sure to take a photo or ask to sit.
People like it and we are confident that we are at the origins of a new culture.
Many people want to have the same fun with us, and we are already accepting orders for production. Filming is in full swing, we will soon delight you with a high-quality video about our drift trike. So guys, nothing is impossible, believe in yourself, in your ideas, you need to act and you will definitely succeed
Specifications
- Engine: YX125cc
- Cooling: air-oil
- Fuel supply system: mikuni vm 22 carburetor
Maximum power: 11 hp
- Engine displacement: 125 cm3
- Gas distribution system: mikuni vm22 carburetor
- Ignition type: CDI
- Transmission:
- Number of gears: N-1-2-3-4
- Rear wheel drive: chain
- Clutch: semi-automatic in oil bath
- Frame – Steel
- Frame geometry - Designed and calculated from scratch
- Brakes – Rear disc with handlebar
- Wheels – Standard from go-karts
- Gas tank – 1.5 liters
- Maximum speed – 80km/h
- Maximum skid angle – 90* ))))
- Load capacity – 130kg
- Dimensions (LxWxH) 140x105x80
- Weight – 80kg
Source: https://customculture.ru/news/134/
Ural Hercules - factory Ural tricycle
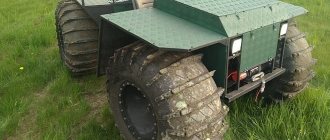
The Irbit Motorcycle Plant has released a three-wheeled modification in its model range for transporting cargo up to 500 kg. The model is called “Hercules” and moves well both on city roads and off-road. The sides of the tricycle are also removable and this allows it not to be limited in the size of the cargo it transports. Hercules is a truck that does not require a category “C” license.
Ural Hercules
Technical characteristics of the Hercules tricycle:
- Dimensions: 335x150x115 cm
- Ground clearance: 185 mm
- Weight: 500 kg
- Fuel tank capacity: 19 l
- Maximum speed: 70 km/h
- Engine capacity: 750 cc
- Power: 45 hp
- Engine type: opposed 4-stroke with two cylinders
- Generator: 500 W
- Electrical: 12 V
- Transmission: 4-speed, with reverse gear
- Tires: 6.45 and 13 inches
DIY electric drift trike
Drift Trike is a three-wheeled bicycle, created for drifting (sliding), cornering in a controlled skid due to the weak grip of the rear wheels made of plastic or polyethylene pipes stretched over pneumatic wheels with the asphalt.
As Wiki writes, the origin of the drift trike is New Zealand - the sport movement was called “boy racers”. In 2011, the American Drift Trike Association was even organized in the USA, with the goal of “promoting” drift trikes. Drift Trike is becoming a recognized sport, for example, Red Bull sponsors the New Zealand team Drift Trikes Whangarei.
- I have an idea - to create my own trike, which came after watching videos on YouTube, thousands of them!
- I tried to find a ready-made trike, but nothing came of it, so I decided to make it myself. I bought a frame at a flea market
- from BMX, I watched how to cut and cook on YouTube (unfortunately I won’t give the link, since this video has been deleted).
- I figured out in Photoshop what the frame would roughly look like (on the left - before trimming, on the right - after trimming)
- Such parts as: frame, fork, handlebar, stem, pegs, saddle were bought used, the rear axle was found in scrap metal at the dacha. All this was welded into the following design:
Rear wheels with pneumatic tires from an ordinary wheelbarrow (with the inscription on the tire “NOT FOR HIGHWAY USE” and an outer diameter of 210mm), they are perfect for a sewer pipe with a diameter of 200mm.
But the sewer pipe has a big disadvantage - the plastic is fragile and easily breaks when hitting a pebble or jumping off a low curb.
The consumption of such pipes turned out to be high: one roll - minus one piece of pipe. Ideally, I think, it would be to buy a pipe for high pressure, such pipes are thick-walled and
more plastic, but this one is difficult to get.
I bought a motor wheel already with a 20′ rim and spoked; I bought a tube and tire separately at a bike shop. Appropriately named “Crazy Bob” tires.
I was unpleasantly surprised by the rate of baldness of the tire; over the summer it went to zero with the trike not being rolled out very often.
Controller for controlling the motor, and fuse.
I already had 2 lithium polymer batteries (LiPo, total voltage 48V and capacity 10Ah), I bought them a couple of years ago for my electric bike.
- The battery box was also made for an electric bicycle (mounted on the trunk), made of fiberglass and epoxy resin.
- The entire assembly of the drift trike took about 2 months.
Naturally, the first ride was the brightest, a sea of adrenaline, squealing tires, the smell of burning rubber...
- More photos in the Gallery.
- More photos here
Source: https://ridemybike.org.ua/index.php/drift-trajk-na-elektrotyage-svoimi-rukami
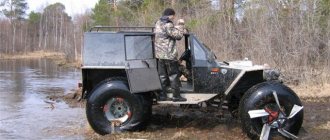
Industrial self-propelled trolleys
If you set a goal and find a suitable self-propelled vehicle, you will be offered either a hydraulic self-propelled trolley - loader, or a Chinese version of a mini-dumper on caterpillar tracks. For work in the field or at the construction site of a large facility, such a mini-tractor with a lifting capacity of 300 kg may be suitable, but there are few people willing to pay 2 thousand dollars for the opportunity to transfer cargo at a snail’s pace.
Self-propelled vehicles from Honda will be very interesting for households. Its mini-dumpers can hardly be called a self-propelled trolley; they are more construction equipment, but in a private home a small device would be very useful.
For example, the ANTBY800 model is equipped with a 13 hp gasoline engine. Essentially, this is a hydraulic self-propelled cart, since it is based on a hydraulic drive that distributes torque to orbital engines. The trolley is capable of moving up to 800 kg of cargo in the cargo compartment, lifting up to 300 kg to a height of 1.4 m and transporting a trailer weighing up to 2 tons.
The hydraulic circuit made it possible to equip the minitractor with a working shovel-blade like a bulldozer. But, like the Lunokhod, Honda’s miracle does not have a cabin or even a place for the operator, which is not entirely convenient, especially if you have to work on the trolley for quite a long time. The cost of a self-propelled cart is almost 700 thousand rubles.
Lighter self-propelled carts, as in the video
They are an order of magnitude cheaper, but in terms of their capabilities they are of little use for housework. As a rule, self-propelled designs have a high center of gravity, a weak engine and a short wheelbase. It is convenient to transport loads up to 50 kg over relatively short distances. For construction work or transportation of materials, the engine is clearly not enough.
All that remains is to make a self-propelled vehicle with your own hands:
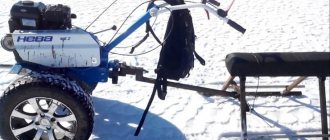
- Adapt existing transport equipment with an engine, for example, a snow blower, walk-behind tractor or walk-behind mower, to a self-propelled cart;
- Assemble an original self-propelled structure based on a chainsaw engine and a homemade welded frame;
- Modify an old scooter, use the engine and transmission;
- Assemble an electric self-propelled cart.
All of the listed options have long been tried by craftsmen in practice, and many of the assembled homemade carts have shown good results. The main advantage of making a self-propelled cart with your own hands is the ability to customize the design to your needs. In addition, building a self-propelled carrier from spare parts and components will cost much less than a purchased cart.
Drift Trike drawings
Homemade Drift Trike: drawings with dimensions for making it yourself.
Drift Trike is a newfangled vehicle for rides, in particular for drift driving. We will look at how to make a Drift Trike in this material.
So, first of all, you will need a front fork with a wheel and a part of the bicycle frame.
To make the frame, I used two types of rectangular pipes. 50 x 25 mm and 25 x 25 mm.
Drift Trike drawings, frame and head tube.
An axle, sprockets, hubs for discs, keys for hubs, discs, tires and a seat from a kart can be purchased at a specialized store or at a karting track. You can buy worn-out tires, but without bald patches.
The chain, grips and throttle cable can be found at the bicycle market; these parts are used on mopeds.
You also need to purchase a pair of housing bearings for a 30 mm axle, the bearing is shown in the photo:
I installed the Greenfield GF-170F engine through an adapter plate so that I could adjust the chain tension.
The axle is mounted on housing bearings.
The design is not complicated, you can do it yourself.
Another important point! The rubber from the kart is viscous, so in order to drift, you need to put a plastic pipe on it.
Also attached is a video of testing a homemade Drift Trike.
Author of the homemade product: Maxim Irevlin, Krasnodar.
Source: https://avto-samodelki.ru/chertezhi-drift-trajka.html
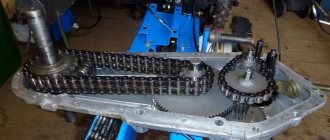
Gear box
When you make a tricycle from the Ural with your own hands, you definitely need to take into account where exactly the gearbox will be located. You already understand that the engine itself will be off the axle, behind the seat, between the two rear wheels. At the same time, make sure that it is attached as securely as possible in at least three places - especially if you plan to perform various tricks, as described above.
As for the gearbox, it is better to install it on the left side of the steering wheel, since your right hand will be occupied most of the time. It is unlikely that if you take the engine and gearbox from a car, you will be able to make a design that is convenient enough to change gears without stopping driving.
Also don't forget that you need to take care of connecting the box to the motor, which is a bit more difficult considering that it is now located a little further from the box than it should have been in the original. But if you're trying to figure out how to make a tricycle with your own hands, you always need to be prepared for these kinds of surprises and difficulties.
DIY drift trike. — DRIVE2
Hi all!
About two weeks ago, I had to go see a friend. This comrade, in addition to the fact that he is the owner of a large collection of baseball caps, is also fond of BMX, and hardcore racing - with jumping on ramps and the like.
So, during our conversation, he talked about such an attraction as a drift trike, that is, a carriage on three wheels, with or without a motor, with the front of a BMX-type bike, and the back is at the discretion of the rider. Hmm, the idea of creating something like that didn’t last long in my head, the next day I was already looking for construction tutorials and materials.
However, there were problems with both. First, I had to find some kind of drawing (it should be noted that I immediately decided to build a trike with an internal combustion engine), but after Googling and Yandexing, I didn’t find anything I needed.
I wrote a letter to a man who built several trikes, he answered, but said that he does everything by eye without drawings... Well, okay, we’ll draw it ourselves. At that time, I knew for sure that the engine would be a Honda GX series unit, which is found... well, I see it most often in karting.
That's why I went to the karting track. A friend, the owner of a kart club, gave me a car, and I, armed with a tape measure, measured all sorts of distances, wrote them down, and purchased a plate for mounting the engine. In the evening, I covered the received data and photographs of bourgeois drift trikes, and sketched out the following drawing...
The numbers are specially shaded, but not to avoid plagiarism, but due to the fact that the metal was welded, they had to be changed. Although the scheme has not changed fundamentally.
It was time to search for iron. In a good way, to create such equipment, you need to use round steel pipes of a certain GOST standard. However, in Krasnodar, it is impossible to find them in retail.
There is wholesale - from one ton and to order... We had to take what we had - a profile pipe of two different sections. That same day, an order was placed online for the necessary karting components, and then I began looking for a BMX to cut.
The victim was found quickly and promptly brought to a special place.
This is how his former owner remembered him.
As mentioned above, all that was needed from the entire BMX was the front end, so without thinking twice, everything beyond the seat tube was thrown into the trash.
I disassembled the remaining part, went through all the bearings, lubricated it and reassembled it. I decided to outsource the frame welding process, because I don’t have the necessary skills for this.
The necessary craftsman was found quickly, he came to the place and, marveling at the idea, assembled a semi-finished product like this in a few hours:
In principle, you can already drift, the main thing is to find a cooler hill.
After this, the process had to be suspended for a couple of days, since the components needed for further assembly had not yet arrived. However, I didn’t have to waste time; during the break, I again went to my good friend at the karting track and bought the missing parts, which don’t have to be new. And now, a call from the transport company! Let's continue the assembly!
The structure is getting heavier and heavier... But it’s a joy to the eye!
- In less than a day, it was already possible to move around on the freshly assembled structure... while standing...
...and pushing off the ground with your feet.
In general, the problems with the engine-transmission part did not affect me, but a problem was discovered in the area of the fifth point. There was somewhere to land it, but my consciousness had not yet understood how to attach it “where” to the frame.
And the whole point is that the karting chair, and this was exactly it, has a very tricky profile in the lower part. I really didn’t want to return to welding work, so I took a day to “think” and came up with an original scheme for attaching it to the frame.
I needed studs, tubes, nuts, blackjack and shhhhh-washers.
The chair fits like a glove!
Well, all that remained was to fasten the pegs, set the front brake and connect the accelerator cable.
Well, throw on a chain! All this was done today, and then followed the first launch and test drive in a straight line! Why in a straight line? The solid rear axle on sticky kart tires greatly limits the ability to maneuver using one narrow wheel at the front; plastic is already there for the rear wheels, but I'm hoping for smaller wheels in diameter, because a 250mm pipe won't fit on the current ones. I hope everything will be fine tomorrow. And after that there will be real tests and videos! For now, I say goodbye and thank you for your attention! Don't forget to press the buttons, write comments and send questions in PM)))
- PS. I almost forgot about the list of what was used)))NEWEnginePlate for attaching the internal combustion engine to the frameRear axleHubs for the rear wheels and keys for themChainChairHousing bearings for the rear axleMetal, of courseGrips (one of them is the accelerator handle)Accelerator cable, its jacketPegsRim brake kitFront tire
- Pile of fasteners
- Used BMX Wheels and tires for the rear axle
- Leading and trailing stars
Source: https://www.drive2.ru/b/1331256/
From tractor to boat
The most common modifications from a conventional walk-behind tractor are all kinds of complex equipment and vehicles. True, the latter can be more called homemade products based on the engine and transmission of the device.
Potato planters. If there is a large area for planting potatoes, a device based on a walk-behind tractor would be ideal. It includes several elements at once. First of all, the potato planter is equipped with a small hopper for tubers.
In front of it is a plow that makes a ditch, and behind it is a hiller that fills and forms a bed. All devices must be adjustable in accordance with the planting depth and size of the beds.
Mini tractor. Most often, craftsmen construct all kinds of mini-tractors. In this case, the shift in the center of gravity of the equipment should be taken into account, since the engine is installed in the rear. Therefore, care should be taken to expand the wheelbase of the rear axle.
Currently, you can find on sale all kinds of components and assemblies for creating a tractor based on a walk-behind tractor, such as front axles, brake system, all kinds of rods and levers, pedals. But if you wish, you can make all this yourself, using suitable parts from old cars.
Boat motor. The engine from a walk-behind tractor can also be an ideal replacement for a conventional outboard motor. To do this, the necessary fastening should be made on the boat hull, and the standard engine cutter should be replaced with blades. In the right hands, a walk-behind tractor can also become the basis for creating a small buggy-type car.
True, it will not be possible to drive in urban conditions - this is due to the official registration of the vehicle with the state traffic inspectorate. But it can be an excellent help in rural areas for fishing trips or hunting for mushrooms. Also, such an “SUV” is ideal for mastering driving skills for beginners.
Most often, the front axle from a “disabled” vehicle is used as the chassis for such a homemade vehicle, the rear axle is a drive axle, it can be installed from an old Zhiguli or from an Ant scooter. By the way, the size of the wheels used will depend on this.
Bikes for drifting and their differences
It's strange that there are still people who haven't heard anything about drift bikes. Even in the last century, such an extreme sport as drifting gained great popularity. In fact, drift is a controlled skid.
The most accessible vehicle for controlled skidding is a bicycle. But not a simple bicycle, but a special trike, called all over the world a drift trike.
Young people in New Zealand, Europe, America get together to compete in skills, share new tricks, and have fun with friends.
The drift bike has three wheels, but it is not a children's toy. Drifting vehicles are very dangerous and require a lot of driving skills and mastery.
Design Features
The main feature of drift trikes is their uniqueness. Very often, drift bikes are designed and manufactured personally by extreme sports enthusiasts.
Vehicles for drifting are quite unusual.
- As a rule, the front wheel is installed with a small diameter - 20 inches, such as on BMX models for trials.
- The two rear wheels are six times smaller in size compared to the front. Their width can exceed a maximum of twice their diameter. The most important thing is that they are made of hard and smooth material. None of the drifters wear rubber tires on their rear rollers.
- The rider sits very low in a wide seat. Each athlete personally chooses a comfortable seat. It is comfortable to sit behind the wheel of a homemade bike even on a car tire.
- To supply the legs, supports are placed on the front fork, closer to the wheel axis. As you can understand, through these levers you can also control the steering wheel with your feet.
No pedals needed
Few people have seen a real three-wheeled trike on the road, so most don't know what it looks like. Pedals are absolutely not needed for this vehicle. Racers get all the pleasure from drifting while descending the hill. Whereas to climb a hill, it would be wise to use the help of a car. For example, how reckless drivers from an American town got hooked on their van.
When pedaling a tricycle, you can accelerate to a very low speed - no more than 25 km/h. While the most exciting stunts on a trike are performed at speeds of over 60 km/h. Extreme sportsmen on a busy highway spin like a top, fall on their side, and dashingly draw a snake on the road surface.
Drift cars with engine
Often, a factory-assembled drift bike is a relatively expensive pleasure. Especially considering that there are trikes that are powered by an engine.
Vehicle for drifting Big Wheel Drift Trike with engine
The car, called the Big Wheel Drift Trike, is produced by the American company SFD Industries, which specializes in the production of auto parts.
This device is equipped with a compact gasoline engine with a power of 6.5 hp. It has a 26-inch wheel at the front and two 3.5-inch wheels at the rear.
Replaceable plastic tubes are placed on the rear wheels so that the rollers themselves do not wear out when sliding.
The cost of a trike with an engine is $2,000. For an extra charge of $200 they can supply a more powerful motor. Plus another $200 and they'll replace your throttle system.
The relation of law to whim
It is interesting that in Russian legislation, a drift trike is classified as an ordinary bicycle. The traffic rules do not differentiate between tricycles and the more common two-wheelers. Therefore, no registration or rights are needed for it.
It is worth noting that drifting on a bicycle is a very dangerous pastime. Often, extreme sports enthusiasts drive on roads with open traffic. While athletes organize their competitions on pre-closed asphalt tracks.
In America, very often drifters on bicycles are chased by traffic police, as you can see by watching the first half minute of the video.
Homemade drift trike
First you need to have a bike that you don’t mind putting under the saw. In addition, the choice of bicycle for disassembly is limited to models with small wheels with a diameter of about 20 inches.
Suitable for both a children's bike and a BMX bike for motocross. To make a homemade vehicle for drifting, they take the old but strong horse “Kama” as a basis.
This bike has a frame center tube strong enough to weld a custom rear chassis to.
The basis for a drift bike is a folding bicycle "Kama"
The front wheel, the fork together with the steering wheel, the steering wheel bushing, that is, the entire front part, right down to the carriage assembly, is used in its original form.
The seat tube and upper rear seatstays are cut off at the root. In the simplest version, the lower feathers are left in their place at the back. A plywood base for seating is laid on them.
Obviously, such a homemade pit stop is not very durable.
In a good way, the rear axle must have a double safety margin to withstand the weight of your body under dynamic loads. To assemble a reliable frame, you will need pipes with a diameter of 18 and 32 mm.
On the Internet, from a variety of different trike designs, you can choose the one that you like best. A 1:1 scale drawing will make it easier for you to assemble the frame. Using a drawing laid out on the floor, like a sketch, it is convenient to assemble individual structural elements. People with a good eye can ignore this point.
What is downhill cycling?
It would be nice to have a pipe bender. Using it makes it easier to assemble an unusual bicycle with your own hands. You can, of course, not complicate the work, but assemble the rear frame of the buggy from straight pipes. But if you have a pipe bender, you can bend the pipes to create a more perfect frame, for example, make arcs in the corners to strengthen the structure. In any case, you will also need a welding machine.
After completing the welding work, you need to try on two small wheels on the finished frame. They can be taken ready-made, for example, from a cart, or cut from wooden blocks. The selected wheel sizes are as follows: width – 3.5 inches, diameter approximately the same. To make the rear rollers glide better, a piece of large-diameter polyvinyl chloride water pipe is put on them.
Homemade wheels made of wood for a drift bike
To support the legs, the easiest way is to screw pegs onto the front wheel axle, or you can weld two pieces of pipe onto the fork legs. Overall, the work is creative and definitely exciting.
After assembling the rear chassis, you can install a comfortable seat, which can be a plastic chair or a small chair. You can get by with a car tire, as the young inventor from Lipetsk did.
After test rides, we correct minor errors, or, more precisely, we customize the trike to suit us. If necessary, we grind the welding seams and finally paint them.
First dump
When the trike is ready, you want to get maximum pleasure from it. No matter how excited you may be to ride, imagine what could happen when you drive it into a pothole.
When jumping into a hole, a drift bike always turns over. Without equipment, when falling at high speed, the rider is erased on the asphalt like an eraser.
You can drift safely on a bike only on a familiar road and wearing motorcycle protection.
We must warn you that you will not be able to go unnoticed on this outlandish thing. Some will modestly stare, some will shout in praise, some will laugh and twirl their fingers at their temples. Ride and be the center of attention!
Source: https://VeloFans.ru/raznoe/velosipedy-drifta-otlichiya
Frame
It will be easier to make an Izh tricycle with your own hands if you have experience in welding and understand the design of motorcycles or cars. The frame will have to be completely manufactured from scratch, have a pre-designed shape and structure.
Usually the calculation is made in such a way as to exclude breakdowns and places with vulnerable structures, so that the trike can travel hundreds of kilometers without maintenance.
Strengthening is achieved by welding corners and additional pipes so that the fork does not vibrate. The basis of the transmission can be taken from a walk-behind tractor or combine harvesters. If you want to get a traction type Izh Planet tricycle, it is better to use sprockets in a ratio of 2:1, i.e. 50 and 25 teeth respectively.
How to make low pressure tires
If you want to make an all-terrain vehicle of a similar design, you must first familiarize yourself with how to make tires - low-pressure tires. It is advisable to use old truck tires as a base, and it is extremely important that their wear is small. Making such tires yourself is quite simple, just follow the following algorithm of actions:
- Clean the tires from dirt.
- Cut them along the inner perimeter, which will allow you to dismantle the wire.
- Mark rectangles near the cut and cut them out using a construction knife.
- Remove the wire and secure the tire.
- Peel the tire from the outer layer.
After such manipulations, the master will have a chamber at his disposal from which he can make a wheel, creating a tire frame. To do this, you will need to weld rims for low-pressure tires, for example, from an aluminum basin, grind the frame and put it on the prepared inner tube. Such wheels can be installed on a homemade all-terrain vehicle made on the basis of a walk-behind tractor.
Tire benefits
Such wheels are very popular when designing all-terrain vehicles, which is due to a wide list of advantages that distinguish them from other possible options. Among them, it is advisable to mention the affordable cost, which will significantly reduce the cost of manufacturing the model.
The wheels are perfect for moving over various types of terrain, allowing them to be used in different regions and weather conditions. There are other advantages of such elements:
- light weight, which can significantly improve the dynamic characteristics of the finished vehicle;
- due to the large area, it is possible to successfully move through sand, snow and other difficult terrain;
- no negative impact on the ground, which allows the use of an all-terrain vehicle for traveling through fields.
An all-terrain vehicle with such wheels can be used as a low-power tractor to perform simple tasks, which makes it a universal solution.
What materials may be needed?
To remake a walk-behind tractor, you will need simple tools, as well as drawings. Only when everything you need is at hand can you start working on the remodel.
Tools you will need:
- a set of keys and drills;
- electric drill;
- welding machine;
- Bulgarian;
- various elements for fastening;
- Screwdriver Set.
Types of homemade all-terrain vehicles
Lightweight all-terrain vehicles, also called carakatas with low-pressure tires, are in high demand as they are excellent for off-road driving. They compare favorably with standard SUVs because they are able to move in the complete absence of road surfaces and in rough terrain. Such products are distinguished by their simple design and wide functionality, which makes them an ideal vehicle for use in hard-to-reach areas of the country. There are several varieties of this kind of product, which allows everyone to choose the best option for themselves. Among them it is worth mentioning:
- boat-type pneumatic passages, which are distinguished by their affordable cost and simplest design. They are equipped with a suspended power unit, which allows them to move around small bodies of water;
- tracked products, excellent for moving through swamps and reservoirs with a lot of vegetation. It is much more difficult to manufacture such a structure, since this will require selecting a suitable tracked drive;
- swamp vehicles on low-pressure tires are the easiest to manufacture and the most promising type, which can be created from scrap materials at minimal cost.
Since the latter type is the easiest to assemble, it is advisable to familiarize yourself with it in more detail. Similar all-terrain vehicles operate on the same principle, which involves the use of large wheels for off-road movement. There are several subspecies of caracats of this variety. Among them it should be noted:
- all-wheel drive models that involve the use of a gearbox and chassis from a car. It is distinguished by the presence of all-wheel drive, as well as a sealed hull made on the basis of a boat;
- tricycles - products with 3 wheels, assembled on the basis of an unnecessary motorcycle, most often domestically produced;
- all-terrain vehicle made from a motorized stroller - involves placing the power unit under the seat, using a motorized stroller as the basis, as well as car parts;
- models where the basis is passenger vehicles or ATVs.
Before manufacturing, it is extremely important to decide on the type of all-terrain vehicle, its model, and also to obtain suitable drawings, which will allow you to avoid mistakes during the self-assembly process.
All-terrain vehicle characteristics
The actual characteristics of an all-terrain vehicle on low-pressure tires directly depend on the components and elements used, as well as the type of device. It is strongly recommended to use power units of sufficient power, which will allow you to overcome even difficult obstacles without any problems.
Suspension
It doesn’t matter whether you make a tricycle with your own hands from an Izh or any other motorcycle. You will have to remodel the front wheel suspension anyway. After all, the distribution of forces in a tricycle is very different from that observed in a regular motorcycle. To do this, you will need two pairs of consoles, as well as two powerful springs - if possible, try to get helicopter or airplane springs, but springs from passenger cars can also be used if necessary. The consoles need to be connected to each other by levers, through which the axle of your front wheel will pass. Naturally, this is not the only way - there are a large number of ways to make a tricycle with your own hands. Drawings are available on the Internet (one of them is in our article), but this method is one of the most effective.
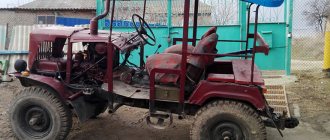
Peculiarities
A tricycle from the Ural can be designed in your own garage. This work will not take much time and will not require large financial costs. To get the desired vehicle, it is enough to take a Ural motorcycle and components from a Moskvich or Zhiguli.
Today there are a lot of other options offered, but a homemade tricycle based on Russian production is considered the most successful, which is not accidental. After all, domestic manufacturers produce equipment that allows you to travel long distances comfortably.
The result is a tricycle that is easy to control.
The future owner of a tricycle will quickly cope with the task if he prepares in advance for the upcoming work. For example, he will have to find a ZAZ-968 and a Ural motorcycle at a disassembly site. From the first you need to take the engine, from the second - the components.
The advantages of a tricycle are obvious: it is comfortable to ride off-road, it does not require large maintenance costs, and the engine does not overheat. However, this transport also has a number of disadvantages.
For example, a tricycle can only go forward. If there is no way to turn around, the owner will have to literally push the unit out. The vehicle is difficult to control when cornering, it goes too fast in first gear, and the load on the front axle is excessively high. Still, the advantages of a tricycle outweigh the disadvantages, so many people strive to assemble it themselves.
Cost of components for a three-wheeled bike
Homemade tricycle
In stores selling spare parts for bicycles, you can see a wide range of components. The price depends on the manufacturer and the material from which the tricycle is assembled. A bridge for a homemade three-wheeled vehicle costs between 20,000–30,000 rubles, the default kit includes:
- stars;
- rear derailleur and rim.
Fork
The length of the fork is determined by your project. If you want to make a long front fork, this trike is suitable for flat roads and long rides. A more aggressive driving style will require a shorter length. A tricycle from Izh, photos of various mods of which can be found on amateur forums, may even have a trunk located above the front wheel. Of course, in terms of cross-country ability, trikes are not competitors to ATVs, but for trips to the country, garden or fishing, the work invested will more than pay off.
Stages of karakat development
Conventionally, we can distinguish the following stages on how to assemble a floating caracat:
- Creating a Frame
- Making a pendant
- Creation and installation of wheels
- Engine and systems installation
Caracat frame
First of all, you need to choose a suitable frame for installing all the necessary equipment and units on it. It is desirable if it is a walk-behind tractor belonging to the medium or even heavy class of equipment.
In fact, even the most “advanced” karakat is nothing more than a homemade all-terrain vehicle, which is usually mounted on a frame with four (4x4) or even three wheels (tricycle). The choice of the number of wheels depends solely on the design features of the intended vehicle and the previously developed design.
The wheels must be “shod” with high-quality low-pressure tires; the structure is powered by an installed powerful internal combustion engine.
Suspension
The suspension of a walk-behind tractor will require special attention and precision on the part of the developer. At this stage, in addition to the suspension itself, the master will need to make a rear axle, which is done exclusively with his own hands.
Rear axle drawing example
The suspension provides a special design made of two separate parts connected together by hinges. In this case, the spars must mate with each other, for which a steering bushing is used. Ultimately, it is possible to form independent front and rear suspensions.
The main condition is to achieve exceptionally high suspension independence, because It is this indicator that allows the all-terrain vehicle to be operated in the most unpredictable places, guaranteeing the safety of the structure.
Maneuverability and cross-country ability should be the primary factors that you should pay attention to when making a homemade caracat design from a walk-behind tractor.
General technical specifications
Homemade tricycles are mainly made on motorcycle frames or structures hand-welded from a metal profile. Wheels from trucks or tractors are used as wheels. The transmission, brakes, steering rod are formed from spare parts of domestic and foreign cars or motorcycles.
For comparison, the table shows the parameters of 2 serial domestic tricycles.
| Characteristic | TMZ-5.971 | ZID-200 (Farmer) |
| Engine capacity (cc) | 199 | 196,9 |
| Power (hp) | 13,6 | 13,0 |
| Dimensions (m) | 2.3x1.35x1.25 | 2.2x1.5x1.2 |
| Weight, kg) | 250 | 210 |
| Wheel base (m) | 1,52 | 1,5 |
| Ground clearance (cm) | 16,0 | 13,0 |
| Maximum speed (km/h) | 70,0 | 50,0 |
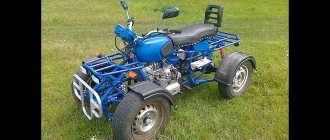
Three-wheeled karakat with planetary engine
The article is compiled based on forum materials, link to source
Some information on the caracat, although everything is clear from the photographs, but it may still be interesting. The engine is from an IZH Planet motorcycle, the left cover with a fan is from an SZD disabled person. The standard electrical equipment was replaced with Voskhodovskoe, which does not require a battery and is much more reliable since it has a chroll sensor instead of cams.
UAZ differential and two long UAZ axle shafts. The axle shafts are shortened since the karakat karakat would turn out to be very wide. The original hubs are cut and pressed from Moskvich ones, since the wheels are made on the basis of lighter Moskvich wheels.
The motorcycle wheel disk is halved and a disk for the Bel-79 is made on its basis. In general, two sets of wheels were made, one based on Bel - 79 for mud, one based on tubes for swamps. Upon completion, an unexpected thing emerged: the tube wheels turned out to be somewhat heavier. This year the summer was dry and on the factory wheels we drove through the swamp without any problems; I haven’t “put on” the tube ones yet.
The frame is reinforced with gussets, at the bottom at the engine mount and in the fork mount area. A bronze bushing is inserted into the fork mount for strength, since even without such loads as in the swamp near IZH, the bearings break in this place. The body is made of sheet aluminum and aluminum corner with rivets:
The price of the karakat turned out to be very decent, but this is because a lot had to be redone during the work, since there was no experience in manufacturing just such devices. Various technical problems were also solved along the way. The design mainly used only new parts and materials, which is why the price was high. The device is being modified as it goes into use; it has been out through the summer and half of the fall through mud swamps, etc. no problems so far. Below are photographs of the making of this all-terrain vehicle.
The caracat's cross-country ability is excellent, it rushes through the swamp as it should, the engine is high-torque and even with a load it moves confidently through a completely off-road swamp. Very maneuverable and well controlled, of course not like a regular motorcycle, but quite normal and not heavy. In the north of the Omsk region and in Tyumen it is very rare to see a four-wheeled carakat; three-wheeled ones have been tested by time, and they are simpler in design than four-wheeled ones, less iron and components, which means more reliable.
Result
The trike turned out to be quite suitable for use. Of course, there cannot be special dynamics with such power, and it is not needed. As I already said, the average speed in the forest rarely exceeds 25-30 km/h, and even then on a relatively flat surface. The power of this engine is enough to confidently maintain a speed of around 20-25 km/h in 4th gear. Then there just isn't enough momentum. I'm thinking of increasing the maximum speed with the help of stars. Now with 15 teeth on the motor and 35 teeth on the gearbox, the speed is as follows:
- in 1st gear - about 3-4 km/h;
- on the 2nd - 6-8 km/h;
- on the 3rd - 14-17 km/h;
- in 4th - up to 24 km/h.
As for traction, there is plenty of it. The trike pulls away easily even in third gear. It’s possible in fourth, but there’s already a load on the engine and clutch.
In general, the power of this engine is quite enough for confident off-road movement, and thanks to the good “lowering” and reverse gear, the cross-country ability has increased noticeably.
Battery
The battery for your tricycle must be installed under the driver's seat - for this purpose a special frame is created, located above the engine. This way, everything important about your vehicle is in one place. You should also consider making the passenger seat behind the driver's seat. Not only does it allow more people to ride at the same time, it can be attached with saddlebags that will completely enclose the engine and battery, making your trike complete.
Beginning of work
You should prepare in advance for assembling the trike. You will need to find a ZAZ-968 and a Ural motorcycle at a disassembly site in decent condition. From ZAZ you will need an engine, from Ural - most of the components. You will have to make the frame yourself and this is the most difficult stage of the whole undertaking. As a result of manipulations, converting a Ural motorcycle into a tricycle can turn into a presentable, powerful vehicle, no worse than its factory counterparts.
The frame plays the role of a connecting link on which all the parts will be installed. It must be reliable and comply with the drawings. There are only a few nuggets that can produce a similar product with precision up to 5 mm; if you doubt your abilities, it is better to entrust the work to professionals. Before installing the parts, spend an hour and measure the frame with a tape measure, check the locations of the holes and clamps.