Petr Pirogov
3245 0 0
Petr Pirogov April 27, 2018
If you are a car owner, then you probably have parts from old and broken cars or motorcycles in your garage. I'll show you how to make a pair of chairs from old car shock absorbers and springs. A pair of these stools will fit well into any home, apartment or workshop.
Important! The springs under the seats are not compressed to avoid injury.
Step 3: Disassembling the Racks
Important! When removing the entire strut, do not forget that the springs are in a compressed state.
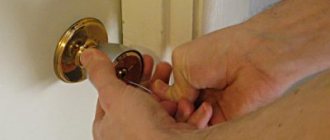
First, I loosened the nut and carefully removed the spring. Then I used a grinder to cut off the eyes for the silent blocks. I repeated the same operations with the second rack.
Step 4: Base
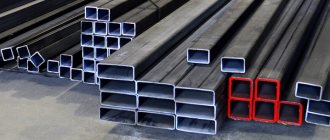
For the base I used a profiled pipe:
- cut two pieces of 50 cm each;
- I cut 4 pieces of 24 cm each (for two chairs).
Let's get started
First of all, remove all protruding parts on the shock absorber. We sand it with a grinder.
We cut off a piece of profile pipe and two metal plugs.
We drill holes in the plugs. We weld one of the plugs inside the profile, and weld the second to the end.
The next step is to cut off a piece of metal plate. We weld it to the profile pipe.
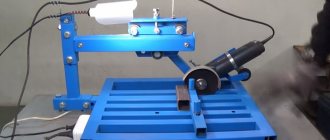
Next, cut a piece of channel to a suitable length. We cut a hole in it, insert a shock absorber and scald it. Nearby we weld a stand made of corrugated pipe with a slot for the plate.
We install the chain. The author assembles a steering wheel from a sprocket and sections of profile pipe.
We make a clamp and weld it to the movable platform from the profile. Then we paint the machine parts, after which we proceed to assembly.
We install the assembled structure on the desktop. We insert the electric drill into the clamp. The result is a compact drilling machine.
This review was prepared based on a video from the YouTube channel Workshop Diy. If you like the idea, write your opinion about the homemade product in the comments below.
Source
Step 5: Assembling the Base
I welded the parts to each other, maintaining an angle of 90 degrees. Then I cleaned the cut line with a sanding disc.
Step 6: support nickels
Using a grinder, I cut out 4 circles with a diameter of 5 cm:
- first applied markings to the metal;
- then I used a grinder to give it a rounded shape;
- brought to size using a sanding disc;
- welded to a steel base.
Step 8: Welding the shock absorber and base
I spot welded the shock absorber to the base, having previously leveled it strictly vertically. Then I thoroughly welded it, cleaned it and painted it with 3 layers of black paint.
Step 9: Seat
I wanted the thickness of the MDF seat base to be about 3 cm, so I glued several sheets together and tightened them with clamps until completely dry.
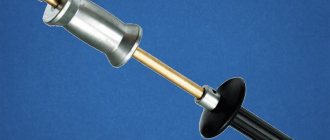
Homemade products from a shock absorber rod - Marine
You can make a pump - but who needs a heavy hand pump? You can make a drive for a ventilator in a greenhouse, but a simpler solution has already been found using a plastic bottle. Therefore, it is better to adapt it for something else. For what ?
Have you thought about throwing it away? or are they dear to you as a memory?
SergeyE wrote: Therefore, it is better to adapt it for something else. For what
when a lot of unnecessary “garage” junk accumulates. You can do welded sculpture. You do have a plasma generator. What does your shock absorber look like? on part of the leg? hands?
SergeyE wrote: You can make a pump - but who needs a heavy hand pump?
To the gardener! Hand sprayer..
SergeyE wrote: You can make a drive for a ventilator in a greenhouse, but a simpler solution has already been found using a plastic bottle.
Don’t rub your nose in - where was this described?
BOGA wrote: What does your shock absorber look like? on part of the leg? hands?
legs or a crutch, but I’m not yet drawn to artistic creativity - only utilitarian things were a big exhibition of such sculptures in the South Port - really well done - and crocodiles and robots, etc.
PROPAB wrote: To the gardener! Hand sprayer..
heavy and small volume - like plastic shoulder bags in bulk
NB wrote: Don't rub your nose in - where was this described?
Various options were also discussed here on the forum, but here it is:
» > Device for automatic ventilation of greenhouses and greenhouses. Homemade automation in a greenhouse. Section: Garden
Since the regulations of the Perm Championship consider propellers to be a terrible weapon on the track, they have an evil coefficient for such a suspension. In short, with screws, I would be at the mercy of lightweight, crumpled Subarus, Eviks and other gloomy vehicles. To stay within the class of up to three liters, I needed shock absorbers without height adjustment. I looked closely at Eibachs, Tanabes, Koni and so on. Prices for used ones start from 16, for new ones from 50. Not a budget.
I decided to do some pumping with my old friend. The appointment was made two months in advance! The wishes were: not to lose too much in comfort, to kill the build-up, to increase energy intensity.
The new kit has increased travel even against the stock suspension, slightly increased compression rigidity and much stiffer rebound. I don’t know all the nuances of the setup, I entrusted this task to the master, giving technical specifications on the behavior of the machine. Fortunately, he himself drives exactly the same Lexus and has remade different versions of the shock absorbers several times.
During the replacement, problems were discovered: -broken left steering rod (consequences of deforestation) - already replaced, rod 800r. -the front right wheel bearing is on the way (came up, bitch, quickly) -the rear left wheel joint of the lever (yes, yes) -a poorly adjusted lock with a large gap -possibly a crack in the body on the right side of the pillar (there’s a nasty squeak there that I can’t find) -soured to death rear brakes, only the inner pad worked. Previous owners served gay people. The next day they soaked and peeled for two hours. I installed ADVICS pads for 1900 rubles.
I was very annoyed, since all this was again an extra expense. But on the other hand, the races do not pass without a trace, the main thing is to provide quality service!
The suspension turned out to be not what I expected - it is quite comfortable. Dense, elastic, absorbs bounces, dampens body vibrations, the roll rate has decreased slightly (the depth remains, springs and stubs are needed), the balance of the car has shifted more towards oversteer. It feels similar to a RAV4 or other tough crossover. Like. But still, this is not a track setting, but a more winter or dirt setting. It's perfect for our roads.
I rode on shock absorbers for several days, and yesterday I arrived on this suspension from Ekb to Perm. After all, the circuit racing championship is taking place in Perm! More about it a little later, as it’s very interesting here!
Featured Posts
Create an account or log in to comment
You must be a user to leave a comment.
Create an account
Register for an account. It's simple!
To come in
Already registered? Sign in here.
There are currently 0 users on the page
There are no users viewing this page.
Step 10: Steel Plate
While the glue was curing, I cut two plates from a sheet of steel:
- marked the center of the plate and drilled a 12 mm hole for the shock absorber rod;
- I drilled holes in each corner for self-tapping screws.
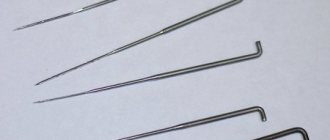
The most common faults
Among the most popular malfunctions are:
- Fluid leaks;
- Deformations and mechanical damage to the housing;
- Damage to the rod or piston;
- The oil is inappropriate or of poor quality.
Leaks can occur due to wear of oil seals or other seals. Oil seals also wear out naturally - the rod is constantly moving, so the edge of the oil seal wears out after some time. However, most often the oil seal gets damaged due to corrosion, scuffing and dust, sand on the rod.
Deformation of the housing is usually caused by impacts on the housing of the damping device. Dents do not allow the rod to move normally to its full height and in the place where there is deformation, the piston can rest.
The piston can be damaged only in one case - if the car falls into a hole at speed. The damper cannot withstand it and breaks through. At the moment of breakdown, the piston collides with the bottom of the chamber, which causes damage to the piston. As a result, the valves are also damaged, and the processes of oil flow from chamber to chamber are seriously disrupted.
Oil is the working fluid in a car shock absorber. The operation of the damper depends entirely on its characteristics and quality. If the oil has a low viscosity, then there will not be the required resistance to the movement of the piston - the damper will “break through” even on small bumps. In winter, oil with a higher viscosity will create too much resistance.
Step 11: Cutting the Seat
Using a compass, I drew a circle on the glued MDF sheets and cut it out using a saw. The edges were sanded with a belt sander.
Step 12: Cutting for the Steel Plate
Instead of just screwing the plate to the seat, I decided to recess it into the MDF:
- To do this, I attached and traced the plate with a pencil;
- Using a hand router with a straight cutting bit, I removed material to the depth of the plate;
- I drilled a hole in the center of the seat - it will accommodate the nut on the rod.
Samara technologies
The comfort and controllability of the standard VAZ 10 are known to everyone. On a good highway and moderate speed, these two antagonistic qualities somehow get along. If you don’t require the car to have the sharp handling of a sports car coupled with the comfort of a limousine, you can easily get by with the standard chassis settings. Especially if you strictly follow the rules - even on “green” highways, do not accelerate faster than 110 km/h. But let's leave the moral aspects and talk about technical ones.
It is possible to make a suspension that is equally suitable for rough roads and excellent highways. And they do. But this option is the privilege of expensive and thoroughbred cars, the cohort of which “vases” are not yet included in. So what, should we put up with this injustice? Not at all necessary! Samara Research and Production Enterprise Sistema Technologies is preparing a series of its new development - the SS20 suspension with adjustable shock absorbers.
Step 13: Painting
I painted all the parts with 3 coats of gloss black paint and used orange paint for the springs. The presence of a contrasting color refreshes the entire structure.
Main stages of work
At the next stage, we saw off all the excess from the glued plywood blank, giving it the required shape - this will be the pressing sponge. See photo below.
In the clamping jaw we drill holes for the lead screw and guides. Then the author proceeds to assembling the lead screw itself.
When all the structural parts are made, you can begin installation. The craftsman drills holes in the desktop leg for guides and a screw. We install racks.
After this, we attach the plywood pressure jaw. Install the lead screw. At the end of the screw we attach a tee, and insert a wooden handle into it.
As a result, we ended up with a homemade carpenter's vice. They are convenient to use for fixing large workpieces (for example, a wooden beam).
Details on how to make such yews from car racks can be seen in the video below. This idea belongs to the author of the YouTube channel Men's Craft.
Source
Step 14: Assembly
I put a cap on the shock absorbers, then a plate, which I secured with a nut and washer. I cut off the excess thread with a grinder.
How to make a handle
It is most convenient to attach a handle clamp from a drill or hammer drill, but if you don’t have one, then attach any clamp that resembles a handle. The main thing is to be comfortable.
This clamp must be secured to the part of the rod where there is a threaded connection. To do this, put on two nuts - they will act as bushings. Then you need to weld them well. Then weld the top cap of the rod to those nuts. To make the look neater, you can use a grinder to grind off any excess drops left over from welding. After which you can screw on the handle (clamp).