If you have an A4 sheet, make it square. Place the paper in front of you so that the corners point to the sides. Bend the two triangles towards the center so that their vertices touch. The bottom edge of the envelope needs to be folded so that it overlaps the side edges, and the tab can be tucked inside. When you fold the top triangle, it will cover the entire envelope.
Place an A4 sheet of paper horizontally in front of you. Measure 7.2 cm in the upper right and lower left corners. Draw the lines as shown in the diagram. Cut off these parts.
Make original envelopes using the origami technique with your own hands - they will be a great surprise for a birthday or any other occasion. The secret of this craft is that a drawing or some kind of secret message will be hidden inside. If you want, you can come up with an exciting game. For example, make 5-10 original envelopes. In the first one, hide a hint where to look for the second one. The second contains the coordinates of the third. Hide a gift in the last envelope: a letter, money, a certificate or something else.
How to make an envelope with a heart?
Preparation and folds
Place a rectangular piece of paper in front of you. This can be a whole A4 sheet or half of it. Smaller sizes are also possible if you need a very tiny envelope.
Further actions consist of creating the bends we need. Fold the paper in half widthwise.
Lay out the paper and fold the side, bringing the corner to the opposite side.
Turn over to the other side. Fold the bottom of the sheet up, aligning it with the previous fold lying at the bottom of the sheet.
Turn the sheet over again to the other side and open it completely.
Fold the upper part to the fold that was obtained after the penultimate steps.
Next, the paper needs to be laid out again.
heart
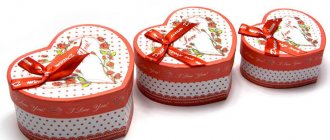
A “heart” theme is a traditional choice for Valentine’s Day, but it doesn’t have to be limited to just this holiday. Any note with warm words of love will touch the recipient even more if it is enclosed in an origami envelope decorated with a heart. Its design is simple, so the folding process will not take much time. Even in the morning, while running off to work, you can have time to make a “message” and leave it on the table or refrigerator door.
You will need a rectangular sheet, A5 or A4 format, if you need an envelope for a standard postcard. It is advisable to use paper with differently colored sides.
Fold the sheet in half along the long side and open it. Bend both upper corners towards the central axis. Turn the workpiece over. Fold the bottom part up along the fold line indicated in the figure. Return the model to the front side. Bend the sides towards the middle line.
We open the outer corners and, using the reverse fold, bring them inside the figure. Turn it over to the reverse side. We fold the upper part into a “valley” along the line indicated in the diagram. We bring the outer corners of the already developed “heart” inward. We bend the inner ones. The origami envelope is ready. Notes or postcards are placed in the pocket under the “heart”.
Envelope heart
If your choice fell on this or that person and you are ready to acknowledge him, then it’s time to think not only about specific words, but also about their beautiful design. An envelope in the shape of a heart is perfect for this. Which you can do yourself.
Prepare a square sheet of red paper.
Fold the corners neatly to form a triangle. Unfold and fold on the other side. Unfold again.
Bend one of the corners into the center so that its top touches the very central point of the sheet.
Turn the sheet over to the other side and fold it in from the bottom so that the bottom edge fits onto the edge of the top side.
Fold the left side so that its edges coincide with the outermost line of the large triangle below.
On the right side, do the same steps. The result was something like an angular heart.
Turn the wrong side towards you and slightly bend the corners on the sides.
Then bend the corners at the top by 0.5-1 cm and turn the craft over. Now you can put an ambiguous note in such a themed envelope.
Lesson #1
1: Take a sheet of A4 paper and fold it in half lengthwise. Then unfold it again - this way you will mark a fold.
2: Place the sheet vertically in front of you, fold the upper right corner towards the middle. Fold the upper left corner in the same way.
3: Measure 3.8 cm from the right edge of the sheet and fold it towards the middle. Do the same on the left side of the sheet.
4: Bend the bottom of the sheet so that the bottom edge coincides with the intersection point of the upper triangles with the curved sides (see picture), bend again.
5: Place the letter or card inside the envelope, placing it between the folded edges.
6: Close the envelope. To do this, fold the bottom part first, and then the top (so that the triangle-flap is located on top).
7: Using adhesive tape, glue the flap of the envelope, and also seal the sides with tape.
Relatives in the village
Many of us have relatives, especially older ones, who live in corners of vast Russia where such benefits of civilization as the Internet and cellular communications have not yet reached. The only way to send news about yourself is to write a letter. An ordinary letter, written by hand, without correcting errors in Word, but from the heart. Seal it in an envelope and mail it. Most likely, the letter will remain at home until it gets lost among the papers, because there is no envelope in the house. To prevent this from happening, you need to make a postal envelope with your own hands. There are quite a lot of schemes, here are some of them.
You need to cut a square from an A4 sheet, then fold it according to this pattern:
- First you need to find the center on the sheet and put a dot there.
- Bend the sheet diagonally, slightly marking the fold.
- The bottom corner is bent so that its top rests on the center point.
- The side corners need to be bent towards the center so that there is a small distance between their vertices.
- Where the corners touch, you need to apply glue.
- Close the top flap of the envelope.
This is what a letter envelope looks like.
Note! The fields for filling out the address can be drawn by hand or printed on a printer.
Method No. 2
1: Take a sheet of A4 paper and cut it to form a square.
2: Fold a square piece of paper in half diagonally, first in one direction, then in the other. Flatten the sheet again.
3: Rotate the sheet 45°. Fold the bottom corner towards the center of the sheet, then fold the bottom edge of the resulting shape along the central fold.
4: Now fold the left corner of the sheet towards the center so that the top of the triangle protrudes slightly beyond the middle of the sheet. Repeat the same on the right side.
5: Bend the tip of the right triangle so that the fold falls exactly in the middle of the part. Do not bend the corner completely - it should stick out vertically.
6: Using your finger, straighten the triangle to create a diamond shape with a “pocket” on top.
7: Fold the flap of the envelope and tuck the top of the triangle into the “pocket” of the diamond. Ready!
Children's envelope
This option is suitable for a small surprise for a child. With a festive decoration, it will be as interesting as what is in it. The children's envelope can be used by children, for example, to store notes or money in it. It can be folded easily by following the instructions
Instructions for assembling the envelope
- Take a rectangular piece of paper.
- Fold the top corners towards the center.
- The angle formed during folding is pressed to the bottom until both parts of the workpiece are parallel.
- The same is done for the second side.
- Turn the folded envelope over.
- The resulting lines need to be expanded so that a rectangle with a cut appears on the front part.
- The cut unfolds, the workpiece itself folds.
No glue
If you don’t have glue on hand and need to make an envelope, use this master class. We advise you to choose thick paper so that the design holds tighter. It's even better to take cardboard. But if you need an envelope for money or quick notes, even a notebook sheet will do.
Use this diagram to properly make your own envelope without glue.
If you have an A4 sheet, make it square. Place the paper in front of you so that the corners point to the sides. Bend the two triangles towards the center so that their vertices touch. The bottom edge of the envelope needs to be folded so that it overlaps the side edges, and the tab can be tucked inside. When you fold the top triangle, it will cover the entire envelope.
Template envelope
If you want a neat envelope with thin taped seams without large angular flaps, use this template. Transfer it to A4 paper, cut it out and glue it - nothing could be easier! Or you can take some interesting material - pages from glossy magazines, newspaper sheets, a map, even a coloring book.
Sources
- https://33-podelki.ru/konverty-iz-bumagi-master-klassy.html
- https://fishki.net/3415763-9-prostyh-idej-kak-sdelaty-konvert-iz-bumagi-a4.html
How to make a simple heart envelope
YouTube channel Step to Health
How to do
Fold the sheet in half crosswise. Draw half a heart so that its center is on the fold of the paper. Cut out the shape.
YouTube channel Step to Health
Unfold the heart. Fold the sides towards the middle of the figure, as shown in the photo.
YouTube channel Step to Health
Fold the top of the heart up.
YouTube channel Step to Health
Fold the flap of the resulting envelope down.
YouTube channel Step to Health
Glue the sides to the bottom to keep it from falling apart.
Method No. 4
Another option for a gift envelope. It can be made from multi-colored gift paper:
2. Bend the top edge of the folded half of the sheet down so that the cut coincides with the bottom edge of the part.
3. Then fold the flap in half again as shown in the picture. Fold it back again, just marking the fold.
4. Now fold the bottom edge to the resulting fold once, then again.
5. Fold the top edge of the sheet down towards the point marked in the figure.
7. Fold the right and left edges of the part to a width equal to the width of the folded triangles.
8. Mark the folds along the dotted lines as shown in the picture.
9. Unfold the folds so that you have a sheet of paper folded as shown in the figure.
10. Using the previously marked folds, bend the right and left sides of the lapel so that two triangles are formed along the bottom edge of the figure.
11. Fold the top edge of the flap along the existing fold.
12. Fold the right and left edges, laying out the lower triangles as shown in the figure.
13. Then tuck the bottom corners inward.
14. Mark the folds along the dotted lines marked in the figure.
15. Pull the edges of the lapels marked with dots and tuck the top corners inward, as shown in the picture. Smooth out all folds.
16. Now you can close the envelope by simply folding the top and tucking in the corner.
Gift envelope design
To make your envelope beautiful and individual, you will need different materials. It all depends on your imagination. These can be ribbons, beads, seed beads, paints, pencils, ready-made bows, flowers and much more.
Invite your child to decorate the envelope himself. For example, color it with pencils. Show that the sides of the envelope can be outlined with felt-tip pens, flowers can be drawn, or the entire envelope can simply be painted abstractly. Also, he can write beautiful words on the front side, which you will first help him find. Many children really enjoy gluing beads. Let your child express himself. Give him beads, beads of different sizes and glue. He will be happy to create a masterpiece on his own. You can wind threads around the envelope, gluing them evenly with glue so that they do not fall apart. This option looks organic even without additional decoration. Although, no one here will install frames for you, so you can safely glue flowers, bows and beads. While preparing the envelopes, you can try quilling with your child. Your child may enjoy twisting the paper strips, and you may end up with some wonderful items for decorating envelopes. Roll up various flowers with your child using the quilling technique, and then give him the opportunity to arrange them on the envelope the way he likes. Surely you and your little craftsman have already tried making appliqués. These skills will definitely come in handy here too. Look at several design options together and come up with a picture that will become an applique for a gift envelope.
An origami envelope with a heart will require a lot of steps. But they are all simple and understandable. Follow the detailed instructions with visual photos, and you will definitely end up with such a cute envelope.
Materials you will need:
- Double-sided colored paper;
- Any office glue;
- Depending on the situation - scissors, a simple pencil, a ruler.
Heart shaped
An envelope with a heart made using the origami technique can be presented to a loved one for any occasion. It looks really nice so you don't need to make an extra card. Include theater or movie tickets, an important letter, money for a dream, a gift certificate or any other gift-impression. Make an envelope with a heart using the origami technique with your own hands, write beautiful words - the recipient will be delighted!
For this craft, you will only need thick cardboard, beautiful packaging or thick colored paper. Watch the step-by-step video instructions in which the author clearly shows and explains how to fold origami correctly to make an envelope with a heart.
How to make an envelope with a flap and a rectangular clasp using the origami technique without glue
YouTube channel VENTUNO ART
How to do
Fold the sheet in half crosswise. Fold the front part down towards the resulting fold. Fold the same part up to the new fold.
YouTube channel VENTUNO ART
Unfold the front part and fold the bottom edge of the paper towards the fold. To avoid confusion, watch the video instructions below.
YouTube channel VENTUNO ART
Fold the resulting strip upward.
YouTube channel VENTUNO ART
Now cover it with the top of the sheet.
YouTube channel VENTUNO ART
Return the top part to its place and bend the bottom corners of the figure to the strip.
YouTube channel VENTUNO ART
Fold the right side of the shape to the left along one side of the small triangle.
YouTube channel VENTUNO ART
Fold the left side in the same way and return it back. A small rectangle will appear above the center fold. Fold the top of the paper so that the fold connects the bottom right and top left corners of the shape. Do not fold the sheet completely. Do the same with the right side of the future envelope.
YouTube channel VENTUNO ART
Unfold the bottom corners of the figure and the folded front part.
YouTube channel VENTUNO ART
Fold the sides of the front of the paper towards the middle, unfolding small triangles from below. The detailed process is in the video.
YouTube channel VENTUNO ART
Bend the part in the middle down along the fold. Fold the sides of the paper towards the center.
YouTube channel VENTUNO ART
Fold the bottom triangles under the paper along the folds. Fold the top corners as shown in the photo.
YouTube channel VENTUNO ART
Fold the top corners and place them under the center piece.
YouTube channel VENTUNO ART
Close the envelope by sliding the flap under the strip at the front.
Master class No. 3
1: Take a sheet of A4 paper, write a letter or short message on it and fold it in half crosswise. Smooth out the fold and unfold the sheet again.
2: Fold the top right corner towards the fold in the middle of the sheet. Do the same with the lower left corner.
Read also: How to make a book with your own hands
3: Fold the right edge of the sheet so that the cut coincides with the edge of the triangle folded in the second step. Then fold the left edge of the sheet in the same way (see picture).
4: Rotate the piece 90 degrees counterclockwise and fold the top right corner along the dotted line as shown in the picture. Its upper edge should coincide with the lower edge of the figure. In this case, bend the bottom fold and tuck the bent corner under it.
5: Repeat the same on the left side.
Money in an envelope: original ideas
The envelope design allows you to place the money inside in different ways.
. Here are some ideas to help you make original envelopes. For example, you could use a postcard
, inside which paste a small envelope with money.
You can write wishes on the card, and when you look inside, the recipient will find a cash gift
.
Another option is to make the envelope also in the form of a postcard, and attach satin ribbons inside that will hold the bills
.
Book of envelopes
. This original idea will appeal to those who would like to learn how to save money. You can make some simple envelopes and sign them, indicating the purpose for which the money is stored in them and the time when it can be spent.
Wicker paper heart
You will need: A4 sheets of two colors, a ruler and scissors.
Master Class
- Fold each sheet of paper in half.
- Turn them over and fold them again.
- Cut into 4 strips 15 cm long.
- Trim the edges of the workpieces so that they become semicircular.
- Make cuts from the fold line to the rounded edge to create a heart.
- Thread strips of paper alternating colors.
The woven paper heart is ready! I recommend watching the video tutorial!
VOLUME PAPER HEART\ VALENTINE
Square envelope
Cut out a square of colored paper and fold the first flap, going a little to the middle, and then bend the corner at the top along the central horizontal line. In the same way, form the second and third valves so that they overlap each other in turn. The last fourth part will be the closing part - all that remains is to seal or seal the envelope at src=»https://topotushky.ru/images/26/upload/post/2020/09/09/3415763/74c21e78155f3bf7813a584e39ea5598.jpg» class=»aligncenter» width ="750″ height="497″[/img]
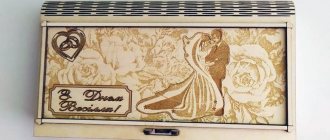
Gift envelope with a heart made of paper using the origami technique. Step-by-step master class with photos
Gift envelope with a paper heart using the origami technique Tsukanova Tatyana Petrovna, teacher of the “Paper Fantasies” class, Spas-Demenskaya Children's Art School, Spas-Demensk, Kaluga Region Gift envelope with a paper heart using the origami technique. Decoration for interior decoration, holiday table, creating a holiday atmosphere, good mood, gift. This material will be of interest to inquisitive and attentive beginner origami lovers. The master class is intended for children of primary and secondary school age, creative parents, kindergarten teachers, additional education teachers, technology and mathematics teachers, educators and counselors in children's health camps.
making an envelope using the origami technique - Learn to fold the basic "book" shape - Learn to fold according to the teacher's verbal instructions - Consolidate knowledge in mathematics - square, side of a square, diagonal, vertical and horizontal - Develop skills in folding and tightly securing the fold line - Develop visual and tactile memory, logical and spatial imagination - Develop fine motor skills of the hands, the ability to work with hands, accustom to precise finger movements, eye - Instill perseverance in achieving the goal. Encourage creative initiative - Cultivate interest in the art of origami - Cultivate accuracy, improve work skills In this master class, I propose to make a gift envelope with a heart out of paper with your own hands (Author: Irina Samarina) Colored office paper or single-sided for children's creativity, ruler, pencil, scissors
Original envelopes with a surprise
Make original envelopes using the origami technique with your own hands - they will be a great surprise for a birthday or any other occasion. The secret of this craft is that a drawing or some kind of secret message will be hidden inside. If you want, you can come up with an exciting game. For example, make 5-10 original envelopes. In the first one, hide a hint where to look for the second one. The second contains the coordinates of the third. Hide a gift in the last envelope: a letter, money, a certificate or something else.
Watch the video master class in which the author shows how to correctly fold an envelope with a surprise - this is origami for beginners. Decorate your craft with drawings, stickers, photos, and fun sayings.
Heart for Valentine's Day
An origami heart envelope can be given as a “Valentine” by putting some goodies inside, or used as a beautiful and original packaging for a birthday gift for a loved one. You can please your friend with a beautiful message or expensive jewelry. It will take very little time to make an origami heart according to the scheme of the famous Japanese master Fumiaki Shingu.
Diagram of an origami envelope in the shape of a heart:
Creating origami crafts is a very interesting activity for both adults and children. They provide an opportunity to bring various creative ideas to life, develop imagination and allow you to usefully spend your free time.
Envelope
- This is just a shell or packaging for inserting various objects or papers. Basically, we are used to thinking of an envelope as a “packaging” for letters or documents. But there are also envelopes made of thick fabrics or blankets for newborns.
Today we will learn how to make envelopes for different needs
and let's start, perhaps, with the most common envelope - a paper envelope.
Making an envelope for a letter
Envelopes have different purposes: simple, gift. Having determined the option that you need, you can proceed to the selection of material and tools. Material for the creative process, you will need basic and additional material for some small details.
In the modern world, almost any necessary thing can be purchased in a store, but making the same item yourself is much more pleasant and interesting. In our article, we will tell you how to make an envelope from A4 paper, and what types they come in.
If you do crafts or have a lot of different materials, it can be used to make a wonderful gift envelope. To decide on the necessary material for production, you can lay out several sheets of paper on your desktop and add decorative elements to them. After selection, the product is manufactured and decorated with the selected material.
ORIGAMI HEART (make a paper heart)
Good afternoon - today I will show you the most interesting ways to fold a heart using the ORIGAMI technique. That is, we will fold a voluminous puff heart from an ordinary square sheet of paper. I will show simple quick techniques that can be used as a paper heart craft for kids. I will also show you beautiful origami crafts in the shape of a heart , which can be used to decorate a gift for Valentine’s Day or inside which you can hide the gift itself (jewelry). You can make small hearts, large paper hearts. Use the heart as an idea for decorating a Valentine's card . Make a heart bookmark for a book with your own hands as a gift to your loved one. And even a heart in which you can wrap a lollipop. Anything from the simplest ideas to more complex paper heart folding techniques. Templates, diagrams, master classes are waiting for you in this article.
PLUFFY INFLATABLE
Here in the photo below we see a beautiful paper heart made of paper, which is filled with air and due to this it turns out to be plump like a crumpet bun.
The basis for this origami heart is a regular square of paper - red on both sides. Office crane paper is suitable. We fold the square in half twice - vertically and horizontally. We get a strip (a square folded in half) in which the line of the previous fold is visible in the middle. Now we raise the corners of this strip - not reaching half a centimeter to the center line (fold).
We turn the craft over so that it lies with the top of the triangle facing up. And now we raise the edges of the lowered flaps up - flush with the sides of the triangle.
Now lower the edges of the flaps that we just raised again. We raised them only to get fold lines. And now we bend both corners of the triangle (left and right) with a sharp edge to the beginning of this fold line (which we just received). We get the upper triangular ears.
Now you need to raise the corners – those sticking out below the ears. Bend these corners up. And then hide it under the upper ears.
Just the finishing touches to this simple origami paper heart craft. We see that the craft resembles a pentagon with sharp corners on the sides. We need to smooth out these sharp corners and therefore we knead them slightly with our fingers (as shown in the photo of the paper heart).
Now we turn our heart craft over so the front side is up. And we notice that at the bottom, at the sharp tip of the heart, we have a hole. We need to blow into it so that our heart straightens, fills with air and becomes fluffy like an airy soufflé.
Made from red and white paper
For this craft we will need paper that is colored red on only one side.
Here is an easy way to make an origami heart from paper painted red on one side.
We take an even square of paper as a basis. Bend the square in half - 2 times, vertically and horizontally. Then we straighten the square again with the white side up - we get 2 fold lines on it - cross to cross.
Raise the bottom edge of the square to the horizontal fold line in the middle. And immediately turn the craft over with the colored side up - so that the fold line of our edge is at the top. And now we bend 2 corners down to the middle vertical line - the right corner and the left corner at the bottom - it turns out like in photo 2.
"Windmill"
The Japanese often make decorative ziplock bags out of paper called tato. You can put souvenir coins, magnets, jewelry and other relatively flat objects in them. The package does not open on its own and reliably keeps its “secret”. It looks original and stylish, and after the gift is removed, it can be used as a Christmas tree decoration or a pendant to decorate the interior.
In the Russian-language version, the tato bags were nicknamed “Windmill” due to the similarity of the lock on them to a children’s toy windmill. This origami envelope is best made from paper with two different colored sides.
Step-by-step instruction:
- We will need a square 21x21 cm.
- We mark diagonal folds on it.
- Bend the bottom corner so that its top is 1/3 above the center. Precision is not needed here.
- Bend the top back to the fold line.
- Fold the flap towards the center.
- Repeat steps 3 – 5 for the remaining corners. Let's start from the right. Now we fold it 1/3 above the center.
- We bend the valve in the opposite direction, aligning it along the middle axis.
- And return the top to the center.
- The same algorithm applies to the top corner.
- Now for the left.
- However, we have not yet succeeded in making a mill.
- In order to fully assemble it, you need to reopen the left side and bottom of the workpiece.
- Now we make a reverse fold at the bottom and left, bringing the previously open part under the bottom.
- We beautifully straighten our “mill”, which holds the origami paper envelope together without any glue and prevents it from falling apart.
"Shirts" for letters
The word "envelope" is derived from the Latin verb, which literally means "to wrap", "to transform". In one of the explanatory dictionaries, the concept is deciphered as “writing shirt.”
The very first letter bags were made from clay. They were found in Syria during archaeological excavations. Several pieces are still kept in the Louvre.
It was not very convenient to use them - the address was stamped with special tools on baked clay; in order to read the message, they had to be broken.
A variant similar to modern correspondence packaging did not appear until 1820. An English merchant, owner of a paper factory, Brewer, made a small batch of envelopes with his own hands and distributed them free of charge to residents of his hometown of Brighton.
It was with this gesture that the history of mail in paper bags began. A simple invention very quickly became popular and in demand. Within a year, those that we made with our own hands became sorely in short supply. The first machine for the production of such packaging was invented and launched. And a few years after the development of mass production, they entered into mandatory circulation in the postal services.
Now such packaging for shipping and storage is becoming a thing of history and is rarely used. But many copies are kept in museums, become an attribute of an entire era, and are carefully passed down in families from generation to generation. And craftswomen create unique models with their own hands from the most unusual materials.