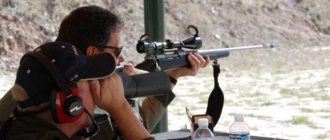
Before using any small arms, they must be sighted. This is required to find out the tactical and technical characteristics of each specific pistol or rifle. Manual sighting, in particular of pneumatic weapons, cannot show fairly accurate results and is performed on special sighting machines.
Why shoot the weapon?
During manufacturing, any pneumatic or firearm is shot using the “cold method”, but this procedure is not enough for more efficient operation. Even if a specially hired professional worked, the rifle often behaves completely differently in the hands of its owner. Since every shooter has his own way of holding the gun, applying it and then firing.
The main task of zeroing is to simultaneously combine the point of average hits with the crosshairs of the optics or the sight on the target.
During sighting work, you can determine the features of an air rifle that can later help or hinder during its operation:
- Certain optical indicators.
- Features of shooting with different types of ammunition.
- Accuracy and accuracy indicators.
Zeroing even pneumatics makes it possible to achieve guaranteed hits clearly on the target. It is performed in the following situations:
- During the installation of a new optical sight.
- When buying a new gun.
- After the wooden stock or butt has dried.
- When using new cartridges.
- Installation of additional accessories on the barrel.
- Installation of recoil reduction compensators.
- If the weapon is accidentally dropped.
- While reinstalling the bolt mechanism.
- After prolonged transportation or when stored without a case or pencil case.
- During active prolonged use.
Any change, even if it is wrapping the receiver with camouflage, will entail an increase in the dispersion of accuracy, as well as a change in shooting accuracy. For zeroing, you need to select only those cartridges that will be most often used in the future.
Taking into account the unspoken rules, sighting is carried out in several stages: the first is done on a sighting machine, the next is done manually, in the field. This is a rather expensive process, and can often use up a large number of expensive cartridges, but experienced shooters recommend doing it regularly.
The role of the machine in zeroing
Beginners in shooting always want to make this task easier for themselves; they use “available materials”: plywood, unnecessary pillows, shelves, chairs. All this is used to make gun stands. However, this structure constantly wobbles, only making it difficult to make an accurate shot. The basis for high-quality and correct zeroing is a special device for the shooting position. This designates a place for the person directly shooting and a place for the weapon.
A durable and fixed stop under the fore-end and stock allows you to ensure a constant position of the gun when firing, regardless of the shooter’s experience and number of shots. Only consistency in weapon behavior and uniform placement can guarantee accurate and effective shooting. All such required conditions allow you to create a machine.
He secures the weapon rigidly, by the stock. Specially installed stops allow the gun to roll back when firing. Supports are very popular among experienced athletes.
How to make a tripod for hunting
The video shows everything in detail. Unfolds and installs with one hand.
What's the point of raising a heavy rifle every time? Okay, I feel sorry for 140 thousand for a thermal imaging camera, I understand. But now a Belarusian night monocular, capable of “seeing” an animal in a field at 100 meters, costs 10-12 thousand. Can you afford it?!
Well, yes.. only there is a more compact version.
I've been using this for over a year now on various hunts. Using a carbine and pneumatics. It is also convenient to use it to aim the collimator on a smooth surface.
This is thoughtful chair shooting.
When shooting from a carbine, it is consistently possible to hit small targets up to 350m (I haven’t shot at longer distances yet).
Here is a plastic stuffed dove. Distance 265m. Two shots, two hits:
I also use it on the following hunts:
— at night from the approach to the fox/hare/boar. But this is not a chassis, but a quick approach to the animal using a thermal imager.
-at the storehouse. If space in the storage shed allows, then I place the rifle in this position, load it and point it at the expected exit point of the animal. very comfortably. When an animal comes out, you just need to look into the optics, point the reticle at the target and press the trigger. There are no unnecessary movements or noise that could frighten off the animal when the carbine is on your knees, standing in the corner of the storage shed, etc.
Types of sighting machines
A machine for zeroing pneumatic weapons is not a recent invention at all. Their different types are used in the army to provide soldiers with shooting skills. For example, one of the 1950 variants developed by PS51 is still in use today. The design features make it possible to rotate it in order to aim the mounted gun.
Almost all manufacturing companies that produce guns also develop their own designs of machines and stops. They all have one common feature: a rifle mount and a rigid base, which completely eliminates the effect of any subjective factors (human, strong wind). Conventionally, today all models are divided according to the following principles:
- Which only allow for maintenance or shooting of weapons.
- Highly specialized for a specific type of weapon or universal.
- Stationary or mobile.
The price of various designs will depend on the dimensions, weight, materials and assembly options, and the manufacturing company. A sighting machine that allows for rigid installation on any surface is the most reliable. Installing equipment to determine the height of the gun may be helpful. Each of the machines can be used as a stand when cleaning and lubricating weapons.
The rifle is placed on the machine (in some cases the butt is supported on a special support), it is aimed at the target using adjustment elements, and shots are fired on the machine according to the principle of a heavy machine gun. This is an excellent device for the first sighting; its results can later be corrected by individual shooting.
The sighting machine can be metal or plastic. The former are heavier and more durable, they are excellent for large-caliber rifles. Plastic devices work well with guns up to 7.62 mm, and they are much cheaper. Owners of powerful weapons, who often use them, most often buy metal products, which they then additionally try to make heavier in various ways.
The most common mistake when zeroing pneumatics: different positions of the gun in the rest or in the machine. The rifle must be placed on the stand with the fore-end, in such a way that the hand of the person shooting will be located after it.
There are a large number of models of small front stops, in particular military ones. The most practical and convenient are expensive structures with the ability to place them in different planes. Military machines do not allow for adjustment and often scratch the butt or stock of the weapon. Plastic ones are lightweight, simplest in design and cheap. They are convenient to use for infrequent shooting, as a backup option. However, for professional shooters, metal stops are optimal, which allow them to be installed at a certain height.
There are also a large number of additional adjustment devices that are not always needed: tilt angle, barrel rotation, rifles. Their cost is quite affordable and convenient to use. The most expensive models can be adjusted with a lever, which greatly simplifies the work.
As an additional accessory, some purchase a pouch for the butt, thereby creating an analogue of a collapsible sighting machine. It is filled with sand, reduces the recoil from the weapon, making zeroing more comfortable.
The main criterion when choosing any model of a sighting machine is the absence of any backlash. All interconnected mechanisms and components must be rigidly fixed.
Shooting supports.
With the rise of technology lately, hunters and shooters are more often turning to factory-made products, which are significantly superior to homemade products in quality, weight, strength and convenience. Factory-made shooting supports are made of high-strength aluminum alloy, very lightweight, fold up conveniently so that you can put them in a backpack, and take up little space. When you go to a firing position, they can be quickly disassembled, and even in the extended position they are higher than homemade ones, sometimes reaching 1.65 meters and up to 1.8 meters. This size is sometimes unnecessary, of course, because you shoot while bending down a little to reduce recoil and make it easier to aim. For shooting, a support height of about 1.5 meters is generally sufficient. Everything above is the work of marketers to satisfy the requests of inexperienced people who have little understanding of shooting, and those who give gifts to others or fulfill someone’s order.
1. Tripods – have three points of support, stable in all directions of possible swing and tilt. As a rule, they have 3 legs of 3 sections each (in manual supports), which will require a little more time to install and extend the legs, and 2 sections in automatic supports.
2. Bipods - have 2 legs, like high bipods, resistant to swinging and tilting in two planes, for example to the right and left, but will have to be supported from falling forward and backward.
3. Monopods – 1 leg, quickly expand and fold, but are not stable on their own. Convenient to use in walking hunting, when you need to constantly move and target prey from a distance.
1. Automatic, such supports have a trigger - you press and it extends itself. In order to expand such a support and bring it into working position, a minimum of time is required. You only need to move the legs of the support to the sides with the movement of your boot (if it’s a tripod or bipod). They assemble just as quickly - you pull the trigger, lower the top part down - the support is assembled. Just a couple of seconds for everything. They usually have 2 knees on each leg. The disadvantages of such supports are that they are heavier than supports with manual extension; when folded, they are more than a meter long.
2. With manual extension, disassembly will take a minute to a minute and a half, depending on skill. Each leg has 3 elbows, when extended, each knee is secured with either a collet swivel clamp (Primos legs) or a latch clamp (Vanguard legs). The petal clamp is simpler. Both hold tightly. The disadvantages of the supports are the extension time. Pros: compactness and light weight. When folded, it is about 80 cm long and weighs from 400 to 900 grams.
The supports are made of duralumin pipe, either round or having a complex profile to increase its rigidity. The coating is anodized, resistant, plastic parts have a rubberized base, very tenacious to the hand grip so that they do not slip out.
When choosing a shooting support, you should no longer pay attention to the name of the manufacturer. With today's high level of competition, all modern industrial supports have high reliability and approximately the same parameters of weight, strength and rigidity. It is worth paying more attention to functionality, the number of legs of the support, and the mechanics of its disassembly. But you need to know the manufacturers so as not to buy an obvious fake, but to purchase a high-quality factory-produced product.
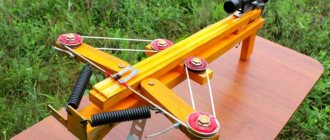
How to make a sighting machine for pneumatics with your own hands
Although purchasing the necessary equipment is not a big problem, most home craftsmen make sighting machines on their own. For example, it is worth considering one of the versions of machines for zeroing pneumatic weapons, which you can make yourself without the help of a welding machine.
Preparation of materials
To make such a sighting machine, you will need:
- Threaded stud measuring 15 mm.
- Square or rectangular profile pipe.
- One bolt with a diameter of 15 mm measures 16 cm.
- Two bolts with a diameter of 15 mm and measuring 11 cm.
- Bolts that act as rivets.
- Six 6mm bolts that have nipple nuts.
- Two wing nuts.
- 14 simple nuts.
- Metal plate measuring 7x9 cm.
- Ten washers.
- A can of black paint.
- Three corners measuring 6x7 cm.
The tools you will need are: grinder, screwdriver, electric drill.
Making a shooting machine
The main stages of work are carried out as follows.
Step 1 - you need to cut two pieces from the profile pipe, measuring 75 and 45 cm.
Afterwards it is necessary to sand both parts from various burrs. Wooden blocks are installed at the ends of the pipes to prevent deformation.
Step 2 - cut two 45 cm lengths of the hairpin, remove the resulting chamfer.
In the long part of the tube, you need to drill two holes at a distance of several centimeters from the edge. Four holes are made in a short piece (two holes need to be drilled a few centimeters from the ends, the other two with an indentation of 20 cm between each other). Next, you need to connect the ends of both sections at an angle with a bolt, 2 washers are installed between the tubes, which will not allow the paint to rub off while folding the entire structure. The bolt is attached to the wing nut.
Studs are placed on the short part of the tube and secured with nuts and washers. The main thing is to twist the resulting connections very securely, since the backlash will not allow you to accurately fire a shot.
Step 3 – the outermost hole that remains at the end of the short tube requires installing a bolt with a washer and a wing nut.
This will help adjust the horizontal position of the machine. A 16 cm bolt must be inserted into the other hole in the long part of the tube and the gun stop must be secured.
Step 4 - the weapon rest must be assembled from three corners, fixed to each other with rivets.
To avoid damaging the rifle, all elements that come into contact with it must be sanded. Including the bolt head, where the stop will become. All connections are secured with washers and nuts, to make them reliable, a vice is used. Restrictive nuts are placed on the studs and a plate is placed on top where the stop for the stock will be installed. The height of the stop can be adjusted using nuts. To make it more convenient, nuts are often replaced with wings.
Shooting tripod
Shooting tripod
Post by Prodigal Doctor » 03 Dec 2015 10:33
Re: Shooting tripod
Posted by A.A.B. » 03 Dec 2015 10:47
Like a hint
Re: Shooting tripod
Post by Sergey V. » 03 Dec 2015 10:58
Re: Shooting tripod
Posted by tango tango » 03 Dec 2015 11:03
Re: Shooting tripod
Post by dvkozurev » 03 Dec 2015 11:10
unscrew one leg from the tripod
Re: Shooting tripod
Post by Prodigal Doctor » 03 Dec 2015 11:18
Re: Shooting tripod
Post by Sergey V. » 03 Dec 2015 11:24
Re: Shooting tripod
Posted by tango tango » 03 Dec 2015 11:26
Re: Shooting tripod
Post by Prodigal Doctor » 03 Dec 2015 11:26
Re: Shooting tripod
Post by Sergey V. » 03 Dec 2015 11:38
The Prodigal Doctor wrote: https://ru.aliexpress.com/item/Primos-descent-hunting-stick-Shooting-Sticks-trigger-Sticks-tall-Tripod-35-60/32235784661.html?spm=2114.031020208 .3.120.425FW8&ws_ab_test=searchweb201556_1_79_78_77_80,searchweb201644_5,searchweb201560_1
Re: Shooting tripod
Post by asklep2009 » 03 Dec 2015 12:05
Re: Shooting tripod
Posted by tango tango » 03 Dec 2015 13:03
Re: Shooting tripod
Post by Siberian Wolf » 03 Dec 2015 13:27
Re: Shooting tripod
Posted by tango tango » 03 Dec 2015 14:04
Source