Greetings!
Today we are making paper crackers with our own hands. Let's start with the simplest ones, which clap loudly. Let's finish with some festive ideas with confetti. Interesting? Then read on.
Most of these paper crafts are made using the origami technique. And to create them, you often just need to repeat step-by-step actions, then everything will work out. Remember we already made paper weapons, airplanes and even flowers? So let's continue.
Moreover, the New Year is coming soon and a firecracker with confetti will be a wonderful addition to a homemade Christmas tree, clock and garlands!
So let's begin!
How to make a paper cracker
Handmade toys can bring joy to children. If we talk about paper products, their production is often associated with the eve of the holiday. Today we will learn how to make a paper cracker. Let's consider not only ordinary options, but also holiday ones.
A paper cracker is a toy that should not cause any difficulties in making. Of course, the first time you fold a craft, you may need adult help.
Regarding materials. Manufacturing does not require hard-to-find means; most often, one sheet of paper is enough. If we talk about a festive cracker, then the materials will be calculated based on the manufacturing option.
So, prepare the paper, now we will tell you how to make a paper cracker.
We recommend that you familiarize yourself with a selection of templates for cutting snowflakes from paper
With a surprise
To celebrate the New Year beautifully and cheerfully, you can build a firecracker with a surprise. This is the best option if you want to surprise your guests.
For work, prepare the following materials:
- toilet paper tubes;
- colored paper with a sticky layer;
- paper napkins;
- sequins and confetti;
- scissors and glue;
- gift wrapping paper;
- ribbon with decorative patterns;
- small toys, coins and sweets.
How to make a cracker:
- Cut out 4 circles from paper napkins. Make sure that their diameter is 0.5 cm larger than the cross-section of the cardboard tube.
- Sprinkle 2 circles with sequins.
- Apply a little glue to the edges of the empty circles and connect them to the sequin rings.
- Wrap the cardboard tubes in gift wrapping paper and secure it.
- Hide a surprise inside the structure and cover both ends of the tube with prepared membranes from napkins.
- Wrap the cracker again in gift wrapping paper with a New Year's design on it. Tie the edges with ribbons to create a large candy.
Attach the candy to the ceiling. To get the surprise out, you need to pierce the napkin membrane with your finger or scissors.
An unusual, but no less interesting option for an explosive surprise can be a box, the production of which is shown in the video:
Regular folding cracker
During the manufacturing process you will need a ruler and paper. It is not necessary to use office paper; a newspaper or even a notebook sheet will do.
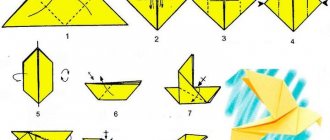
Diagram of a regular firecracker
The secret of a loud clapper lies in the size of the paper used; the larger it is, the quieter the clap will be, and working with a large sheet is not so convenient. However, the dimensions of the original sheet can be changed at your discretion.
Manufacturing process:
- Fold the sheet. You should end up with a workpiece divided into two identical halves.
- We bend the corners inward. We move to the other side of the sheet and repeat the steps. Inspect the triangles, they should be parallel to each other.
- We fold the workpiece so that the vertices of the triangles touch. We iron the resulting fold with our hands or using a ruler.
- We work with the first bent line. Fold the workpiece again.
- Now we need to get a triangle. Open the part of the craft at the top on the right side and pull it to the left. Bend the rectangle. We repeat this with the other part of the workpiece.
- Take a ruler and carefully iron all the folded lines.
The cracker is ready. It remains to be tested. Take the product in your hands, hold it by the bottom at an angle. Make a sharp movement of your hand from top to bottom. If you hear a characteristic clap while moving, then you have completed the production and now you know how to make a paper cracker.
Making an origami firecracker from A4 sheet
From a simple sheet you can make not just a toy, but an original masterpiece. Be sure to involve your child in the making activity. Just a few minutes and you will provide him with interesting entertainment. For making, try not to use thick paper, it should be soft.
Let's get started:
- place the material in front of you. Fold in half and unfold;
- We bend the corners on each of the two sides and fold the sheet again. Corners that are bent should be located inside the workpiece. There should be a trapezoid in front of you;
- Fold the figure in half again. After folding, attach the internal corners to the resulting line;
- We unfold the workpiece and fold it along the previously obtained lines. When this is done you will have a triangle. The firecracker is ready;
This toy, when compared with the previous version, is not as durable. But for playing with a baby, this is an ideal option.
Double paper crackers
These varieties may surprise you. It has been verified through experiments that the larger the wings of the toy, the louder the clap will be. Let's learn from the example of double and triple manufacturing how to make a powerful paper cracker.
Let's start with the double clapper. To create it, it is better to use a double notebook sheet.
Manufacturing process:
- fold the corners towards the middle on both sides of the paper;
- We determine the center and, focusing on it, fold the sheet;
- turn the product over and fold the workpiece along the previous line, you should get a small depression inside;
- Place the “wings” that connect the corners inside and fold them several times;
- repeat the work with other angles.
The figure located on the table is a double cracker. Test it for the power of the clap. If the sound is quiet, try ironing the sides more thoroughly. If the sound remains quiet, you need to replace the paper. If everything suits you, you can play.
Instruction No. 3
Another simple lesson on creating firecrackers using pre-prepared templates. You will need:
- colored paper;
- an awl or needle from a compass;
- scissors, stationery knife;
- ribbon, lace or thin ribbon.
Download the templates attached to the lesson (diagram 1, diagram 2) and print them on thin paper (cracker sizes are 25 cm and 16 cm). Cut out the templates along the outline. Using an awl or a compass needle, make small holes along the dotted lines, then cut out diamond shapes.
Fold the cracker first along the vertical lines, then along the horizontal ones, as shown in the figure. Glue a detonator cord to the inside.
Roll the cracker and glue it together. Tie one end with string or ribbon, fill with confetti, then tie the opposite end.
And this is what we got:
Single clapperboard using origami technique
Before you make such a paper cracker, stock up on your zest and desire to experiment. Prepare a sheet of paper and get started:
Origami clapperboard (Step 1)
- fold the sheet into a “house”;
- bend the workpiece so that the roof of the house folds inward;
- fold it in half again and break the workpiece crosswise;
(Step 2) - there should be pockets on the sides, fold one of them inward along the line;
- We repeat the previous point, but with a different pocket.
(Step 3)
The cracker is ready. For spectacular pops, place confetti inside the product before using. To do this, simply cut colorful paper or foil.
Take the toy by the edges where the pockets are located, tilt it slightly at an angle, and wave your hand sharply. You should get colorful cotton.
Festive cracker
If a fun holiday is coming up, you can’t celebrate it without this toy. It differs from previous versions of materials and the method of use.
For the first one you need to prepare:
- gift paper;
- 2 bushings (can be replaced with any cardboard);
- strong thread or cord;
- confetti;
- tape;
- cardboard;
- scissors;
- glue;
- scotch.
Manufacturing process:
Holiday cracker (Step 1)
- If you don't have sleeves, take cardboard and roll it into a tube. Glue the edges. Be sure to wait until the glue has completely dried. Make several similar bushings.
- Take gift paper; like cardboard, it can be replaced, for example, with candy wrappers or regular colored paper. Lubricate the bushings with glue and treat the finishing material with it. Cover both bushings and press the material well against the walls.
- Determine the diameter of the sleeve and cut out a cardboard circle. You need to make a hole in the middle with a needle and stretch a thread or cord. The cord must be secured with tape inside one of the cylinders.
(Step 2) - You don't have to use a cardboard circle. It is easy to replace. To do this, cut one bushing in half and insert its parts into the first bushing. You need to do it like this. So that the edges have a protrusion measuring one to two centimeters.
- We fill the future toy with confetti. It can be made using colored paper, foil, finely chopped Christmas tree rain and even chopped candy wrappers.
- We tie our cylinders like candy wrappers, with ribbons on each side. We tuck the remaining paper pieces inside the product. The cracker is ready. You can activate it by pulling the edge of the protruding thread.
Purely English entertainment
Crackers are one of the main attributes of traditional British Christmas. They are somewhat different from the usual pyrotechnic products that explode into colorful streamers and confetti. British crackers resemble oblong sweets, inside of which all sorts of surprises are “hidden”: small gifts, paper crowns and notes with playful wishes. Such devices burst mechanically, producing a soft click.
It's easy to make your own Christmas paper cracker. The assembly diagram and template can be downloaded from British craft sites dedicated to the New Year holidays. Factory-made products consist of a cardboard cylinder wrapped in bright packaging, tied with ribbons on both sides. Attached to the inside is a thin strip of Cracker Snaps coated with a detonation-sensitive compound (such as silver fulminate), much like the cap on a toy gun. Thanks to this part, cotton is heard when the wrapper is torn.
Historical link
It is believed that Christmas crackers were invented in 1847 by the owner of a small confectionery factory in London, Tom Smith. He was looking for original advertising for his products, which were almost not in demand. At first, Smith simply added small love notes to regular candy. The idea for firecrackers came when the pastry chef heard the crackling of logs in the fireplace - both festive and cozy. To insert the pyrotechnic mechanism, the candies had to be enlarged several times, and then Smith abandoned the sweet contents altogether in favor of miniature trinkets, jewelry and other similar souvenirs. The new products are called Cosaque (from the French “Cossacks”). The popularity of poppers, and with them the rest of Smith's products, grew rapidly. Later, when other confectionery factories began to produce the same products, they were united under the general term “cracker,” which translates as “cracker.”
Walter Smith, the son of the founder of the company and the successor of his business, improved the design and filling of cracker candies. He added large crowns made of tissue paper that opened up and were placed on the head during Christmas dinner. He also changed the content of the notes from romantic to humorous, thereby expanding the circle of consumers. Humorous wishes, predictions and anecdotes should have been read at the festive table. Today, all Christmas crackers in the United Kingdom are modeled after the Smith family factory.
Master Class
When making a paper cracker with your own hands, you can do without a cardboard cylinder. Cracker Snaps strips are easiest to order from AliExpress, although they are not required. It is enough to take ordinary office paper - with a sharp tug, it will make, albeit not loud, but still a characteristic flapping sound.
You will need:
- ready-made Cracker pattern;
- scissors;
- breadboard or stationery knife;
- ruler;
- layout mat;
- Cracker Snaps;
- glue stick;
- narrow tape;
- cigarette paper;
- gold marker or acrylic paint;
- twine or satin ribbons;
- decorative name tags;
- office paper, A4 format, printer.
If a packing list is used, it must first be cut into 21x27 cm rectangles.
Step-by-step instruction:
- We print the template on cardboard. It should not be too tight, otherwise there will be problems with cutting. We place a sheet of wrapping or office paper on a mock-up mat, and attach the template to the top using tape.
- We cut rhombic holes under the ruler using a breadboard knife. Here you need to be especially careful not to damage the thin partitions.
- Having finished the openwork part, we cut out the blank along the outer contour.
- Let's start folding the Cracker body. Help yourself with a ruler so that the folds are even and clear.
- We fold the openwork rhombuses in half into a “mountain”.
- We place the workpiece with the wrong side up on the plane. We practically fold the areas with diamonds in half.
- Now we begin to slowly roll the product lengthwise, forming a cylinder. The cut out sections are folded into the sides, like a fan.
- We leave the cracker closed so that it “remembers” the shape and proceed to making the “filling”.
Crown:
We make crowns from soft but durable tissue paper that folds compactly. You should not pay excessive attention to these elements, the main thing is that they can be put on your head freely. The tradition of decorating oneself with a crown dates back to the times of the ancient Roman Empire and is associated with the winter solstice holiday, Saturnalia. Then, for nationwide festivities, a comic ruler was chosen, who was supposed to give out absurd orders and lead the clownish ceremonies. His head was crowned with a crown, symbolizing power and a halo of sun rays.
The ancient rituals of Saturnalia are reflected in Christmas culture. In particular, the custom of giving small, inexpensive gifts to all participants in the festive feast and reading humorous poems also comes from there. The Christmas crown is made deliberately careless, as if slightly making fun of power and its attributes.
- We cut out a strip of 50x9 cm from the silence.
- We fold it like an accordion. We cut one edge into triangles, imitating the teeth of a crown.
- You can paint the top part with gold paint or a marker to make the headdress look festive.
- Glue the sides of the strips together to form a circle.
Assembly:
- Cut out small strips from craft or other decorative paper. We write wishes on them, “pie” poems, funny quotes, and anything that can make others laugh.
- If you have Cracker Snaps pyrotechnic elements, shorten them slightly to fit the A4 pattern (standard crackers are larger in size).
- We bend the strips on both sides by about 1 cm. Glue them to the side parts of the pattern from the inside. The central one should remain free.
- We fill Cracker with small gifts: candies, jewelry, cosmetics, magnets, key chains, and so on.
- When the preparation is completed, we roll the products again. Now it will be easier since they already hold a cylindrical shape. Close the housing securely by inserting it into the slot.
- We fasten the edges in the same way.
- If the poppers are intended for specific people, decorative name tags should be attached.
- Finally, we tie the Cracker with twine, lace or satin ribbon.
Unusual candy crackers made from a sheet of paper are ready. You need to make as many copies as there will be guests at the festive table.
How to use Cracker
When serving a festive dinner, the British place poppers near the plates. The guests gathered at the table take hold of each device in pairs and pull in different directions. At the same time, the participants of the evening form a circle, which makes the atmosphere warmer and more friendly.
When the Cracker bursts with a bang, the first thing guests do is remove the crown and place it on their head. Then they take out humorous messages and read them one by one, trying to make the neighbors have fun with all their might. After all, how you celebrate the New Year is how you will spend it.
Very simple candy popper
If you don’t have a printer at home or haven’t found a suitable template, this is not a reason to give up the idea of making a paper cracker with your own hands. Instead of a regular sheet of paper, you can take the remains of thick wallpaper - they are great for a quick model.
You will need:
- a thin cardboard tube, 12 cm long;
- wallpaper 35x20 cm;
- Cracker Snaps strips;
- scissors, glue, tape - regular and double-sided;
- decorative tape.
Step-by-step instruction:
Place a cardboard tube in the middle of the wallpaper. We attach it with double-sided tape. Place the second strip of adhesive tape along the bottom edge. We wrap the tube with wallpaper, forming a cylinder, characteristic of a cracker candy.
We take the product by one end and, stepping back about 10 cm, carefully squeeze the wrapper around the cylinder.
Leave a small hole to insert a strip of Cracker Snaps and tie decorative tape at the folds. We glue the pyrotechnics inside the package with tape.
Add gifts, a crown and a note.
We tie the second end of the Cracker.
Reusable safety cracker
This is another option for a holiday cracker; its advantage is safety and reusability. If you want your child to receive not only a festive mood, but also a lot of positive emotions, then you need to learn how to make this paper cracker.
What is needed for production:
- paper for gifts;
- multi-colored paper;
- paper serpentine;
- glitter;
- medium balloon;
- long cardboard sleeve;
- PVA glue;
- scotch;
- scissors.
Let's start step-by-step production:
(Step 1 preparation of materials)
- Take the bushing. Its length should be 14 centimeters, so it is appropriate to use this material from a paper towel or food foil. This is the main preparation.
- Cut off a larger edge from the ball and tie a tight knot at the tip. We put the ball on the sleeve with the cut side. We attach it to the cardboard using tape.
(Step 2) - Take wrapping paper (you can use colored paper). Cut out a rectangle that can completely enclose the sleeve. Glue the paper onto the main part.
- The most important part - preparing confetti - can be entrusted to children. They will tear candy paper, streamer and any other material into small pieces.
(Step 3) - Place the confetti in the blank, cover the sleeve with corrugated paper on top. Secure the paper with a small rubber band.
Our toy is ready, you can use it. To do this, take the product in one hand, point it up and slightly to the side, pull the tail of the ball and release it sharply.
Ready-made reusable cracker
Why is the cracker reusable? When the shot is fired, you can fill the sleeve with confetti again.
DIY New Year's cracker: all the pros and cons
New Year's firecrackers are quite important, as are all pyrotechnics. They can be easily found on any counter, and they cost mere pennies, but they have big disadvantages. Firstly, the factory product has a small supply of gunpowder, which can be harmful to your health. Yes, there is a negligible amount of it there, but the fact that it is there makes this pyrotechnics prohibited for children (who, however, regularly violate safety rules). Secondly, the same gunpowder produces a very loud sound when it explodes, so the product should not be exploded in a room where there are small children (otherwise it could end in severe fright). Thirdly, the gunpowder may become damp and simply not explode, which will greatly disappoint you. There is a fourth reason why you should abandon factory-made pyrotechnics - increased fire hazard, although if you make a home product incorrectly, it can also turn out to be dangerous.
You can easily make a real holiday cracker with your own hands at home, and it will be relatively safe and environmentally friendly. Today we will discuss how to make such a craft at home using improvised materials. The most creative life hacks for making New Year's pyrotechnics, which you can take to the garden or place in the children's room, are already waiting for you in our article, but remember that these products also have a drawback - you will have to clean them up not only after using them, but also after creating them .
Tips for those who are making a cracker for the first time
Even such a simple toy as a cracker has its secrets, using which in production will help achieve better results.
Here are some useful recommendations from megamaster.info:
- To make the cracker clap loudly, do not use office paper or thin newsprint. This type of paper is not thick enough to produce sound.
- Do not use the toy around small children. The sudden noise may frighten them. If the Toy is intended for a child, we recommend the last (safe) version of the cracker.
- To prevent the activity from causing boredom to your child during the manufacturing process, invite him to decorate the cracker. By the way, by decorating a cracker with gouache paints you can achieve greater paper density. Once the paint dries, it will form an extra layer of strength that will make a louder pop.
A firecracker, if made correctly and beautifully decorated, can become not just an original craft, but also a wonderful addition to a family holiday. As you have seen, you don’t need to spend a lot of money to create it. A few sheets of paper are all you need to organize the best holiday with your family.
Useful tips
If you don’t have A4 or a notebook at hand, you can also make a cracker from a newspaper, magazine or album sheet. The paper in them is thinner and the effect can be even better. Use the firecracker with caution, away from children and animals, because the loud sound may frighten them too much.
For a more spectacular effect, you can paint the firecracker with watercolors, pencils, and crayons. Instead of ordinary pieces of paper, cut paper in the form of flames, mouths, snowflakes, whatever - it all depends on your imagination . To make confetti, you can use a hole punch and different types of paper, then the confetti will look like store-bought ones.
If you haven’t fully imagined or figured out how to create such a toy, you can make your task easier and watch video tutorials on the Internet. In them you will be able to see with your own eyes the entire process of creation from scratch, better understand folding techniques and be able to repeat all the actions after the creator, which will make your task several times easier.