How a homemade feather removal machine works
Before getting acquainted with the types of plucking machines, let's consider the principle of operation of the equipment. The machine consists of a container, on the sides of which there are rubber beaters. They have a ribbed surface, which allows you to grab and pull out feathers, while the bottom of the container rotates. As you can see, a feather removal machine is a simple device.
How to use the pinching technique:
- A scalded bird carcass is lowered into the machine.
- The equipment is connected to the network. The bottom rotates - the carcass begins to jump and hits the “rubber fingers”. Feathers fly off.
At the end you will get an almost completely plucked bird, only small feathers on the legs will remain.
Which bird is used to pluck a feather plucker?
Types of bird pickers
Based on the mechanism used, the designs are divided into:
- Centrifuge . The container is generally round in shape and has a vertical opening into which the bird is loaded. Beaters on the bottom and sides of the container help pluck feathers as the bottom rotates. During operation, water is supplied to the tank for greater plucking productivity. Suitable for small birds: quails, chickens, ducks.
- Drum type . The “tentacles” are located on the surface of the drum, which is rotated by a motor. You need to bring the carcass to the drum and press it. This way you can pluck a large bird, but for small ones it is not very convenient.
- Power tool with attachment . Making such a plucking machine would be very cheap. An attachment with “tentacles” is put on the instrument and brought into the carcass. It is not very convenient to use - your hands will get tired. Therefore, to process large quantities of poultry, use the previous options.
In one hour of working with a poultry picker, you can process up to 30 carcasses.
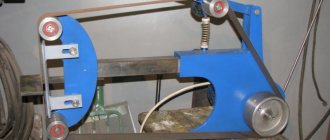
We suggest making a homemade feather plucker from a washing machine.
Soldering iron stand - what is it for?
A high-quality part is necessary for those people who do a lot of work with soldering. To make such a device as a soldering iron stand, no special skills or abilities are required. The process uses simple and accessible materials and tools. The finished device is easy to use. A homemade soldering iron stand should consist of separate elements. First of all, special containers are provided for rosin, flux and a department for mixing them. Some models are equipped with a box where small parts are stored. The soldering iron stand is suitable for any device, regardless of its power and degree of heating.
When making the structure, the location of these containers should be taken into account. Everything should be located so that it is convenient for the master to solder.
Instructions: how to make a feather removal machine from an automatic and semi-automatic machine
Before you make a chicken plucker yourself, prepare a drawing. It will help you take into account and calculate all structural elements, as well as correctly assemble the mechanism.
For production, you can take an automatic or semi-automatic washing machine. The main thing is that the washing machine is working and top-loading. It could be “Baby”, “Fairy” or “Oka”.
You will need to purchase rubber beaters. These are inexpensive parts, and you can buy them on the market or order them from an online store. It is worth considering that the size of the beaters depends on the dimensions of the carcass: the largest are for geese and turkeys, the smallest are for quail.
If you are worried that the carcass may be damaged during plucking, this is not the case. Rubber tentacles ensure maximum safety of the bird.
What tools will you need:
- set of wrenches;
- socket wrenches 8-30 mm;
- small adjustable wrench;
- drill with step drill;
- Bulgarian;
- pliers;
- hammer;
- tester or multimeter;
- marker.
Now prepare the washing machine. It needs minimal alteration, so no special costs are expected.
Converting a washing machine into a feather removal machine
All you need to do is remove the motor from the housing. Since holes for the beaters will be made in the bottom of the housing, the flowing water will fall on the engine during operation. This cannot be allowed.
Disconnect the bottom and remove the electric motor. Then do this:
- Remove the activator with the drive mechanism.
- Remove all electrical parts.
- After preparing the washer, take the shower head and attach the rubber hose to it.
You won't need a shower or hose now, but you should prepare them in advance.
Assembling the perso-removable structure with your own hands
Now you need to assemble all the elements into a single device. Do this:
- Weld a motor support from a steel corner.
- Connect the electric motor to the network. We talked about how to do this correctly in previous articles.
- Build a frame for the finished device from a metal corner. The body must be at some height from the ground.
- To make the structure work, install pulleys. You can take them from the same washing machine.
- Place the small pulley on the motor shaft, and the large pulley on the activator shaft.
- Connect the pulleys with a belt. This will allow the motor to transmit speed to the activator, which will rotate the bottom of the device.
- Now make sure that the housing and motor are securely installed, as strong vibration may cause them to fly off.
Read also: DIY cardboard shredder
All that remains is to install the rubber beaters. Proceed sequentially:
- Make holes in the tank using a drill with a step bit. Depending on the size of the beaters, the size of the holes should be three or four millimeters smaller.
- To allow waste water and feathers to escape, make larger holes between the main holes. Then install a tray or wide container under the tank to collect waste.
- To facilitate installation of the beaters, the holes are lubricated. You can use machine oil. After lubrication, insert the rubber beaters into the prepared holes.
To protect the motor from water, make a plastic casing for it from a can or box.
Assembly of the feather removal machine is complete. To ensure that water flows during operation, install the previously prepared hose and shower head on the edge of the container.
Test work
Time to check out your homemade device.
Why is it recommended to use watering when plucking? Because within 2 minutes of the bird beating against the beaters with the flow of water, all the feathers fly off. While with the dry version, large feathers remain on the bird and more time is spent.
Since a lot of water leaks out during operation and feathers fly, carry out the procedure in a specially designated area.
The feather removal machine is an example of elementary automation of farm labor. Those who breed poultry know how labor-intensive the process of plucking—removing feathers from bird carcasses—is. Even with a small population, plucking takes a lot of time and effort, let alone a farm raising chickens, ducks, turkeys and other poultry for sale. Owners of small poultry farms replace manual labor with special devices. You can buy a feather plucker or make it yourself - for example, from a washing machine.
DIY pike streamer
In the summer, aquatic vegetation grows rapidly, so many reservoirs become overgrown, making it impossible to use conventional baits. In this case, non-hooking baits are better suited, which increase the chances of catching fish, since most species of fish prefer to be in thickets of aquatic plants. Some hide in the thickets from predators, while others ambush representatives of peaceful fish. Many anglers use a pike streamer, both with a regular hook and with a non-snag hook. Such baits can be used in tackle with a Sbirullino float or in regular tackle. To facilitate the casting process, it is worth securing the appropriate weight on a separate leash.
The basis of any fly is a hook, somewhere around size 9 or 10. It is possible to use a special hook that has protection against snagging . In addition to the hook, you will need wool and a piece of lurex.
First, a piece of lurex, about 5 cm long, is wound to the shank of the hook. After this, the lurex must be fluffed using a needle or other sharp but thin object. Using the same thread, a rooster feather is attached on top of the lurex. You can use wool of different colors, but no more than five, since the presence of a large number of shades on the bait can scare away the fish. After this, the thread should be secured with nail polish. After fixing the product, the hairs are fluffed out using an awl or needle. The bait is ready for use.
This streamer catches perch perfectly if you additionally attach a certain weight to it. This bait will please the amateur fisherman with its effectiveness when catching pike or perch in the middle of autumn.
How does a plucking machine work?
A homemade feather plucking machine is assembled from a reservoir and rubber parts placed on its inner surface. These parts are called hammer fingers - they are the main part of the device. It is impossible to make these ribbed elements yourself - you have to buy them.
One chicken picker can contain up to 120 beating fingers. Their cost is rather high - on average 20–40 rubles per piece. However, this is the only major expense that will be incurred when creating a homemade product from an old washing machine. Everything else can be found on the farm - a feather plucker assembled with your own hands will cost you little. But the result is excellent: the fuss with plucking will be replaced by an electromechanical installation.
When purchasing pickers, consider the size of the carcasses being plucked. Quail beaters are not suitable for geese, broilers and other larger animals.
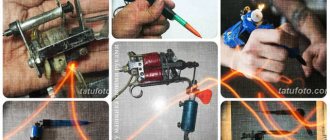
Fly tying scissors
The next most important item is scissors, and you shouldn’t skimp here. Fly tying is a precise and fine work where a lot depends on the scissors. You can cut thread and feather only with a sharp, properly directed tool. The nail scissors from my wife's table are not suitable.
Knitting scissors are designed for feathers and thread only; that's all they can cut. In the process of knitting, sometimes you have to cut fishing line, fluorocarbon, lead - under no circumstances do this with feather scissors. For this purpose let there be others. This way you will save time and nerves.
Scissors for cutting feathers should cut with a light touch and the first time.
By the way, at first, I naively believed that, as a last resort, they could be taken to a grinder. Ha ha ha.
Maybe I came across the wrong craftsmen, but both times the scissors came back to me and they cut the paper beautifully and crumpled the pen. The point, most likely, is not so much in the severity, but in the so-called direction.
In general, we buy our first scissors in a specialized store specifically for fly tying. It will take a long time to dull them with a pen and thread, so this investment is justified.
To go with them, we buy inexpensive ones for fishing line, braids, and another one for cutting lead and other wires. Total - three pieces.
How does the plucking machine work?
- A chicken carcass, previously scalded with boiling water, is placed in the container.
- The bird picker is plugged into the mains.
- After switching on, the bottom begins to rotate. The carcass, jumping, hits the ribbed rubber fingers. Feathers fly off her.
- The result is an almost perfectly plucked chicken, duck, goose, and so on. All that remains is to remove the small feathers on the paws.
The poultry plucker can handle almost any poultry - you can use it to pluck chickens, ducks, geese, quails, and turkeys.
Bobbin holder
The next tool is a bobbin holder (also known as a reel seat). It’s also a tricky thing. There are regular and ceramic ones. The difference in price is about ten times.
The most popular thread is black. For her we use ceramics. The difference between these tools is not only in price, but also in the quality of work.
It is easy to work with ceramics, the thread does not break, comes off easily and does not “run over”.
When everything goes so smoothly, you are not distracted by these minor troubles, but focus on the process itself, which definitely requires concentration.
However, during the work process it is sometimes necessary to add another thread, so in order not to re-equip in the process (and sometimes this is technologically impossible), you need to have a couple more bobbin holders with thread already threaded. To make a couple of turns, inexpensive ones will do. Total - also three.
What is the design?
- Centrifuge. A round container with a hole for loading carcasses is used. Beaters located on the bottom and sides of the barrel remove feathers as the bottom rotates. As work progresses, water enters the container to enhance the productivity of the process. This design is suitable for small animals - no larger than a duck.
- Drum. A drum with “tentacles” is used - it is rotated by a motor. The carcass is simply brought to the rotating drum and pressed. This option is convenient for large birds.
- Electric tool. This machine with an attachment requires virtually no investment. An attachment with “tentacles” is put on the rotating instrument. He is brought to the scalded carcass. The disadvantage of this option is that your hands get tired quickly.
When using the first option - a centrifuge, you can pluck 30 chickens.
Fly tying vice
If, when building a house, a competent craftsman dances from a stove, then in our business, when completing his set of tools, this stove will be a vise for tying flies.
This is the most important and at the same time the heaviest and most cumbersome inventory in this story. Fly vises vary in design, features, and price.
In the field, knitting something complex is problematic, if only because the range of materials is obviously limited.
Therefore, you need a model with a clamp with a minimum set of options. The main thing is that the jaws reliably hold hooks of different sizes and that the vice itself moves in four planes.
In principle, this is enough. If all these conditions are met, take the cheapest ones so that you don’t mind carrying them with you and using them in difficult hiking conditions. As a rule, simple vises turn out to be the most durable.
What to make a feather plucker from?
Before assembling the device, draw up its drawings - they will help you take into account and calculate all the nuances of the design. What washing machines might be useful? Any automatic or semi-automatic washing machine that meets the following conditions:
- it must be working;
- with vertical loading.
Read also: Discs for brushing wood
Washing machines such as “Oka”, “Fairy”, “Malyutka” are suitable as “raw materials” for bird pluckers. Don’t worry - the carcass in the plucker will not be damaged and will not lose its presentation: the rubber fingers are soft enough and will not cause harm.
Recommendations
For stands with a diode, select the diode itself in terms of power, with a margin designed for a specific soldering iron. For example, 25 W soldering irons will require a diode with a maximum operating current of 110-120 mA, and taking into account a 2-3-fold reserve to prevent overheating of the part itself, the maximum operating current will reach 0.3 amperes. The use of diodes with a reverse voltage less than 300 V is not allowed - if the voltage is at the limit or slightly beyond the limit, thermal and electrical breakdown will occur.
Do not use plastic as the main material - the heated inserts of the holders, which transfer excess heat in a matter of seconds, will quickly melt it. The holders will fall to the side, and the soldering iron will “move” off the stand onto the table.
It is recommended to use heat-resistant and non-flammable power cables. Ground the soldering iron body separately.
How to make a feather plucker from an automatic washing machine?
Assembling the feather removal machine consists of several stages. First, remove the motor from the washing machine body. It is important to take into account this point: when the device is operating, water will be supplied to the tank. Since you will have to make holes in the bottom for the beaters, the water flowing down will fall on the engine. This must be prevented. Perform the following actions:
- Remove the bottom and remove the engine.
- Remove the activator with the drive.
- They take out all the electrical “stuffing”.
- Place a rubber hose on the shower head - you will need it later.
Let us next consider the assembly procedure step by step.
Setting the operating mode
The drum in the bird picker should rotate in one direction. If in the washing machine it rotates alternately in different directions, you should reconfigure its operation to the correct mode. How to do it? Disconnect the body and bottom and connect the wires in the correct order. The ends of the wires are connected to the power cord. The washing machine has a hose. It is not needed in the bird picker, so it is cut off. The hole is sealed with sealant.
Creating holes
When the hose is removed and the wires are rearranged, they begin to connect the bottom of the structure to the body. Remove the screw and plug from the drum. Then, having dismantled it, they begin to create a device equipped with “fingers” - you need to attach ribbed elements. Procedure:
- The holes are drilled with a drill. You will need a special drill - a stepped type. The dimensions of the holes depend on the beaters - they are made 3–4 mm smaller to strengthen the fastening.
- When the plucker rotates, feathers and water should come out of it. To do this, additional holes are made between the holes for the beats - larger ones. Some kind of vessel is placed below to receive waste.
- To facilitate the installation of rubber “tentacles”, the holes under them are smeared with machine oil.
- To protect the engine from liquid ingress, a special protective housing is made. It is made from a plastic container.
Assembly
- A steel corner is used to create a support for the motor.
- Connect the engine to 220 V.
- A metal frame is welded from the corner - the body of the device should be at a distance from the ground.
- The pulleys are installed - they are also taken from the washing machine. The small one will be placed on the motor shaft, the large one on the activator shaft.
- The pulleys are connected by means of a belt so that the engine transmits movement to the activator and the bottom of the chicken picker rotates.
- Check the strength of the fastening of the housing and the motor - they will experience strong vibrations and, if the fastening is unreliable, they may simply fly off.
This completes the assembly. All that remains is to install a hose with a shower nozzle, prepared in advance, on the edge of the tank to water the carcasses with water.
PCB holder
The simplest version of the holder is a pair of electrical installation “crocodiles”. They are positioned so that they are turned in one direction. They are installed on supports made of linear sections of the same wire from which the inserts holding the soldering iron are made. There is also a more advanced device with brackets and guides that allows you to hold printed circuit boards prepared for soldering more firmly and reliably. The PCB retainer can be installed anywhere on the stand.
Tests
All that remains is to check the homemade device. Turn on the machine and throw the chicken or duck into the drum. Don't forget to provide water supply. When plucking dry, much more time is spent than with water. When the carcasses are sprinkled with “rain,” the feather flies off them in two minutes. The dry version also leaves a large feather. Please note that during plucking, a lot of water flows out, and feathers can fly to the sides, so you should also choose a special place for the feather plucker.
The described device allows not only to simplify the process of plucking poultry, but also to save on the purchase of an expensive industrially produced plucker. An old washing machine, a set of tools and minimal technical skills will help you become the owner of another useful household device.
Simple manual labor can be easily replaced with automated one. Thus, plucking geese can be entrusted to a special device - a plucking machine. You can either purchase it or make it yourself.
It is difficult to deny the value of goose meat and feathers. Many people can handle cutting meat, but not everyone knows how to properly pluck a bird so as not to spoil the feathers themselves and not leave stumps on the carcass, which will reduce its value.
On a large farm there is no time for such a long procedure as plucking. However, it is quite difficult, so it is better to use a plucking device. The process of its creation lasted a relatively long time.
Read also: Two switches for two light bulbs connection diagram
In the middle, friction is provoked, which causes the fingers to cut into the carcass and tear out feathers. The drum is mounted on a moving axis.
The goose feather removal machine not only saves time, but also improves labor productivity. If you have a small number of poultry, then there is no point in buying an expensive machine; it is better to make it yourself. The devices differ:
- Dimensions;
- Power;
- Number of fingers.
A homemade geese machine consists of:
Working with a goose tweezer consists of the following steps:
- After slaughtering poultry, leave the carcass for a couple of hours;
- After this, dip it in warm water for 2-3 minutes;
- Comb all feathers thoroughly. Immerse in boiling water for 2 minutes. The main thing is not to keep it for too long;
- Place the carcass in a preheated machine;
- During the automated plucking process, pour boiling water over the goose. Take it out and rinse with cool water;
- Clean areas where feather cover has not been completely removed.
If the fluff is small and soft, burn it, and then use a sharp blade to remove the spoiled areas and rinse the goose under running warm water.
It is used together with a sharpening machine or a screwdriver. The main component of the nozzle is the drum, which must have sufficient rigidity to work effectively.
Instructions for making a plucking attachment:
- Attach the bottom to a pipe with dense metal walls using screws;
- Make a hole in the center of the bottom. Insert a pin into it and secure it with two screws. Choose a diameter so that the pin is securely held in the tool used for work;
- Drill several holes around the circumference of the drum; Make them in several tiers, placing them at equal distances;
- Insert strong pen removal pins into the holes.
A machine of this type, despite its apparent primitiveness, will allow you to pluck not only geese, but also chickens, quails, ducks and turkeys. It will be useful not only for the farmer, but also for the hunter interested in processing carcasses.
The device can be constructed from a part of a pipe with a diameter of 100 mm. For this option you will need two bottoms, which can be made of wood or plastic. In the center of the bottoms you need to drill a hole through which to insert a pin to tie the mechanism and use it on the tool. As with the previous nozzle, you need to make holes in a circle and tuck your fingers into them.
- Frame on which the drum is mounted;
- Electric motor;
- Belt drive system;
- Feather container;
- Drum of any length with 2 axes.
The creation technology is similar to those presented above.
You can make a strong device from an activator-type washing unit, which is a container for plucking. The convenience of this design is that the lower section is initially equipped with a drive that can be used to transmit rotations. It is also convenient that the tanks are made of durable steel.
To transform an outdated washing machine into a powerful pinching unit, you need to build a rotating type bottom and connect it to the shaft. The bottom can be made from durable sheet metal.
Large intervals between structural elements should not be made, as parts of the carcasses will fall into them. Before fixing the bottom, you need to drill holes to fix the hammer fingers. They are drilled on the side surfaces.
Plucking geese in this design is carried out with water, so it is important to make holes for water to drain. Their diameter (mm) should be sufficient to allow clumps of feathers to escape. It is permissible to use a colander as a filter.
For a constant supply of water, you can connect a plastic hose to the inner surface of the drum.
The big advantage is that such a mechanism will be able to pluck not only geese, but also all poultry. A similar option can be done with a plastic barrel, but then you will need to make the frame yourself and build the drive mechanism.
Creating such a product with your own hands is a simple process that anyone can easily master. The main thing in this matter is to understand the importance of each component element and not neglect it. The correct sequence of actions and the use of durable materials are the key to ensuring that the structure will last a very long time.
DIY dry fly
To make a simple fly, you will need several brightly colored hairs, about 5 cm long. It is preferable to use a bright black or bright orange tint. The hook is removed from the spoon and the hairs are threaded through the ring, which are fixed on the hook using a cambric. After fixing the hairs, they can be fluffed using a needle or other sharp object.
This is the simplest fly that requires a minimum amount of time and a minimum of materials used. It can be made directly while fishing or before going fishing. The use of bright colors allows you to increase the catchability of the bait. This fly can be used for catching perch, as well as pike at shallow depths.
Mortar for fur
If you have flies with fur elements in your arsenal, it is useful to get a mortar. This tool is not needed at all to pound something in it.
Using a mortar, the individual hairs of the cut bundle are aligned. The fur hairs on the skin have different lengths, and in order for the wing of the fly to be even, the hairs need to be aligned with the edge opposite to where we cut it. One can only guess how difficult it is to do this manually, so this is also included in the minimum set.
Specifications
Feather removal units were invented relatively recently - in the second half of the last century, and the production of domestic samples began only in the early 2000s. Structurally, the feather removal machine is a cylindrical unit consisting of a body and a drum placed in it, inside of which there are rubber or silicone punching fingers. They look like spikes with a pimpled or ribbed surface. It is these spikes that are the main working part of the machine. The fingers are endowed with a unique property: thanks to the rubber surface and increased friction force, down and feathers adhere well to them and are retained throughout the entire processing cycle.
The material used to make the unit’s body is food-grade stainless steel, and light-colored polypropylene is used to make the drums. This requirement is a recommendation from sanitary inspection and is due to the fact that light-colored materials are easier to control for contamination. In addition, polypropylene has antibacterial properties and is able to inhibit the growth and development of various types of bacteria - salmonella, E. coli, staphylococci and pneumobacilli. The material also has high mechanical strength and can withstand shock loads well. The inner surface of the drum is absolutely smooth, easy to clean and not prone to absorbing dirt.
Needle threader
To thread the thread into the bobbin holder, you need a special device, which consists of a very thin wire loop on the handle. It would seem like a trifle, but without it, equipping the bobbin holder turns into a real pain.
Theoretically, a regular fishing line of suitable diameter, rolled into a loop, can help with this task, but the needle threader itself is inexpensive. It's better to have it in your work kit.
Tweezers
We complete the set of instruments with high-quality tweezers, or better yet, several with different “beaks.”
Take a hook out of the box, a bead, a tungsten head, adjust something on the fly while working, and so on. There are no general recommendations here; everything, as they say, is individualized.
Dabbing needle
The next component of the minimum set is a dabbing needle. This tricky name hides a needle on the handle, which is used to apply glue to the head of the fly.
The thing seems simple, but there are also nuances here. The thickness of the needle, as well as its sharpening angle, is designed in such a way that a drop of glue or varnish of a certain size adheres well to the tip. Regular shoe needles or a sharpened match may not be suitable for this purpose. Let's add it to the list - dabbing needle, one piece.
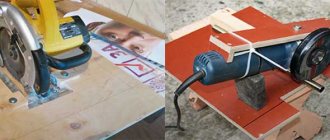
How to make a device in the form of a screwdriver attachment
To make such a nozzle, you will need a metal blank, cylindrical in shape. It is easy to make from a thick pipe made of light alloy metal. To do this you need:
- attach the bottom to the pipe section with screws;
- make a hole in the center of the bottom;
- secure the stud in the hole using nuts;
Attention! The size of the pin must match the drill chuck.
- on the walls of the cylindrical workpiece, drill holes equal in size to the diameter of the nails;
- Insert rubber beaters into the prepared holes and pull them until they are completely fixed. If the walls of the drum are thin, then the feather removal fingers are installed on the washers;
Attach the finished attachment to a screwdriver and you can start plucking the bird carcass. To increase the productivity of the device and not to have to hold it in your hands while working, the screwdriver can be attached to the desktop.
- For processing small poultry - quails, chickens, etc. It is recommended to use beaters 5 cm long, working length 4.5 cm.
- To process large birds - chickens, broiler chickens, ducks, geese, turkeys, you should choose beaters with a length of about 9.5 cm, a working length of 8-8.5 cm.
- For processing chickens and broilers, it is better to use beaters with a pimpled surface that produces delicate plucking. They are also called ball ones.
- Geese and other birds with hard plumage are better plucked with ring-shaped beaters - with a surface having horizontal ribs.
If the machine is worn out during operation, the feather removal fingers are replaced with new ones by simply cutting them off with a knife.
Pen clips
Next comes the pen clips. You also need to have at least two of them. In addition to the feather, they are used to hold thread, sometimes fishing line, and so on.
These things are inexpensive, so choose those whose design suits you most. But again, remember the rule - the simpler, the more reliable. If suddenly something goes wrong, where can I find a pen clip in the taiga?
Manufacturing process
A DIY feather removal machine can make the already hard work of farmers easier. Having all the necessary materials, tools and, if necessary, drawings at hand, it is quite simple to make a device for plucking poultry, including quails, chickens, ducks or broilers at home. As an example, you can consider how to make a feather removal machine with your own hands from an old washing machine.
In order to make a feather-plucking model for quails, you first need to acquire the following material:
- An old washing machine that loads clothes vertically (in this case, the Princess model is used).
- Beating fingers, thanks to which the feather plucking machine will ensure high-quality removal of bird feathers.
- Galvanization.
- A plastic container, such as a bucket.
The instructions for making a feather removal machine with your own hands are accessible and understandable. So, in order to make equipment for plucking quails and other poultry, you need:
- First you need to understand the operating mode of the washing machine. The model chosen as an example, like many others, operates in a mode during which the drum rotates alternately in different directions. The plucking machine should work a little differently. The drum rotates in one direction during operation. In order to correct this, it is necessary to change the operation of the selected model to a different mode. To do this, you will need to disconnect the body and bottom of the selected washing machine model and rearrange the wires properly. The free ends of the wires must then be connected to the power cord. The washing machine is equipped with a hose. A do-it-yourself feather picker for plucking quails and other poultry does not involve its use. Therefore, you can safely get rid of it. After cutting off the hose, it is recommended to seal the hole, for example, with sealant.
- After manipulations with the wires and hose, the bottom of the structure must be connected to the body. The drum will need to be removed from the plug and screw. Having removed the drum, you can proceed to the next stage, at which the do-it-yourself de-feathering machine for plucking poultry will acquire the main parts - the beating fingers, purchased in advance. To do this, the drum must be drilled. The diameter of the holes that need to be made should be about 11 millimeters, and they should be located in two rows. The punching fingers are inserted into the holes made, and it is installed in its original place.
- After installing the drum, you need to get rid of the bottom on the bucket. The sides of the bucket will need to be drilled in the same way as the drum itself. The diameter of the holes remains the same, but the number of rows increases and is 3. The rows should be located at the same distance from each other, which is 30 millimeters. The punching fingers are placed in the holes made.
- The washing machine cover and frame are removable. To do this, just unscrew the screws that are located on both sides of the selected model. Next, in order for the homemade feather removal machine, which is quite easy to make at home, to become more and more similar to the completed model, it is necessary to fix the bucket with screwed-in pins using self-tapping screws at the bottom of the installation. At this stage of making equipment for plucking quails and other poultry at home, you must be extremely careful. After all, during fixation the motor may be damaged. This can be avoided through a preliminary inspection of the future equipment in the open light and designation of the place where the upcoming fixation will be carried out.
- In order for the plucked feather to come out, the feather picking machine must have a corresponding hole. Such a hole is made in the bottom of the bucket and washing machine. After this, the plucking machine can be assembled. First you need to place a bucket in the washing machine, into which the beaters are threaded, and fix it. After this, you can close the model for plucking feathers, made at home, with the previously removed lid. To prevent the feather from scattering in different directions during operation, a do-it-yourself feather removal machine must be equipped with a chute, which can be made from pre-prepared galvanized steel.
After completing these simple steps, the plucking machine for quails and other poultry is ready. The drawings necessary to make feather-plucking models are not required in this case. After all, the description of the manufacturing process is more than clear and accessible.