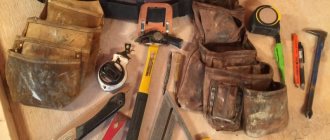
If you need a wooden mallet, but you only have a basic set of tools, this article is just for you. All you need is a saw, a clamp, some wood glue and sandpaper. If you have a miter saw, drill, and router, that's great because they can come in handy when finishing, but they're not absolutely necessary. Ready? Then go ahead!
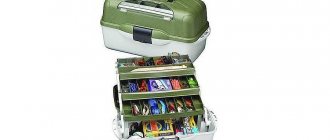
Wooden mallet: necessary materials
Mallets are usually made from hardwood, but you can use whatever you like. Wood of contrasting colors will look beautiful. We will use meranti and white oak.
Since our mallet will be made according to the “sandwich” principle, all wooden elements must be the same thickness. In our case it is 20 mm, but 25 or 30 mm will do if you prefer.
- handle: 320×35 mm (and 20 mm thick) made of oak;
- firing pin: 500×70×20 mm;
- dowels (optional): 2 elements with a diameter of 9 mm and a length of 70 mm.
ATTENTION!!!
If you want to learn more about wood crafts and the tools used for this, be sure to check out the material at this link.
RљРёСЏРЅРєР° SЃРІРѕРёРјРё SЂСѓРєР°РјРё
RџSЂРѕРґРѕР»Р¶Р°СЋ SЂР°СЃСЃРєР°Р·С‹РІР°С‚СЊ RїSЂРѕ SЃРІРѕСЋ SЃС‚олярку. RќР° SЌS‚РѕС‚ SЂР°Р· SЂРµС‡СЊ RїРѕР№РґРµС‚ RїSЂРѕ RєРёСЏРЅРєСѓ. Р'ообще SЃРµР№С‡Р°СЃ есть выбор R±РѕР»СЊС€РѕР№ РїРѕ RєРёСЏРЅРєР°Рј, отличнР* РїРѕРґС…РѕРґСЏС‚ для СЂР °Р±РѕС‚С‹ РєРёСЏРЅРєРё РїРѕєСѓРїРЅС‹Рµ РеР· белой резиРС‹.
Р'елой потому, что РЅРµ оставляет черных пятен РѕС‚ РёСЃР їРѕР»СЊР·РѕРІР°РЅРёСЏ. Есть Сѓ меня такая. Есть Сѓ меня еще другая самодельная, сделанная РёР· РїРѕРґС ѓС€РєРё РѕС‚ РіСЂСѓР·РѕРІРёРєР°.
Р'ообще Сѓ меня суммарно более 25 молотков, кувалд Рё РєРёСЏР SРѕРє.
RќРѕ СЏ придержРеваюсь RјРЅРµРЅРёСЏ, что RїСЂРёСЏС‚нее SЂР°Р±РѕС‚ать Rє SЂР°СЃРёРІС‹Рј инструментом. R SЂРµС€РёР» SЃРґРµР»Р°С‚СЊ SЃРµР±Рµ RєСЂР°СЃРёРІСѓСЋ RєРёСЏРЅРєСѓ РёР· RєСЂР°СЃРЅРѕРіРѕ дерева.
РќСѓ Р° почему Р±С‹ Рё нет? Кто-то скажет, что это RїРёР¶РѕРЅСЃС‚РІРѕ, РЅРѕ СЏ РѕС‚ работы РІ Р јР°СЃС‚ерской РїРѕР»СѓС ‡Р°СЋ SѓРґРѕРІРѕР»СЊСЃС‚РІРёРµ.
Если Р±С‹ РјРЅРµ приносили SѓРґРѕРІРѕР»СЊСЃС‚РІРёРµ RєСЂСѓР¶РµРІР° РЅР° РєРёСЏРЅРєРµ , СЏ Р±С‹ РёС… прицепил:)
RљРѕРіРѕ-то это возмутит, ребята, всем RјРёР» РЅРµ будешь.
Да, СЏ алкоголик пользуюсь SЂСѓС‡РЅС‹Рј инструментом.
Ручку СЏ решил дделать РѕР· палки РѕС‚ РґСѓР±РѕРІРѕРіРѕ RїРѕРґРґРѕРЅР°, Р° РѕРі RѕР»РѕРІСЊРµ SѓРєСЂР°СЃРёС‚СЊ SЃР°РїРµР»Рµ. Р'ыл скачан чертеж РёР· просторов интернета
РќРµ то, чтобы Сѓ меня совсем РЅРµ было РёР· чего делать СЂСѓS ‡РєСѓ, РЅРѕ для нача ла необходимо посмотреть РЅР° SЂРёСЃСѓРЅРѕРє древесины. Кто-то РјРЅРµ сказал, что это РІСЂРѕРґРµ СЏРїРѕРЅСЃРєРёР№ РґСѓР±. Р' РЇРїРѕРЅРёСЏС… РЅРµ бывал, утверждать РЅРµ Р±СѓРґСѓ.
Нарезал РґСѓР± Рё сапеле РІ S‡РµСЂРЅРѕРІСѓСЋ.
Нарезал Рё вперед, рубаночком. РЈ меня есть Рё рейсмус, Рё фуганок (Рє нему СЃ такой щепкоРNo. Рё подходить опасно), РЅРѕ СЏ ведь делаю І SЃРІРѕS' SѓРґРѕРІРѕР»СЊСЃС‚РІРёРµ?
Сапеле Сѓ меня будет РїРѕ краям, Р° внутри тот же РґСѓР±. Собираем РЅР° клей колодку. Ручка сделана РЅР° обратный клин, С‚.Рµ. РїСЂРё работе будет только SѓСЃР°Р¶РёРІР°С‚СЊСЃСЏ RїР»РѕС‚нее. Ручка РЅРµ РїСЂРеклеивается.
Теперь SЃС‚амеской Рё SЂСѓР±Р°РЅРєРѕРј S„ормируем SЃРєРѕСЃС‹, Р° также сбиваем фаски.
Ресил РЅР° ручку накл еить RїРѕР» РѕСЃРєРё S€РїРѕРЅР°, Р° то RєР°Рє-то РїСЂРѕСЃS ‚овато получа ется + есть след РѕС‚ РіРІРѕР·РґСЏ. Палка же РѕС‚ РїРѕРґРґРѕРЅР°. После SЃР±РеР» фаски РЅР° ручке, чтобы РІ СЂСѓРєРµ R»РµР¶Р°Р»Рѕ.
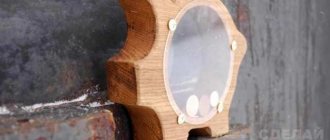
R РІРѕС‚ наш результат после RїРѕРєСЂС‹С‚РёСЏ RјР°СЃР»РѕРј.
RљРёСЏРЅРєРѕР№ СЏ пользуюсь. Р' СЂСѓРєРµ лежит хорошо, берешь SЃСЂР°Р·Сѓ RїСЂР°РІРёР»СЊРЅРѕ, СЂСѓРєРё S‡СѓРІСЃS ‚РІСѓСЋС‚ ориентацию SѓРґР°СЂРЅРѕР№ С ‡Р°СЃС‚Рё РёР·-Р·Р° прямоугольной ручки.
Задавайте Р'аши РІРѕРїСЂРѕСЃС‹, постараюсь всем ответить.
Source: https://web.archive.org/save/https://m.pikabu.ru/story/kiyanka_svoimi_rukami_5738692
We connect the elements of the mallet together
Make sure that all elements have a smooth and even surface at the junction points. Place one of the wide pieces for the striker on a small piece of wood (this is necessary so that the clamp does not leave marks on the face of the striker). All other parts of the mallet will be attached to this element.
Place the handle on it strictly in the center and at a right angle using a ruler. Once you find the desired position, secure it with a clamp. Make notes with a pencil in case the clip comes off (but try not to let that happen).
Apply a thick layer of wood glue to the inner surface of the element on one side of the handle. Glue a short striker element to it, remembering to ensure that all corners are right. The edge will stick out, but that's okay - we'll cut it off later. Secure this part securely with a clamp. Remove excess glue with a rag.
Now detach the handle, apply glue to it and glue it in place. You can make the handle stick out from the firing pin. We'll make sure it's flush. Make sure that all angles are right and the handle is exactly in the middle.
Take the second short element of the striker and do the same with it as with the first. Make sure that all elements are at the same level at the top and bottom, and that the handle fits snugly against them.
Let the glue dry, leaving the product for 24 hours. Check that the inner surface is smooth and level. Use sandpaper if necessary. Glue the second long element of the striker and secure it with a clamp. Be sure to reuse a piece of scrap wood to avoid damaging the front surface.
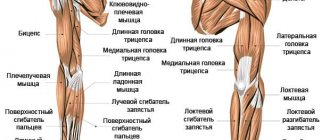
Rules for selection and operation
The choice of the necessary tool is influenced not only by the type of planned work, but also by the properties of the working surface and the parameters of the desired result. The most popular is a wooden instrument, which has the following characteristics:
- different wood in the handle and striker;
- absence of mechanical damage and burrs on the wooden surface;
- the presence of a protective coating of drying oil.
When choosing a rubber tool, you must rely on the following characteristics:
- weight;
- handle size;
- material of manufacture;
- striker diameter.
A tool that is heavy and has a long handle is capable of striking with greater force, which requires greater physical effort from the master and contributes to fatigue.
Experienced craftsmen recommend paying attention to modern models of instruments that are made of fiberglass. This material is not only highly durable and not affected by solvents, but also has a long service life while maintaining its original shape and properties.
For thin and delicate types of work, you should opt for mallets with a small head, which has a small force and impact area.
To perform work on light-colored surfaces, craftsmen advise purchasing mallets with white rubber boots. The black rubber work surface leaves streaks that are difficult to remove and can ruin the appearance of the structure. The principle and technology of using a mallet is the same as when working with a simple hammer, but before applying the first blow, you must know the properties of the material and its strength. The first contact of the tool with the working surface should have a low amplitude, which can subsequently be increased.
Working with tiles involves using light blows with a rubber tool on the protruding areas
Particular attention should be paid to working in the corners of the product, where cracks and chips may appear. Experts recommend purchasing goods only in specialized stores that have quality certificates and all permitting documents
A quality product must comply with the established GOST 19645.
Step you can skip
We will also cut the dowels into the head of our mallet. They do not perform any function other than decorative. When it comes to wood, glue provides a stronger connection than dowels, so they won’t make a difference. But they look beautiful! Drill holes through the striker, apply glue to the dowels and cut them into the striker. After the glue has dried, cut them flush.
Form
The striking part of a wooden mallet, depending on the functions performed, can have several forms.
- Round striker. It is used for installation and straightening processes. For example, this hammer can be used to straighten dents in metal. In addition, these mallets are often required for laying paving slabs and paving stones.
- Rectangular striking surface. It is used when chiseling material together with a chisel and chisel. It is also suitable for roofing and seaming, making permanent joints using seams.
- Square shape. The purpose of such a striker is roofing and folding.
We give the mallet striker the required angle
The angle of the striker should be such that its surface is approximately parallel to your hand when you hold the mallet in it. You can choose the angle that is convenient for you or simply make 4 degrees, as in our article. You can use a miter saw, but a hand saw will also work. The main thing is to make marks in advance and cut carefully. If you don't have a protractor, just find and print out any protractor online, then use it as a stencil.
Glue hammer
Analogues of rubber hammers are sold in medical supply stores, however, their price is quite high. A homemade tool will cost a small amount, especially if all the components for its manufacture are available. It is best to make a transparent or white tool, since products of other colors may subsequently leave marks on the material.
Homemade hammer made from polymer glue
To make it convenient to work with the tool, you need to prepare a good handle for it in advance. It should be oval in cross-section, 25-35 cm long, gradually tapering to the end where the head will sit. Ideal wood for creating a handle is beech, birch, maple. You can buy the pen ready-made. Products made of metal and plastic are suitable, although wooden ones are more comfortable to use. If desired, to plan the handle, use an ordinary wooden stick, a branch that has been previously dried naturally.
Making a wooden handle
Materials and tools
The following is prepared from consumables, tools and additional devices for the production of a rubber hammer:
- hot melt glue rods approximately 1.1*30 cm - 3-4 pcs.;
- a handle or steel rod with a thread at the end;
- clean water - about a glass;
- cellophane bags - 2 pcs.;
- empty medicine bottle - 1 pc.;
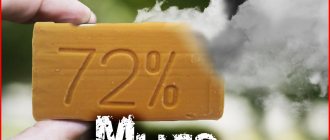
- laundry soap - 1 pc.;
- heat gun;
- vice;
- drill 1 cm;
- sharp knife;
- glass cup;
- drill;
- hammer;
- a rag.
The master should have a refrigerator and a microwave freely available. Gloves are used to protect hands, and glasses protect eyes from damage. Provide good ventilation of the room.
Making a hammer from hot melt glue
Water is heated in a glass jar or cup so that the container does not crack in the future due to temperature changes, and the glue cools in it more slowly. The most convenient way to do this is in the microwave. A vial is immersed in a glass with a heated liquid (slowly to avoid cracking). Next, proceed to the main stage of work:
- heat the hot-melt glue in the gun and carefully, in a thin stream, pour it into the bottle to the top;
- make sure that no water gets inside the container;
- after filling, leave the bottle until it cools and hardens directly in the water (about an hour), if necessary, to speed up the work, put it in the refrigerator;
- wrap the blank in the bottle in a couple of plastic bags, then throw it on the floor or carefully hit it with a hammer so that the glass breaks;
- carefully clean the future instrument from glass fragments, making sure to wear gloves, then wash it under running water and soap and wipe with a rag;
- take a knife and cut off the “neck” that inevitably remains from the mold, as a result an even workpiece will be created;
- Drill a hole for the handle in the head of the future hammer, securing it in a vice in advance, then screw in the handle.
Bringing the surface of the mallet to perfection
Sand the mallet with sandpaper. Admire the work done. If you have a router, you can create smooth curves on the handle at the grip area. If you don't have a router, you can simply sand the edges. You can also make a curve at the end of the handle. Overall, give your piece the look you want.
What is it used for?
The main purpose of the tool is to create a mechanical impact in cases where blows with a conventional hammer can cause harm to the material being processed. The mallet has found application in straightening metal sheets during roofing work.
I use it when laying paving stones and laying laminate flooring. Using the tapping method, it is possible to fit a fragment of masonry to an already laid element. When used for floor or wall tiles, uniform distribution of the adhesive mixture under the finish is achieved.
Thanks to the softened contact with the surface, metal parts are formed with a rubber hammer. For example, body straightening. To increase the degree of impact on the working surface, it is recommended to choose a tool with a wooden striker.
It is impossible to describe all areas of application of a rubber mallet. The device is in demand in private households and large-scale production. This is an indispensable item in the furniture industry. By tapping the parts being connected, it is possible to achieve maximum tightness. Carpenters use the tool in combination with a chisel or chisel. Locksmith work is performed using various machines.
Treating the surface
Mix beeswax and mineral oil and treat the item. Our homemade mallet is ready! Now you have a convenient and beautiful handmade tool. Try it out at work!
The most interesting ideas are in your inbox! Subscribe to our newsletter so you don't miss the best solutions. Just enter your email in the form below)
How to make your own rubber hammer
Hi all. In today's project, we with our own hands , similar to the hammer from the neurologist's office. You can, of course, buy a ready-made one, but why buy an expensive rubber hammer if you can make this tool yourself from hot glue sticks?!
It's very simple, cheap and doesn't take much time.
Step 1: What is needed for the project
Materials needed: - 4 sticks of hot glue (30 cm long and 11 mm in diameter) - Some water - Steel rod with threaded end - Glass pill bottle (the larger the diameter, the larger the hammer...) - Soap - 2 plastic bags
Tools (+accessories): — Hot glue gun — Wooden vice — Drill with a diameter of 10 mm — Utility knife — Glass beaker — Hammer
Electric/power tools: – Microwave – Refrigerator – Drill
Reason for making: I need a rubber mallet! Precautions: Ventilated area, leather gloves, safety glasses Cost: $2.50 Qualification: Basic Estimated time: 3 hours (
60% of which is waiting time).
Step 2: Heating a glass of water
The work begins by heating a glass of water. This will prevent the glass from cracking due to temperature changes and will also help the hot glue cool more slowly (next step).
I put a glass of water in the microwave for over a minute. A kettle is also suitable for this operation.
Next, I slowly immersed the bottle into the glass. Be careful not to crack it.
Step 3: Pouring Hot Glue into the Glass Bottle
Start pouring hot glue into the bottle. Make sure that no water gets inside the bottle through the neck.
Step 4: Let the hot melt glue cool
Allow the hot melt glue to cool for one hour. After 60 minutes it will be slightly warm.
I then placed the bottle in the refrigerator and (intentionally) forgot about it. This is a good idea because the hot melt glue will harden better in the cold.
Step 5: Break the glass bottle by throwing it on the floor!
First, wrap the bottle in two plastic bags. Then throw it hard onto the floor. I didn't succeed the first time. I had to throw the bottle 5 times to get the glass to crack!
Don't forget to wear safety glasses, safety is always important!
Step 6: CAREFULLY Remove the Glass
The hot glue stuck to the glass so much that I had to use a hammer. Remove any remaining glass by first wearing leather gloves.
Step 7: Hot glue the blank
Remaining dirt and pieces of glass should be removed. To do this, rinse the resulting workpiece with water, soap it, and then rinse again. Next, wipe dry with a towel.
Step 8: Cutting off excess hot melt glue from the workpiece
Excess hot melt glue forms in the neck of the bottle. Cut them off using a utility knife.
Step 9: Drilling the hole for the handle and securing it
I clamped the resulting hot glue blank in my wooden vice. Next, I drilled a hole in the center of the piece, about ¾ inch (1.9 cm) deep. The hammer handle should be inserted into this hole.
What are there
Standard devices come in the following types:
| Type | Description |
| Wooden | Scope of application: molding of raw materials and structures during assembly and dismantling. |
| Rubber | It is expected to work with products that are too sensitive to pressure. The handle is made of metal or wood. Popular with roofers. |
| Construction | It is used for installation of soft metal-plastic and metal structures. Equipped with a head made of rubberized material. |
| Inertialess | It is used when manipulating structures in which it is necessary to maintain the integrity of the surface, for example, assembling furniture sets. The inside of the striker has an elongated cavity containing metal shot or balls that prevent it from rebounding. |
| Locksmith | Used for folding and straightening material, or when working with sheet metal. There is a rectangular striker and a round wooden handle. |
| Carpentry | Features wide and flat sides. Slotting work cannot be done without it. Suitable for adjusting planing devices. |
| Turning | The scope of use is identical to metalworking, only all its parts are made on lathes. |
| Plastic for roofers | Can be found where double standing seam technology is used. Impact-resistant polyethylene is used in the manufacture of the striker. |
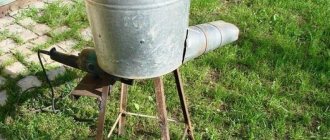
| For tiler | There is a rubber head with a round heel. To lay the paving stones, use a 400 g device. For paving slabs, you need to choose a product weighing from 600 to 800 g. |
| "Carver's Hammer" | It looks like a hand bell or a one-handed rolling pin. Designed for wood carving. Made from hardwood. Can be used to create sculptures. |
| Textolite | Has electrical insulating qualities. Jewelry and body work cannot be done without it. Helps where sparks from impacts cannot be allowed to form (gasoline tanks, etc.). |