The diversity and availability of natural materials provides great opportunities for handicrafts and creativity. You can make interesting and useful things for home decor from almost anything you can get your hands on, and besides, such accessories fit perfectly into the now fashionable style of eco-interiors. So, for example, while walking in the forest, the idea came to me to weave a basket from pine needles. It turned out to be not at all difficult and it worked the first time, and the result looks very neat and nice. Do you want to create an eco-interior or decorate a room in a rustic country style? Feel free to start creating decor from natural materials! In this article we will tell you how to make a basket from fresh and dry pine needles.
Features of creating crafts from tree needles
Before starting work, you should take into account that dry needles are more prickly than fresh pine needles: it may be worth giving your child thick gloves so that he does not injure his fingers when assembling a complex figurine. In addition, when picking needles from branches, you can get dirty with tree resin.
Material for crafts is collected on a walk near the Christmas trees (you can also find cones there) or a few branches are left for creativity after the New Year holidays.
Crafts from cones and needles can be made not only in a natural style: the material painted with paint or shiny varnish will become an original interior decoration.
Which tree needles can be used in crafts?
The choice of material for work depends on its subject:
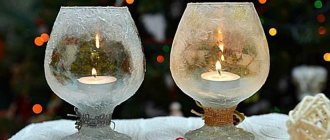
- Fir needles are good for making small crafts, decorations for a candlestick or holiday table - they are short, easy to work with and have a strong smell.
- Pine spines are suitable for creating large and voluminous compositions or weaving.
- Fir needles are plastic and small in size, but at the same time they have no smell, so you won’t be able to create a fragrant craft from it for the New Year’s mood.
All About Forest Wool. DIY pine needle yarn
Don't be confused if this is your first time hearing about pine wool. No one has heard of it for a long time; obtaining forest wool is a forgotten skill. In the old days, the so-called “forest wool” was known - a fibrous material extracted from pine needles.
The Encyclopedia of Efron and Brockhaus - and she can remember little: “Forest wool or pine wool is prepared from fibers contained in pine needles. L. wool finds (limited) use for making fabrics, the wearing of which supposedly should have healing value.”
To obtain “pine wool,” the needles were steamed, boiled in lye, combed, washed and dried.
The resulting fiber was used to make warm knitted items. “Pine” clothing was considered not only warm, but also very useful, preventing rheumatism.
Very little information about forest wool has survived to this day. Memory and knowledge about natural products has been replaced among the people by artificial and synthetic ones. This applies to both food and clothing and other areas of everyday life and life in general.
The reason why surrogates have taken over our lives is very simple - natural things are difficult to obtain. But please dilute a quality product with petroleum products. That is why many have now begun to pay attention to eco-products.
But here it turns out that some materials are simply lying around underfoot!
1) Warmer than animal wool (That’s why they used to knit foot wraps from pine wool, insoles, shower warmers, knitted socks.) 2) Has a beneficial effect on the human body 3) Has medicinal properties (relieves pain, improves blood circulation) 4) Pine trees grow themselves, there is no need to cultivate huge fields, as for cotton and flax. 5) Chemicals are not used. fertilizers for needle growth!!! 6) In general, this is a very comfortable out-of-season material. Collect all year round. This can be done between main tasks. There are no emergency situations with her. (In winter and summer in one color) 7) Pre-treatment can be minimized if you use the first processing method - soaking. Storage of raw materials is quite convenient. 9) Eco raw materials! We hope that together we will restore the true properties and benefits of forest wool. 10) Remarkable thermoregulation of tissue. The breathability and good thermal conductivity of forest wool provide good moisture removal.
How to get wool from needles
To do this, you need to know how thread is made from plants. Thread can be obtained not only from flax or hemp - for example, nettle or fireweed are also suitable for this. Their long stems determine the length of future fibers, which are twisted together to form a thread.
In a nutshell, the process is as follows: the dried stems are crushed in a mill - a special device that seems to crush the stems centimeter by centimeter to make them soft. Then comes scuffing and scrubbing - at these stages the solid remains of the stem are removed. Carding is the final phase of preparing the material for yarn. As a result, smooth fluffy strands of plant fibers without foreign inclusions are obtained.
With pine needles it’s a little more complicated. To obtain fiber from pine needles, you need to break through their tough cellulose. Unfortunately, no reliable data has been preserved about the methods used by our ancestors. It is only known that before processing, the needles were soaked in water for two to three months, changing the water every week or more often. So, there is no recommended recipe, so now the information is obtained empirically.
Currently, there are six methods for processing pine needles. five of them here. But for the sixth method, we invite you to the festival of crafts KRAPIVA+
Let's leave the cream for the festival, so to speak!))
After soaking in five different ways, we move on to kneading. Let's start obtaining forest wool fibers. To do this, you need to drain the water, put the needles in a bag and immediately begin beating and kneading.
The kneading procedure is long and meditative, but only after doing it can you see the first long-awaited fibers of forest wool.
The needles are almost black after boiling. As soon as we begin to crush the color will change to brown.
It is necessary to periodically rinse the fibers from small debris and continue kneading and beating again in a bag or without it. Finally, the fibers become light brown and lighten even more as they dry.
Spinning from pine has its own characteristics due to the special properties of the fibers of these plants. Our ancestors used this technology to spin, only of course not on an electric spinning wheel, but on a spindle. Although the formation of the thread itself, the beginning of twisting, is very similar.
If you have seen free-motion embroidery, the effect is approximately the same, as if it were not your hands, but the machine itself that formed the pattern. The most important point when hand spinning is to draw out the required amount of fibers and stretch them lengthwise.
The peculiarity of nettle spinning is that it is necessary to frequently and abundantly wet the fibers and thread. But for pine fibers this is not necessary; they need obedient hands, since they themselves are very disobedient and short, which makes the spinning process difficult. Therefore, you need to mix them with other fibers that have a decent length - nettle, hops, fireweed, flax. Blends can be with different fibers, even animal fibers, and in different proportions.
First, you need to collect pine needles and decide which needles to work with: a). Yellowed needles that have already undergone partial processing in nature; b). Fresh collected from tree branches; V). Recently (after the wind) fallen from the branches; G). Perhaps the collection season would also make sense: winter, spring, summer, autumn... Presumably the best time is winter. There is proven experience. But comparisons with other seasons were not made.
• FIRST METHOD: Soaking. Pour the needles with plenty of water at room temperature. Change the water 1-2 times a week. Maintain this regime for 2 months. This technology is the longest and has already been proven! Quite simple - you only need to change the water. The output is a high-quality mass of fluffy fibers. Does not require strong mechanical processing. And one more not obvious, but important plus, antiseptic substances are washed out slowly - from the edges to the center... And as a result, there is less risk of ruining everything completely than in the second technology. It will be visible when compared with the second method. But there are also disadvantages: firstly, you will not get industrial volumes; you need large free dishes and space, a water supply, and also a drain. Secondly, if you are undisciplined, then this is not for you! You can easily lose everything - it will rot. This option is good for the village in summer. For those who have water, as a semi-industrial method - i.e. for yourself and your family.
SECOND METHOD: Steaming. Processing time is less than about a month. You need less water and less attention, but the quality may be worse... (Check it yourself!) Pack the needles tightly in a container of any size. Pour boiling water over all this. Close the lid tightly and insulate (wrap it in a warm blanket). All this costs 5 days. Then the water is drained. And we repeat everything again, but now you can stand for no more than 4 days. The third and subsequent procedures should be carried out at least every 4 days, but not more than once every three days. And so on until the end of the month! The gain per month of time is still not that big. Let's add boiling water here and we get a complication of the technology. The advantage is that boiling water sterilizes the needles. Less risk of ruining everything. You can put everything very tightly and there will be more yield from the working container. The advantage is the ability to take smaller containers and less water. But the quality of boiled needles is different - they are tougher. Apparently not everything softens during cooking. But this requires verification.. This method, in our opinion, is good for the first acquaintance in the city, in the kitchen, with a small saucepan, on the balcony or in the refrigerator. Let’s say you brought 0.5–1 kg of pine needles from the forest and want to try the procedure in an old enamel pan [We warn you, you will ruin the pan forever – you shouldn’t take a new one]. The advantage of this technology: sterilization - while pouring boiling water. But it's not complete. Since the needles have already cooled down. And when you add 100° water to the needles, you don’t get the required 100° in the pan. And if you accidentally contaminate the water during the third or later procedure, then the risk of ruining everything may be even greater than in the first method. But don’t forget about the small dishes that we put in the refrigerator.
THIRD METHOD: Bringing to a boil. In this technology we are trying to combine the advantages of the first and second methods. Fill a pan with tightly packed needles with water and heat. Bring to a boil, remove from heat and quickly wrap in blankets, leaving until the next day. For tomorrow we change the water and do it all over again - until it boils, insulate it and wait until tomorrow. It will take at least a week to get the fiber. It's even tougher. By the way, there is an idea that sufficiently soft fiber can be obtained only after 2 months, regardless of the processing method. Water has this effect (and it doesn’t matter what its temperature is). So maybe the first method is the best. But you should check this private judgment. Pros of this method: less time.
FOURTH METHOD: Boiling for 2-3 hours. We lay the pine needles tightly, fill them with water, put them on the fire, bring them to a boil and simmer for 2-3 hours over low heat, wrap them up until the next day. The next day we drain it and start all over again. We continue for 7 days. In general, everything is the same as in the third method, just boil for 2-3 hours. Result: You should say goodbye to the pan already on the 2nd day. After 7 days you can get the result. And although the fiber is made even tougher, and the needles will have to be kneaded manually, we still save 7 days. Sterility is fundamentally higher than in the first and second methods.
FIFTH METHOD: Boiling for 30 minutes with ash (or potash). What the idea is here will become clear if you get the result - everything is very tough. Although the needles scatter, they don’t fall apart willingly. Perhaps it’s really worth working on the water and that’s it (the first method). But there is another approach - coking of fibers can be prevented with alkali. Let's say right away that the method is dangerous - it is alkali. We recommend using natural (ash) potash. Why? Yes, because it does not dye the fiber like ash, and there are no harmful substances in it. But you need to be able to get it correctly. And this is also technology. To begin with, simple soda ash Na 2CO 3 is suitable as an experiment - it is sold as a laundry additive. (And under no circumstances should you use caustic soda - NaOH). This recommendation is only for a short experiment. For future work, try making natural (ash) potash. The technology is similar to the 3-method, with the only difference being that potash (or soda) is added to the water during boiling. We recommend 1 tablespoon per 1 kg of needles. But, in any case, we should strive for smaller doses. The fiber is soft and fluffy, but not strong.
Currently, there are six methods for processing pine needles. five of them here. But for the sixth method, we invite you to the crafts festival KRAPIVA+ (5-12.08.2019)
We invite everyone who wants to get pine yarn with their own hands together with us to the festival of crafts KRPIVA+
The aroma of pine needles in the house.
A simple and incredibly successful solution for anyone who will only have an artificial Christmas tree in their home. You can create the scent of a real Christmas tree yourself!
You'll need cinnamon (sticks are best, but powder will work) and other Christmas spices, such as nutmeg, cardamom, cloves, and pine or spruce needles. Boil the spices along with the needles and store in a warm place. If necessary, the mixture can be heated. If the house has a fireplace or stove, place the mixture in them. If you can’t get pine needles, just add a few drops of fir oil, which you can buy at the pharmacy, to the broth.
House decor made from branches for the New Year
If you have bought a Christmas tree, but the festive mood has not settled in the house, you can complement it with positive New Year's ikebana.
Ikebana is an alternative to a bulky Christmas tree that has nowhere to put.
After all, not all people install natural wood, preferring a more affordable artificial product.
What about the aroma of natural pine? A New Year's decorative craft made from natural branches will help fill your home with the unique aroma of a coniferous forest.
Decor made from pine needles will enliven the space of the house, breathing into it joyful notes in anticipation of a magical holiday. Such New Year's ikebana can be made with your own hands from spruce or pine branches, pine cones, New Year's balls and festive tinsel. Use a beautiful bottle, basket, felt boots, or felt boots as the basis for such a product.
You can complement the New Year's composition with red apples, tangerines, whole walnuts, honey and gingerbread. A composition of pine needles, star anise and cinnamon sticks will help create a unique aroma.
You can decorate different areas of the house with these crafts:
- decorate the surface of the fireplace with them;
- festive table;
- staircase railing to the second floor;
- front door;
- sideboard, racks, shelves.
On a note! A floral sponge will help extend the life of an ikebana made from living pine branches. Crafts made from artificial twigs have no expiration date.
Another variation on the theme of wreaths...
If you love Christmas wreaths very much, you don't have to limit yourself to just one for your front door. You can hang homemade decorations anywhere, we will decorate them accordingly. For example, a composition of wreaths made from different coniferous branches looks very harmonious.
Instructions:
- Select branches from different coniferous trees that are approximately the same size.
- Make a ring out of thick wire and paint it white.
- Secure the branches to the base with wire or a glue gun.
- Hang the wreaths on a wide red ribbon at different heights.
- If desired, you can add decor from ribbons and balls to the wreaths.
What can be made from branches?
Since childhood, the aroma of pine or spruce has been associated with the New Year, but today fewer and fewer people want to buy a whole tree for the holiday. And there are many reasons for this:
- Saving. Green spruce or pine is a rather expensive pleasure, which not every family can pay for.
- Place. Not everyone has spacious apartments to mount a huge Christmas tree.
- Time. Selecting, buying, bringing and installing a New Year's beauty in your home requires a lot of time, which not everyone has.
Have you ever decorated a house like this?
Not really
Instead of a whole tree, you can use artificial or natural branches, decorated with your own hands in New Year's style. This decor will allow you to bring a winter fairy tale and a festive atmosphere into your home.
Crafts made from pine needles come in a wide variety of varieties:
- Coniferous wreaths. They are pine or spruce branches, carefully laid out in the shape of a round wreath with additional decor in the form of New Year's toys, pine cones decorated with sparkles, wooden pendants, beads, ribbons, etc. Such products will help decorate the front door both outside and inside the house.
- Compositions of coniferous branches with candles. The principle of operation and methods of decoration in this case are similar to the technique of creating a wreath, but the branches of pine needles are laid out in any shape, and not in the shape of a circle. A candlestick with candles in the New Year style is placed in the center of the composition;
- A DIY Christmas tree made from branches: Christmas tree decorations, nuts, candies - all this can be used to decorate a homemade beauty. To make such a craft, you need a base in the form of a strong stick with a stable base, onto which individual coniferous branches are fixed. As a result, the finished tree looks so natural that it is difficult to distinguish it from a real tree.
On a note! The decor of a composition made of pine needles can be very diverse. Absolutely everything that is present in the needlewoman’s arsenal is suitable: beads, ribbons, rhinestones, whole and broken Christmas tree decorations, pendants, brooches, ribbons and much more.
Mistletoe for kissing.
According to tradition, if a single guy and girl accidentally end up under mistletoe branches, they must kiss. Sometimes lovers can wait for hours for their other half under the Christmas decoration... You can make your own Kissing Ball instead of relying on luck!
Instructions:
1.Choose a base for your ball. It is more convenient to work with special balls from a florist store, but you can simply make a wire frame.
2. Attach the pine needle branches to the base.
3. Complete the composition with mistletoe leaves and other greenery of your choice.
4. You can decorate the kissing ball with pine cones and dried flowers.
5. You can complement the ball with a gold or scarlet flyer, which, among other things, can be used to secure the composition in the right place.
Make a broom for a bath
Bath brooms made from Christmas trees only at first glance seem like instruments of torture. If you leave spruce branches in hot water for an hour, they will become soft and turn into a good massage tool. But for these purposes it is better to use fresh branches rather than half-dead holiday decorations.
Therefore, to make a bath broom, it is better to take fir branches: they are not so prickly and do not crumble, and they contain no less beneficial essential oils than pine and spruce. You just need to select large branches, tie them together, and the bath accessory is ready.
Bath sheet: a detailed guide to the Russian bath →
Place in sachet
flickr.com
flickr.com
flickr.com
flickr.com
flickr.com
The smell of the holiday will always be with you if you put the fir needles in a beautiful fabric bag and tie it with a ribbon. You can also add cinnamon, orange peels or lavender to the sachet. For bags or pillows, it is better to take a small canvas: the sachet will smell stronger, and you can first do cross-stitch on the fabric.
Ready-made sachets can either be hung in the bedroom or placed between stacks of bed linen. The main thing is not to forget to knead them from time to time so that the essential oils come out and the aroma is preserved.
Use in the countryside
Spruce needles are ideal for mulching the soil. By covering the ground around the plants with pine needles, you will rid them of weeds and parasites. In addition, this will allow you to water the garden less frequently and loosen the soil, protecting it from washing out and weathering.
Mulching strawberries with spruce needles will help especially well: the berries will rise above the ground and will not reach anyone but you. The needles are also suitable for crops that love acidic soil.
And peeled branches can make good homemade supports for climbing plants.