The wear and tear of large household appliances leads to the fact that owners get rid of them and purchase a new unit in return. Home craftsmen are in no hurry to scrap old equipment without removing its working electric motors. Connecting the washing machine motor to various home-made devices can significantly save money.
Using the engine from a washing machine, you can build a sharpener for sharpening tools, knives, machines for various purposes, circular saws, feed cutters, concrete mixers and many different devices and homemade devices.
Before you connect the engine, you need to find out what type it is and what it is capable of. The scheme for connecting the motor to the household electrical network depends on this.
After reading this article, you will learn about what types of electric motors from washing machines exist, how to connect the motor from a washing machine to a 220 volt network, if it is asynchronous, collector or inverter type. And most importantly, you will learn how to make the connection yourself.
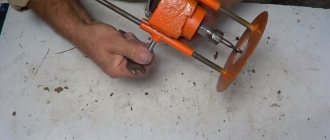
Circular saw from an engine from an automatic washing machine
The author used a 430-watt motor from an automatic washing machine as a power unit. The selected engine produces as much as 15,000 revolutions per minute, at such speeds the saw has monstrous performance, but this is unsafe and unnecessary, so in the future the author plans to reduce the speed by installing a resistor or something similar. The machine is assembled simply and quickly, the author had a table already ready, he used an antique foot-operated sewing machine. So, let's look in more detail at how to assemble such a machine!
Materials and tools used by the author:
List of materials:
— motor from a washing machine; - metal table (from an old sewing machine); — corners, channels, etc. (for making a frame for the engine); - switch and wiring; — a circular saw blade (the author has it attached to a bolt); — drill chuck (installed on the motor shaft); — nuts, bolts; - plywood.
List of tools:
- Bulgarian; - welding machine; - drill; - wrenches, etc.
Manufacturing process of a circular saw:
Step one. Preparing the basis
As a basis, the author used a metal table, which in ancient times was part of a foot-operated sewing machine. You can assemble such a table from scratch using a corner, pipes or something similar. We weld two corners or channels to which we will then screw the engine.
Step three. Final revision
To finish, we will screw protective plywood plates over the engine to prevent chips from falling on it. We cut out the parts from plywood and fasten them with self-tapping screws. That's all, the machine is ready, let's move on to testing! During testing, it turned out that the speed was too high, causing the table to move around the garage. The power of such an engine turned out to be more than enough. In the future, the author plans to modernize the machine - make the speed lower.
In general, the homemade product turned out to be successful and viable. I hope you liked the project and found useful information for yourself. Don't forget to share your homemade products and experiences with us!
Source
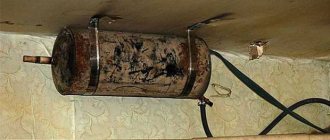
What can you make from a drum?
Here is a short list of what can be made from a drum:
- decorative lamp;
- coffee or coffee table with lighting;
- protective container for bulbs and other plants;
- smokehouse;
- barbecue;
- feather removal machine.
Decorative lamp
To make a decorative lamp from a drum:
- place a lamp or other light source in it;
- place it on a beautiful leg (floor lamp) or hang it from the ceiling near the bed (night light);
- Take the power cable and plug out.
Coffee or coffee table
In such a table, the drum serves as a cabinet on which the tabletop is fixed, which opens up enormous scope for creativity. For example, the tabletop can be made of natural or organic glass with a pattern on the back side , and a backlight lamp can be installed in the drum.
You can make the tabletop opaque, but place a lamp inside the drum, covered with a colored diffusion dome; after turning on the lamp, the cabinet will begin to glow, creating a feeling of mystery and romance.
Protective container for bulbs and other plants
If moles or any other pests damage ornamental or fruit plants in your area, dig a drum into the ground, then fill it with fertile soil .
Thanks to the small holes, water with nutrients dissolved in it will penetrate into such a protective container, and pests will not damage them, because they will not be able to get through the stainless steel walls.
Another method is to plant plants in a drum filled with soil and located on the surface of the site as a decorative flower bed.
The only drawback of such a container is that it slows down the soil regeneration process , so it is advisable to update the soil in it every year or every other year.
Smokehouse
If you need a smokehouse, then do this :
- make or use a ready-made smoke generator (for example, a potbelly stove); for hot smoking, a steel barrel with a diameter equal to the diameter of the loading hole of the drum is suitable;
- in the back of the drum, where the pulley is located, cut a hole whose diameter is equal to the diameter of the stove chimney;
- if you are using a barrel stove, then cut a hole equal in diameter to the loading hole;
- attach the drum to the smoke generator, then fix it;
- make submersible trays for storing food, you will lower these trays into the loading hole;
- make a steel lid to cover the loading hole (do not use the standard washer lid for this, because it is made of plastic).
Brazier
To make a grill from a drum:
- disassemble the semi-automatic machine;
- remove the tank with the drum from it;
- cut the tank and pull out the drum;
- remove all plastic parts from the drum;
- Place the drum on a flat dirt or concrete area.
To use the grill, load it with charcoal, then light the fire. Thanks to perforations in the bottom and walls, the coal will receive enough air for combustion .
If you prefer to heat the barbecue not with coal, but with wood, then cut them to such a length that you can lay them across the drum and they will not rest against its walls.
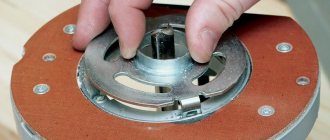
Feather removal machine
Such a device will be useful to everyone who raises poultry for food or for sale, because it reduces the time of plucking each carcass several times, and also eliminates the need to perform this operation manually.
are not very efficient due to their low engine power , so before plucking the carcass you have to soak it in boiling water, which is not always convenient.
The most efficient machine is made from a drum and tank from a semi-automatic machine and a 500-1000 W motor.
The principle of operation of the feather removal machine is that a rotating rotor with rubber fingers mounted on it causes the carcass to rotate along unpredictable trajectories, tearing some of the feathers out of it.
The additional fingers installed on the tank perform the function of a kind of brake, while also tearing out the feathers.
Tools and materials
To make such a machine you will need:
- an unnecessary activator washing machine with a working motor and belt drive or a tank and drum from a semi-automatic machine with a 500–1000 W motor;
- finger-beats 50–100 pieces, they can be ordered in the online store;
- plastic pipes or rubber hoses for the hearth
- steel pipes for making the frame;
- drill with a set of drills;
- Screwdriver Set;
- set of wrenches;
- grinder and welding inverter (only for converting a semi-automatic machine).
Procedure
To turn an activator machine into a pen removal machine, proceed as follows :
- Remove the activator, then drill 10-15 holes in it for the fingers, placing them at approximately equal distances.
- Make sure the drain works and clean it if necessary.
- Mark the body (tank), drill 4–5 rows of holes for the fingers on each side, 4–6 holes per row.
- Insert your fingers into all the holes so that they point upward on the rotor and inward on the housing.
- Replace the rotor.
- Modify the power switch so that the activator motor and the water drain electric motor are turned on at the same time; if they operate from the same motor, then modify the system for turning them on.
To turn a semi-automatic washing machine into a feather removal machine, do the following :
- Disassemble the device, remove the tank and rotor from it.
- Cut the tank crosswise to remove the drum.
- Check the condition of the bearings and replace them if necessary.
- Cut the drum so that only the bottom part remains, remove the rest.
- In the lower part, drill holes for the beat fingers, the optimal distance between the holes is 5–7 cm, space them evenly.
- Drill 4–6 rows of holes for fingers in the tank, the distance between rows and holes is 7–10 cm.
- Insert your fingers into the bottom of the drum and tank.
- Insert the drum into the tank, then install the drive pulley onto the shaft.
- Weld a frame from steel pipes on which the tank will stand vertically, with the loading hole facing up.
- Select an electric motor of sufficient power with such a number of revolutions that the drum rotation speed is 200–400 rpm.
- Install the engine, tension the drive belt.
- Mount the motor control device.
- At the bottom of the tank, tightly cut a pipe to drain the water.
- Attach a clamp for the supply water hose to the top of the tank (you can hold it in your hands, but it is easier to work with a fixed one), and position it so that it does not interfere with loading or removing carcasses.
- Make sure that the entire structure is firmly on the floor and install standard weights on the tank; if this is not done, the device will vibrate strongly during operation.
Remember, before pulling out a plucked carcass, be sure to turn off the engine and wait for the drum to stop completely, and while plucking, water the carcass with water , this will speed up the process of removing feathers.
After finishing work, be sure to clean the drum and rotor of feathers, and rinse with plenty of water to wash off the blood.
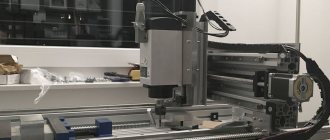
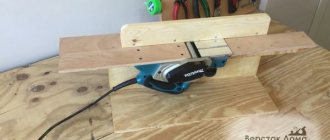
How to make a circular saw with your own hands from a washing machine engine?
A circular saw is always useful on the farm: at the dacha or in a private house. But not everyone can afford a good expensive tool, and a cheap analogue quickly breaks down. The way out of the situation is to make a circular saw with your own hands. For example, you can make it from an engine from an old automatic washing machine, which is a shame to throw away and takes up space. This homemade tool can handle boards up to 5 centimeters thick. The advantage of this design is its weight, which is about 20 kilograms. The saw turns out to be mobile and you can take it with you in your car.
How the device works
The engine starts, which drives the shaft and pulley. As a result, the drive belt rotates, transmitting speed to the circular saw pulley. The saw begins to rotate, allowing the material to be cut.
A homemade circular saw is always useful in the household. Due to the fact that it can be made from improvised materials, it will cost you almost free.
Speed regulation
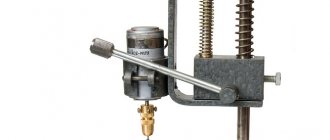
During the operation of the tool, it becomes necessary to work with materials of different sizes, so you need to be able to adjust the speed up or down. To do this, you can use a dimmer or trigger from a hand-held electrical appliance, because they allow you to regulate the voltage supply and, accordingly, the speed of rotation of the disk. We connect one of the coil terminals to the armature terminal, and connect the second one to power supply from the network. We connect the second armature output through a dimmer in the same way. We check the scheme and launch it.
A more complex way to regulate speed is to use a tachometer. Using it, you can regulate the rotation speed without losing engine power. Attention, you need to connect the tachometer using a microcircuit. It equalizes power when the load on the shaft increases. You can buy the required microcircuit or make it yourself. The TDA 1085 board diagram will help with this. The list of necessary parts is extensive, but with the list at hand, it can be easily assembled in specialized stores.
Tank craft ideas
From a plastic or steel tank you can make :
- heater for summer shower;
- water dispenser;
- expansion tank of the heating system.
To turn it into a heater, do the following :
- paint it black on the outside so that it heats up more strongly under the sun's rays;
- place a summer shower on the roof;
- supply water to it with adjustable flow and a drainage pipe through which excess water will drain;
- connect the faucet with the sprayer;
- plug extra holes;
- Cover the top with a lid to protect the water from dirt.
To make a washbasin:
- raise the tank using a metal or wooden frame to a convenient height;
- connect the tap;
- plug extra holes;
- cover the top with a lid.
To make an expansion tank:
- lift the tank into the attic and connect it to the supply pipe (direct) of the heating system;
- connect a drainage pipe or hose to the hole located at the highest level;
- close the tank with a lid, even the standard lid of the washing machine will do;
- insulate the tank with mineral wool or polystyrene foam.
Assembly
There is nothing complicated in assembling a circular saw, but there are some nuances. The circular saw motion module includes the following elements:
- motor shaft;
- shaft for disk attachment;
- belt transmitting movement;
- motor and saw pulley.
Important! In a simplified version, assembly can be done without the use of bearings.
The build process includes the following steps:
- a drive belt is put on the smaller pulley: rotation is transmitted to the saw blade from the shaft; to avoid the belt slipping, notches are needed on the pulley; if there are none, we make 3-4 transverse grooves ourselves;
- for better adhesion, bitumen can be applied to the surface;
- the belt can be used not only from a washing machine, but also from any equipment; it must have serrations and be of sufficient strength;
- to prevent the drive loop from slipping off the large pulley, a small protrusion is welded onto its end; you can weld a disk with a larger diameter than the pulley;
- For safety reasons, the disk on the shaft should be secured very well so that it does not come off during operation, which can lead to serious injuries;
- To adjust the belt tension, the hole for fixing the engine must be bored out.
Case products
The washer body can be used to make:
- a box for various small items or tools;
- porthole window;
- lockable dog house;
- flower beds for various plants.
Box for various small items or tools
Any semi-automatic machine with a horizontal load is suitable for making such a box.
To get a box from it, do the following:
- remove the top and back covers;
- remove the motor and tank with drum;
- measure the interior space;
- Make shelves according to these dimensions, taking into account the door protruding inward;
- in the upper part of the shelves, install a pair of 3-5 W lamps and connect them to the switch in the door lock, to reduce the load on the switch, use a relay;
- put the machine on its feet;
- insert the box inside it, secure it and replace the back and top covers;
- lay hidden wiring to the nearest outlet.
In the same way, you can make a minibar, then instead of light bulbs, install a New Year's LED garland with a controller. When the door opens, the garland will begin to flash, creating a unique play of colors.
Porthole window
To make such a window, you will need the door of a semi-automatic washing machine with horizontal loading and a part of the body with hinges and a lock.
The advantages of such a window are its unusual appearance, somewhat reminiscent of a ship's porthole, and its tightness when closed due to rubber seals.
To make such a window, disassemble the washing machine, taking out all the insides, then use a grinder to cut out the part of the body with hinges and a lock .
The cut piece can be of any shape, however:
- the round one looks more stylish, but cutting it out will require more effort;
- The square one is easier to cut, but it looks less interesting.
Remember, the size of the window opening into which you are going to embed the porthole must be larger than the rubber door seal. After installing such a window, carefully seal all cracks and voids with foam, but do not stain the sealant.
You can decorate the inside of such a window and hide the cut edges of the frame using wooden or plastic decorative overlays.
Closable dog house
The washer door and part of the frame with the lock and hinges can be used to create a lockable kennel for a small to medium sized dog. To do this, it is enough to cut out part of the body with the door and nail it to the booth in the area of the manhole.
Now you can close the dog so that it does not scare guests or dig up flowers in the garden. The animal's intelligence is enough to grasp the connection between digging up flowers, the owner's dissatisfaction and the inability to leave the booth.
Flowerbed-pot for various plants
The body of a washing machine, both semi-automatic and activator type, is a good flowerbed. To do this, remove all the contents from it and remove the door, then drill several dozen drainage holes with a diameter of 8–10 mm in the back wall.
Lay the body with the loading hole up and load it with a layer of crushed stone with a fraction size of 20–50 mm , then a layer of sand and fertile soil in which any plants can be planted. If you paint the body, the flowerpot will become even more interesting and attractive.
Do not use such a flowerpot without a layer of stones and drainage holes, otherwise you will not be able to properly regulate the level of soil moisture.
On the surface, under the influence of sunlight, the earth will dry out, while below, next to the back wall, excess moisture will begin to accumulate, which will lead to the appearance of pathogenic microflora and damage the roots of plants.
In addition, excess moisture will negatively affect the condition of the metal body of the washing machine, which will cause corrosion processes to begin in it and soon rust will eat through it so much that it will be visible even from the outside.
Tips for work
It is worth taking into account the following tips from professionals:
- homemade circular saw is intended for household use; it is capable of processing small volumes of lumber with periodic interruptions;
- if the tool is often in demand and the volume of work is large, then it is worth considering the option of purchasing professional equipment;
- there is no need to cut by force if the material does not flow; For a more powerful tool, a more powerful motor is correspondingly needed.
How to make a circular saw from a washing machine engine, see the video below.
Source
Synchronous motors
It has been known since school days that when magnets are brought close, they attract or repel. The first case occurs at opposite magnetic poles, the second - at like ones. We are talking about permanent magnets and the magnetic field they constantly create.
In addition to those described, there are variable magnets. Everyone remembers an example from a physics textbook: the picture shows a magnet in the shape of a horseshoe. Between its poles there is a frame made in the shape of a horseshoe and having half rings. Current was supplied to a horizontally located frame.
Since the magnet repels like poles and attracts unlike poles, an electromagnetic field arises around this frame, which turns it vertically. As a result, it receives a current that is opposite in sign to the first case. The changing polarity rotates the frame and returns it to the horizontal plane.
The operation of a synchronous electric motor is based on this principle.
In a real circuit, current is supplied to the windings of the rotor, which is a frame. The source that creates the electromagnetic field is the windings. The stator performs the functions of a magnet.
It is also made of windings or a set of permanent magnets.
The rotor speed of the electric motor of the described type is the same as the current supplied to the winding terminals, i.e. they work synchronously, which gives the electric motor its name.
How to make a circular from a washing machine motor with your own hands
The electric motor from the SMA should not be lying around idle in the garage. An owner who respects his work will immediately find a use for it. For example, with a small investment you can get an excellent circular saw from a washing machine motor, which can easily cut boards five centimeters thick. Everything you need to make such a machine can be found in your own garage - the necessary tools, components, scrap metal.
How to turn on an asynchronous type motor
The asynchronous system consists of:
- The stator is a fixed base.
- Rotor - the element that rotates the drum.
The SM used three-phase motors that can fully operate at a voltage of 380 V. Connecting the motor from the washing machine to a single-phase 220 V network requires connecting a capacitor.
It will reduce the power of the device, but will make the work safer.
Choose a capacitor more powerful than the motor, then it will withstand voltage surges.
Three-phase connection diagram
You will need a set of accessories:
- multimeter;
- capacitor;
- wire - a plug at one end, three terminals at the opposite;
- intermediate wire, terminals at the edges.
Connection:
- Take the power cable and connect the capacitor.
- Attach the intermediate jumper wire to the other side of the capacitor.
- Ring the winding to find the lowest resistance outputs.
- Insert the straight wires that will connect to the outlet.
- Connect the capacitor.
If you cannot hear the motor noise after plugging it into the outlet, most likely the starting capacitor is connected incorrectly. You will have to look for the right terminal using the “scientific poking method”. A detailed description and the result of the experiment with three wires can be seen in this video:
Motor selection and connection
It all depends on the power of the unit. Belt-driven motors are best so that the speed is transmitted directly to the saw. If you plan to install a 35 cm disk on a circular machine, then 1 kW of energy will be required to start it. The saw, whose diameter is 17 cm, operates from 500 W. This means that motors from old Sibir or Oka washing machines are quite suitable. All that remains is to adjust the engine speed, because unstable rotation will cause the saw to “tear” the wood.
The tachometer, which controls the control module, is responsible for the number of engine revolutions in the washing machine. But since the module will not connect to the circular circuit, it is recommended to install a voltage regulator.
Existing types of electric motors
Modern washing machines are equipped, as a rule, with single-phase electric motors with tachogenerators that regulate the speed. Soviet-era electric motors are already considered a rarity; they are distinguished by a two-speed operating mode. Motors installed in modern washing machines can be divided into three types - these are motors:
- asynchronous;
- collector;
- inverter
Asynchronous
For motors of this type, the rotor speed differs from the speed of the magnetic field of the stator winding. This is the most common type of electric motor. Washing machines are equipped with asynchronous capacitor motors, powered from a single-phase household electrical network.
The stator has two windings, one of which is connected directly to the network, and the second winding is connected to a starting capacitor, forming a starting rotating magnetic field.
The advantage of asynchronous engines is their simplicity of design and ease of maintenance. Wear-resistant electric motors can last for decades if properly maintained.
The disadvantages of asynchronous motors include sensitivity to fluctuations in the frequency of the mains current and the inability to change the shaft rotation speed during operation, but this does not prevent them from being used in various home-made devices.
Collector
Many washing machines today are equipped with commutator motors. A distinctive feature is the presence of 2 brushes. The brushes are adjacent to the rotor commutator, imparting electricity to it, which causes the rotor to rotate in the magnetic field of the stator winding. Collector power units operate using a belt transmission of torque.
The advantages include the presence of a pulley on the motor shaft, which makes it easier for home craftsmen to create devices with a belt drive, and the ability to operate on direct current. As a rule, motors are small in size and controlled by a simple electrical circuit.
The disadvantage is the rapid wear of the belt and the “ability” of the brushes to fail at the most unexpected moment. Still, these can be considered minor trifles compared to the benefits.
Inverter
For the first time, an inverter motor was installed in a washing machine by LG in 2005. Since then, inverter-type motors have been widely used by leading companies in household washing machines. Unlike its analogues, the inverter is attached directly to the drum of the machine and does not require a belt drive or bearings.
The advantages of a direct drive inverter are simplicity of design, compactness, the ability to assign different operating modes, low noise and high efficiency due to the absence of loads from belt drive friction.
The downside is the impracticality of repairs in the event of an electric motor failure. The cost of restoration may be greater than the value of the engine itself. Also considered a disadvantage is the impossibility of use in various home-made machines and mechanical devices due to the design features of inverters.
Useful tips
When making a circular machine with your own hands, it is recommended to provide opportunities for its repair and maintenance. Any moving part must have convenient access for lubrication. When starting all installation work, you should prepare detailed drawings and diagrams and perform the appropriate calculations. A homemade circular saw is different in size and can easily fit in a utility room.