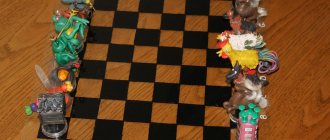
Nowadays, many have already forgotten about two such legendary board games as chess or checkers, but they allow you to pass the evenings well, relax and at the same time flex your brains a little. Of course, this is not surprising, because today most people spend their free time in front of the TV or computer. But it happens that the electricity goes out, and then we don’t know what to do with ourselves? Then you can play checkers or chess, and to make it even more interesting, you can make them yourself.
Available materials
In order to make board games at the right time, when there is no light or the moment comes when you want to do something interesting, you need to acquire the necessary materials in advance. Actually, they are very cheap, so the main thing here is to remember what we need to create games, so as not to throw away a good thing. And we will need:
- two cardboards, and the size of one of them should be 17 x 17 cm, and the second - 6 x 17 cm, although of course, they can be larger, because in order not to think about where to get them, you can simply use a cardboard pizza package ;
- scissors;
- felt-tip pen and simple pencil;
- compass;
- a printed stencil with chess pieces, although you can do without it and just paint checkers and chess by hand.
First thing's first - a template
1. Cut a blank for template A from a 6mm MDF board. (We chose this material because its thickness corresponds to the length of the copy sleeve, which will be used to mill the recesses for the balls in the future.) On one of the long sides of the workpiece, mark its middle.
2. Make a paper copy of the template and cut it along the dotted line. Carefully attach the template to the MDF blank with spray adhesive, lining up the dotted line with the long edge and aligning the center marks of the template and the blank.
Using a stop, line up the first row of holes on template A, then drill all the holes in that row before moving on to the next.
3. Using a 16mm Forstner drill bit and drill stand, align the template so that the drill bit is directly above the first row of holes. Move the stop towards the template and secure with clamps (photo A). Pressing the template against the stop, make through holes in the first row, and then, moving the stop, drill the remaining rows. (More details about the technique of drilling neat holes have been repeatedly discussed in previous issues of our magazine.)
4. Remove the paper template by moistening it with mineral spirits to soften the adhesive. Mark both sides of the template with numbers 1 and 2 so that the milled holes for the balls are located symmetrically.
Creating a chessboard
The most important thing in creating games is the process of making a board for it. To do this, you need to take the largest cardboard and draw it into squares. True, you will first need to outline its boundaries, stepping back on all sides by 0.5 cm and drawing a square with sides 16 x 16 cm.
It became known how many Russians are ready to give up plastic tableware
Experts: salt may help fight multiple sclerosis
Vyacheslav Fetisov headed the central council of VOOP
And inside it, using a pencil and a ruler, you will need to draw seven vertical and the same number of horizontal stripes, the distance between which should be 2 cm. Thus, we will get a grid of many squares, each side of which will be two centimeters. After this, you should pick up a felt-tip pen (it can be of any color, but it’s still best to choose black) and use it to paint the board in a checkerboard pattern so that black and white squares alternate.
They also need to shade the half-millimeter fields of the board, outlining its boundaries, and at this point the first stage of making games will be ready.
Make a tray for the balls
1. From a 12 mm plank, cut a blank measuring 146 * 305 mm for the bottom of tray J. Check how this workpiece is inserted into the tongues of the guide rails H. If necessary, adjust it to the runners using a plane and sandpaper - the tray should slide out and insert easily.
2. Insert a semicircular cutter with a diameter of 12 mm into the collet of the router fixed in the table and position the longitudinal stop at a distance of 25 mm from the axis of the cutter. Set the routing depth to 5 mm. Select one groove on the face of Tray J. Then turn the workpiece 180° at the ends and make a second groove along the opposite edge. Repeat the operation to select two more pairs of grooves, moving the stop to a distance of 45 and 65 mm (Fig. 2).
3. Using a dial-type groove disk and an anti-splinter insert, use a saw to select a groove 12 mm wide and 6 mm deep J (Fig. 2) .
Slide the assembled ball tray into the body along the guide rails H. Secure it with a clamp and attach the stop L with screws without gluing it.
4. Cut out a separator block K L from the previously set aside trim . Glue the front wall I to the bottom of the tray J (Fig. 2) . Then glue the divider into the groove, lining it up in the middle of the width.
5. Drill and countersink mounting holes in stop L (Fig. 2). Place the stop in place, secure with clamps and drill guide holes for screws through the mounting holes in the rear end of the bottom J. Remove the clamps and check how the tray I, J, K, L is into the tongues of the guide slides H. Then finally install the stop L into place, without gluing it, but using only screws (photo H).
History of origin
In general, the term saber is tightly linked to the Abkhaz-Adyghe word “sashkho”, which literally means “big knife”. The first examples of sabers date back to the 12th-13th centuries, and these were large combat knives, which, along with daggers, complemented the warrior’s weapons. The first literary mention of checkers dates back to 1625.
The blade of the so-called “Caucasian type” was chosen as the basis for the new model.
The arguments for replacing the saber with a saber were:
The checker handle was held with 5 main grips:
Structurally, the checker consists of the following elements:
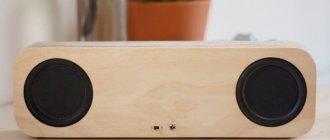
Hot Rod
I usually make these things to order. But I decided to make this machine simply because I wanted to. I started making it with wheels. There were different wide ones. So I decided to install them.
Then I made the motor.
I had to tinker with the front suspension. Initially I wanted to do it with a spring. I spent the whole evening fiddling around with it. But after a little assembly I realized that I didn’t like it. As a result, I converted it to shock absorbers.
Then the radiator grille.
Well, that’s all.
A pack of cigarettes fits into a hole in the trunk.
Dimensions of the machine: length 31 cm, width 13 cm, height 11 cm.
DIY checkers
The popularity of the game of checkers these days is undeniable and lies in the simplicity of the rules and the huge number of various combinations that make the game beautiful and unpredictable. It is impossible to count checkers fans all over the world - this is a truly folk game, which also greatly develops logical and analytical thinking, especially in children and beginning checkers players. There are checkers sections in almost every city in the country, where anyone can come and sign up. Books are published about checkers, magazines are printed, websites are opened on the Internet, and even songs are written. But in order to play a game of checkers, you don’t even need to have figures and a specially made board with you; if you wish, all this can be done from improvised means.
1.1. Checkers board
The checkerboard consists of 64 identical squares, alternating light (white) and dark (light brown) fields.
The game is played only on dark fields. The checkerboard is positioned between the partners in such a way that there is a dark corner field to the left of the player.
In official competitions, a board must be used that meets the following requirements:
- have a playing surface from 40 to 45 cm;
- the surface of the board should not be shiny, it should be matte;
- the alternation of light and dark fields should be distinct, their color should not be too pale and should not merge with the color of the checkers.
Review of the best samples
This sample is a classic tired saber, the blade of which is made of 65G spring steel. Due to the low level of chromium content, it is susceptible to corrosion. The blade is hardened by 20-24 units. according to Rockwell, which classifies the saber as a souvenir weapon, as a result of which it is allowed to be freely purchased. Of course, it is not recommended to chop anything with it; such actions can lead to damage to the blade.
The main difference of this model is the presence of a protective bow on the hilt, which protects the cavalryman’s hand from injury in battle. Similar checkers were in service with privates and non-commissioned officers, which led to minimalism in the design of the sheath device.
Making a checker sheath
Attached images
Attached images
Attached images
Attached images
Attached images
Attached images
Attached images
Attached images
Attached images
Attached images
Attached images
Attached images
Did you treat the seam with anything to make it less noticeable?
It was necessary to make the stitch pitch smaller, then the threads on the seam would look better. Otherwise, it is enough to iron the seam with an iron and coat it with shoe polish first.
It turned out very well!
Thank you for your good review of the work.
How much time did it take for everything? And the work is really very good.
Wooden training checker 90 cm
Application area
Wooden checkers are used in the following Cossack disciplines:
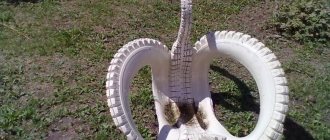
Do-it-yourself wooden checker for flanking
Hardwoods are used to make the blade: red beech, yew, elm, hornbeam or ash. Before you make a training saber at home, you need to familiarize yourself with the basic parameters of the weapon: balance, thickness and length of the blade. During flanking, the grip is carried out with the thumb and forefinger not at the handle, but at the base of the blade. Therefore, the thickness of the wooden block in this place should be small.
[barcode] => [article] => [nds] => 0 [view_id] => 5 [type_id] => 1 [count] => 40 [title] => Wooden training checker 90 cm for flanking buy in Moscow for children in the Cossack online store inexpensively
=> [slug] => [rating] => [rating_count] => 0 [attention_id] => [old_price] => 1200.00 ) [_oldAttributes:yii\db\BaseActiveRecord:private] => Array ( [id] => 5080 [guid] => 8ffd0b5c-a868-11e9-cb94-00259029c3d6 [update_time] => 1614237282 [active] => 1 [pub] => 1 [name] => Wooden training checker 90 cm [fullname] => Wooden checker training 90 cm [weight] => 0.050 [made] => [ed_id] => 796 [content] => [html] => [content_site] =>
Process over the author's portrait head. Young Michael Rooker
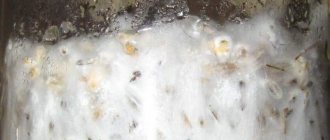
Hello Pikabu, I’m sharing videos from the process of creating my new work. This time again the head is a portrait on a ready-made articulated body from Iplehouse. The sculpture is a mixture of two manufacturers, my favorite is Cernite 425 translucent and white Premo Scalpi. While working on Misha, I realized that such a mixture does not lose strength, but at the same time it is less waxy and translucent than pure cernit, many craftsmen complain about this, in addition, the mass is more pleasant and pliable to work with. I mix 1:7 (one part white 7 parts cernit), you can reduce the cernit content to 5, that is, 1:5 will also be good. The size of the head from the chin to the crown is 9.5 cm, the diameter of the eye is 11 mm.
The work is still in progress, I will publish the final version later.
This sepia tone was chosen as the main photo for the ball, he’s just cute here
in general, when sculpting, I rely on footage from the film “Henry: Portrait of a Serial Killer”
The only thing is, due to the peculiarities of the body’s proportions, it is necessary to break the proportions of the face so that everything lives with each other. So you have to sacrifice a little of your strong-willed chin. Although the option in the video is far from final, maybe I’ll find a way out.
You can see my other works on Instagram or VK
Characteristics
As a rule, the blade of a checker was made of high-carbon steel that underwent special heat treatment. Sometimes there are samples made of Damascus steel, but as a rule these are premium samples. Individually, officers of cavalry and Cossack units ordered sabers with damask blades.
Caucasian samples are characterized by a slight bend in the blade, while Turkestan checkers have a more pronounced bend. Fullers were made on the sides of the blade; if there were several of them, then the one with the larger width was located closer to the cutting edge.
Checkers were produced in large quantities, and in the serial version, engraving was not applied to the blade. The handle was made of wood, using overhead mounting, and impregnated with special bitumen-based varnishes. To strengthen the handle, it was fastened with brass rings.
The standard Cossack saber had the following dimensions:
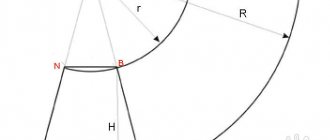
1.2. Name of the diagonals of the checkers board
picture
An oblique row of squares from one edge of the board to the other forms a diagonal.
Diagonals that rest at one end on the bottom edge (side) of the board are considered lower diagonals, and those that rest on the upper edge are considered upper diagonals.
The largest of the diagonals, consisting of 8 black squares and crossing the board from left to right, is called the big road.
Two diagonals (6 fields each), lying on both sides of the big road, and two diagonals (3 fields each), connecting the first but form a tee at the ends. The large diagonals of the tee are called the lower and upper tees, respectively, and the small diagonals are called the lower and upper tees.
Two diagonals crossing a high road and a tee (7 fields each) make up a double. These are called the lower and upper twin.
The two diagonals following the double (5 zeros each) together with the diagonals connecting them at the ends (4 fields each) form a jamb. Accordingly, they are called lower and upper jambs, lower and upper jambs.
1.4. Moves of checkers and kings
1.4.1. A move in a game is considered to be the movement of a checker from one square of the board to another. The first move is always made by the player playing white. Partners take turns making one move at a time until the game ends.
1.4.2. Checkers are divided into simple and queens, but in the initial position all checkers are simple.
1.4.3. A simple move only goes forward to the adjacent field diagonally.
1.4.4. If during the game a checker reaches one of the fields of the last, eighth (counting from itself) horizontal row, it turns into a king, receiving new rights. Each side can have several kings on the board at the same time. Queens are indicated by double checkers, i.e. placed one on top of the other.
1.4.5. A queen, unlike a simple one, moves to any of the free squares diagonally in any direction (both forward and backward), but can, like a simple one, only move to squares not occupied by other checkers, and it does not jump over its own checkers Maybe.
1.4.6. A move is considered made if the player, after moving a checker or king from one field to another, removes his hand from it.
1.4.7. If the player whose turn it is to move touches his checker, which can be used to make a move, he must move it. If he touches two or more, he must move with the checker he touched first, if a move or capture is possible. Touching your checker, which does not have a move possible according to the rules of the game, does not entail any consequences, and the player is free to make any possible move.
1.4.8. If a player, when making a move, moved his checker or king to another field, but did not take his hand away from it, he has the right to move this checker or king to any other field possible for them.
1.4.9. If a player wants to correct one or more checkers, he must first clearly announce to his opponent: “I am correcting.” You can correct checkers only during your turn to move.