Chess is one of the oldest and most majestic games. People of all ages and social statuses adore them. This game was invented in India and quickly spread across all continents and countries. Entire generations of people have fallen in love with chess because of its unpredictability and variability. Nowadays, many international competitions are held in this game. Thousands of people from all over the world are fighting for the chess crown.
This game helps develop logical thinking and the ability to calculate your actions in advance. Chess is made from a wide variety of materials. There are figurines made of gold and other precious metals, precious woods, crystal, ivory and other expensive materials. Since most people cannot afford such chess, you can buy ones made from the simplest materials or make them yourself.
Wooden chess with magnets
For the New Year, my beloved wife gave me a chess set.
The chess pieces are quite miniature, but they are made nicely and in the classic Staunton style.
Everything was fine, but I definitely didn’t like the lightness of the figures.
I considered weighing these figures down with lead, as they do in larger sets, but later came up with an unexpected solution: make this set magnetic! Magnets will create a feeling of heaviness when a piece is torn off the board, eliminate the possibility of pieces slipping and falling, and will also automatically center them on the selected field.
Neodymium magnets of the appropriate size were purchased. And at the same time some other useful things)
Felt backings are carefully cut off
Holes for magnets are drilled
And carefully glue the magnet onto the super glue
The main thing is to maintain polarity! So that it does not happen that on some fields the figures attract, and on others they repel. I figured this out for the third figure, but by luck the polarity coincided in the first two)
Gradually, the figures are completed and magnets are glued to the back of the board (also observing the polarity).
Fully finished figures
The result even exceeded my expectations! The figures rise very pleasantly, heavily and are funnyly drawn straight to the center of the field. The result is a very nice, camping set that has retained its natural woodness)
Source: https://pikabu.ru/story/derevyannyie_shakhmatyi_na_magnitakh_5800224
Developing children's creative abilities
From an early age, children love to invent, fantasize, and play. By making chess with the children, parents and teachers develop not only creativity in children, but also practical skills and abilities. Working with paper, wood or clay, kids get unforgettable emotions. And if they work together with adults, then children gain valuable experience in communication and work skills. The pleasure of playing such homemade chess cannot be compared with anything else.
Learn to fantasize, work with your hands and think through games with your head. All-round development of your children is guaranteed!
Figuratively speaking. 35 unusual chess sets
Mathematicians have calculated that the number of possible positions of 32 figures on 64 cells is greater than the number of atoms in the Universe. The number of chess sets is, of course, smaller, but their diversity is amazing. The blog “About Chess” offers its own version of the “best of”, leaving the list far from complete...
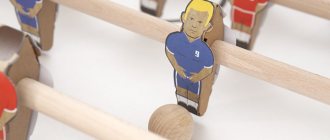
Since we are on a sports site, we will start with this topic.
Football is represented by a set of American football, the "just" football ones that I found are inferior to this:
The most automobile:
The kit is made from the same materials as the Renault Formula 1 car: titanium, steel and aluminum. The figures are made in the form of bushings, pendants, a pilot's seat, and the board creates the illusion of a track. The clean, minimalist lines of the Renault Formula 1 kit symbolize the simplicity and austerity of modernity. Cost: $42,000.
Hockey:
Sumo:
Another question that interests many is the maximum price for a set.
The most expensive chess set in the world was sold in Britain by Jewel Royale. It is made of gold, platinum, diamonds, rubies, sapphires, emeralds, black and white pearls.
Each figurine is decorated in the middle with a spiral of precious stones. The largest chess piece - the king - costs 100 thousand dollars. Despite the fact that the figures look airy and light, they are quite heavy.
So, the king weighs 165.2 grams. The total cost of the kit was $9.8 million.
The cost, perhaps, could rival Faberge chess,
It’s difficult to say the exact cost, but I was estimated at “from $5 million”
Let's continue the money topic.
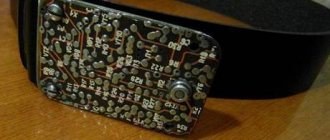
Sometimes people come up with very strange ideas, and some even implement them. So, one eccentric, apparently a chess lover, decided to make himself a board and pieces out of money. He collected enough change and took out brand new bills from the bank.
He began to assemble a chessboard from banknotes, bending the pieces of paper in a certain way, and from coins - chess pieces. The playing field was made up of 20-pound and 50-pound notes, and the rim was made up of 10-pound notes.
To prevent the field from starting to unfold on its own, it was kept under pressure for some time.
The figures from the coins turned out to be recognizable. The pawns are 1 penny coins. The cost of the chess was 2402 pounds and 68 pence.
Another value in the “most” category is of interest.
The largest chess set (or rather, one piece) was made by order of Rex Sinquefield in 2012 for the start of the first cup named after him.
The height of the king is almost 4.5 meters, the base is 1.8 meters. The figure is listed in the Guinness Book of Records.
- You can even watch how the record was prepared.
- 1
- The smallest ones, apparently, were made by master Anatoly Konenko:
Miniature wooden chess pieces are turned under a microscope on a miniature lathe. The height of the chess pieces is 2.0 – 3.8 mm. Playing field 17.0 x 17.0 mm. Checkerboard squares from different types of trees. Birch bark ornament. The bumblebee is real.
The theme of alcohol is popular in chess, and there are many “drunk” sets. My choice fell on this one:
- I don’t recommend playing these, but you can admire them.
- I understand that you don’t heed the advice, so I suggest using the most stable chess in the world:
This set was invented and developed by industrial engineer Adin Mumma, who back in 1970 was inspired by the roly-poly toys, or, simply put, tumblers, for this masterpiece. The result of the work was so successful that it was awarded the International Design Award.
Peculiarities
The game requires a board of 64 squares of light and dark colors and special pieces that players move around the field. Figures for the game are also divided into light and dark. There are 32 of them in total, a set for one player consists of 16 pieces: pawns (8 pieces), knight (2 pieces), bishop (2 pieces), rook (2 pieces), queen (1 piece), king (1 piece). Various materials are used to make figurines; these can be wood, plastic, marble, metal, ivory, onyx and polystone. Carved wooden chess sets, which are also suitable as a gift, have become very popular among players.
With its originality, such chess will attract any person, because painstaking work is needed to create them. Handmade work cannot be compared with factory production; each master puts a piece of his soul into each figurine. Such products can take up to several months to produce. Wooden chess can not only decorate collectors' homes, but also serve as a game.
DIY multi-level chess
Translated by SaorY for mozgochiny.ru
Greetings, brainiacs ! Sometimes, in order for something interesting not to become boring, it’s worth diversifying it, so let’s do the same with ordinary chess - we’ll make a 3D board for it with our own hands
chess board consists of walnut wood blocks, which have different lengths, which creates the original effect of a multi-level board. Just some basic instrument skills and a little time, and you can test your playing skills from a different perspective.
Step 1: Design
According to my brain, the design of the chessboard should be original, but not pretentious, so as not to complicate the game process itself. Therefore, I studied various versions of chess on the Internet, and I decided to create mine from ordinary wooden blocks of various sizes.
Step 2: Calculations
Based on the dimensions of the chess pieces, I, together with my friends, “developed and calculated” the design of the board and the necessary materials. And it turned out that the difference between neighboring levels is 2.
5cm, that is, the shortest block will have a height of 2.
5 cm, and the height of others is found by multiplying this value by the corresponding number from the brain table presented in the photo, the number of blocks of equal length is also indicated there.
- So, materials and tools:
- • Woodworking tools • Lumber • Wood glue • Clamps and clips • Blowtorch
- • Protective fire gloves
Source: https://mozgochiny.ru/igrushki-podarki/mnogourovnevyie-shahmatyi-svoimi-rukami/
Wood models
Beginning amateurs, professional carpenters, and skilled carvers like making chess with their own hands from wood. The traditions of each country can be seen in the figures and board design. There are heroes from Russian fairy tales, Ukrainian Cossacks, Indians with spears, Norwegian Vikings. The craftsmen pay special attention to the design of the board. This could be a table with a drawer for figures, a ship, veneer made from different types of wood, or a typesetting canvas made from cut out squares of different types of wood.
The master decides how to make a chess set from wood with his own hands based on his skills and imagination. A beginner hobbyist can use a thick tree branch for a summer cottage option, making stumps of different sizes with simple patterns cut out. To do this you will need a sharp knife or chisel. If you have a jigsaw or electric saw, you can cut posts of different heights from a block by making small cuts on the sides of the main shapes.
Having made chess with their own hands from wood, professional carvers enter them into competitions and win prizes. The price of some works of art reaches several thousand dollars. Not only the quality of the work performed is valued, but also the transmission of traditions and history of the people, and the originality of execution.
Orenburg shawl
I have been interested in knitting for a long time, I knit a lot, crocheted and knitted. But I wanted to learn how to knit Orenburg openwork. This is my second, best scarf so far! I knitted it in 2 threads: 1 mohair thread (Alize) and 1 Lydia thread (pure wool). The size turned out to be very large, 120x120 cm before blocking. And 150x150 cm after blocking. Weight 340 gr.
Postcard "Lollipop"
An original postcard, the production of which does not require any special materials, except:
• hole punch or patience to cut out the circles yourself;
• ropes or ribbons;
Postcard size 10x15cm. The size of the decorative backing is approximately 8x13cm, the circles are 3cm in diameter, the length of the wooden stick is 7.5cm, the flags are 5x2cm and 4x1.5cm. Production time 20 minutes.
You can see how quickly and easily a postcard is made in the video below.
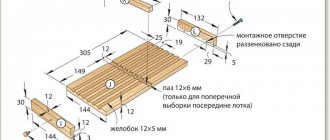
Make guides for the pull-out tray
G from 6mm MDF board and save a piece of the same width, which will serve as a temporary spacer when aligning the opposite ends of the rails.
2. Turn the assembled housing C/D/E/F upside down. Apply glue to the back side of the spacer G , align it with the front wall opening (Fig. 1) and glue it in place, securing it with clamps.
3. Cut out the guide
rails H. From a workpiece measuring 12x30x305 mm, cut out the front wall I of the drawer tray and save the scrap, from which the stop L .
4. Using a dialed groove disc and a splinter guard in the saw table, make tongues 12 mm wide and 6 mm deep in the runners H and the front wall I (Fig. 1b and 2). Set the front wall aside.
5. Drill and countersink mounting holes in the guide rails H , positioning them so that they do not coincide with the recesses on the opposite side of the game board. (For the 4.2mm diameter screws used in this project, the mounting and pilot hole diameters are 4mm and 2.8mm respectively.)
6. Glue one slide H into place close to the spacer G , secure with clamps and secure with screws. Press the previously set aside spacer scrap to the rear end of the runner to align the second runner (photo F ). Then glue and screw the second runner into place (photo G ).
With the first runner H in place, press a scrap spacer to its rear end to accurately position the second runner.
Glue the second runner in place and secure it with a clamp so that it does not move when you screw in the screws.
Master class on making a DEMONSTRATION CHESS BOARD (magnetic)
For preschoolers and students in grades 1-11,
a record low registration fee of 25 RUR.
Master class on making a DEMONSTRATION CHESS BOARD
Recently, attention to chess has increased greatly. They are associated with mind, intelligence, the ability to analyze a situation, and the ability to think. In this regard, school programs are being developed for extracurricular activities, where chess-task learning technology is used. But the question arises with visual aids and demonstration materials.
This master class offers a very simple method of making a Demonstration Board and a set of figures. Its main advantage is its light weight and ease of carrying.
Goal: to create visual demonstration equipment for using a health-saving system of didactic chess tasks and games in the educational process.
Objectives: development of visual-figurative and logical thinking of children;
development of the ability to act “in the mind.”
To begin with, take 3mm thick binding cardboard of the required size. In this case, a standard one (70*100 cm) was used with subsequent trimming.
For ease of carrying, a handle was cut out.
We are done with the base of our board.
Let's move on to creating a chess field.
On top of this soft iron we glue a regular vinyl board measuring 50*50, using “crystal” moment glue. Leaving free space on one side for ease of use.
While our field is drying, we will start making figures.
We make figures from ordinary cardboard. Templates can be found on the Internet. We transfer and cut out of thick cardboard. To distinguish between the “white” and “black” armies, we glue the cardboard of the desired color. Brown and yellow were used here. These colors on this field are clearly visible from afar.
Attach a magnet to double-sided tape. That's it - the figures are ready!
You can try it on our board.
All that remains is to secure the field onto the prepared cardboard.
For ease of carrying and use in lessons, we will add a cord. Using a hole puncher, we make holes at the required width and thread the rope in a circle, securing it with a knot.
The demo chessboard is ready!
Thank you for your attention!
Author: Additional Education Teacher Gagarskaya L.V.
Source
Hobby
Happy holiday guys) and I spent this holiday in the workshop. New material arrived: 50*50 bars. Go