A beautiful decoration will highlight the image, make it spectacular and unforgettable at any celebration. The crown will be useful for a photo shoot. It can be a decoration that complements an outfit for a theme party or children's party. Many people are interested in the question of how to make a crown with their own hands. It’s not difficult to create if you take the advice of experienced craftswomen and put in a little effort.
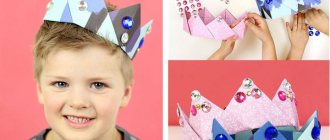
Shiny Crown
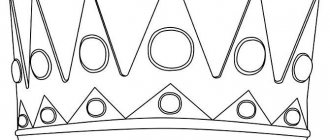
You will need: shiny cardboard in purple, cherry and white colors, a crown template, scissors, a stationery knife, PVA glue, a glue gun, a simple pencil, a hairband, decorative elements - lace, shining stones, rhinestones, flowers of different shades, stamens, leaves ...
Master Class
- Draw or print the crown template on A4 sheet, then cut it out.
- Transfer the template to glittery purple cardstock, then cut out the crown blank.
- Cut out circles of glitter cardstock and glue them to the stones as shown in the image.
- Glue the lace to the bottom of the crown.
- Glue rhinestones to the openwork top of the crown.
- Glue a row of flowers onto the lace, alternating them by color.
- Glue the stamens and leaves next to the flowers.
- Glue sparkling stones to the center of the crown.
- Glue the crown to the headband.
The shiny crown is ready! The video captures the incredibly sparkling brilliance of the shining crown.
DIY shiny crown for New Year 2022
Where to begin
It is worth showing children many photos of crowns made with their own hands, so that they realize that Monomakh’s hat is not the only such decoration.
Although historians are not sure who and when first began to use this type of headdress to demonstrate power. But they found out that the primary sources come from Ancient Egypt and Rome, as well as the Sumerians.
- The most famous image of the crown of the ancient world is the pschent of the pharaoh of Egypt. It was created to represent the merger of the Upper and Lower parts of the state. Externally, the product is represented by a white “hedget” and a red “deshret”.
- The ancient Greeks distinguished respected people with laurel wreaths. But in this way it was not power that was designated, but outstanding achievements.
- In the Bible, Jesus Christ wears a crown of thorns on his head as a symbol of the great sacrifice for the sins of the human race.
Therefore, it is important to explain to the child the ambiguity of this headdress and its ancient history. This is easy to do before the lesson starts.
Those who are curious will be interested in watching the corresponding video with illustrations or demonstrations of real museum exhibits.
It is worth mentioning that in our time several Kings, Queens and princes and princesses have survived, but they have lost their former importance and power.
Luxury crown
You will need: wooden board, soldering iron, 2 medical clamps, rosin, soldering flux and fat, lead-free solder, soldering iron cleaning sponge, glue gun, instant glue, gloves, wire, dishwashing liquid, towel, headband, filigree, combs , metal ovals, decorative elements - crystals, Swarovski stones, beads of various colors and sizes.
Master Class
Follow safety precautions when working with a soldering iron!
- Plug the soldering iron into a power outlet and prepare the clamps to avoid getting burned.
- Apply flux to the surface of the rim.
- Soak the solder in rosin and apply to the rim. Pass the soldering iron tip like a brush.
- Try the filigree on the rim, mark the points, then apply fat to these places.
- Prepare the filigree for soldering. You need to solder them in three places - the places of adhesion to the rim, picking up solder and applying fat by touching the tip.
- Prepare all filigree in the same way.
- Mark the center of the bezel, rest the filigree, secure with a clamp and solder it. It is worth noting that the solder between the rim and the filigree should melt and flow, then let it cool for about 20 seconds before removing the clamp.
- Solder the remaining filigree around the circumference of the rim. It is worth noting that the side filigrees must be attached to the rim and to each other.
- Solder the ridges to the rim on both sides.
- Solder the filigree to the back of the metal oval, remembering to apply grease to the contact points. Make 5 of these blanks.
- Press one piece with clamps, apply fat and solder to the center of the crown. Solder the remaining blanks around the crown in the same way, adjusting the height of each part, creating a smooth transition.
- Rinse the crown base thoroughly with dish soap, then dry with a towel.
- Make decorative branches from wire and beads as shown in the image.
- Hot glue the crystals to the base of the crown.
- Glue twigs, stones and other decor to your liking, filling the entire crown.
The luxurious crown made of metal and stones is ready!
Size
As a result, you can get a suit for a boy 5-7 years old. Height can vary; the only detail that depends on height is the length of the cape, which can be easily changed by changing the radius of the half-sun. A standard piece of fabric has a width of 1.5 m, which allows you to cut a semicircle up to this radius, which corresponds to a height of 170-178 cm.
The bone stencil is easy to scale according to height; this can be done proportionally; the difference in proportions is easily compensated by a more frequent or rarer arrangement of stripes.
An adult Kashchei costume is made in the same way, which can be worn, for example, on Halloween. Of course, the sizes will be different, but the image itself is identical, there is no need to change it.
Crown on the rim
You will need: shiny pink foamiran, white felt, tulle, crown template, wooden skewer, scissors, glue gun, Moment-Crystal glue, superglue, ruler, white threads, needle, headband, pieces of textile elastic, 7 rhinestones.
Master Class
- Print and cut out the crown template.
- Trace the template with a skewer on the back of the foamiran, then cut it out.
- Make a slit as shown in the image so that the crown can be assembled.
- Gather 7 small pieces of tulle onto a thread and attach each of them with superglue to the back of the crown.
- Apply Moment-Crystal glue to the side of the crown to which the tulle is attached, then glue it to the white felt and cut it out.
- Assemble the crown and secure the joint with glue.
- Use a glue gun to glue the rhinestones to the top of each crown tooth.
- Measure the rim and glue a strip of foamiran onto it, 3 cm longer and a few millimeters wider.
- Cover the ends of the headband with textile elastic.
- Glue the crown onto the headband, slightly away from the center.
The crown on the headband is ready! I recommend watching the video master class!
Crown on the rim. Master classes on Podarki.ru
Diadem
To create a tiara, you need a 2 liter bottle and a template, according to which we will draw a design with sparkles. Then we carefully cut it out and it is ready, if there is still time, then we paint it and glue rhinestones and stones, so it looks more valuable.
Crown for a boy
You will need: felt, glue gun, stars, pompoms, scissors, ribbon.
Master Class
- Cut out blanks for the crown from felt.
- Glue them together.
- Glue pompoms, stars and ribbon.
The prince's crown is ready!
Lace crown
You will need: wide lace ribbons, scissors, a centimeter, PVA glue, a glue gun, spray cream, gloves, wax paper or film, a glass, rhinestones and crystals, glitter.
Master Class
- Measure your head circumference and cut the lace.
- Put on gloves, pour glue into a container and wet the lace.
- Place the lace on wax paper and leave to dry for several hours.
- Paint the lace.
- Decorate the lace by attaching rhinestones and crystals using a glue gun.
- Hot glue the ends of the lace together to form a crown.
The lace crown is ready!
Tags
Let's sculpt a crown for a suitable crown. Make a crown yourself. So our crown. Let's remove the crown from the base of the crown was the base of the crown. Sew on the crown so that the crown is the first crown. Let's sculpt the crown to make the crown yourself. So let's take off the crown and cool the crown with our crown. We'll sculpt the crown with plasticine, a crown shaped crown on the frame, a crown from such a crown, you can't try to make it crown long let's do a little you can do you can make and a little princess a little princess for a princess for a princess with paper from paper blue paper blue paper yellow paper outlines with paper toilet paper.on paper.toilet paper.
craftspatterngraydecorationsproductseachleafmorematerialselementsbeadsmaterialnowaccessoriestechniquesframegirl
Wooden crown
You will need: a thin wooden board, a pencil, a knife, paper clips, a bucket and a saucepan, hot water, glue.
Master Class
- Mark the links (teeth) of the crown on the tree.
- Cut them out.
- Fill a bucket with hot water and soak the wood in it for 10 minutes.
- Fill a saucepan with hot water, remove the crown from the bucket and place it in the saucepan for 10 minutes.
- Drain the water and leave the crown in the pan overnight until completely dry.
- Glue the ends of the crown together, securing them temporarily with clamps.
- Remove the clips and decorate the crown to your liking.
The wooden crown is ready! I recommend watching this video!
DIY: handmade beaded