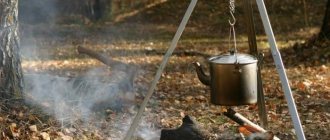
How to make a homemade camping pot
In order to make such a homemade pot, you need to prepare two tin cans of green peas, corn, etc. The jars must be different in volume. The large one is 500-600 milligrams, and the small one is the size of a two-hundred-gram glass. The jagged edges of the cans will need to be smoothed out using pliers and a file or with a hammer on a mini anvil.
Next, use a nail or an awl to punch holes at the edges of the cans. These edge-ears will serve to attach the handles of micro-kettles. As handles, you can use soft copper wire with a cross-section of one millimeter or a stranded cable from an electrical wire.
The smaller jar should fit easily into the larger one, like a nesting doll. You can cook mycelium in a large homemade pot, and boil herbal tea in a small one.
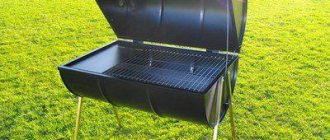
Also, in addition to the pot, for those who like to indulge in fried mushrooms in nature, you can make a mini-frying pan in a similar way. Low (but wide) cans of sprat in oil or tomato are well suited for it; in addition to their intended purpose, they can be used as a lid for a soup pot.
The main advantage of this craft is that the homemade pot has thin walls, which significantly improves the speed of cooking; lightness and small, almost toy size. The entire “trio” will easily fit in a backpack pocket and will not interfere with walking.
Well, to completely silence homemade camping pots so that they don’t interfere with enjoying the pristine silence of the Russian forest by knocking against each other, put an old woolen glove between them, which will also protect your hands from burns when you remove cooked food from the fire .
Another advantage of the Kuvaev system boilers is that they do not require devices for a fire, which are usually used on a camping trip. That is, stakes with spears and a crossbar will not be needed. It will be enough to cut off one pole with a knot at the end and, having sharpened it, stick it deep into the ground at an angle above the fire. Good luck!
Source
Making a stop for cutting moldings - visual instructions
We start with making the video itself. For it you will need a piece of thick-walled pipe 30 cm long. We prepare its ends to the size of the bearings and press them flush with the ends of the pipe.
Now we make a frame for the roller on which it will rotate. We cut out two plates from sheet steel and mark them as in the photo. Calculate the diameter of the holes to suit your bolts.
We weld the plates onto a piece of 20x40 professional pipe, slightly longer than the size of the roller. We clean the weld seams with a grinder.
The molding clamps are made from two elongated bolts. We weld wide washers to their ends, and screw the locknut onto the bolts and weld them to the stop frame.
We place the roller on a threaded rod, pressed against the stop with nuts. We place a washer between the roller and the side plates of the stop. This is necessary so that the roller rotates freely on the bearings and does not touch these plates.
We will make the support stand telescopic, with adjustment from a jack. The first part will need to be welded to the frame with a roller on the back side. From the opposite end we weld a connecting sleeve from a piece of pipe of a smaller diameter suitable for the jack rod.
Using scraps of 20x30 or 20x20 professional pipe, we first make short cuts, and then long ones.
In the short ones we make several holes of 9-10 mm in diameter for bolts. We weld them to a small piece of round pipe like a tripod.
We make perpendicular holes in the pipe and weld several locking bolts and nuts.
From a larger corrugated pipe we make small U-shaped stops for the drawer. They will also need to be secured with screws. The legs look like this (photo).
Let's start assembling the stand. We set up a tripod of legs, and between them on a raised platform (you can use a wooden block or brick) through a square plywood spacer we set up a jack.
We measure the distance for the drawer and cook it from the same professional pipe as the legs. We weld this part to the lower stops. We place a piece of plywood on it and fix the jack on it.
We weld thrust bearings from small plates at the end of the legs.
Our focus is ready. It turned out to be very functional and practical, and you can’t call it collective farm at all. It is adjusted from the jack lever, fixed with bolts, and clamps are provided to stop the workpiece. The width of the roller also varies, and even if it needs to be increased, this will only require redoing part of the frame.
By the way, if you need to protect the workpiece from the marks of the roller, this can be easily done by wrapping it with electrical tape or heat shrink.
An excellent device and another reason not to throw away your used jack. Note to all craftsmen.
Differences in material
Cast iron version
This material has been used since ancient times.
- resistance to corrosion, high temperatures;
- durability;
- high heat capacity;
- food cooks in it quite quickly.
Cons: large mass and fragility. This is not the most suitable option for winter hiking.
Aluminum version
Pros: lightness and relative strength.
Disadvantage: it takes much longer to cook food in it than in step 1
Steel version
- plastic;
- good resistance to mechanical influence;
- decent strength (better than item 2).
Disadvantage: high risk of leakage. But it is only available in soldered and riveted versions.
Stainless steel version
Stainless steel is in great demand today. A stainless steel fire pot is best for the speed of cooking any food. This material can withstand high temperatures and is very reliable.
Titanium version
It surpasses items 2 and 3 in many characteristics.
- Easy to clean, you can use sand or any detergent.
- The food stays hot in it for a long time and almost does not burn (you need to stir it when cooking - this will ensure even heating).
- high strength,
- corrosion resistance.
Its mass is less than the mass of item 4, but greater than the mass of item 2.
The main disadvantage is the hefty price tag. But such expenses quickly pay off.
Types of combustion
The simplest wood chipper is actually a flame-burning basket roaster. Make one from purchased semi-finished products for 150-200 rubles. You can do it at home in half an hour (see below), but a wood chipper on a flame will turn out to be very voracious. In nature, you will need to prepare a platform for it, like for a fire: embers from the side holes can be shot quite far. In terms of heating technology, a flaming wood chipper has one advantage over a fire: the fuel load does not spread, so you can use difficult-to-burn materials such as pine cones, mountain and desert shrubs.
A good wood chip stove uses pyrolysis and afterburning of waste gases (wood gas) to one degree or another; There are also purely pyrolysis, especially economical wood chippers, see below about turbo stoves. Cost-effectiveness combined with even greater omnivorousness brings wood chippers with pyrolysis to the forefront when there is a shortage of fuel. In emergency situations, a wood chipper with sluggish, but very long and extremely economical surface combustion can literally be a lifesaver, see at the end.
Questions about forms
Today, there are only two common forms for a tourist bowler hat:
Standard Sphere
Its key advantages are:
- comfort of cooking and cleaning dishes;
- even heating over the fire.
There are also weaknesses:
- serious dimensions;
- inconvenience of movement.
Oval
Products of this shape are easy to transport. They fit into a backpack without any problems. True, the culinary process in an oval cauldron comes with complications. And the water in it warms up unevenly. Military products usually have a similar shape. They were originally intended only for meals, and not for culinary processes.
Price
It is no coincidence that we placed this indicator only in third place. Although the cost of a manicure plays a vital role for people. It’s just more important to start by making sure that you are not being deceived and that they are showing you real photos and not ones stolen from the Internet.
There are two rules regarding cost: expensive is not necessarily high quality, but cheap is not 100% of the same quality.
If you're looking for below-average prices, you'll likely have to put up with low to average quality workmanship/materials. Not a single self-respecting master who:
— underwent expensive high-quality training,
- purchases good materials and equipment,
— takes care of sterilization and disposable consumables,
— invests in advertising and professional development —
will not put low prices. This simply means working at a loss.
Recently, Nastya’s friend, having spared money for a manicure in our studio, went to another one. Sent the result:
There was also an audio message under the video, which cannot be reproduced here, since it would have to be “beeped” almost entirely. As a result: the desired savings turned into double costs, because she had to immediately make an appointment with us in order to get rid of this nightmare.
But paying dearly does not mean getting high quality. Therefore, price is not always an indicator. You don't have to look for an expensive salon to get excellent service. That’s not why the salons are expensive, you’re just paying to “sit in a beautiful interior.”
How to make a cauldron with your own efforts
How to make a campfire pot if you don’t intend to purchase one? This question is very relevant. The easiest way to make it is with an aluminum version and a matching pan. The process is simple: instead of two handles on the sides, make one. And this handle should go through the top of this container.
This is the easiest DIY option. In addition, aluminum is not the most optimal material. It is much more logical, but also more difficult to create a stainless steel version.
You can make a pot with your own hands from this material by following the following instructions.
You must be proficient in argon arc welding. There must be appropriate technology. You can contact a special company or friends.
You need material with a density of 0.8 - 1 mm. You can take the tank from the activator washing model.
- High strength.
- Excellent thermal conductivity.
- Chemical inertness.
- It is easy to process mechanically.
You will get an oval-shaped product. Example:
The required bottom proportions are 2:1. The height is identical to most of the bottom.
The required volume is calculated based on data on the number of participants in the trip. For one tourist – 0.4 liters. And you need an additional 0.5 liters.
Material cutting
A strictly rectangular workpiece is used. You need to bend the walls. To do this, a block is made of two logs - cylinders. Their length corresponds to the height of the product. And their diameter is half its height.
There is a formula to calculate the volume. In it, D is the diameter of one log. Then 2 x D are the parameters of the container: its width and height of the walls.
To calculate the volume (V) of a cylinder, you need to multiply the area of the bottom by its height. The bottom is two semicircles and a square. The first ones have a diameter D. The second one has a side D. The formula is: V = (((Pi/4 ) * D^2) + D^2) * 2 x D = D^3 * ((Pi/2)+ 2) = 3.57 x D^3.
Here Pi = 3.14 The ^ sign denotes exponentiation.
It is better to immediately calculate D in decimeters. This will give you the value in liters.
It is easier to identify the workpiece parameters. Here the width is 2 x D. The length is calculated as follows: 2 x D + Pi x D = D x (2 + Pi).
Assembly
- Secure the logs - nail them together. The upcoming seam must follow the narrow side of the container.
- The workpiece is folded on all short sides. This can be done using a mallet. The procedure takes place on a metal pipe.
- The workpiece is bent around the circumference of the block. To fix it you need a steel wire. In the area of the intended seam, all edges must be tightly connected.
- The workpiece is pulled together along the contact line of the logs. It does not grasp them along a long plane. The wire does not pass through the intended seam.
- A strip of asbestos is placed under the seam. This will prevent the wood from being charred during welding. It is done as carefully as possible.
- When it cools down, you need to make sure that the walls are not warped. The bottom is cut and welded.
- Since after bending the wide part of this cylinder is convex outward, it is necessary to increase the length of the workpiece by 2-3% by analogy with the calculation.
A boiler of 5 liters or more often results in a lack of symmetry. Then the bow and eyelets are created. For the bow, do not make holes in the walls at the top, near the edge.
Stainless steel is used to create the lugs. The work proceeds according to the following drawing:
The bows are made from wire. Its diameter is 3 mm. It must be elastic, steel, coated with zinc. It bends according to this pattern:
When lowered, it should be in close contact with the wall and rotate with little friction. Therefore, the distance between the bent ends in the free position is slightly inferior to the width of classical boilers.
Before this bending, the ends are annealed to a length of 1.2 - 1.5 cm. They need to be bent with pliers 90 - 100 degrees.
The lugs are put on, bent and welded. Their width is 1.5 – 2 cm. The length of the curved elements of the bow: 7-10 mm. The gap between it and the wall is 0.3 - 0.5 mm.
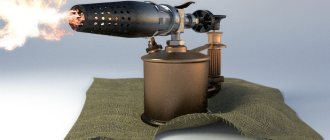
A military set of boilers (cauldrons) is often purchased. It contains a pot, burner, spoons, etc. You can also arrange a tripod for convenient fixation of the camping pot.
Source
Folding
The next most popular wood chip stove is a camping and country folding one. Such wood chippers are assembled into a working configuration from flat parts, which when folded form a compact package. It is placed in a cooking container or in a special pocket inside the backpack so that the corners do not tear anything. Due to its compactness when folded, parts of the folding wood chipper can be made from ordinary structural steel with a thickness of 1-2 mm. The weight of installation in the stowed position then increases to 0.8-1.2 kg, but the stove turns out to be quite durable without the use of special steels. In addition, the same approach allows you to make a summer wood chipper of increased size, on which you can cook lunch for everyone in a cauldron or boil a bucket of water.
Mini hiking
Drawings of the parts from which the folding camping mini wood chipper is assembled are shown in Fig. higher. The assembly process is simple:
Folding country house
A country folding wood chipper must, firstly, withstand a significant load. Secondly, with its increased dimensions, it becomes difficult to ensure a variable combustion mode by simply drilling holes in the sidewalls. Thirdly, a country wood chipper should make it possible to place dishes of different sizes on it, and at the same time, the requirements for maximum compactness when folded and minimum weight are not necessary for it. In Fig. Patterns of the sidewalls of a country wood chip stove that meet these conditions are given; side of the square of the scale grid - from 10 to 50 mm, depending on the purpose of the furnace and the availability of material.
Material – structural steel with a thickness of 1.5-2.5 mm. The red-filled blades of the sidewalls, forming the burner, bend inward at angles of 45 degrees after cutting out the blanks. This ensures, firstly, the possibility of installing vessels of various sizes on the burner. Secondly, together with the shaped cutouts at the top, the dimensions and configuration of the bottom of the installed vessel, the flow of secondary air is regulated, i.e. This stove is self-adjusting according to the cooking utensils. If you put a frying pan or a small saucepan, it will burn longer, but heat less. Under a large cauldron with a rounded bottom it’s stronger, under a bucket it’s even stronger, and under boiling water it’s generally at its maximum.
Note:
In order for this oven under heavy cookware to be as stable as possible, the assembly grooves in the sides (filled in green in the figure) must be made exactly as wide as the thickness of the sheet of metal used.
About pyramidal wood chippers
Sometimes amateur designers, in order to achieve more complete combustion of fuel, make folding wood chips of a pyramidal shape. Indeed, in such furnaces the share of pyrolysis in the heat release increases. But the additional heat is easily lost, as can be clearly seen in Fig. on right. The stove is not a cooling tower after all.
Differences in material
Cast iron version
This material has been used since ancient times.
- resistance to corrosion, high temperatures;
- durability;
- high heat capacity;
- food cooks in it quite quickly.
Cons: large mass and fragility. This is not the most suitable option for winter hiking.
Aluminum version
Pros: lightness and relative strength.
Disadvantage: it takes much longer to cook food in it than in step 1
Monomakh's hat - ancient regalia
Mention of the Monomakh's Cap appeared in the 16th century. in "The Tale of the Princes of Vladimir". It talks about Constantine Monomakh, a Byzantine emperor who ruled in the 11th century. Hence the name. Most likely, Ivan Kalita was its first owner. According to available art historical data, the Monomakh Cap was made in the East in the 14th century. This is the most ancient crown of Russia. It was not worn as an everyday headdress, but was used to crown Russian monarchs from 1498 to 1682. The crown consists of gold plates with patterns. At the top of the crown is a cross inlaid with precious stones. Monomakh's hat is framed with sable fur. The weight of the crown without fur is 698 grams.
Thus, the Monomakh Cap, like the scepter and the orb, has been a symbol of Russia since pre-Petrine times. By the way, it is credited with medicinal properties. Thus, it is believed that it can relieve various ailments, especially headaches.
Convenient pot made from an old thermos
If you come across an old thermos with a body made of aluminum or stainless steel, do not rush to scrap it. Two hours will be enough for a skilled craftsman to make an original and convenient pot.
To work, you will need a minimum of tools and materials that everyone has: - a hammer; - screwdriver; - pliers; - file; - hacksaw for metal; - drill; - a piece of wire or a stainless steel electrode, several rivets, a newspaper or a sheet of Whatman paper, a marker or a little paint, thread.
Step one: Making the markings
Step two: Saw the body of the thermos, make eyelets
The bottom part, sawn off from the body with a hacksaw or grinder, is the main workpiece, and eyes are cut from the top. Thanks to the same curvature and material, a tight fit is ensured and there are no galvanic effects that contribute to corrosion, but they can, of course, be made from scrap galvanized sheets. The sharp edges of the lugs and the main workpiece are dulled with a file or a piece of an abrasive wheel manually.
Step Three: Handle Making and Assembly
A stainless steel handle curved on a pipe or log is inserted into the holes and the edges are bent with pliers. Those who like to add a designer twist to a product can experiment with its shape and size.
Peculiarities
All instruments of this type have a similar design. It is mandatory to have a heavy base so that the “third hand” for soldering does not fall during operation if you need to secure heavier parts. The connections are usually movable, on hinges - this allows you to fix objects in the most convenient position. A clamp with a magnifying glass and backlight makes it possible to carefully examine all the little details and not make mistakes when working. Typically, third-hand parts are made from anodized aluminum. This is a fairly durable metal that is not subject to rust. The frame (base) can be made of cast aluminum or cast iron. There are 2-3 alligator clips.
Before starting work, the device must be installed on a flat surface. A soldering iron is fixed in one of the clamps, a board is fixed in the other, and you can also place solder or additional lighting there, if necessary. Thanks to the mobility of the hinges, the user can adjust the position of parts and tools, and rotate the magnifying glass lens as needed.
The device has the following advantages:
- a holder for a soldering iron allows you to prevent accidental burning of the table during operation;
- the quality of soldering increases - the user does not touch the board elements, the likelihood of oxidation at the joints is reduced;
- The device can be used when working with parts of different sizes.
Questions about forms
Today, there are only two common forms for a tourist bowler hat:
Standard Sphere
Its key advantages are:
- comfort of cooking and cleaning dishes;
- even heating over the fire.
There are also weaknesses:
- serious dimensions;
- inconvenience of movement.
When going on a hike, you can easily put a cup or pan and other auxiliary utensils in such a pot. This saves a lot of space in your backpack.
Oval
Products of this shape are easy to transport. They fit into a backpack without any problems. True, the culinary process in an oval cauldron comes with complications. And the water in it warms up unevenly. Military products usually have a similar shape. They were originally intended only for meals, and not for culinary processes.
Crowns in the Russian Empire
Dwelling on the regalia of Russian emperors, it is worth highlighting the crowns of the Russian Empire. For coronations in the kingdom they used the Monomakh Cap.
In Russia, the ceremony of the first imperial coronation was performed on the wife of Peter the Great, Ekaterina Alekseevna, who later became Catherine the First. It was for Catherine I that the first imperial crown in Russia was specially made.
Cooking on the go. Part 1 - Cauldrons
The first thing that is associated with the word hike is, of course, a fire, because it is an integral part of a hike, fishing or hunting. It’s always nice to remember evenings spent around the fire in good company with a cup of hot tea. Anyone who has ever eaten food cooked over a fire will definitely remember the pleasant aroma and specific taste of camp dishes. Therefore, in order for your impressions of the trip to remain only positive, you need to pay special attention to cooking over a fire.
In the first of a series of notes on camping cooking, I would like to tell you about the cauldrons that are used for cooking over a fire. And so let's begin... A pot is probably the most important piece of equipment used in a camp kitchen. First of all, it’s worth mentioning the number of pots needed on a hike. Usually, for a group of 10-12 people, you should take 2-3 kettles; you shouldn’t take more, since you carry all the equipment on your own hump, and no one needs extra cargo on the route. A smaller quantity will also create certain difficulties, because usually one pot is used for preparing porridge or the first course, the second for tea. The third can be useful when preparing food for large groups, for example, for cooking compote from berries collected at a rest stop or jelly. The second point that requires special attention when preparing for a hike is the volume of the pots. Most often, for preparing soups and cereals on the go, the volume of the pot is selected at the rate of 0.5 liters per person; for making tea, compote or jelly - an average of 0.4 liters per person. But it should be taken into account that when cooking food over a fire, water evaporates more intensely. Therefore, it is necessary to add another 10-15% capacity.
How and from what are camping pots made? When making pots, steel, aluminum or titanium are mainly used. The cheapest option is, of course, a steel pot. It is light and durable, and also the cheapest. The disadvantage of titanium and aluminum pots is that they are expensive, although they are more practical than their steel counterparts. It is also worth paying attention to how the pot is made. The most common are stamped and welded pots, which are most suitable for tourists. You can also find riveted cauldrons; their main drawback is leakage when deformed. Preparing the pot for the trip and its operation. The handle of a pot is an element that plays a very important role, since an insecurely secured handle can cause injuries and burns. Therefore, before going on a trip, you need to carefully check the fastening of the handle. Periodically you need to clean the outer part of the boiler from soot, which is a heat insulator. To put boilers in a backpack, you can sew covers for them so as not to stain the entire contents of the backpack with soot. You can also take a lid for the pot with you, which will significantly speed up the cooking process. In order to quickly and efficiently wash the cauldrons after porridge or soup, I advise you to take with you a regular dishwashing sponge and a metal sponge. Frying pan In my opinion, a frying pan is not an essential item when camping, since most dishes can be made without it, but if you decide to take a frying pan with you, then I advise you to take a Teflon-coated frying pan with a removable handle. When cooking food in such a frying pan, you should use a wooden spatula, which will not damage the coating, unlike metal forks and knives.
With pyrolysis
Turbo - not turbo?
“Turbo” is a catchy slogan, and manufacturers and traders under it launched supercharged chippers to the masses; they are repeated by many amateurs, see fig. on right. But on a hike, it’s enough to be a novice travel companion to understand: batteries for a boost motor are an energy-dependent stove and a completely unnecessary expense. Also, the micromotor and fan are prone to breakdowns in hiking conditions, and the boost pipe sticks out and interferes with proper packing of the backpack. However, hunters, fishermen and tourists, right up to the toughest pros, who go to the “seven” (the route of the highest, 7th, category of difficulty) should not discount the turbo chippers at all.
How to make a homemade camping pot
In order to make such a homemade pot, you need to prepare two tin cans of green peas, corn, etc. The jars must be different in volume. The large one is 500-600 milligrams, and the small one is the size of a two-hundred-gram glass. The jagged edges of the cans will need to be smoothed out using pliers and a file or with a hammer on a mini anvil.
Next, use a nail or an awl to punch holes at the edges of the cans. These edge-ears will serve to attach the handles of micro-kettles. As handles, you can use soft copper wire with a cross-section of one millimeter or a stranded cable from an electrical wire.
The smaller jar should fit easily into the larger one, like a nesting doll. You can cook mycelium in a large homemade pot, and boil herbal tea in a small one.
Also, in addition to the pot, for those who like to indulge in fried mushrooms in nature, you can make a mini-frying pan in a similar way. Low (but wide) cans of sprat in oil or tomato are well suited for it; in addition to their intended purpose, they can be used as a lid for a soup pot.
The main advantage of this craft is that the homemade pot has thin walls, which significantly improves the speed of cooking; lightness and small, almost toy size. The entire “trio” will easily fit in a backpack pocket and will not interfere with walking.
Buy or make?
This article describes how to make a wood chipper with your own hands. There are many types of ready-made camping wood chippers on sale, but it’s not even a matter of obviously inflated prices; in monetary terms they are generally acceptable. The fact is that marketing-oriented “improvements” of many factory-made wood chippers actually deprive them of their main advantages: simplicity, reliability and versatility
(see below, about turbo wood chippers). Therefore, it is better to make a wood chip stove yourself.
Design and use of an army bowler hat
The most common is the oval-oblong shape of the container, which has a convex-concave bottom topography. Usually one of the walls has a characteristic smooth bend inward, the product’s contour resembles a bean. There are spherical pots, but they are less convenient to use and transport.
The product is equipped with a loop handle made of rigid wire, making it easy to carry and hang over a fire. The container is convenient to wear on a waist belt; for this purpose, it is placed with the concave side towards the body.
The included lid is often used in the form of a frying pan - it is used to heat or cook main dishes.
The lid handle is designed to hold the lid tightly on the main container, securely lock the product during transportation, and a tablespoon can be inserted into the provided hole.
Royal crowns of Russian autocrats
A golden filigree pointed headdress, presumably of oriental workmanship of the late 13th - early 14th centuries, with a sable edge, decorated with precious stones: pearls, rubies, emeralds and a cross. Regalia of Russian Grand Dukes and Tsars. A symbol of autocracy in Russia. The special status of the crown dictated its use - until the end of the 17th century when all Russian sovereigns were placed on the throne. The Tsar put on the Monomakh cap only on the day of his royal crowning; subsequently he used his personal headdress - the “crown”. The last Russian tsar to be crowned king with the cap of Monomakh was Ivan V, whose co-ruler was his brother Peter I, in 1682. Peter I himself, crowned together with his brother as a junior co-ruler, was crowned king with a specially made “cap of the second outfit.”
The hat appears in a legend according to which the Byzantine emperors, before transferring it and other regalia to Rus', themselves sent an expedition to Babylon for it, where they found it among other treasures left by King Nebuchadnezzar near the tomb of the Three Youths.
The Kazan hat was created ca. 1553 in honor of the capture of Kazan in October 1552 by the army of Tsar Ivan IV the Terrible and the annexation of the Kazan Khanate to the Moscow Kingdom. The crown of the Kazan Kingdom looks like an elongated golden cap, decorated with turquoise, rubies, pearls and other stones. Along with the oriental ornament on the crown, there are applied “kokoshnik-gorodki” in three rows. A large precious stone or large pearl is fixed in it. The cap was originally crowned with a deep red stone - Chinese spinel, but in 1627 it was replaced with a yellow sapphire.
The image of the Kazan cap crowns the shield of the Kazan kingdom in the Great Coat of Arms of the Russian Empire. Nowadays, the Kazan cap also crowns the shield in the coat of arms of Kazan. Kept in the Armory Chamber of the Moscow Kremlin.
The Astrakhan hat was made in 1627 especially for Tsar Mikhail Romanov and in honor of the conquest of the Astrakhan Khanate. The two-tiered crown has a massive metal body, with an eight-pronged tiara added to the lower part of the outer frame. At the bottom of the crown is attached sable fur, traditional for this type of crown - “hats”. The hat is decorated with 177 stones and pearls. Today, the image of this crown is crowned with the coat of arms of Astrakhan.
Altabasnaya - that is, made of gold fabric. This hat was made specifically for Tsar Ivan V Alekseevich, and to decorate the hat, decorations taken from Fyodor Alekseevich’s Diamond Cap were used. Also used in jewelry were: diamonds, yachts, and emeralds. Currently included in the collection of exhibits of the Armory Chamber of the Moscow Kremlin.
Diamond hat 1682 - 1687
Spare headdress of Ivan V. Was designed for everyday use. The hat was also richly decorated with precious metals and diamonds, some of which Ivan transferred to his favorite Siberian hat.
Diamond Crown. 1682 - 1684
The first crown of Tsar Peter. What is noteworthy about this headdress is that in height and circumference it was significantly inferior to the similar “diamond cap” of Peter’s elder brother, Ivan V. After a trip to overseas countries and becoming acquainted with local fashion, Peter was embarrassed to wear this crown in public.
The best models of bowler hats used by modern tourists and hunters
- The most common in the CIS is the Russian army bowler hat. This is a pot with a lid, which is a plate or frying pan (not everything can be heated in it, and it is not advisable to fry it). The advantages of this model are the low price and a special hook on the handle for the fire. The water in the pot boils perfectly, but you shouldn’t fry in it, it will lose its appearance, the paint will peel off, and it will burn out;
- The German field kettle with a lid differs from the domestic product in the quality of workmanship and the presence of an aluminum bowl, which is included in the kettle. The design of this pot has not changed since World War II;
- BW flask. Used by NATO troops and many foreign tourists. Due to the high price, it is not very popular with us;
- The airborne landing pot is our version of the NATO flask. For its production, thicker aluminum is used than in conventional Russian military bowlers. The disadvantages relate to the design of the flask, namely the shape of the stopper.
Choosing a camping pot is a responsible matter. Choose the model that is most suitable for you. If you prefer to travel by car, then it is better to buy a cast iron pot, and if you go on long hikes, take a closer look at titanium pots.
Source
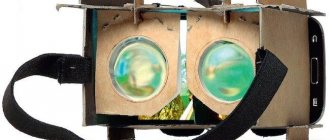
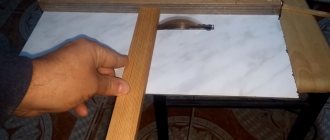
Second way
Surprisingly, you can build a homemade tripod from an ordinary bottle. For this you will need:
- A bottle with a lid (preferably a large one).
- A screw with a diameter of 0.5 centimeters.
- Construction washers (2 pieces).
You need to make a hole in the bottle cap and then insert a screw there. It is better to make the hole with a drill of a smaller diameter than the screw, so that it can be screwed in and fixed. The screw should be screwed in from the inside, after placing the washers inside the cover. Now the structure is ready to install a camera on it. It needs to be screwed onto the screw that protrudes from the outside of the cover.
The bottle must be covered with sand or stones so that it does not tip over along with the camera. Now you just need to screw on the cover with the camera. The homemade tripod is ready.
This design can be attached to a pole or tree using straps or rubber bands so that shooting can be done from a higher place.
Scepter and orb of Tsar Boris Godunov
The appearance of such concepts and objects as the scepter and the orb as symbols of the power of the Russian state is associated with the reign of Boris Godunov. They were commissioned in 1599-1600 to craftsmen at the court of Rudolf II. Manufacturing took place in Eger (modern city of Heb). When creating the set, jewelers followed the traditions of the Renaissance.
Monomakh's scepter was made of gold with enamel details. Twenty diamonds, a large emerald, and other precious stones were used as jewelry. The orb has an enamel inlay. The details depict scenes from the reign of David. The orb is decorated with 37 large pearls, 58 diamonds, 89 rubies, as well as emeralds and tourmalines.
Tsar Mikhail Romanov owned the crown from the “Great Dress”. It was made in 1627 by deacon Efim Telepnev. He was the chief master at the Armory. The crown of the crown consists of two tiers. Below on the outer frame is an eight-pronged diadem. The crown is framed in sable fur with precious stones. After the 18th century, the crown of the “Great Dress” became the crown of the “Kingdom of Astrakhan”.
Lost regalia of the Russian Empire
Only some regalia have survived to this day. They found a worthy place to exist in the Moscow Armory Chamber. But many of them are irretrievably lost. These include the “Great Crown” of Tsar Feodor I Ivanovich. Speaking about this work of art, we must say about its indescribable uniqueness. The crown was made in Istanbul at the end of the 16th century. As a gift, Patriarch Jeremiah II of Constantinople sent the crown to Tsar Feodor I Ivanovich, who was the last of the Rurik family. The “Great Crown” was worn by kings only for important celebrations. Around 1680 the crown was dismantled. Subsequently, its details were used for the “diamond hats” of Ivan V and Peter I.
Crown, scepter and orb on the royal coat of arms
In 1604, False Dmitry, on his small seal, appeared with an image of three crowns under an eagle. This was the first time such an image appeared and did not last long. However, already in 1625, instead of a cross between the heads of the eagle, a third crown appeared. This image appeared under Tsar Mikhail Fedorovich on the small state seal. The same was done in 1645 for his son Alexei on the Great State Seal.
The orb and scepter were not on the coat of arms until the reign of Mikhail Fedorovich. In 1667, the state seal of Tsar Alexei Mikhailovich appeared with the image of the state regalia of power. For the first time on the fourth of June 1667, the king gave an official and clear explanation of the symbolism associated with the three crowns. Each of the crowns depicted on the coat of arms and seal corresponds to the kingdoms of Siberia, Kazan, Astrakhan. And the scepter and orb of Russia mean “Autocrat and Possessor.” And already in 1667, on December 14, the first Decree on the coat of arms appeared.