History of origin and meaning of the amulet
The Bird of Happiness has a very interesting history. As the legend goes, a child in the family of a poor villager fell ill. The doctors could not help him and only threw up their hands, trusting in God. Every day the baby got worse and worse and the father decided to distract him a little. He asked his son what could cheer him up. The child replied that he dreams of only one thing - to see the sun all day. But at that time it was winter, the days became gloomy and dark, and the sun's rays only occasionally brought joy with their light. The father was afraid that his child would not live to see spring and wondered what he could do for him.
While thinking, the villager paid attention to the wood chips, and an idea came to him. He worked all night and by dawn he had made a beautiful bird from a pile of pieces of wood. She was so light and delicate that her wings fluttered even from a light breeze. My father decided to hang it above the stove so that the warm air would create the illusion of flight.
In the morning, when the boy woke up, he saw a bird that reminded him of the sun. After this, his health began to improve and he soon made a full recovery. From then on, the Bird of Happiness hung in the villager’s house for a long time, protecting his family from illness and troubles.
What does the Bird of Happiness amulet look like?
Since then, birds made in this way have been called amulets and are associated with the luminary of the day. There are also other properties of the amulet:
- protects against disease, especially for young children;
- prevents theft in the home;
- protects against accidents such as fire or flooding;
- protects the home from the arrival of uninvited guests;
- smoothes out family conflicts.
A husband or wife who feels that someone is casting a love spell on their other half especially needs a talisman. In order for it to work, certain actions are carried out on it, activating its protective qualities.
Who is the Bird of Happiness amulet suitable for?
The amulet is very popular among people. It can be used by anyone who wants to protect their home from evil. A wooden bird can be bought in any souvenir shop, and in order for it to acquire a magical meaning, it is activated in a certain way. She protects children, helps to maintain comfort, and with her there will be no sadness or sorrow in the house.
The Bird of Happiness amulet protects the house from evil
Slavic beliefs say that the Bird of Happiness is needed by pregnant women. It is hung over the expectant mother's bed. Thus, she protects her and the unborn baby, and subsequently will help the birth pass without complications.
Rules and principles of use
You need to think carefully about where to hang the Bird of Happiness amulet so that it covers the entire house. Our ancestors placed the bird in the red corner of the hut as an image of the soul. It was also hung above the table so that it would circle over the boiling samovar. A crib was considered a special place for a talisman. For the baby, the amulet acted as a protector from evil forces and at the same time was a toy. If you hang it over an adult’s bed, it will disperse evil spirits in the darkness. The best place for a talisman is near the front door. From everyone passing under it, the bird will absorb all the negativity.
Once a year, the Bird of Happiness needs to be wiped clean of dust. Amulets can absorb many energy messages. They take away illnesses, troubles, injuries and will take as much negativity as they can.
If the amulet fell or broke on its own, this means that it took upon itself something bad that was intended for the inhabitants of the house. It is worth reading several protective spells, sprinkling every corner of the house with holy water and going to church. On the way you need to remain silent and not answer questions. No one should know what happened. A spoiled bird can no longer be used. The broken parts must be wrapped in a scarf, taken to a pond at dawn, burned, and the ashes scattered to the wind. You can buy a new amulet, speak and hang it in place of the old one.
Let's fly...
If adults want to fold something beautiful and functional out of paper, it is much more important for children to get an exciting toy. The next model is addressed to young masters, which, unlike other types of origami birds, actually flies, and does not sit on a support or float in a suspended state.
How does she do it? The principle of movement is the same as that of the well-known paper airplanes. The aerodynamic qualities of origami allow you to cover quite large distances, and by making it out of thick paper, you can get not a disposable, but a fairly durable toy.
In appearance, the “flyer” most closely resembles a swallow or swift.
Activation of the amulet
If the Bird of Happiness is not activated, it will remain just a beautiful decorative thing and will not play the role of a protector. Slavic sorcerers consecrated the amulet with fire. A similar method will work now. To do this you need to buy 10 church candles and incense. The ritual is performed on a sunny day. It is best to do this in the summer, but another season will do, provided that it is not cloudy outside.
- With everything they need, they go out into the field or into the park.
- Candles are stuck into the ground and set on fire.
- They burn incense and pray to their saint.
When the Sun is at its zenith, the bird is raised to the sky and said: “A tree grew in a dark forest, in a damp forest. It grew, reaching towards the sky, dropping branches to the ground. Your children will not grow and bloom, my illnesses and sorrows will leave me. I burn with fire, I drive away trouble. Everything unnecessary goes to the fire, trouble goes away. Lord, have mercy and save me, God’s servant (name). Amen". After these words, the bird is asked for help and support in any endeavor.
This text was spoken by the ancient Slavs, so there is no doubt about its power. A bird, illuminated and charged by the Sun, receives a powerful influx of energy, which then spreads to a person and his home.
How to play?
Today, thanks to the Internet and a large amount of educational literature, anyone can try themselves in this ancient craft. Detailed master classes and a detailed description of the process of making an unusual toy will help you create a real masterpiece with your own hands. The only thing is that processing and sawing wood requires knowledge, dexterity and the ability to use a knife. Therefore, this process should not be trusted to children. You can start this type of creativity no earlier than 7 years old under mandatory adult supervision. But even the smallest family members can paint thin feathers with bright colors. Any paints are suitable for creativity: regular gouache or bright and more durable acrylic paints.
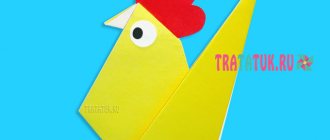
Origami bird of happiness
Prepare red and yellow sheets of A4 paper, scissors and a stapler. Follow the step by step instructions:
- Fold the yellow sheet diagonally down.
- Cut off the remaining portion to make a square.
- Fold the adjacent sides of the square towards the center. Place the sharp angle to the right.
- Bend the left corner to the right.
- Bend the top left short edge towards the middle.
- Repeat with the bottom edge.
- Fold the workpiece along the valley.
- Fold the right corner up.
- Use a reverse fold to fold the corner inward. This is the bird's neck.
- Form a beak with the inner fold.
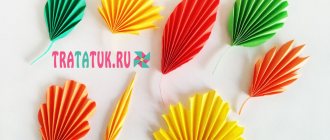
- Fold the red sheet lengthwise like an accordion.
- Round the edges.
- Cut out patterns.
- Straighten to evaluate the result.
- Make a vertical cut in the body of the bird along the width of the folded accordion.
- Insert the accordion into the cut and straighten it out. We got wings.
- Cut a strip of yellow paper into 2 parts - a square and a rectangle.
- Make accordion patterns similar to the wings.
- The big one is the tail, the small one is the crest.
- Attach the elements to the craft using a stapler.
- The bird of happiness is ready.
This figurine can be hung from the ceiling in the room. The air movement will cause it to fly and spin.
The bird of happiness has always been considered a talisman for family and home, which will undoubtedly bring all the best and protect from evil. They made birds from different materials: wood, pine cones, nuts, shells, fabric, thread. Today we will look at how to make a bird of happiness from paper and cardboard.
This is an excellent opportunity to spend time with children in an interesting, educational and useful way. Working with materials develops fine motor skills, and making poultry makes imagination and thinking work, and develops patience and perseverance. And of course, these are warm memories of the time spent together, which will forever remain in the memory and little heart.
tit bird
Curious kids are interested in activities that develop their skills. A child will be able to complete a simple craft with a funny tit. To do this, you should prepare a set of multi-colored paper, as well as scissors with glue.
Operating procedure:
- A circle cut out of yellow paper is folded in half;
- The tail is made from a black rectangular blank, which is also folded in half and decorated at the top with a yellow detail, while the paper protrusion should be raised up;
- Having cut out a couple of black circles, you need to carefully glue them in front to make a titmouse’s head, and the beak will be a small triangular piece, which is also glued to the base of the workpiece;
The black base of the paper will serve as the material for cutting out the legs and wings. The eyes are cut out with a black felt-tip pen.
Origami: DIY bird of happiness
Legends and songs were written about the bird of happiness, and many people were probably at least once interested in what it looked like. However, its appearance in the imagination of each nation differs: in particular, in Japan the crane is called the bird of happiness. In this East Asian country, there is a belief that 1000 of these origami birds are able to fulfill even the most unrealistic but secret desire. Of course, this is just a beautiful fairy tale, but maybe by the time the 1000th crane flies out from under your hands, your old dream will really come true?
To create such a bird you will need paper, preferably colored on both sides. Sheet sizes are preferable to 18 by 18 or 24 by 24, since with smaller parameters it becomes more difficult to work out every detail unless you have significant experience in origami. And the last nuance that is important to consider when choosing paper is the degree of its softness and strength. Often you have to bend and straighten one line several times, after which some materials begin to tear in this place, which reduces the result to “no”.
- According to the classic origami bird of luck pattern, the square is placed so that it resembles a diamond, after which it is folded in half twice and folded back, each time forming a rectangle. This move made it possible to outline auxiliary lines. Now you need to turn the paper over and start bending again, but along the diagonals of the rhombus, each time getting triangles. This created the last auxiliary lines.
- The sheet is turned over again, and then you need to press on its center with your finger, lifting all the corners up and combining them: i.e. the paper “hugs” the finger, which is immediately removed. The paper standing on the surface with its base in a plane is still the same square, but in the projection of a rhombus. It should be turned over so that the “blind” corner, which is the base on which the pressure was pressed, is at the top, and the diverging ones look down.
- A new stage - the sides of the diamond need to be bent inward, aligning the edges along the center line. After which they bend back. The same must be done for the upper “blind” corner: lower it down and straighten it again. The basting lines are ready. The most interesting and important point: the lower edge of the top layer should be pulled, lifting it, as a result of which folds should be created along the previously drawn lines, and a hollow, not completely closed rhombus should be formed. The same actions are performed for the opposite (back) side.
- Now, in appearance, the figure resembles 2 elongated rhombuses, combined with a single base. Continuing to hold it in this position, you should again fold the sides inward, towards the middle line: for each rhombus this is done separately, they are under no circumstances combined at this stage. Then it is important to bend each of the lower parts upward and move them apart no more than 45 degrees, and then straighten them again.
- According to the resulting lines, the ends of the rhombus will again need to be bent, but inward, and on either side the very tip is also bent by 45 degrees - this will be the bird’s head. The final step is lowering the “wings”, i.e. the upper ends of the rhombus, as well as flattening. The Japanese bird of happiness is ready to fly after its dreams!
Option 1
- Take a piece of paper and place it in a vertical position;
- Fold the top two corners, but not all the way to the middle. These triangles should occupy only a third of the sheet;
- You should end up with something like a house, but make sure they are level. Now fold these corners down. You will end up with an inverted triangle;
- Then we fold two more sides. But they shouldn't stick to each other. Leave a small distance;
- Now we need to fix our bends. To do this, bend the top of the inverted triangle;
- Turn the origami right side up and try to form wings;
- The wings are very easy to make. Fold each half down and lift it slightly;
All that remains is to straighten the craft and the ship is ready to fly.
Required materials and tools
Before you begin, you need to stock up on tools and materials that you will need during work:
- multi-colored sheets of cardboard;
- colored paper. It is better to choose good quality paper, otherwise it will tear and ruin the final result.
- scissors;
- a simple pencil;
- glue and brush.
And of course, free evening to work on crafts. Having prepared everything you need, you can begin.
Where crafts come in handy
The bird of happiness is a Slavic amulet, which in ancient times brought peace and prosperity to the house. But even in our times it has not lost its popularity. Here are the main areas of its use:
- as a talisman for the home;
- during popular celebrations, for example, during the apple rescue;
- during weddings in Rus', as a guarantee of strong love and great happiness.
The bird was usually hung from the ceiling in the center of the main room so that, while circling, it could inspect all the wealth, feel positive, and increase it all.
How to make a bird using origami technique?
The most actively used origami techniques are cranes, swans or doves. Owls, seagulls and other representatives of the fauna are less popular, and more often precisely because of the difficulty of working with them. There are, of course, many designs for each bird: they differ both in the required level of preparation and in the general appearance of the figure.
All of them imply the presence of colored or plain paper, which will not tear from too frequent manipulation at a specific point, but will also be easily deformed. In addition, you often have to resort to using a simple pencil, ruler, protractor and scissors. However, in some algorithms these devices may not be needed.
The easiest way to make a paper swan is. You can often notice such a bird as an element of table setting, when large napkins are folded in a similar way, placing them on an empty dish.
To make it, you need a large sheet of paper in the shape of a square, on which a central line is marked, and the side corners are turned to it. The figure resembles an elongated rhombus. The triangles that made up its long part have their internal corners bent, and the figure along the middle vertical is again folded in half.
The most acute angle (lying at the base) is bent diagonally so that this part forms a perpendicular to the base, and its tip is directed with a new fold outward to the side. The swan's head and neck are ready. It is enough to bend the tail twice along parallel diagonals with an accordion, and the work with this origami bird is completed.
Pigeon
This is an option for those who are just starting to get acquainted with Japanese papermaking techniques. The dove folds in just a few steps. You can make two mirror-symmetrical birds and decorate a Valentine's Day card or wedding invitation with them.
We start with a traditional square. For the Japanese, this figure has a special meaning, symbolizing the structure of the world, the four main elements, the unity of the cosmic and earthly principles. That is why the square is the basis for origami, which is primarily intended for religious rituals.
Algorithm of actions:
We turn a sheet of paper measuring 21x21 cm with one of the vertices towards us. Fold in half, connecting two opposite corners: top and bottom. You should end up with an inverted triangle. We bend the resulting figure in the middle parallel to the base. The blank will resemble a boat standing on its own mast. We turn the model over.
Separate the top layer of the triangle and bend it to form a rhombus. Next, fold the workpiece in half from left to right. Bend the protruding part back. This will be one wing of the dove. We bend the remaining part in the same way. We get the second wing.
Forming the head. We make a reverse inner fold, pressing the middle line of the “torso” fold with a finger almost at the top. We iron the resulting fold well so that it does not diverge.
Now you can write some message on the bird, as was customary among the Japanese aristocracy. Or use as a pendant.
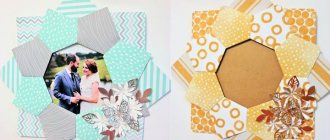
How to make a bird of happiness from paper and cardboard
The easiest way to make a bird of happiness is using paper and cardboard. These materials are very common and are found in every home. Despite the banality, there are many ways to make birds, obtaining radically different results.
Let's give a few examples.
Quilling
To begin, take double-sided colored paper and cut it into strips: 4 cm wide and the length of the entire sheet. The base of the craft will consist of twisted strips in the form of droplets.
To get started, you need to take a strip of the desired color, make a drop of the desired size from it, twisting it a little in the center. Glue the edges and trim off the excess.
Once you start making a bird, you will understand for yourself what size drops you need and how many.
When starting to make wings, immediately make several dozen blanks and lay them out in the desired combination. This way you will see the overall picture and can change and improve it.
To complement the base of the body and decorate the finished product, twist the ends of the strip on both sides and fix it on the sheet.
To secure the composition, glue the strips to the album sheet with an edge.
For the head, make a drop out of white paper. You can draw the eye with a black marker or glue a black peppercorn.
The bird's tail consists mostly of twisted stripes, which makes it appear more voluminous and more magnificent.
Twisting strips is a fun activity for both children and adults. And imagination will allow you to make the bird bright and rainbow-colored.
Origami
Origami is an old form of decorative and applied art of creating different figures by folding an ordinary sheet of paper. If this option of creating a bird of happiness is closer to you, feel free to get down to business.
Before making a bird of happiness out of paper, prepare 2 sheets of colored paper - one will be spent on the body and tail, the second on the wings. The sheets can be either the same color or radically different.
First, bend one of the sheets so that you get a square. The excess part needs to be cut off, but not thrown away. We will still need it.
Next you need to fold the square as shown in the picture, getting the body. Bend and straighten the tail to make it look more voluminous. The craft will immediately be transformed.
For the tail, take the rest of the paper and fold it like an accordion, 0.7-1 cm wide. At the end, with small scissors you need to make cuts along the side parts of a triangular shape. This technology is reminiscent of making a snowflake.
Now let's move on to the wings. To do this, fold the remaining sheet with a similar accordion. Along the edges, as well as on the tail, we make triangular cuts.
As the step-by-step instructions say, all that remains is to make a rectangular hole into which to insert the wings.
No need to cut the sheet!
At the last stage, all that remains is to glue the tail and straighten it. To make your handmade paper bird of happiness even more beautiful, you can give it a “hairstyle.”
This is how it should turn out to be a beauty.
Application for children
This technique is perfect for children who are in 2nd grade and younger. It is not as difficult as quilling or origami, and the happiness from the result will be the same.
The materials for the craft are the same as in the previous versions. If the child is small, you can prepare a template for cutting. This way the work will go faster.
Draw the bird's body and head on a white sheet of paper. It can be cut out of paper and glued. Next, cut out “feathers” from colorful paper. For the wings the blanks will be smaller, for the tail a little larger. Next, make cuts along the edge so that the “feathers” appear fluffy.
Attach it all to a piece of paper. You can also finish drawing the sun, grass, trees.
You can then cut out the bird and attach it to the ceiling with a thread or wire. This will give the craft special importance and value. And the child will be extremely proud of his work. How it will look can be seen in the photo.
For children who are interested in making crafts, you can prepare several templates that will make it easier to work with. Depending on the chosen technique, they will look different.
These can be blanks of the body, feathers, or cut strips of paper. The main thing is to simplify the work, making it accessible to all ages.
Here are some basic examples:
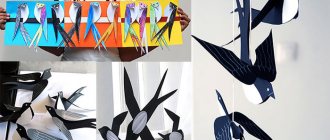
Volumetric craft using the kirigami technique
Unlike origami, the kirigami technique appeared not so long ago, and is suitable for children who are in grade 5 or older. Examples of crafts:
It is important to carry out all actions step by step. Download the bird outline template in advance or draw it yourself.
Bend the album sheet strictly in half, attach the template, and secure it. Using nail scissors or a stationery knife, cut out the blank.
When the work is finished, remove the template and unfold the sheet. These are the funny birds of happiness you now have.
It looks very beautiful if you make a kirigami craft not just on a sheet of paper, but by first selecting a beautiful color. You can give the sheet certain shapes. It’s great if the form is thematic. For example, the shape of a heart before Valentine's Day.
Let the bird of happiness, made with your own hands, not only please the eye, reminding you of spring and awakening, but also bring all the best and most desirable things to your home, family and environment.
Swan
How easy it is to make an origami bird out of paper can be seen in the following step-by-step photo. Fold the square of paper in half diagonally and bend the corners in different directions. Then the workpiece is turned upside down and bent in half. Next, in the direction of the dotted line, fold the swan's neck and head. Press the outermost corner inward, bending the paper 2 mm. This will be the bird's beak. All that remains is to form the shape of the tail with folds and the swan is ready!
If you attach two swans to a sheet of cardboard with their beaks facing each other, after gluing on a large red heart, you will get an interesting card for Valentine's Day. You can give this craft for a wedding. The newlyweds will appreciate your child’s efforts and will keep this craft as a keepsake for a long time.
Bird for luck
The Japanese customarily make flying cranes out of paper to make their most cherished wishes come true. And the more birds you get, the happier their creator will be. Russian origamists took the Japanese model as a basis and, slightly modifying it, offered their own version of the “lucky talisman”.
The origami bird of happiness is made by analogy with wooden amulets, which have been made by residents of the Arkhangelsk region and surrounding areas since ancient times. These are toys with an elegant, elongated body and fan-shaped carved wings. They were hung from the ceiling above a child's cradle, in the “red corner” of the room or above the windows. It was believed that birds protect the house and people from evil forces from the outside, and ward off diseases and other troubles.
Indeed, Pomeranian wooden toys and Japanese paper cranes have a lot in common. It is interesting that the authentic “firebirds” of the Russian north were made by cutting thin shavings from solid timber, without the use of glue or other fasteners. The Japanese make their cranes in exactly the same way, exclusively by folding paper.
The “lucky” origami model is best assembled from double-sided single-color paper. This will allow you to better demonstrate its sculptural form and openwork elements.
From a rectangular sheet of A4 format, cut out a square with a side of 15 cm. We will subsequently make wings and a tail from the scraps. We mark a diagonal fold on the square and bend the sides of the workpiece to it. We get the basic “kite” shape.
We fold the upper part of the figure to the center line in the same way. We have the basic figure “Fish”. “Close” it along the long axis so that all the folds are inside. We straighten it again, and then lift the longer part up. This will be the neck, which, having made a reverse fold, we need to insert into the middle of the body.
Carefully run your finger, or even better, the flat side of the scissors along the folds of the workpiece, otherwise it will open up. We make the bird's head in the traditional way, as if “pushing” the upper part of the neck inward. We cut off the corner of the body where the tail will be attached. We cut the remaining piece of paper from the square into two parts: narrow and wide. We collect both into an “accordion”. From the first we make a tail, from the second we make wings. We cut out a pattern along the edges, as is usually done with New Year's snowflakes.
We insert the assembled wings into the hole cut in advance, and then open the free edges as wide as possible. Glue in the tail. This is the resulting firebird from an origami crane. You can also give the model a magnificent crown, although it is already fabulously good.
Parrot
An exotic guest from distant tropical countries is more often than other birds made using the origami technique. It can be made in two versions: for children the model will be simple and quite conventional, and for experienced craftsmen it will be very realistic and effective.
The first folding method is quite within the capabilities of elementary school students. Interesting techniques for transforming a piece of paper into a three-dimensional parrot will not only give them aesthetic pleasure, but will also help them master the basics of algebra and geometry.
Assembly diagram:
For a motley tropical origami bird, it is best to take a two-color sheet of paper, then the head will turn out to be one shade, and the body will be another.
Step by step description:
- At the base square we outline a diagonal fold.
- Place the figure with the middle line towards you. We bend the sides towards the center.
- The result is a basic “kite” figure. We bend the upper triangle back, as shown in the figure.
- Fold the sides to the middle axis.
- Raise the top layer of the workpiece.
- We bend along the previously outlined folds in the opposite direction, obtaining the basic “Fish” shape.
- We lower the upper triangles down.
- And we return it back, but already folded in half. It looks like a crown.
- We bend the lower peak twice. Then we close both halves of the workpiece, as if “hiding” all the folds inside.
- We turn the resulting model 180°.
- In the place where the head will be, we make a reverse inner fold, as described in the previous master class.
- All that remains is to draw the parrot's eyes and he is ready.
This cute paper pet can't fly, but it sits great on the table. He will make excellent company at breakfast or while working on the computer.
How to make a more complex origami bird is best watched in the video. The master focuses on details that may escape the attention of beginners reading the description. A classic diagram will help to separate the folding stages: