Introduction. How I started writing this article
Everyone knows that Russia is not the friendliest country for compatriots doing something new (and doing anything at all). We follow foreign trends with much greater interest and perceive innovations from our fellow tribesmen with great skepticism, believing that everything that “they have” is cool, and everything that “we have” is at least doubtful. As a result, even a good product is extremely difficult to convey to consumers unless you are an oligarch and can stupidly waste millions of evergreens on advertising.
It must be said that there are, of course, pleasant exceptions: several audio magazines agreed to listen to our setup and write their impressions - many thanks to them for this. Some people refused to do it for free, and custom articles are not our way. We agreed with the editors of stereo.ru to arrange an audition in 2022 on the condition that before that I would write a saga on the topic “how it was.” Actually, why not - such examples help to quickly translate what you want into reality and motivate you to achieve heroic deeds. I’ll say right away that this describes about 1% of all the experiments and difficulties that the project had to face and overcome. Many topics remain unsolved. If the reader has any questions, write in the comments, I will try to answer everyone.
Acquaintance
So, let's get acquainted. I am Konstantin Rumyantsev, engineer and instigator of the Operly project, which already has some fame in audiophile circles. My school hobbies are electronics and music. Accordingly, I have two degrees on the topic that interests us: in the first, I am a physicist (Department of Radio Electronics), and in the second, I am a teacher of classical guitar. Received in exactly this order. Both educations are full-time - as they say, “from bell to bell.”
In addition, I was involved in rock and roll for 10 years. Actually, after school, I wanted to go to a technical university to design low-frequency amplifiers, but I didn’t find such a specialty, so the closest direction was the department of radio electronics. Graduated in 1994. Probably, if the country had not been going through such upheavals at that time, I would have immediately started designing audio equipment, but then this was happening... There was no time for electronics. In general, when things became calmer, I wanted to try to realize my old dream.
Another motivation of mine was that my daughter, Sophia, was growing up. At the time of the start of the project she was 13 years old. Children are like a sponge. They absorb what’s around them, it’s useless to explain anything to them, it just has to be part of their life. Sophia grew up as a smart, tech-savvy, modern girl. I managed to instill in her the right musical taste: Deep Purple, AC/DC, Black Sabbath, Rolling Stones are her favorite bands. I wanted her to be involved in the process of designing and inventing too.
I know from myself that until you go through everything yourself, even the smartest books will not give even an approximate picture of real R&D. It is clear that I did the main work, but Sophia also helped me - I gave her tasks: to translate something into Russian, change the speakers, etc., besides, I always consulted with her and shared my thoughts, we discussed new ideas . It was nice to watch how her independence grew and she could be entrusted with more and more. As a result, she began to take initiative, become more and more involved in the process, and look at the project from an entrepreneurial point of view, which makes me happy.
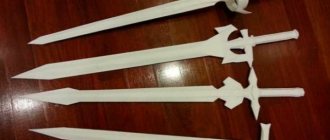
MARK 1: the speaker on the back of the deck is better than on the front
Somehow it happened that I label the technical names of my models like Tony Stark’s Iron Man suits (my daughter and I joke about this). Accordingly, the first model is Mark 1. And this is by no means a horn, and here’s why: my thoughts did not immediately lead me to this type of acoustic design. At first, like the vast majority, I thought in terms of a closed box (a closed box is a box) and/or a FI (also a box, but with a hole and a pipe inside).
So, the first model, also known as MARK 1, was a classic ZYa. It used a rather cunning jamming system inside the housing, the principle of which I took from microwave technology. I didn’t want to bother with a multi-way system at this stage, so I settled on a full-range speaker.
MARK 1 had several iterations that provided a lot of useful experience:
• I installed the SB in the case - well, the sound is just like sound, not a lot of low-end, nothing special
• I strengthened the body (especially the front panel) - the sound became more accurate, and even strengthened it - even more accurate. The latest iteration is a steel rib on the front deck. In this configuration, the accuracy of images and articulation were already quite decent and in these categories they were ahead of conventional multi-strips in the mid-price range. The owner of an initial Focal ($3,000) once came to me and said that I really surprised him.
• Perhaps the most important experience that most influenced my further development and which I did not immediately realize. In the heat of experimentation, I changed the speaker to a better one, but it had a slightly larger basket. I was too lazy to increase the seat by a few millimeters and, being the “smartest” one, I attached the speaker to the inside of the case, and simply cut the leading edge at an angle with a knife. With this speaker the sound was a cut above, but the clumsy appearance of this solution was decidedly unsatisfactory. In the end, the seat was cut to the size of the basket, everything was done carefully, the speaker was screwed onto the front side of the case. And guess what? I did not like!!!
Something elusive has changed, somehow there is less magic. No, no, in the measurements everything was the same, but I didn’t play the guitar for four years at school from morning to night so that I could make mistakes in such things. But at that time, like most of my colleagues, my understanding of sound revolved around the frequency response, phase response, TDH, etc. - in general, it was not enough to draw conclusions correctly. I didn’t understand then what happened, but this moment was clearly etched in my memory.
Now I understand that by fixing the speaker on the back side and making an expanding profile with a knife, I got a primitive horn. This thought didn’t occur to me then, but it became a thorn in my head. My efforts at that time boiled down to searching for an acoustic design that would allow me to raise the low end, which was frankly lacking.
MARK 1, speaker loaded from the rear of the front panel
Having tinkered with the ZY to my heart’s content and converted it to FI, I realized that the maximum possible in this design is to obtain a result that other similar “smart guys” have already received, which meant joining a long line to the consumer’s heart. I didn’t want to be the hundred thousandth in line and decided to continue my search.
By the way, there was another extremely useful experience: when I made changes to the design, I first assembled one column, then turned it on, and if the experiment was considered successful, I assembled the second one, and the first one, accordingly, played while I was tinkering with the second one. So, every time a couple turned on, it was not very good, but after some time everything was adjusted. This was noted by Sophia, and her friends, and my friends, i.e. unprepared people. The conclusions are as follows: the slightest non-identity in the speakers ruins the stereo image, so it is extremely important to make as identical enclosures as possible, and the speakers must be warmed up before testing.
Paper birds on a string
Elegant paper birds in the Chinese style are a wonderful Christmas tree toy and decoration for indoor flowers. On a sheet of cardboard you need to draw the silhouette of a bird:
- Draw a horizontal line first;
- Draw a circle with a pencil, so that the line runs exactly along the diameter, dividing it into two equal parts;
- Next to the second, but slightly higher, the line should separate approximately one third of the circle
- Circle them, drawing the silhouette of a bird.
Work progress:
- To make their tail and wings you need two sheets of paper. They need to be rolled into an accordion.
- In a cardboard silhouette, you need to cut a vertical line near the junction of the circles and thread one of the sheets folded into an accordion.
- Slightly straighten it on both sides. Then cut another vertical line in the tail area and thread the second sheet through.
- It needs to be glued at the base so that the fan-tail does not straighten out too much and remains like feathers.
It’s not at all difficult to make such a bird craft with your own hands in literally half an hour. Meanwhile, you can decorate the hall for a holiday, so that when guests arrive, there will be a festive mood and the room will be cozy. And besides, such decoration would be appropriate for any holiday.
The Blue Bird craft from a stencil follows the same rules, but when creating a cardboard silhouette, you immediately need to draw a tail of 2-3 feathers, then decorate it with a carved pattern.
In this case, the wings are made from smooth paper tape, also decorated with a carved pattern.
MARK 2: having cut a hole in the partition, I realized that the sound stopped “squeezing”
While working on the previous model, I read a lot of literature on acoustic design and my eye fell on a design called “Voight Trumpet”, also known as TQWP. Like most beginning audio designers, I saw the ideal in the ideal frequency response - like “align the frequency and you will be happy.” TQWP was quite suitable as a candidate, because it promised a not very complex design and an excellent (measured) result.
MARK 1: speaker on the front side of the panel, steel stiffener
Well, I ordered it to be cut, assembled, everything “according to science.” I experimented with damping material. There seems to be more bass, and the speakers are the same, but the sound is incredibly flat. Anyone who has a musical education at the college/conservatory level knows that finding “your” sound is one of the most important components of learning. The sound should be round, strong, flying.
Sound is an integral part of the musician and the work. When you work on sound for years, you have a different attitude towards what comes out of the speakers, you get more irritated if the sound is clumsy. In MARK II the sound was extremely clumsy, although its frequency response was much smoother than that of MARK I. The paradox, however...
Mark 2, Voight Trumpet (TQWP) - a friend still has it today
I don’t even understand how I came to the next action—let’s assume it’s intuition. The fact is that the TQWP has a partition that is located behind the speaker: I freaked out, took a 50 mm cutter and cut a hole in the partition directly along the axis of the speaker. Lo and behold, the “flatness” disappeared. Now I could listen to these speakers quite normally, without irritation. By the way, the low frequencies have not changed.
The conclusion from this experiment is this: there should be as much free space behind the speaker as possible. Any compression of air cripples the sound.
Light bulb bird with feathers
If an old down jacket is torn, or a light bulb in a chandelier has burned out, then it’s time to go shopping. And from a down jacket and a light bulb you can make a charming bird. You will need for work:
- Bulb;
- Tennis ball;
- Silicate glue;
- White acrylic paint;
- Colored paper.
Progress:
- The lamp should be painted white - the glass part and the base if it is transparent or only the base if it is made of frosted glass.
- You need to apply a little glue to the base, next to the glass part, and wrap some lace or yarn on top.
- It is advisable to immediately make a small loop, with which you can then hang the craft.
- You need to put a tennis ball on the base, after making a hole in it, and glue it to the threads.
- Glue a red paper comb and a paper beak onto the ball. Apply glue to the entire remaining area of the ball and dip it in synthetic fluff or down from a down jacket.
- Next you need to glue paper wings and a tail to the glass part. Then glue is applied to the lamp, as well as to the ball, and immersed in fluff.
- You can also glue paper legs to the bird and make a stand in the form of a nest.
- To do this, you will need a small plastic container - a yogurt jar, a cosmetics jar, the bottom of a mineral water bottle.
- It is necessary to glue fabric and branches to it. It is advisable to use a glue special for fabric, colorless, or use double-sided tape.
- You definitely need to make eyes from dark-colored scraps or beads or sequins.
- They can also be drawn on with a marker before the feathers are glued to the tennis ball.
MARK 3: another bad idea
Since TQWP was, in a sense, a reverse horn, why not make a real reverse horn? With mathematics, as you might guess, everything is in order - I calculated the cross sections of an exponential horn with a pre-horn chamber. Since at that time I did not have any production space - only a rented premises with an area of 12 sq.m. — the question of how to make such a sickly structure was very pressing. I ordered the housing to be cut, but I decided to make the return horn itself from foam plastic. This is obvious: the material is easy to process, cheap, easy to shape, it will be relatively easy to saw an expanding profile in it and get what you are looking for.
MARK 3, foam horn - stupid idea
No sooner said than done. It turned out to be a complete mess. That is, the Mark 3 was even better than the previous model, but the low end was sluggish, unenergetic, rotten, and muttering, although its sheer quantity was excellent. The idea of making a horn out of foam plastic turned out to be outrageously stupid, because foam is hard to the eyes, but for sound it is quite loose - and the lower the frequency, the deeper the wave penetrates into the material, and only God knows what is added and subtracted with what.
MARK 3 assembled
We can safely say that any formula for calculating a horn assumes the presence of an absolutely rigid wall. The further the walls of the horn are from absolutely rigid ones, the further the sound of the real horn is from the calculated one. And vice versa: the harder it is, the closer the result is to the ideal horn. I believe that the majority of horn detractors had experience with a horn wall that was not rigid or resonant enough, and instead of a wonderful open sound, they received a difficult to understand mix, which many mistakenly consider “the horn sound that I don’t like.”
Fire safety. Master class “Paper Horn”
Sakharova Tatyana
Fire safety.
Master class “Speaker made of paper” Technology “Club hour”
according to the program
“Paths”
on the topic:
“
Fire safety ” .
Master class “
Paper horn ” Tasks
1. Foster respect for the firefighter profession. Improve the ability to interact in a team, develop curiosity, and the desire to help each other. (“Socio-communicative development”)
2. Strengthen children’s understanding of the megaphone , where it can be applied and used. Give a simple idea of the amazing properties of air and its movement (“Cognitive development”)
3. Develop the ability to express one’s opinion, stimulate speech activity (“Speech development”)
4. Strengthen the ability to work with paper , develop creative thinking and imagination (“Artistic and aesthetic development”)
5. Develop fine motor skills of the fingers (“Physical development”)
Materials and equipment
Sheets of A4 paper , scissors, glue, stapler, metal and paper speaker for sample .
Do you know what a megaphone ? With the help of it and the amazing properties of air, anyone who has moved more than 20 steps away can hear you. " Speaker "
denotes
a "pipe"
that is expanding.
Air transmits sound, but over short distances. This happens because the air movement, spreading in all directions, gradually weakens and disappears. But from an ordinary sheet of paper you can make a device that will increase the distance at which the voice will be heard. The thick paper of the horn walls reflects sound well, collecting it in one direction.
Stages of work:
The horn looks like a bag , from which the lower sharp part has been cut off. paper bag , cut off the bottom sharp part and glue the side seam. Align the top in a circle (wide)
and glue a handle to the side.
Master class for children of primary school age “Butterfly made of paper” This master class is intended for children of primary school age.
Goal: make a butterfly from paper Objectives: • Educational:. Master class “Safety on the road” “Safety on the road” Purpose: to generalize and consolidate knowledge of the rules of the road. • raising children to have a high general culture.
Master class for teachers “Safety through the eyes of preschoolers” Caring for children should always be the focus of attention of adults. Protecting the health and life of a child is one of the most humane and most...
"Safety through the eyes of preschoolers." Master class for teachers Educator: Good afternoon, dear colleagues! Today I invite you to go on an unusual and exciting journey through the land of safety.
Master class for educators “Safety through the eyes of preschoolers” Good afternoon, dear colleagues! Today I invite you to go on an unusual and exciting journey through the country of safe childhood.
Master class on making flicker “This is my safety” “This is my safety!” Reflective elements on children's clothing! A law has come into force requiring children to have...
Master class on making flickers “Flicker is my safety!” Master class on making flicker “Flicker is my safety!” Master class on making fabric flicker crafts for children 6-7.
Master class “The magical world of paper and magnificent flowers made of corrugated paper. Crocuses" Master class Topic: "The magical world of paper and magnificent flowers made of corrugated paper" (crocuses). Goals: to disseminate manufacturing experience.
Presentation “Fire Safety” “For children about fire safety” in the educational process. Left alone, without adult support, the child is defenseless. Therefore, it is important to apply.
Project “Fire Safety” in the senior group Project in the senior group Topic: Fire safety Author: Lobkareva N. V Project type is short-term. Participants: children of the older group.
Source
MARK 4: if the foam is loose, then the concrete is hard
Indeed, concrete is an excellent material: it is cheap and acoustically inert. I already designed MARK4 as a commercial model. 400 mm wide, 600 mm deep. Why these particular sizes? Because if the reader goes to the IKEA website and looks at what, for example, countertops and/or cabinet depths are, then 400-600-800 mm are the most common. I think sticking to working standards is the right thing to do and makes life a lot easier. Let's return to MARK IV. As usual, the question arose of how to produce all this on 12 sq.m.
The idea was this: I cut out the negative of the reverse horn from foam plastic, a kind of expanding sausage, use it as a form, “roll” fiberglass onto it - it turns out to be a matrix-positive horn - and then fill the matrix with polyurethane foam (it turns out the same “sausage”), take it out from the halves, glued together, mounted in a wooden case, filled with concrete, and then, when it hardens, I simply tear out the foam from the concrete, obtaining the desired expansion profile. This, by the way, is a pretty cool idea for DIYers, which allows you to get any shape without any CNC, cheaply and cheerfully.
MARK 4 with a straight horn made of foam composite and painted with glitter (daughter's idea), which looks quite controversial. The same 4a28 is installed here
This model assumed a straight horn made of vibrated concrete. However, the manufacturer with whom we had an agreement, after holding out the rubber for six months, returned the money - we had to make a straight horn ourselves from a foam composite. This material is much better than foam, but expensive and also not rigid enough.
Negative of a direct horn for Mark 4 made of putty and coated with epoxy. Do you see the carnation in the center? The plywood profile of the horn was mounted on it, and by rotating it the required surface was obtained.
MARK IV sounded pretty good already. Excellent in some genres. Of course: concrete is hard, non-resonant - not like foam plastic. To fit the model into kitchen dimensions, it was decided to make it on a 10-inch speaker, and this shortened the length of the return horn - one of the reasons for the large size of all return horns.
The problem is that I could not find 10-inch speakers of sufficient quality so that, firstly, they would be mass-produced, and secondly, they would have high frequencies up to at least 17–18 kHz and would be reasonably priced. Even after purchasing Audioirvana, I was left unsatisfied. I liked 4a28 the most. But firstly, they were no longer produced, and NOEMA, which seems to be considered the successor, produces speakers for completely different purposes (I also tried them). Secondly, the HF was still not enough, and thirdly, these speakers worked well in a very narrow volume range: turn it up a little louder and the diffuser began to warp. I also didn’t like the experiments with coaxials: measurements were measurements, but the sound was somehow incomplete. I still have several shelves in my basement filled with 10-inch speakers of various models.
In total:
• concrete - although an acoustically suitable material, it is also cheap, but dirty to produce, takes a long time to gain strength, is inconvenient when working with wood due to humidity, and is very heavy. On stream, this technology raised questions.
• the model itself has a short horn and an outlet of insufficient size - as a result, it gives unevenness at low frequencies.
• the main thing is that I didn’t find a speaker that I liked enough. Looking back, I think I didn't get the hang of this model. Now I know guys who would do 10 inches with a normal top. Perhaps someday I will return to this model or this technology as the cheapest possible horn to produce.
How to make a horn with your own hands
This article is devoted exclusively to the technological issues of making a round horn; in it you will not find any methods for calculating horns, nor specific sizes, nor praise for the resulting horn, but only how to make it at home, on your knees, with sufficient accuracy and minimal material costs. It is assumed that you have a set of coordinates that defines its geometry. We refer anyone eager to deepen their knowledge in this area to this site. After selecting the dynamic head, calculating the horn and obtaining all the necessary drawings in AutoCAD, we stared at these drawings and thought hard. How to make such a large part with a diameter of more than half a meter and a rather complex shape. The option of making a horn from segments was discarded immediately.
MARK 5: brevity, brevity and once again brevity
By the end of 2015, my understanding of the ideal speaker was described by the following theses:
• full horn (forward and reverse);
• absolutely rigid body;
• a minimum of joints - preferably without them at all;
• 8-inch speaker. Larger size means the top suffers, smaller size means the bottom suffers. 8 inches is optimal;
• maximum dimensions of the base: width - 600, depth - 800 mm. This is approximately how much a person sits on a regular office chair if he puts his legs under him - that is, very compactly;
• original appearance;
• repeatability of production.
Having calculated the mathematics of direct and reverse horns, I sat down to drawing during the New Year holidays. First of all, it was necessary to choose how to fold the reverse horn - the appearance and size depended on this. Having drawn a drawing on a piece of paper with a simple pencil, I began to put the calculation into a sketch. Drawing a horn on a computer is a very labor-intensive task. Perhaps someone does it quickly, but personally, every time I end up with some kind of crocodile - ugly, unlaconic, low-tech.
Now it seems that everything is obvious, that it was in no way possible to draw differently. But considering that every 1-2 days I started drawing everything anew, and the first acceptable profile layout that didn’t make me sick appeared about a month and a half later, you can count for yourself how many attempts were made. And this is just the beginning.
Mark 5. Pencil sketch, first 3D model, photo of the finished product.
When I was still agonizing over the sketch, I kept stumbling over this question: how to mount a speaker in a full horn? After looking through thousands (well, really thousands!) of horn designs, I did not get an answer to this question. If it were just a reverse horn, everything would be clear: we make a reverse horn and load the speaker from the front side. If it were only direct, then everything is the other way around: we mount the speaker on the back side of the horn and there are no problems.
With a full horn there is an eternal ambush: either the throat of a straight horn should not be the diameter of the speaker cone, as needed in the calculations, but much wider so that the speaker basket fits into it. Either the direct horn must somehow be mounted on top of the speaker basket, then it must be removable for maintainability purposes, that is, be able to somehow be attached or screwed to the reverse horn. I didn’t like all these decisions, because... violated the basic rules:
• the throat of the direct horn must be strictly adjacent to the speaker cone. Remember the experience with MARK 1, when you got a small, literally 2 cm, horn? The precision of the horn throat is the key to a clear sound picture and divine horn sound, so the option with a straight horn, whose throat has a diameter that allows you to place a speaker basket, is not suitable.
• there should be no joints, because each joint cripples the sound, and the threaded connection on which a rather heavy straight horn hangs, with constant vibration, it is generally unclear how it will behave over time - so screwing the horn on top of the speaker basket is also not an option.
• the laconic appearance does not allow making all sorts of flanges for normal bolts.
how to make a horn with your own hands from cardboard
Please enable JavaScript for a better site experience. A horn is a simple device for amplifying the volume of sound. A simple horn can be made from paper material. It consists of two parts - a bell and a neck. Start by making the bell. Take thick office paper.
Draw a petal on a piece of paper with a base of 3.2 cm and a length of 22.4 cm. The side parallel to the base is 9.5 cm and has a slight rounding. Each petal of the bell along its length does not have a straight line, but a smooth transition.
Cut out one template and outline it with a pencil to make 10 petals. When you cut out the blanks, leave a 0.5 cm wide piece on the left side of each of them. This piece is needed for gluing the next petal. Cut the edge in several places so that it can be folded back easily.
Use wood glue rather than regular paper glue. It is better to glue not in a chain one after another, but in pairs, then glue the pairs. Let each glued seam dry, otherwise, when gluing the next petals, the previous seams may come apart. The throat of the horn has a cone shape.
Draw a straight line 35 cm long. Place a compass at the base of the line and draw one arc with a radius of 7 cm and the other with a radius of 31 cm. On one side, leave an edge 0.7 cm wide for gluing. Glue the cone together. After complete drying, make 1 cm long cuts on the narrow side of the cone to glue the pipe.
It is convenient to glue the pipe onto a wooden blank with a diameter of 2 cm. To easily remove the finished pipe, screw 4 cm wide strips of paper coated with glue onto the blank until the wall thickness of the pipe reaches 1.5 mm. After drying, remove the pipe from the blank. Lubricate the cuts of the cone with glue from the inside and insert the pipe. Additionally, glue a strip of paper around the top. Fold the finished parts of the horn so that the neck enters the bell from the inside to a depth of 0.cm.
Carefully coat the edges of the socket around the entire circumference with wood glue, bending the neck inward with your finger. Cover the outside and, after drying, the inside with a layer of liquid wood glue.
The horn will become hard. If desired, the horn can be varnished or painted. It will noticeably enhance the sound. Using the same scheme, you can make a horn from tin, only the seams need to be able to be connected by soldering or locking. It is possible to make the same device, say, to decorate an interior in the style of the first half of the twentieth century.
And it will really work. Take a regular embroidery hoop. Make a cone from black paper with a diameter equal to the inner diameter of the hoop and a height of about 50 millimeters. Hoop the cone in any way you like. For example, for this purpose it can be equipped with a width equal to the thickness of the hoop.
Make a piece of regular wooden or plastic drawing ruler, the length of which is equal to the diameter of the hoop. Take an electromagnetic telephone capsule with a screw-on cap, for example, type TK. Unscrew the cap from it, pull out the membrane.
Sand the middle of it with sandpaper until it's shiny. Tin the surface. Then straighten a paper clip, which you also tin. Solder the paper clip to the membrane in such a way that when the membrane is centered, it can come out through the central hole of the capsule cover.
IDEA!!!
So, while still developing the sketch, I came up with the idea of breaking the geometry of the forward horn by the size of the speaker basket and attaching the speaker directly to the reverse horn. This will connect the speaker to the heavy mass of the speaker, which is good, and the damaged geometry can be restored with a compensation ring, which is put on top of the speaker and restores the geometry of the straight horn (the red ring on top of the speaker is what it is). The idea of attaching not the entire horn on top of the basket, but only a ring that continues the geometry of the straight horn and is exactly adjacent to the diffuser, is obvious at first glance, but it solves all the problems:
• the direct horn and the reverse horn are now one whole - there is no longer a need to make them separately and then mount them.
• the straight horn is clearly adjacent to the speaker cone.
• there is no need for any flanges - now the direct horn “flows” into the reverse one, everything is laconic and technologically advanced.
Then there was a long story about how I suffered with the 3D designer, who eventually drew a 3D model, color choice and a long epic with manufacturing.
The very first, still computer-generated, version in red and black, which was made by a designer I knew. The first set was then made in this color. This color scheme is still the main one.
After the first listening, it became clear that this version of the horns simply had to be commercially attractive - it combined all the main points:
• had excellent uncompressed sound. As one of the buyers said when we played Vinyl Jame 2022: “it’s like a window was opened” - this is him after listening to much more expensive setups, and one woman even cried (really, really).
• had, I would say, an outstanding appearance.
• was technologically advanced and repeatable.
This model could already be shown to the general public, and it was called Intelligence, as if hinting that intelligent music would sound the best. Intelligent music here means classical, jazz, choir, not very hard rock, acoustic genres, etc.
Step-by-step instruction
- A bird needs a beak and eyes. It is better to make the beak out of paper so that the craft is voluminous and expressive.
- You can also draw it, but the bird will be much less elegant and festive.
- The eyes can be glued on with plastic ones, like on soft toys. Paper is, however, more convenient.
- They can be round, square, oval. You will need white and black paper to make them look naturalistic.
- You need to glue them almost at the very crest to the paper body so that the bird turns out tall, as if it was stretching out its neck and studying everything around.
- Accordingly, large paper squares, rhombuses, and ovals do not need to be cut out. They can be small and even different in diameter.
- To make a beak, you will need two paper ribbons or one, but painted the same color on both sides. The tapes are folded and carefully glued. You need to cut out triangles on both sides so that the edges are formed by two triangles, like the tongue of a lizard.
- The beak can also be pointed or rounded.
- The tape should be folded in half and glued to the horn-body. The paper bird craft is almost ready.
- All that remains is to cut out beautiful wings with wavy feathers and place it in a prominent place.
Children's paper bird crafts can be made using the same technique, but make the mouthpiece wide and small in height so that they look like cartoon characters, games, angry birds. You also need to cut out eyebrows from paper to make the birds really angry.