Female beauty is a factor of historical significance. This statement cannot be disputed by either a confirmed bachelor with Don Juan inclinations or a masculine champion of body positivity. Artists and public figures of the opposite sex should also approach people “on the level”. However, both natural intelligence and natural beauty need support, care and development. A cute from birth, but unkempt and dirty, and a master who drank away his skills - two sides of the same coin. And to take care of your appearance you need the appropriate accessories. Among the most important of them is a mirror with shadowless illumination of the face. More precisely, with a micro-shadow drawing: the backlight on the mirror should eliminate shadows from the nose, ears and other fairly large “objects”, but clearly and proportionally show small skin defects, without smoothing out the relief of the face at the same time. Cosmetic mirrors with candlesticks have been known since ancient times; the advent of electric lighting revolutionized the business of make up - bringing your face into proper condition. Mirrors with light bulbs first appeared in theater dressing rooms, because the appearance of an artist is a good piece of his daily bread. The conditions of modern life allow any housewife to find enough time to take care of herself at the level of a professional beauty. But - alas! – demand dictates not only supply, but also prices. In this segment of household goods they are not at all encouraging. Therefore, the purpose of this article is to tell readers how to make a dressing room mirror with your own hands. The money for materials for it will be spent several times less than for a purchased one of no better quality, and the result will be a wonderful gift for your life partner or just a good friend. In general, the work ahead is not difficult; if there was a desire, even a person who had never previously dealt with carpentry or electrics could cope with it, see, for example. video below:
What sizes should I take?
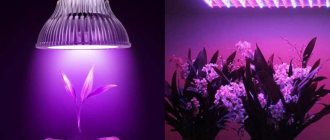
The main part of the cost of a mirror for grooming will be the mirror itself and the lamps for it. Illumination with cheap incandescent lamps is not particularly suitable for home and generally non-professional make-up. In terms of spectrum, they are better than others, see below, but they emit too much heat. The luminous efficiency in the visible light region for conventional incandescent light bulbs is only 3-5%, for krypton ones 6-8%, for halogen ones up to 12%. Both of them practically do not emit ultraviolet radiation, so approx. 90% or more of the electrical power they consume is emitted in the infrared region. Once you sit in front of such a mirror, your face begins to sweat, your makeup floats when barely applied, and small skin defects either hide or stick out too much. This is probably the main reason that illuminated cosmetic mirrors could not enter everyday life for a long time - artists know how to put on makeup very quickly. Therefore, we will need to use quite expensive LED lamps, and quite a lot. The number of light bulbs directly depends on the size of the mirror; By optimizing both together for a specific purpose, we obtain the most economical design.
For a housewife who is not particularly pretentious about her appearance or a young, still fresh girl, a mirror from approx. 40x40 cm. An overhead light on such a mirror is not necessary: pale shadows from the nose and eyelids do not interfere with a quick touch-up. Therefore, for a make-up mirror with lighting for everyday home use, you will need only 6 light bulbs (item 1 in the figure), because their installation step for any mirrors for this purpose is within 20-35 cm.
A stylish woman who has independently developed and painted her own unique look on her face cannot do without top lighting on a cosmetic mirror. It requires at least 3 lamps, otherwise there will not be at least approximately shadow-free lighting. This is the first. Secondly, in front of the mirror, in the process of creating yourself, you have to fidget and twist properly. If the mirror is too narrow, then at times there will be glare in the eyes instead of what needs to be corrected, emphasized or shaded (see below). In total, for independent high make up (qualified makeup), you will need a mirror of 40x60 cm and at least 9 light bulbs for illumination, pos. 2.
A professional-level makeup mirror should be even higher and wider, somewhere from 60x(100-120) cm . Firstly, in this case the lighting needs to be completely shadowless, and even more dispersed overhead light is required. Secondly, the master/craftswoman needs to walk around the client/client, and the one who is her own craftswoman needs to stand up, take a step back and forth, turn around, etc. It is unacceptable to glare into the mirror's eyes, as before. case. So, to illuminate the mirror for professional beauty enhancement, you will need at least 11-12 light bulbs, pos. 3 and 4.
And finally, an important area of application for illuminated mirrors is dressing rooms and fitting rooms . In these, lower light is also added to achieve shadowless full-length lighting; For this you will need from 20 lamps, pos. 5.
Note: the width of fitting room floor mirrors for clothing stores, tailoring studios, etc. public service providers should take from 0.8-1 m, which is required for sustainability reasons. A floor mirror for home use may be narrower. Accordingly, fewer lamps are needed to illuminate it, see, for example. track. video clip:
Video: floor-mounted makeup mirror with light
Drilling holes
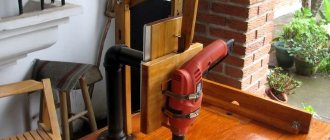
You need to drill holes in the places where the light bulbs will be.
First, you can make holes with a regular drill. Next you will need a round bit for drilling large holes. Their size should be equal to the diameter of the light bulb sockets.
After drilling is completed, each hole must be treated with sandpaper and wiped with a damp cloth to remove dust.
Setting the light
The most important condition for a successful makeup session is properly installed lighting from the mirror backlight. Do not take this as obscene, but please note that since makeup mirrors came into everyday life, the expression “Painted like a port whore” has almost completely fallen out of use. Because in the old days, cheap priestesses of free (but not from material remuneration for it) “love” had to put on makeup in any kind of lighting. Arranging light for the purposes of cosmetic personal care ultimately comes down to selecting light bulbs for the backlight of the mirror. We will further deal with this issue specifically, but in order to choose them wisely, it is necessary to familiarize yourself with some information on the organization of working lighting in general and in relation to makeup in particular.
To make a mirror with light bulbs with your own hands, providing lighting of the required quality, you need light sources that meet certain requirements for:
- General rules for the location of illuminators (lamps);
- The spectrum of light from them;
- Directional pattern (DP).
What is the spectrum of light, we will assume that everyone knows. And DN is a characteristic of the distribution of light intensity in different directions from its source.
General rules
Correctly placed illumination of a person in front of a facial mirror illuminates him in two ways: obliquely directly from the side illuminators (side incidence) and by re-reflection from the mirror. Side-incidence rays highlight shadows and, with a sufficiently large number of light sources, make them completely invisible. But not too large: in addition to overheating (see above), completely shadowless lighting will make the reflection of the face in the mirror flat. Shadows invisible to the eye must be visually perceived subconsciously, then the face in the mirror will not turn into a pancake. Based on these considerations, the generalized geometric and colorimetric characteristics of the human face, and the limits of the intensity of the luminous flux from ordinary household lighting lamps, the optimal step for their installation on the mirror frame, in connection with its dimensions, was determined.
The lateral incidence of light alone is not sufficient to ultimately optimize the illumination of a person's face in front of a makeup mirror. Lateral “shadowless” lighting (there are other ways to organize it) will not penetrate deep and/or very small skin defects. They will stand out excessively, while in normal lighting they will most likely not be noticeable. This visual illusion encourages you to apply and apply cosmetics when you have had enough of it for a long time. Finally, everything seems to be as it should be - in front of a mirror with the wrong lighting. And I looked at myself in ordinary light - a caricature, and that’s all.
The role of frontal illumination with reflected light in this case is simple: it muffles deep microshadows, and the face maintains a natural appearance. Subject to two conditions: the ratio of the intensity of side and front illumination must be quite definite, and the light reflected from the mirror should not be perceived as a glare, even subconsciously, otherwise the eyes quickly get tired. The first condition is determined by the DN of the illuminators (see below), and the second by their luminosity (the total intensity of the light flux). In order to comply with the latter, incandescent lamps for dressing room mirrors are used with a power of 15-40 W, and LED lamps with a power of 4-8 W. The smaller the number of lamps on the mirror frame, the greater, within the specified limits, the power of one must be so that the total light flux remains approx. one and the same.
Note: the optimal total luminous flux is provided by 15 incandescent lamps of 25 W or LED lamps of 5 W on a horizontally oriented mirror 70x110 cm without bottom lighting. The total power of lamps for a fitting mirror with bottom lighting increases by 1.25-1.5 times.
Range
Lighting for makeup that is incorrectly selected according to the spectrum can also give a result like... mmm... “a budget lady of unusually easy virtue.” The requirements for the evenness of illumination of the face in front of the mirror in terms of the spectrum are significantly more stringent than in terms of the distribution of light intensity.
The main types of spectra of various light sources are shown in Fig.:
Spectra of various light sources
A smooth (thermal) spectrum is produced by incandescent lamps. The distribution of brightness by color in it is somewhat different than in the sun. But it is precisely to light with a thermal spectrum that our eyes and the entire physiology of vision are adapted by evolution, so that the eyes adapt to such differences completely naturally. Therefore, a professional-level makeup artist’s mirror is illuminated with incandescent lamps. However, the makeup studio room should be quite large, with a high ceiling and supply and exhaust ventilation. Another disadvantage of lighting with incandescent lamps is that when adjusting the light intensity (for example, with a thyristor regulator), the spectrum of the lamps changes greatly, even to the point of being unacceptable, so lamps for mirrors in dressing rooms are selected individually for each.
Smooth spectra are characteristic of modern LED lamps. Small dips in the yellow-orange and blue-green zones generally do not interfere with normal vision and perception of what is seen, because The color sensors of the human eye - cones - are configured for red, green and blue colors (RGB); this is the so-called primary colors. We largely subconsciously “complete” details in the complementary colors yellow, blue-green (turquoise) and purple. However, long-term regular work associated with strained color perception under island lighting is contraindicated: vision deteriorates and nervous disorders may begin. But this is a matter of many years and decades, and even under not entirely favorable general conditions, so it is possible and necessary to illuminate the mirror for your own home make-up: the spectrum of LED lamps remains almost the same when their brightness is adjusted within a wide range. That is, if the face illumination from the mirror seems too bright or dim, it can be adjusted without fear.
Note: For the same reasons, do not use LED bulbs in light fixtures for delicate, small work. Negative effects from a continuous spectrum will appear much faster, because in this case, both color perception and vision accommodation are strained.
Light with an island spectrum is emitted by fluorescent lamps; however, “housekeepers” with a 3-layer phosphor have an almost continuous spectrum. But in those that are cheaper, the gaps in additional colors are so deep that when looking at small multi-colored details, a continuous “twitching” accommodation of vision occurs. The eyes become very tired, the head becomes heavy. Therefore, lighting with an island spectrum is only suitable for public spaces in which no regular work is carried out that causes eye strain. Even master plasterers and finishers who worked an extended shift (12 hours) in a room with “island” lighting with little or no natural lighting complain of headaches and pain in the eyes. Quite justified: an outsider can see how their eyes turn red and watery by the end of the work.
And the last one is the “line” spectrum. The name is conditional, since such a spectrum does not consist of individual lines, but RGB “islands”. But the gaps between them are “bottomless abysses”; there are no additional colors in the spectrum at all. The “line” spectrum was provided by the first economy light bulbs with a single-layer phosphor, and their current light sources are provided by cheap LED strips. They are applicable only for general decorative lighting of ceilings, shop windows, etc., and you should not read or work under “line” light in any way.
Note: LED strips and single-piece LEDs are not suitable for illuminating the face from a mirror for another reason, see below.
DN
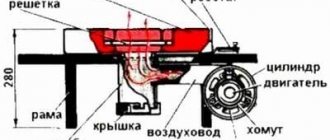
The directional pattern of light bulbs for illuminating the face during cosmetic procedures in a plane perpendicular to the longitudinal axis of the lamp (conventionally horizontal) is preferably circular or close to it, which is generally observed for any household lighting lamps. And in any plane passing through the same axis of the lamp (conventionally vertical), its pattern should look like either a clown wig or a ceremonial loaf of hearth bread with a dented bottom. In a section along a vertical plane, such a pattern is shown in Fig. on right.
Directional pattern of a lamp for illuminating the face from a dressing room mirror
To prevent mirror glare, the total radiation “downwards” (backwards, towards the base) should be approx. 5% of the total or 8-15% of the frontal one (in the figure - “up”). The proportion of “front light” needed is approx. 0.5-0.7 from the side. There are no difficulties with either one - ordinary lighting bulbs are made with just such a pattern. A small “back light” is needed for background illumination of the ceiling when installing lamps in chandeliers, so that the room does not look gloomy, and the side light is stronger than the front light - for the most even illumination.
Note: 30-40% of the production of household lighting lamps have a figure-of-eight pattern, with a depressed top. For lighting a makeup mirror, this is not important.
Illuminated mirrors in the bathroom – 50 photo ideas:
PreviousMirrorsHallway design with mirrors - impressive and original
Next
MirrorsMirror-sun: the advantages of creating a product with your own hands
Lamp selection
The final criterion for choosing lamps for illumination is the type of mirror itself. The reflection coefficient of aluminized glass mirrors lies in the range of 0.78-0.84; nickel-plated acrylic – 0.92-0.96. Accordingly, the proportion of reflected light changes at the same “back” from the lamp. The optimal proportion of reflected light is determined by the choice of design of lamps and sockets for them - straight or inclined (oblique).
Lamps for illuminating the dressing room mirror
Lamps with a spherical matte cylinder (pos. A in the figure) are an ideal option, no matter whether they are incandescent or LED. LED lamps in a transparent container almost always have a figure-of-eight pattern with a fairly strong “back” light. Under such lamps you need to place oblique sockets tilted away from the mirror. But in general, “LEDs” in transparent cylinders for illuminating the face in the dressing room are not suitable: the unbearably bright emitting modules constantly get into your eyes. The scope of application of lamps of this type is lighting of large rooms with high ceilings, because... There is no light loss in the cylinder.
Under lamps with a 3/4 spheroidal balloon (pos. B) to illuminate the face in a home makeup room, you need to place oblique sockets tilted towards the mirror. In direct sockets, these lamps will be far from the mirror, causing the reflection zone to move to the middle of the mirror plane and the reflected light may glare. Lamps in a half-balloon, pos. G, are installed in the same way on the frame of an acrylic mirror, because the light directed at it from spheroidal lamps will be excessive for the optimal value of the reflected light flux.
The appearance and drawings with installation dimensions of straight and inclined E27 sockets (for a wide base) for flat mounting (wall-mounted) are shown in Fig. below. The installation dimensions of wall sockets for lamps with E14 (minion) socket are the same. There are no wall sockets for E10 and E8 sockets; lamps with such sockets are placed in E27 or E14 sockets on ring adapters with an internal thread for the lamp socket and an external thread for the existing socket.
Appearance and drawings of E27 sockets for dressing room mirror illumination lamps
Note: so that the induced beauty does not change noticeably in daylight or artificial lighting, LED lamps for illumination from a cosmetic mirror should be set to a color temperature from 4300K to 5100K. If you plan to go out in all its glory under daylight, you need lamps with a color temperature of 5600K – 6100K. Therefore, activists who constantly participate in outdoor events are recommended to keep 2 respectively in their dressing room. set of mirror lamps.
Information for your information
Quite a lot of high-flying public figures put themselves in proper appearance in front of makeup vanities illuminated by spot lights - directional illuminators adjustable in 3 planes, in brightness and spectrum, see fig. on right. Well, firstly, setting up such a unit requires the services of an experienced lighting technician. Secondly, it costs 1 (one) economy category spotlight (without computerization with tracking the object, issuing recommendations to it and automatically adjusting for extraneous light), somewhere from $180-200.
Professional makeup vanity with adaptive lighting
power unit
LED strips require a separate power supply. They are connected to their own power supply, which converts alternating mains voltage 220 V 50 Hz into direct current 12 V. The choice of power supply is made according to the power indicator of the tape.
Here you will have to make some calculation - the power per linear meter (indicated in the technical specifications) should be multiplied by the total length. The power supply is selected with a margin of 15-25%, but not more than 50%, so as not to overload the LEDs. This is dangerous for them and can put them out of action ahead of time.
Frame
The hassle of arranging light for applying cosmetics is more speculative, and the physical ones come down to purchasing components. But you need to make the frame for the backlit mirror yourself, otherwise why all this fuss? Its design is traditionally copied from theatrical makeup mirrors; The lamp sockets are recessed into the frame up to the rim. But there are no physical, technical, physiological or other objective reasons for this. There is only one, and rather historical one - tours.
Traditional design
In the old days, but already familiar with electric lighting, the only mass media that existed were periodicals and embryonic cinema. The main distributors of living culture were artists. We toured everywhere where a good gathering was expected. All kinds of breakdowns are inevitable when constantly moving, and in some places in the outback of those days it was no easier to buy a light bulb socket to replace a broken one than it is now to buy a Pentium Core series processor in a rural grocery store.
According to the same tradition, the frames of dressing room mirrors were made too massive and durable for household use - the entire expensive, fragile product had to withstand frequent transportation, incl. horse-drawn transport on broken roads. The actual mirrors for theater dressing rooms were made small, like the ones we have today at home “for one’s own use.” Nowadays, you can make an illuminated mirror for home make-up of the “old-fashioned” type yourself, within 1000 rubles, see for example. story below:
Video: dressing room mirror for 780 rubles
We are looking for ways to improve
However, as the size of the mirror increases, the complexity and labor intensity of the design increases disproportionately to the operating conditions of the product. Mainly due to the use of thick boards or beams for the frame.
Frame details of a traditionally designed illuminated dressing room mirror
The lamp socket is recessed into the frame partially or completely, up to the rim (item 2 in the figure). In both cases, the hole (item 1) or a through hole for it must be drilled with a feather or core drill. Taking into account the subsequent decorative finishing, you need to choose grooves for steel fasteners, and grooves for wiring. This requires either an expensive special tool (a hand-held wood router) or tedious work with a hammer and chisel. After that, the gaps visible on the rough product must be puttied, pos. 3. If you work on the balcony or in the living room, so many shavings are formed that the future happy owner will not be happy with the gift.
We are looking for a way out
The simplest way is to assemble the lighting instead of wall-mounted sockets on suspended flange sockets, see fig.
Using a table lamp socket in a backlit mirror
They are suspended, again, conditionally, because... Mainly used in table lamps. An additional threaded flange is purchased for the sockets (sold optionally), and you get a floor-mounted fitting mirror with lighting that is reliable enough for home use, see video:
Video: dressing room mirror for a makeup artist
However, problems remain. The first is the rigidity of the frame; it has large glass. The second is wiring. According to electrical safety rules, leaving it open is unacceptable. This means that it needs to be covered with something like a box. But then why not use wall flange sockets, pos. 4 in Fig. higher? These are used in plasterboard, plywood, etc. hollow thin-walled building structures.
The design of a large dressing room or floor fitting mirror in a box frame is shown in the figure:
Wall-mounted straight flange sockets for backlight lamps are attached to the bottom of the plywood box. The thickness of plywood is 4-5 mm; then the box is assembled on cranial bars made of slats from 16x16 to 25x25 (not shown in the figure). The wiring is laid in a box. For its lid, you can take thin textured MDF (see also below), then there is no need for front finishing.
Holes for the necks of the cartridges are pre-drilled in the lid. After its installation, the flanges are screwed onto the necks and additionally attached to it with white self-tapping screws. The strength and rigidity of the frame are excellent. An additional plus is that the installation depth of the mirror in the frame can be adjusted in advance to the light characteristics of the available lamps. You can, for example, install more powerful lamps (8-12 W LEDs), turn them on through a thyristor regulator, and recess the mirror deeper, about half the height of the box, then its glare will be eliminated.
What is needed for making
Before starting work, you need to prepare all the tools and materials so that you don’t have to run to the store later.
Materials you will need:
- Mirror;
- boards or wooden beams;
- sockets and light bulbs;
- electrical cable, plug;
- metal corners;
- fasteners;
- dye.
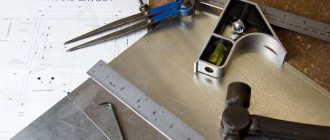
Tools needed:
- Wood cutting tool;
- drill with pen attachment;
- measuring instruments;
- wire cutters;
- screwdriver;
- sandpaper with a block.
It is also worth taking care of safety precautions, working in shoes with rubber soles, safety glasses and gloves.
New option
And still, problems remain. Complexity, labor intensity, a large amount of chips, and a common fire hazard for all previous options (including the traditional one). Electrical wiring can only be laid in wooden structures impregnated with special compounds - fire retardants, which give the wood some fire resistance. You cannot impregnate plywood with fire retardants; it will delaminate. But there is a material that does not burn even without fireproof impregnation, it only chars - MDF. MDF trims and extensions for interior doors are perfect for the mirror frame; they are already textured to resemble valuable types of wood. The standard width of both is 60, 80 or 120 mm; extensions are available in widths up to 350-381 mm (15 inches). Thickness – from 6 to 16 mm. Length – 2.2-2.7 m, i.e. for a small mirror you will need one board, for a professional one a pair, and for a fitting room 3. If you take platbands (they are cheaper), then the so-called. euro, with a flat front surface.
Illumination of the dressing room mirror from lamps in carbolite sockets
We will not make a box frame; we will use wall sockets without recessing. The backlight on the mirror frame in carbolite sockets looks so-so (see picture on the right), but now there are a lot of elegant white and ceramic plastic sockets on sale. The advantage of this solution is that you can use oblique cartridges and achieve the best illumination from flare. Technological advantage - no need for wide holes, there will be significantly less chips.
There is also a technological drawback - when processing MDF with power tools, it reeks of burnt wood, so you need to work in the summer on a balcony or in a garage or a separate workshop. The design disadvantage is the low rigidity of MDF. But it can be easily eliminated; it is enough to install stiffening ribs made of wooden slats on the back sides of the boards; They also form a cable channel. The slats can be impregnated with fire retardants. The most affordable purchased or homemade composition is a strong solution of boric acid. Boric powder must be dissolved in water at a temperature of 80-90 degrees; Boric acid is insoluble in cold water.
The design of a makeup mirror in a frame made of textured MDF is shown in pos. 1 pic:
It is assembled using glue (preferably PVA, liquid nails dry too quickly) and small nails or wood screws. Assembly order (items 2-5):
- Blanks for the sidewalls, top and bottom of the frame are cut from the extensions or platbands for butt assembly with a bevel of 45 degrees.
- The slats - stiffening ribs - are applied with glue and attached with hardware (item 2) separately to the side, top and bottom boards of the frame.
- Glue is applied to the mating surfaces of the corner joints. The sides, top and them are moved into one on a flat surface covered with film.
- The frame blank is tightly tied crosswise with a strong cord.
- Measuring the diagonals checks the squareness of the frame. If necessary, the workpiece is corrected with light blows of a mallet or rubber hammer.
- Weights are placed on the corners of the frame.
- After 1-2 days (after the glue has dried), the whiskers (“tails”) of the stiffeners are attached to the mating boards with steel fasteners, pos. 3.
- Holes are drilled for entering wires into the sockets, a switch and (optional) light intensity regulator are mounted, wiring is laid, pos. 3 and 4. The ends of the wiring extend outward by 12-15 cm so that installation of the cartridges occurs without difficulty. Wiring is carried out using a two-wire cable in double insulation. The cross-section of current-carrying conductors for 220 V LED lamps is from 0.25 sq. mm; for incandescent lamps 220 V and LED lamps 12 V from 0.7 sq. mm.
- An elastic gasket (sheet rubber, etc.) is laid, then, face down, the mirror itself, pos. 4.
- The back side of the product is sewn up with fiberboard (item 5) - this is also a non-flammable material.
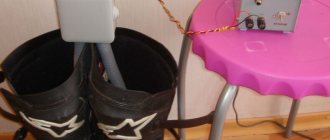
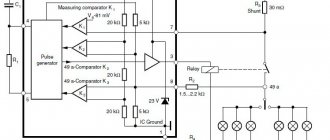
Electrical circuit for switching on the lamps of a dressing room mirror with illumination - The product is turned face up, the circuit is installed (see figure on the right); all lamps are connected in parallel. If the mirror will be placed in the bathroom, you need to use 12 V lamps. A step-down transformer and, possibly, an adjustable power supply are placed outside the bathroom, in a room without increased danger (hallway, corridor, etc.).
- Lamp sockets are mounted in place. The lamps are installed and a test run is performed.
- Support legs (for a floor mirror) or a suspension are attached, the mirror is placed in place - ready!
Note : if you cut trim or trim with a jigsaw, cut from the rear, i.e. Turn the boards face down. But if with a circular saw, manual, lever cut-off or on a stationary saw, then vice versa, from the face. It is necessary that the teeth of the saw, during the working stroke, crash into the front surface of the board, and not jump out of it, otherwise the laminating decorative film will be severely torn. The working stroke of a jigsaw is from bottom to top, while for circular saws it is from top to bottom.
Option for acrylic mirrors
You cannot chisel or saw acrylic mirrors by hand - they will crack, although optical acrylic plastic breaks much worse than glass. But for careful processing of wood, laminate (better) or metal (even better) with power tools, acrylic mirrors are quite suitable. Therefore, an acrylic cosmetic mirror with face lighting can be made frameless, see fig.
Acrylic frameless makeup mirrors
Lamp sockets in this design are wall-mounted, straight or oblique. First, a strip of fiberboard along the contour is glued to the back of the mirror with silicone. A rough fiberboard thickness of 4 mm is enough to lay wiring for LED lamps. After installing it and testing it, the entire back of the mirror is also sealed with silicone fiberboard for furniture backdrops, with the white side facing out. The suspension parts are also glued with silicone. The shell (side surface) is painted in the desired color. There is no need to worry about the mirror breaking or collapsing - acrylic glass is much lighter than silicate glass and much more resistant to fracture. But it is also more susceptible to thermal deformation, so the illumination of an acrylic mirror must be assembled only with LED lamps.
Design
When choosing a mirror, you should take into account not only its functional characteristics, but also the interior features:
- Floor mirrors are used in loft and minimalist style rooms, playing a functional role as an additional light source.
- For Provence, a mirror canvas in a frame made of natural materials in pastel, muted tones with imitation of scuffs and light patterns is suitable.
- High-tech style implies a laconic form without frills. It can be a square or round mirror without patterns, decorative ornaments or ornaments.
- Country style is realized using a wooden frame, while the corners are rounded. Almost everyone can make such a mirror with their own hands.
For a classic interior, models of standard shapes are suitable - oval or rectangular. It is not necessary to use a frame; you can choose a product with a pattern along its contour . Something else you should pay attention to is the shade of the lighting. It should match the color of the walls, floor and ceiling of the room.
Loft
Provence
High tech
Country
Network connection
Under normal conditions, you connect the tape yourself to the network via a power supply - the device is plugged into the network, and the tape is connected to the 12 V output. In this case, there may be different connection options. For example, if you need to automatically turn on the mirror lighting when you turn on the general lighting in the bathroom, the power supply is simply connected to the switch.
However, some users find it necessary to start the mirror illumination themselves and not use it constantly. To do this, you need to install a button (microswitch) on the frame (box), which will turn the lamp on and off at the request of the owner.
How to glue a mirror?
The formed frame is glued to the mirror using liquid nails.
You should only use glue specifically designed for working with mirrors (glass-metal).
Tytan 930 works well.
Mistake #14
The composition of regular glue or epoxy will eventually pull out the amalgam and dark spots will appear on the front side.
Mistake #15
Liquid nails must dry for at least 72 hours.
After this, a grip point of even 1 cm2 can withstand a weight of up to 30 kg! Despite the fact that a square meter of a mirror with a thickness of 4 mm weighs only 10 kg.
Using gentle hand pressure , glue the frame to the back.
Mistake #16
No need to put large weights on top of the frame or substrate!
There have often been cases when, due to uneven distribution of weight, the canvas was bent, followed by a distortion effect in the mirror.
This is especially critical for large sizes and thickness of mirrors up to 6mm.
Touch button and light strips
The first thing you need is, of course, the mirror itself. Each one will have individual sizes and shapes.
If possible, order a mirror with a facet.
In addition to beauty and the play of light on the sides, this beveled edge will add safety.
At the bottom of the mirror you will need to visualize a button.
To do this, you will need to remove the amalgam or reflective layer from the back side.
Mistake #1
Without removing it, the touch button will not work.
Even if you know exactly where it is located and will point your finger at this area.
Choose the appropriate button shape yourself - a square or a circle.
How to make it on an initially solid mirror base? There are three ways.
Mistake #2
The simplest and cheapest is to carefully drill out the protective coating from the back side with a diamond core bit or grind it off with a diamond cutter for a Dremel.
Although the method is working, the result is a “collective farm”.
The most difficult method is sandblasting. This service is usually provided by those who professionally deal with mirrors (cutting, processing, drilling holes).
How to remove amalgam at home without resorting to outside help? Chemistry will help in this matter.
Removing amalgam on a mirror without sandblasting
Look for a special gel in stores, such as Satinglass or Zenfi ZF-10S. These may be other brands.
To begin with, you create it in Photoshop or simply manually draw a stencil for the future button. The simpler the design, the easier it will be to cut with a blade.
Transfer the picture to tape and stick it at the bottom of the mirror with an indentation of at least 5 cm. It is better to take colored tape so that the outlines are clearly visible.
Mistake #3
You cannot place a button on the very edge of the mirror.
There will be a frame made of aluminum profile. Miss by a couple of centimeters and you will have to partially cut out this profile.
Otherwise, it will prevent the button from getting into place. The button is not that small!
Also cover the space around the button with protective tape. Only its contours should remain open.
After all the preparatory work, use a PLASTIC spatula to rub the gel over this area and wait a certain time according to the instructions (usually from 15 to 30 minutes).
Mistake #4
Do not smear anything with an iron spatula, otherwise you will leave scratches on the glass.
A plastic spatula can be taken from a set of children's plasticine.
Mistake #5
You cannot work with chemicals without protective rubber gloves and goggles.
This gel is a very aggressive material. After 20-30 minutes, the amalgam is easily removed along with the gel using the same spatula.
As a result, you will get a perfectly transparent outline of the touch button, clearly visible from the mirror side.
The touch switch, which will be hidden behind this button, has a light display. When turned off it lights up red, when turned on it lights up blue.
Very often, such chemicals are used to etch not only the button, but also the frame frame – the light strips.
Many masters prefer to make not a “floating mirror,” but a mirror that will shine, what is called “from the face.”
Floating Mirror
Backlight from the face
To do this, smooth strips of amalgam are removed along the perimeter, after which they are made translucently matte using stained glass paint or a special paste.
As a result, the LED strip does not shine from the back of the mirror, spreading light to the sides, creating a sort of floating effect, but comes directly from it. Just from these translucent strips.
Here the entire process of etching the mirror layer with subsequent matting of these strips is shown in detail.
Tools
As tools, it is worth preparing a soldering iron and a basic set of tools with a stationery knife, pliers and other tools available in every home kit.
Important: when choosing LEDs, keep in mind that the more powerful the diode, the more electricity it will consume. To understand the power of a meter of LED strip, we multiply approximately 5-6 watts by the total length of the strip.
Step-by-step instruction
Let's look at how to make LED lighting for a mirror with your own hands. Procedure:
- Develop a project or at least a working drawing. This point should not be treated as a waste of time, since careful consideration of details and advance calculation of all necessary materials and tools will help to quickly and efficiently complete the work and obtain the expected result.
- Assemble a box for the LED strip according to the size of the mirror. As a rule, it is a frame glued to the surface on the reverse side. Its size is 8-10 cm smaller on each side than the length and width of the mirror - this ensures hidden installation of the lamp. The easiest way to do this is to use duralumin corners or a rectangular pipe. Some difficulty will arise when cutting corners at 45°, which is best done on a pendulum machine or, which is somewhat worse, manually using a miter box.
- Drill holes in the top bar of the box (frame) for hanging on the wall. (This item is necessary if special fasteners or brackets are not used).
- Place the mirror on the front side. Glue the frame on the back side, ensuring an even distance from the edge on all sides.
- Glue LED lighting to the outer sides of the frame. You can use your own adhesive layer provided on the tape. Double-sided tape or waterproof glue will also work.
- Connect the parts of the tape with connectors, attach the wires and hang it on the wall.
- Connect the wires to the power supply, and connect the unit itself to the network. Use one of the options for turning on the backlight - either from a general light switch or from your own button.
- Perform a test run, and if any problems are detected, correct them using the appropriate method.
The specified procedure is given as an example; in each specific case, deviations or additional points are possible.