2/5 — (3 votes)
Good afternoon
I decided to go with a boyish theme today. Yes, really... What kind of things are there? Probably, hahaha. For me, all this technology, especially military equipment, is not something, well, I would say difficult. My son himself and they constantly ask their mother to buy them cars.
Since February is approaching and exhibitions and craft competitions will soon begin again in kindergartens and schools on February 23, I remembered that perhaps someone would want to make a tank on their own. Or perhaps on the threshold of May 9, and there, too, the boys are starting to do just such “stuff.” But what can it be made from? I think that using improvised means you can build a bunch of such simple and uncomplicated works. Both preschoolers and schoolchildren can cope with them, and adults even more so.
I decided to wander around the Internet and collect such products, and then show everything that I found to you, my subscribers and guests. I hope you will be incredibly happy about this. And be sure to share the information you find on social networks and write me a short review below.
Among other things, don’t forget that with the guys you can learn poems for dads or just on a military theme. Design wall newspapers and sign them with beautiful congratulations and wishes cards. So, go for it, because that’s what the holiday is for.
DIY tanks made from scrap materials for children
First, I want to show simple ideas of what, in principle, you can build military equipment at home, called a tank. And after that, certain waste materials will be examined in more detail. So, I wish you good viewing. I hope some idea will give you a new creation.
So, the first option is to use matchboxes.
You can also build a machine from shell casings.
From the most common material that everyone has in their kitchen, these are washable dish sponges.
Or you can make an edible tank.
Believe it or not, such military items are even made from chicken egg cases.
Or use a regular box with thick cardboard, and make the wheels in the caterpillar from the lids.
You can also decorate the craft using the quilling technique or modular origami.
And here is another product made from metal flasks.
Or use plasticine.
Tips for mounting sculptures and trophies
Not all paper products require reinforcement. For example, for interior items (animal heads), the rigidity of cardboard is sufficient. If you are making a fancy dress costume or a superhero mask (which will be actively used), it must be strengthened. Reinforcement with epoxy resin. First you need to prepare the adhesive mixture: mix the resin with the hardener, then dilute it with alcohol until it is liquid but viscous. Apply the composition to the inside of the product in one layer, wait until it dries completely. Paint the outside of the piece with resin, then lay down a thin layer of glass wool (can be substituted with a bandage) and reapply the epoxy. During drying, the resin may leak, so the product must be placed on a blank and taken outside, or a large number of newspapers should be laid on the floor. Waves and smudges are removed with a hairdryer. Finally, the product must be sanded and re-coated with a thin layer of epoxy.
DIY paper sculptures for beginners in examples
- A statue of iron Arnie worthy of the hand of a sculptor.
Iron Man himself
the mighty and imperturbable Hulk
decor sculpture
How to make a paper tank easily and quickly
As everyone knows, paper is the most affordable and popular material from which you can make anything, and in this regard, a tank is no exception. You can make an applique with children first.
To do this, you will need stencils to use for this craft.
A more serious option is toys made using the origami technique. Here, of course, you will need the ability to correctly and beautifully fold paper step by step. To do this, I recommend that you read this manual.
First we will make a simple tank, and the second master class will be with a rotating turret.
1. So, take a full sheet of paper, preferably double-sided colored paper.
2. Now with a slight movement of your hand, nothing complicated, fold the leaf in half horizontally and smooth it with your hand.
3. Then find the top corner from below and fold it like this as shown in the picture (that is, fold the top corner to it).
4. Do the same with the bottom corner.
5. The folds should be criss-crossed.
6. Next is the important work, we will make the flaps: bend the corner from the right side downwards.
7. And the bottom side will have to be divided into two equal parts. In this case, do not touch the first one, but bend the second one like this, to the lower right corner:
8. Do the same on the other side.
9. Thus, you should get something like this “frog” or a regular triangle.
10. On the opposite side, do the same work.
11. Now bend the paper on each side, look at the drawing and see what needs to be done.
Do everything carefully and smooth the lines with a ruler, preferably a metal one, if available.
12. In order to assemble the tower, you will need to bend the corners on each side (where the triangle is) (but only on one side, do not touch the second triangle).
13. And then close the parts to the center of the craft.
14. And thread what you rolled into the inside of the large triangle.
15. Then bend the ends from the triangle, as if into the inside of the product.
16. This is the kind of miracle that should come out.
17. Next, make a barrel out of plain paper of a different color, take a rectangle and twist it into a tube.
18. Well, then insert it into the hole. Congratulations, you have done the job, now your tank is ready and can delight your child, both boys and girls will love it.
Now let's consider a more complicated option, although there should not be any particular difficulties, since everything is shown in detail in the pictures, every step is right, wrap the sheet as well and you will succeed.
For fun
Boxes from a washing machine or refrigerator make huge exhibits; a pet can easily fit into the hatch and take part in the game. All parts of the tank for gluing are easy to draw, following the detailed instructions, and for joining you will need the help of a friend.
The chassis in such copies can be made from some components of old toys, after which the machine will be able to move around the room.Such ideas will be of interest to large families with more than one child. By participating in the process, children will unite to achieve a common goal and the team spirit will be strengthened. By playing with a work of their own art, young people will understand that everything can be done by themselves, they just need to show a little patience and perseverance.
DIY tank from T-34 cardboard (diagram and step-by-step instructions inside)
It turns out there are quite a lot of types of tanks. To be honest, I didn’t know about this, well, the boys know better, they will always understand this topic better than us. It's still military equipment. I propose to stop at T34-85, and then consider other options that I managed to find on the Internet.
Important! The tower in this model is movable, that is, it rotates (spins).
We will need:
- paper density 220 - 7 pcs.
- ruler
- glue gun
- dye
- scissors
- glue
- templates or stencils in PDF format, print in advance
Stages:
1. Friends, I was not able to upload not all the layouts here to the blog, so if anyone is interested in this thing, write to me and I will send it to you by email (you will need to print 7 sheets on a printer) and cut them out.
2. Well, then, as you already understood, fold everything along the fold lines and glue the parts together with glue or use a glue gun.
3. Take paint of any color and paint the finished product.
4. This is a fun toy you can make too. I wish you good luck and creative success. Surprise everyone with your talent.
Friends, here are some samples of ready-made designs for you, download and create.
After you print out the T-34 pattern and cut out all the parts, you will need to find and walk along the fold lines. Bend where necessary and iron with a ruler. And only after that proceed to gluing.
First glue the main body for the tank; transparent PVA glue is well suited for this job. Then glue the cannon, and then the caterpillar.
The next model is IS7, keep a layout of the parts. True, a very experienced master can do it.
Wooden airplane
Do you have any ice cream stick lovers at home? If yes, then do not rush to throw them away (that is, the sticks). After all, even into this seemingly garbage, you can breathe a second life.
photo: aglinia.cphr
To work you will need:
- 6 flat ice cream sticks;
- 2 black buttons;
- wine stopper;
- a piece of cardboard;
- drawing pin;
- markers;
- glue gun;
- sharp scissors and knife.
Using a sharp knife, carefully cut a disk about 5 mm thick from the cork. From one stick, cut a piece 2 cm long, from the second - 2 pieces of 1.5 cm each. On a piece of cardboard folded in half, draw a propeller with a black marker and cut it out. It's time to start assembling the structure. Glue two sticks to the cork disk, on the other side, glue a 2-centimeter piece of stick between them - this is the tail. Glue one and a half centimeter pieces on both sides of the tail. So you added stabilizers to it.
Glue the wings onto the fuselage. Now you can make wheels - that's what the buttons were for. Glue them under the airplane wings.
Attach the propeller to the center of the disk with a button.
Read also: What should a child do if he is kidnapped?
If you still have a desire to improve the airplane, you can paint it with a marker or paints.
An original, quick craft for kindergarten or a cute souvenir – it’s up to you. But we know for sure: such a spectacular aircraft will undoubtedly appeal to everyone.
Beautiful tank made using origami technique
Yes, the most favorite and simplest technique is origami crafts. Children and even some adults love them. In this chapter, you will find folding diagrams that any beginner or even a student can understand.
And here is another toy, called Abrams, a little prettier than the previous one. Catch and use these tips, everything should work out.
Schemes of animals, birds
They occupy a special place in a person’s life. And nature without animals would be incomplete. Why don't we plunge into this wonderful world. Just look at the birds, by making them using the technique, you will be able to bring a piece of life and beauty into your interior. And if the bird serves as a gift, then for the owner it will bring freedom to difficult areas.
The polygonal raven is a complex design that requires skill.
You can download light paper figures for children and their designs on the website ru.dreamstime.com by inserting our referral number res25459430 to get a discount on paid subscriptions and gain access to free ones.
Doves of peace will decorate any kindergarten and become an educational craft for a child.
Complex polygonal
You can download patterns of these wonderful black birds for bird decor on Etsy.
The wise owl is ready to inspire you to make smart decisions.
Just look at this beauty! The wall parrot will become a favorite of both children and adults.
Low poly 3D white dove.
A panda is an excellent detail in a minimalist, monochromatic interior.
The sly fox will bring a forest atmosphere to your home.
Predatory panther and black cat symbol of grace in your design
Creative design cat relax
Master class for beginners Candy tank
And for those who love souvenirs and gifts, they can congratulate their beloved men on the holiday of February 23 in a rather original and non-trivial way. Or such a masterpiece can be made for a competition or exhibition in a kindergarten or school. In addition, you can use this idea for May 9th.
To begin, make a trapezoid-shaped tower from a cardboard box. Use a glue gun. I found this work on YouTube.
Here are some more ideas.
Diversify your everyday life
You don’t have to wait for a themed event or February 23 to start creating; in any free time you can start implementing ideas. Making it yourself is very entertaining and interesting, minutes of labor fly by unnoticed, and the figurines will delight the eye for many years.
Children are often bored and don’t know what to do with themselves; parents should provide support in any endeavors of the young person. Taking the preparatory steps upon yourself, offer to create a masterpiece together and, at the same time, talk about all the intricacies of the work.
The question of how to make a tank out of paper is not as complicated as it might seem at first glance; the origami style does not involve the use of glue and scissors at all. And the figurines turn out to be quite cute and neat; with their help you can decorate a boy’s nursery.
The voluminous panels will fit perfectly on the wall; the huge background will easily accommodate all the desired designs of military equipment. Working together with your beloved child will bring a lot of positive emotions and memorable moments. It would be foolish to neglect such opportunities, and all the time and effort spent will not be in vain.
Plasticine craft in the form of a military tank
For the youngest children, preschoolers and elementary school children, I recommend making another craft in the form of a tank from plasticine or special clay (dough) for modeling. Diversify your children's leisure time, or use this type of work in labor lessons or art classes.
Besides, this process is so exciting and you definitely won’t get bored, it’s better than surfing the Internet or watching cartoons at home.
Take soft plasticine and tear off a piece from it, roll it into a ball, then flatten it into a washer, make six of these things. Moreover, each should differ slightly in size from each other. In the picture, you can see this.
These blanks will be needed to design the caterpillar.
And so that the caterpillar doesn’t run away, ahah, hide these “wheels” in a long strip of plasticine.
In a similar way, roll up the second track product. Use a stack to create the outline of the wheels.
Now mold a box out of plasticine; it should be rectangular in shape.
Attach the chassis to the resulting car.
Next, start making a tower, roll out a puck of the same color as the body.
As you can see, it is better to make it not from a small piece of plasticine.
Next, complete the craft with a cannon; if you want, make a machine gun and fuel tanks.
And even make the headlights a different color, just like real tanks. Good luck, friends!
Experimentation is not prohibited
At various exhibitions and competitions in various institutions, models of the same type are presented. Improved options can be provided for home use and games.
Guided by your imagination, you should make personal adjustments and add bright colors to the design. Each young designer decides for himself how to make a homemade tank, the main thing is that the process is interesting and entertaining.
Taking old models of equipment as a basis and arming them with modern guns, such a solution would look very extraordinary.
Having a large amount of material available, it is worth trying your hand at creating three-dimensional compositions. Thanks to its small components, a tank made of modules looks very beautiful; the process will be painstaking, but the end result will delight you with its uniqueness.
Important! By experimenting with shades, you can create both winter and summer camouflages; khaki-style design will complement foreign models fighting in hot climates.
How to make a tank from beer in cans
Another holiday idea, or gift, whatever you want to call it. But, on the day of defenders, you can afford to build a tank from beer bottles and present it to men. Just such a present, which you make with your own hands, will be an excellent solution if you are still puzzled by the question of what to give on February 23rd.
We will need:
- corrugated paper
- scissors
- cans of beer in tin containers - 4 pcs.
- cardboard sleeve
- a pack of kirieshki, or nuts, pistachios
- double-sided tape
- super glue or glue gun
- box cover
Stages:
1. Glue double-sided tape around the perimeter (or at least as shown, make two horizontal lines) of the box lid.
2. Tear off the paper until the tape becomes sticky. Attach beer cans.
Also put tape on the jars of alcohol, and then put a sheet of paper.
3. Then wrap it with green corrugated paper and connect the ends with glue.
4. Now cut out a strip from dark green paper; its thickness should be approximately 3 cm.
6. It will be useful for decoration; glue it on top of the caterpillar body. Then build a tower from the box and a barrel of its own (the bushing will come in handy).
7. Accordingly, to make the craft beautiful and not scary, also decorate these parts of the car with paper.
8. Next, according to the plan, glue the tower and the barrel with a glue gun, and then glue this whole miracle to the caterpillar. And the gas tank will be a pack of goodies.
Short review
Before you sit down to design, you should know what an armored vehicle consists of and carefully think through the work. The chassis is formed from small wheels on which a caterpillar chain is stretched.
Products made from A4 paper come in both smooth and with protruding ribs for greater adhesion to the ground. The case will be the largest part, in real life it can fit 5 people. This is important to take into account if the layout is planned to be made as close as possible to the real structure.
Small hatches for viewing will be integral components of the body. Children get the most pleasure from constructing a tower and a gun; here the most daring ideas and preferences are used.
Note!
- What can be made from a box at home for kindergarten: the best craft ideas + video master class
- How to make flowers from napkins quickly and easily: 15 ways to create bouquets of roses, carnations, peonies
- How to make flowers from corrugated paper with your own hands: step-by-step instructions for creating voluminous bouquets
The upper blank of the tank, made of A4 paper, can rotate if such possibilities are provided for in advance and a wire hinge is inserted. During the game, such maneuvers will be quite useful and exciting, the toy will be dynamic, and the battles will be more exciting and natural.
Advice! All kinds of emblems and, of course, a red star are useful for decoration; when decorating, you can add all the details that the creator’s soul desires.
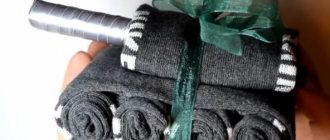
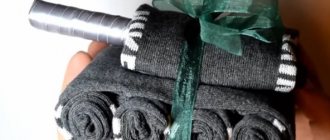
Sock tank for February 23rd - step-by-step instructions for beginners
I’ll show you several descriptions at once, and you can decide which one you like best. All of them are so elementary that any boy or girl can figure it out even without words. It’s impossible to accumulate a year’s supply of accessories for a man. But five or six pairs of socks are quite possible.
You can make a tank either with a bottle (in this case it will act instead of a barrel), or without it. I decided to show all the models.
So, here is a ready-made master class in pictures, take it and create.
The next product is simpler; you will also need men's socks, plus a satin ribbon, scissors, colored paper, and an elastic band.
Twist three pairs of socks into a tube and secure with an elastic band.
Next, decorate with another sock and decorative ribbons.
Roll the turret and barrel out of socks, do as shown in the picture.
For brightness and festivity, glue red stars.
Well, now, as promised by a couple of new products this year, take your pick, maybe you’ll make just such a beautiful tank.
Application for kindergarten
For kindergarten children, the option with applique is perfect. For this you will need colored paper, an ordinary A4 sheet or a cardboard base if you are making a postcard.
You will also need a ruler, pencil, scissors and glue of any format.
- All the details of the future tank are scattered on colored paper.
- Next, they need to be cut out; if the child is very small, this should be done in advance by an adult.
- All that remains is to glue all the parts of the tank in their places.
- When making a cardboard postcard, you need to bend the sheet in half and glue the tank to one of its sides.
- Congratulations are written on the inside.
This applique will please and delight any man.
Car in the form of a wooden tank
Well, now I suggest you familiarize yourself with the handmade work that I found in the Country of Craftsmen. Perhaps young craftsmen will want to invent such military equipment. I suggest using sketches and diagrams.
The sequence of actions is presented below in these screenshots. Unfortunately, I couldn't find better quality.
This is the article that came out today, if I find something else, I’ll be sure to add it. Well, for now I say goodbye to everyone and see you again.
Best regards, Ekaterina
Creating and editing flat patterns
For full operation, you need to download the appropriate work programs. Pepakura comes in two types: “Viewer” and “Designer”. “Viewer” allows you to view available scans; they are easy to find in Internet resources. “Designer” provides the ability to edit ready-made layouts, often for simplification. You can also rotate in any of these programs for a better look, select parts on a 2D scan to look at the gluing and fold lines.
Nuances. Most of the free designs, which can be freely viewed and printed in “Viewer,” are not available for full editing in “Designer,” due to copyright issues.
You can limit yourself to Viewer to begin with. The files are in pdo format. Choose by difficulty level. Most often it is written about in the description, depending on the number of pages and small details. Select, download, open through Viewer and print. My personal advice is to start with completely white blanks. But if you downloaded it already with built-in textures, then it’s easy to remove them - click on the cube and they will disappear.
