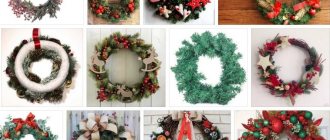
Any interior items that are made with your own hands fill the house with special comfort and warmth. In addition, they are not only beautiful, but also exclusive. A do-it-yourself chandelier made from scrap materials is particularly original. To create it, you need to involve all the design talent. But it is she who will bring not only light into the house, but also an atmosphere of comfort. Several master classes will help you create such a masterpiece. And they will push some people to search for new and stylish solutions.
How to make a lamp with a garland from plastic cups
There is a wonderful article on my website with photographs of crafts made from plastic cups.
When I was collecting photos on the Internet for this article, I suddenly realized that some crafts I want to make not because there are a lot of plastic cups left after the party, but because they are cool! I even want to buy cups specifically to make a craft similar to the one discussed in the master class from this article. And it turns out that now disposable tableware finds a second life, bypassing the first. And this, it seems to me, is the paradox of our time. One of the crafts that I will definitely make myself someday is a lamp with a garland of plastic cups. This is a stunning glowing ball with magical lights reflected on the walls of the cups. I even want to buy nicer cups for such a lamp! But that's in the future! Due to the lack of time to make my own, I want to add to my collection a video master class on how to make a lamp from plastic cups.
VMC is presented in English by Gaspar Muniz. Therefore, for convenience, in this article you will find an illustrated version of the step-by-step production of crafts.
My options for tomato pots
I have three options for containers for picking grown tomatoes:
- Plastic bottles 1.5 l without top. I cut above the middle. I choose straight bottles, not those with a “waist” in the middle. They are difficult to plant. I burn through the drainage holes with a soldering iron.
- Regular cellophane bags, thicker. I fill them with soil and plant 2 plants in each. The beauty of this method is that I fold the edges first, otherwise the container turns out to be deep. As the bushes grow, the edges can be straightened and soil can be added. I pierce the cellophane at the bottom with a toothpick to let out excess water.
- Bags with clip-buck fastening. They are sold in disposable containers. There are 100 of them in a package. Price: 50, 100 rub. and higher. Depends on size. You can choose any size, for example, with a height of 15 cm, 18 cm, 20 cm and different widths. I cut off the clasp, fill it with earth, and there you have it, a glass. I make punctures at the bottom with a toothpick.
The good thing about zipper bags is that they come in different sizes.
It is inconvenient to plant in bags, they are soft and do not hold their shape. I do this:
- I pour some soil on the bottom.
- I place a tomato in the center.
- With one hand I hold both the bush and the bag at the same time; with the other I pour earth evenly on all sides.
If I manage to attract my husband, then he holds it, I pour it out. The bags just have time to fly off with the tomatoes.
I have bottle glasses on pallets; I bought plastic ones. I selected it according to the size of the window sills. I put the bags in plastic boxes, like this:
I cover the bottom with film
Even more options for cups for seedlings. I collected mine, described above, and yours from the comments below into one article (on my website):
And this idea is useful for growing without picking:
If the information was useful to you, please like it. Subscribe to "t". We will sow and grow everything together.
DIY lamp master class
We will need:
- plastic cups – 50 pcs.;
- garland – 1 pc. (for 50 light bulbs);
- clothespins – 3 pcs.;
- stapler
Let's start tinkering:
Step 1:
First you need to make holes in the center in the bottom of each cup. It is convenient to use a screwdriver, drill, or just a heated nail. Make sure that the diameter is sufficient to fit the garland into the hole of the light bulb. Having made one hole, you can “try on” the light bulb to determine the desired size.
Step 2:
Let's take 12 cups and collect them in a circle, connecting them to each other with a stapler.
Step 3:
Next, in order to assemble the ball, we need to attach the second row of cups. This time you will need 9 pieces. Before you staple the cups, secure them with clothespins to make sure they will all fit. Then fasten them to each other and adjacent cups from the first row.
Step 4:
The last third row consists of 3 cups. We deal with them in the same way as with the previous rows. Make sure you secure the cups securely enough! Half of the lamp is ready.
Step 5:
Insert the garland bulbs into the bottom of each cup of the resulting structure.
Step 6:
Make the second half of the lamp in exactly the same way and insert the garland bulbs into it in the same way.
Step 7:
Connect the two halves of the product to each other, if necessary, securing them first with clothespins.
Ready!
This wonderful homemade decoration is suitable for decorating your home for the New Year or Christmas. You can use it for your bedroom or create an unusual glowing ball right before the party.
Openwork lampshade
Such chandeliers and sconces made from scrap materials look great. An ordinary glass jar or a container for bulk products can act as a lampshade. Knitted openwork lace is used for decoration.
To make a lamp you will need:
- glass jar and tin lid;
- hex nut;
- drill, drill bits;
- electrical wire;
- bracket, cartridge;
- electric lamp;
- napkin or lace;
- spray glue, paint.
Your actions:
- In the metal cover, drill one hole in the center (for fastening) and 4 in a circle (to avoid overheating).
- Secure the bracket, chuck and nut. It is better to use a light bulb no more than 40 W.
- Apply glue to the surface of the jar. Glue on the lace.
- If you plan to create a sconce, you can secure the openwork napkin with tape. Then paint with spray paint. Once dry, carefully remove. The napkin will retain its shape.
LiveInternetLiveInternet
– Quote book
SilverRain cap https://club.osinka.ru/topic-66201?&start=240 description. 5 threads p.
Dress “Countess” and 2 collars I machine knitted a simple dress that can be worn with r.
Machine knitting. Drawings. Olga Yuryeva https://www.youtube.com/channel/UCZ-Tk35ScZphbPmeB50ZeKg.
Hats on the car
Bow hat. Master Class. I have long liked this knitted hat with a bow.
–Applications
- I am a photographer
Plugin for publishing photos in the user's diary. Minimum system requirements: Internet Explorer 6, Fire Fox 1.5, Opera 9.5, Safari 3.1.1 with JavaScript enabled. Maybe it will work - Cheap flights
Favorable prices, easy search, no commission, 24 hours. Book now - pay later! - Postcards
Reborn catalog of postcards for all occasions - always no analogues at hand
^_^ Allows you to insert a panel with an arbitrary Html code into your profile. You can place banners, counters, etc. there - TorrNADO – torrent tracker for blogs
TorrNADO – torrent tracker for blogs
–Links
-I'm a photographer
How to make a chandelier with your own hands from plastic cups
Wednesday, September 14, 2011 03:31 + to quote book
1. 300 or more cups
2. stapler with staples
3. electric wire with socket
4. energy saving light bulb
This idea, of course, is not new, but you can’t even imagine how many interesting crafts you can make from coffee cups. So, in this article you will learn how to make a chandelier with your own hands from ordinary plastic cups! I admit, this is not my invention. Let's get to work!
Chandelier made of plastic cups
Step 1. Required material
Start saving cups or just buy them at the supermarket. The optimal quantity is 300 cups. It might be better to make such a chandelier from paper cups, but plastic ones also worked well. In addition, instead of glue, you can use a regular stapler and staples. A little later you will need an electrical wire with a socket attached, an energy saving light bulb (I'm afraid a regular light bulb will get very hot and the plastic will melt), a few (3 or more) bolts, a large washer and a few small ones.
So, you will need:
6. large washer
7. small washers
8. heat source (lighter or something like that)
9. sharp metal pen (for example, a scriber - a tool for marking metal)
Well, let's begin... We staple 3 cups, this is the basis around which you will build everything else.
In the process of work, it is necessary to fasten the bottom of the cups first, it turns out more neatly. If you start from the top, the plastic will tear. Although, this is everyone’s business, it’s just that at the end, if you run out of staples, you can only fasten the bottom. If you use paper cups, you can glue them together.
Now you have in your hands the base around which you will build your lamp. Due to the conical shape of the cups, the end result will be something like a sphere.
First, as you can see in the photo, overlap one edge over the other or hide one under the other. If this is too labor-intensive, then you can simply stack the cups so that the edge of one is under the edge of the other.
But so, the result was not at all what was planned at first (due to laziness and the desire to finish everything in one evening). The top was a little crooked, so the lamp looked more like an egg than a sphere.
So, now your task is to assemble the cups into the desired shape. Don't forget to leave a hole for one cup free.
Step 4. Hanging the lamp
Take the last glass, heat up the soldering iron and burn a small hole in the bottom.
Place a large washer on the inside, tie a knot in the electrical wire, and pass it out through the hole.
Attach it with bolts with a pin and small washers between them so that the bolts do not turn. If the lamp breaks, you can easily remove the cup to repair it.
Ignore the paper clips in the photo, this was the first attempt to secure the last cup: tested, does not work.
We are creating a masterpiece - you need to try!
You can get excellent kitchen lighting if you make your own lamp from beads or fabric. You will get a shabby chic style lamp or a real candelabra chandelier.
For this job you will need:
- An old hoop, garden basket, hanging metal planter, or wire to create a frame;
- Decorative chains;
- Beads, beads, ribbons, strong threads;
- Lamp socket.
Expert opinion Ksenia Petrovna Romanova Expert in the field of interior design, as well as the head of a fabric sales salon
The lamp will be a two- or three-level structure of rings located one above the other and connected by chains or wire.
The rings can be taken in different sizes, creating a lampshade in the spirit of a vintage classic, or the same size - this is exactly the type of lighting that is done in the Art Nouveau style.
Also see our other materials:
The base of the lamp is certainly painted, wrapped or decorated, after which they begin to string the beads.
The consumption of beads in this project is as follows:
Bottom part: beads with a diameter of 16 mm, 15 pcs. on a thread;
Here you can vary the degree of tension and the number of threads.
Advice! The work should be carried out by first hanging the chandelier and inserting a socket into it.
By analogy, you can create a chandelier from artificial fruits for the kitchen. And subdued lighting will be achieved if you use fabric to cover the frame. As a rule, such a lampshade is made for country and Provence styles.
LiveInternetLiveInternet
– Quote book
SilverRain cap https://club.osinka.ru/topic-66201?&start=240 description. 5 threads p.
Dress “Countess” and 2 collars I machine knitted a simple dress that can be worn with r.
Machine knitting. Drawings. Olga Yuryeva https://www.youtube.com/channel/UCZ-Tk35ScZphbPmeB50ZeKg.
Hats on the car
Bow hat. Master Class. I have long liked this knitted hat with a bow.
–Applications
- I am a photographer
Plugin for publishing photos in the user's diary. Minimum system requirements: Internet Explorer 6, Fire Fox 1.5, Opera 9.5, Safari 3.1.1 with JavaScript enabled. Maybe it will work - Cheap flights
Favorable prices, easy search, no commission, 24 hours. Book now - pay later! - Postcards
Reborn catalog of postcards for all occasions - always no analogues at hand
^_^ Allows you to insert a panel with an arbitrary Html code into your profile. You can place banners, counters, etc. there - TorrNADO – torrent tracker for blogs
TorrNADO – torrent tracker for blogs
–Links
-I'm a photographer
How to make a chandelier with your own hands from plastic cups
Wednesday, September 14, 2011 03:31 + to quote book
1. 300 or more cups
2. stapler with staples
3. electric wire with socket
4. energy saving light bulb
This idea, of course, is not new, but you can’t even imagine how many interesting crafts you can make from coffee cups. So, in this article you will learn how to make a chandelier with your own hands from ordinary plastic cups! I admit, this is not my invention. Let's get to work!
Chandelier made of plastic cups
Step 1. Required material
Start saving cups or just buy them at the supermarket. The optimal quantity is 300 cups. It might be better to make such a chandelier from paper cups, but plastic ones also worked well. In addition, instead of glue, you can use a regular stapler and staples. A little later you will need an electrical wire with a socket attached, an energy saving light bulb (I'm afraid a regular light bulb will get very hot and the plastic will melt), a few (3 or more) bolts, a large washer and a few small ones.
So, you will need:
6. large washer
7. small washers
8. heat source (lighter or something like that)
9. sharp metal pen (for example, a scriber - a tool for marking metal)
Well, let's begin... We staple 3 cups, this is the basis around which you will build everything else.
In the process of work, it is necessary to fasten the bottom of the cups first, it turns out more neatly. If you start from the top, the plastic will tear. Although, this is everyone’s business, it’s just that at the end, if you run out of staples, you can only fasten the bottom. If you use paper cups, you can glue them together.
Now you have in your hands the base around which you will build your lamp. Due to the conical shape of the cups, the end result will be something like a sphere.
First, as you can see in the photo, overlap one edge over the other or hide one under the other. If this is too labor-intensive, then you can simply stack the cups so that the edge of one is under the edge of the other.
But so, the result was not at all what was planned at first (due to laziness and the desire to finish everything in one evening). The top was a little crooked, so the lamp looked more like an egg than a sphere.
So, now your task is to assemble the cups into the desired shape. Don't forget to leave a hole for one cup free.
Step 4. Hanging the lamp
Take the last glass, heat up the soldering iron and burn a small hole in the bottom.
Place a large washer on the inside, tie a knot in the electrical wire, and pass it out through the hole.
Attach it with bolts with a pin and small washers between them so that the bolts do not turn. If the lamp breaks, you can easily remove the cup to repair it.
Ignore the paper clips in the photo, this was the first attempt to secure the last cup: tested, does not work.
Your lamp is ready! All that remains is to hang it on the ceiling and connect the wires. Be very careful when doing this!
We make the frame ourselves
To make the frame, galvanized steel wire with a diameter of 2 mm is used, which is connected with solder. To remove oxides from the zone of connection of elements, a solution of zinc chloride is used.
The frame is assembled on a base (for example, a factory-made glass lampshade or a wooden model), which allows you to obtain a geometrically correct configuration. The operating algorithm is as follows:
- Mark parallel lines on the surface of the lampshade that correspond to the horizontal sections of the frame.
- Cut the wire into pieces that are rolled into rings in accordance with the section size.
- Secure the rings to the surface of the mandrel using adhesive tape. If a wooden model is used, the wire is secured with nails or staples.
- Remove burrs from the frame using sandpaper, and then remove the resulting structure from the base.
DIY chandelier from a plastic bowl
If your hands are in place and your imagination is also in order, then you can make your life much easier.
My wife came up with the idea to cut down the chandelier when we were once again walking through Megastroy. We chose ordinary plastic bowls to match the color of the headset, bought a meter of wire, and a cartridge.
To fix the future lampshade on top, I found a black ring from an old socket at home (it won’t be visible from above, I didn’t buy another white socket for that)
What to take as a basis
The central place in the design of any chandelier is the base. It is made from different materials and can be:
- wire;
- plastic;
- wooden;
- metal.
Often, the structural part of an old chandelier is taken as a basis, onto which new shades and decorative details are later attached. You can weave a wire frame yourself or use ready-made natural materials. Chandeliers whose structural basis is made from driftwood or massive branches look original in the kitchen interior.
In country houses and apartments decorated in chalet style, you can find chandeliers made from deer or elk antlers.
Progress
- Step #1: First, you need to take a small sheet of wax paper and attach it to a piece of plain paper using tape.
The first stage of creativity.
- Step No. 2. Find a photo or drawing that you would like to use, then you can start printing. But keep in mind that the printer must print on the exact side where the sheet of wax paper is located.
The second stage of creativity.
- Step #3: Apply a thin layer of tanning cream to a small piece of wood.
The third stage of creativity.
- Step No. 4. Place the wax paper on the wood with the side on which the photo is printed. Using a ruler, you need to remove all the irregularities.
The fourth stage of creating a new interior detail.
- Step #5: Wait 10 minutes and remove the paper from the wooden surface. The decor for the living room, bedroom or children's room is ready!
The final result of the work.
We hope that you liked the idea of the craft and you will bring it to life. Decorate your home only with bright and unusual things that will help you transform your interior beyond recognition!
Did you like the article? Subscribe to the channel to stay up to date with the most interesting materials
Great storage solutions
Since these cups are small, they can be great for storing various small objects and things. You can choose a regular stand for a spinning rod with cup holders and place mugs in the holes, which will act as excellent containers for storing handicrafts, buttons, jewelry or gear.
If you want to create a charming and aesthetically pleasing piece of decor and interior design, then take a look at the following projects from talented professionals.
Using pretty paper, stunning ribbons and ruffles, you can create gorgeous jewelry boxes, as well as a cute pin or pin cushion.
DIY hanging rope scratching post
Almost everyone who has a cat in their home suffers from the bad habit of cats sharpening their claws on pieces of furniture. It is impossible to wean an animal from turning the upholstery of a chair into fringe, since the kitty does not do dirty tricks, but frees its claws from the dead stratum corneum. This problem is solved with the help of a scratching post, which can be purchased at a pet store. But it often turns out that the posts entwined with rope do not attract the cat, and she continues to spoil the decor of your home. In this case, a homemade scratching post for cats can help.
Today we will look at how to make a scratching post for a cat from a plank and rope.
To make a rope scratching post we will need:
- a board about 50 cm long;
- thick hemp rope (jute cord);
- bright, dense thread (this is more for beauty, that is, for you, and not for the cat);
- glue gun;
- scissors;
- leather belt.
The board must first be prepared - sanded with fine sandpaper, if necessary, and a small triangle cut out in the lower part (a v-shaped notch is obtained).
Now take the glue gun and cord. It is advisable not to cut the cord so that its edges do not unravel. We retreat a few centimeters from the top edge of the board and coat the strip with glue. We attach a cord to this place.
We are waiting for this part of the cord to stick, so as not to displace the cord during further work. We begin to wrap the board with cord, applying glue to the board to securely fix it. Without glue, the cat will move the cord out of place when it sharpens its claws.
We take a bright thread, and, stepping back a few turns from the upper edge of the rope, wrap it around our board. We make one or several turns depending on the thickness of the thread, and fix the end of the thread with glue.
Now we need to make two through holes in the upper part of the board at the same distance from the edge. We pass a strong leather cord through these holes, and tie the ends of the lace into knots.
All that remains is to hang our scratching post on a convenient place on the wall.
A homemade scratching post for cats looks beautiful and is also practical - it takes up minimal space in the house, and can also be moved if necessary. The undeniable advantages of such a scratching post include the ability to replace a damaged rope. While you are accustoming your cat to a new scratching post, you can place it near a chair or the wall where the animal is used to sharpening its claws, and then move it to a more suitable place. You can attract the cat's attention with the help of her favorite mouse toys.
Did you like the article? Subscribe to the channel to stay up to date with the most interesting materials
Selecting a lamp and socket
Regardless of the design and material of the chandelier, when choosing light bulbs, it is best to choose LED and halogen options. They are characterized by a longer service life, but most importantly, they do not heat up when consuming electricity. It is important given the low fire resistance of most materials for decorating a chandelier yourself.
The situation is similar with cartridges. The best choice is ceramic or porcelain products, which have the highest heat resistance, which is important in the kitchen. As a rule, they are impact-resistant, aesthetically pleasing and come in a wide variety of shades. Even more impressive is the range of cartridges made from heat-resistant plastic. Their main advantage is their low price.