A blade made by yourself is not only a guarantee of good quality, but also a certain “prestige” among friends. Making a knife from a file at home may seem like a daunting task. But with some skill and careful study of this material, almost anyone can cope with this. You need to take the process seriously and everything will work out.
A knife made from a file.
Required tools and materials
The process of making a knife involves many difficulties, including the selection of materials. For manufacturing, you need to select a file more than 3 cm wide; it is advisable to look for a Soviet-made tool. The cross-section of the file surface should be flat or diamond-shaped; if the latter is found, this will be the best option, since the shape of the steel is stronger and will withstand loads.
The manufacturing process will require the following tools and items:
- Rivets made of brass alloy.
- Etching is performed with ferric chloride.
- Magnet for checking the degree of hardening.
- To process surfaces you will need sandpaper.
Processing is carried out with a grinder or grinder. You also need to decide on the material of the handle of the future knife. A file knife can have a metal or wooden handle, its weight and purpose depend on this. Before manufacturing, it is worth preparing a sketch of the future product; usually it is drawn on paper.
The process of making a knife from a file
Sharpening two-handed saws yourself or how to simply restore an old long hacksaw
If you have an old two-handed hacksaw Druzhba-2 in the garage, then before using it, it is recommended to restore its integrity. Before using the tool, pay attention to the following points:
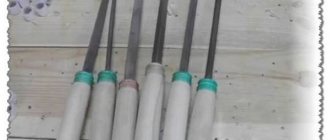
- Handles - wooden handles may have dried out over a long period of non-use, so it is possible that they could freely fall out of the holes. You can restore the serviceability of the handles by dipping them in water for several hours so that they swell. You can also machine new handles for the tool, which won’t take a lot of time and effort.
- The presence of corrosion on the canvas - signs of rust should be eliminated, and then treat the device with machine oil
- Sharpening the teeth - after storing the tool for a long time in the garage, there is a high probability that the hacksaw needs to restore the sharpness of the teeth
If there are no difficulties with restoring the handles and removing corrosion, then sharpening the teeth is just the opposite. A large saw requires a lot of time and effort to restore the integrity of the links. However, there is an advantage to this, since large teeth are much more convenient to sharpen. Although the tool differs from an ordinary hand hacksaw, however, the principle of restoring the sharpness of the teeth is similar. A step-by-step description of sharpening teeth on a two-handed saw has the following format:
- First you need to fix the tool. It will not be possible to do this in the jaws of even the largest vice, so we use two corresponding board lengths. We place the boards parallel to the blade, leaving only the teeth visible. If you don’t have a vice, you can use a clamp
- Work should begin with setting the teeth. All teeth must be the same height. You can determine the presence of protruding links by eye, and to align them with the rest, you should work with a flat file
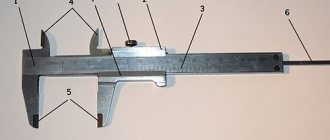
- At the next stage, it is necessary to align the teeth at the same angle of deviation from the plane of the blade. To perform the wiring, you will need a special tool. It is also recommended that you first make a template (layout) to check whether the links are sufficiently spaced (or buy one). The teeth should be spaced 0.5 mm from the plane of the blade or 1 mm from each other. The wiring process is performed one by one. Not many craftsmen know how often to set teeth. According to the rules, it is necessary to carry out setting no more often than 1 time per 5-6 sharpening of teeth
- As soon as the teeth are set apart, you can move on to the final and most important stage - sharpening. For this, a special triangular file is used, the size of which must be no less than the height of the teeth
- Correct sharpening is performed by moving the file away from you with medium pressure against the tooth. In the reverse position, the file should not touch the blade. It is necessary to pass the file confidently, but not quickly
- First you need to go along one side of the teeth, and then along the other. When sharpening, you should also choose the appropriate angle from 35 to 70 degrees.
Finally, all that remains is to treat the tool blade with machine oil and use it for sawing thick logs, trees and even lumber. When carrying out work, it is recommended to follow safety precautions to avoid injury.
This is interesting! If you have mastery of working with a grinder, you can sharpen the teeth with a power tool with an abrasive disc.
Firing the workpiece
The files are made from U10 steel, which is enriched with carbon; a file made from this steel is fragile and can easily crack under load. In order for the metal to be hard and not crumble when struck, it must be hardened. Usually the procedure is carried out in a special oven, the temperature of which reaches 700 °C.
To harden a knife made from a file, which you made yourself, you can use a regular gas stove.
The combustion temperature on the stove is not high, reaching no more than 300 degrees. To achieve the required heat, you need to use a kind of screen. In the absence of a special thermometer, you can use ordinary table salt, its melting point is equal to the hardening of knife steel.
Knife hardening
Hardening of the file is necessary only in the cutting part. Checking for uniform hardening occurs visually; after reaching the temperature, the knife should be uniformly reddish in color. The product must be kept at maximum temperatures for at least 4 hours. Cooling is done smoothly; if you cool the part right away, it will simply crack. Cooling of the part occurs through a gradual decrease in temperature; heating decreases every hour by a quarter of its initial intensity.
Sanding and varnishing a knife handle
Final sanding is done using sandpaper. Gradually increasing the grain size, it is necessary to remove all rough marks from paper of a larger grain size. It is enough to complete the process of sanding the knife handle with 600 grit paper. The last step in making the handle will be its impregnation.
There are several ways to impregnate a handle to better preserve it. This is oil impregnation, wax impregnation or varnish coating.
Each method has its own advantages and disadvantages. For example, wax must first be melted by heating it, and heating has a detrimental effect on the strength of the glue that glues the handle. Oils must be updated periodically. And the varnish serves only the function of surface protection.
How to harden a knife from a file
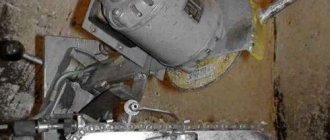
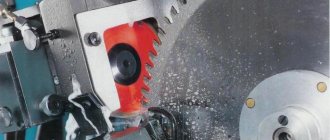
After firing, you can begin to form the future product. The workpiece is secured in a vice, the parts are processed with a grinder and all excess slag and layers of metal are removed. The sharpening machine is used with a coarse-grained abrasive wheel. The degree and shape of sharpening is carried out according to the prepared sketch. On the handle compartment you need to drill one or two holes to attach the handle.
After the tool is hardened from the file, it is necessary to treat the entire surface except the handle. A burner can be a tool for hardening, since the temperature is higher and the knife will harden faster. Uniform tempering of a knife from a file will give strength to the future product. The correct hardening of a knife made from a file can be determined with a magnet; if there is no reaction with the metal, then it is suitable for further use. After the process, the metal needs to be cooled, just put it in a bucket of water.
File knife and drawing for it
There is such a thing as metal stress. With this action, the metal crumbles and crumbles. To avoid adverse consequences, it is necessary to heat the instrument in the oven at the maximum temperature for several hours.
Forming, hardening and tempering is an important sequence!
In the workshop, holding the workpiece in a vice, we cut off and cut off unnecessary pieces, or grind it on a coarse-grained abrasive disk, giving the file a completely different shape - the shape of the future knife. If the knife is decorated with wood or other plates, do not forget to drill holes for rivets in the handle or cut a groove with a grinder.
Hardening is the next stage after formation. Many people make a big mistake, basing their assessment of the degree of hardening on the glow of the heated metal, but only an ordinary magnet can show the real picture - if the hot metal does not react in any way to its presence, then the hardening has been brought to the required degree. The future blade should be heated evenly, with the exception of the handle area; only a small area of 3-4 cm at the base of the blade should be heated. For this, it is best to use a burner that produces a higher temperature.
Also prepare a container of water in which you will cool the metal. When you achieve a uniform glow of the metal and the magnet stops reacting to it, warm the workpiece for a few more minutes, and then sharply plunge it into water - just like in the movies! If the process has been followed in every detail, the metal will be able to scratch the glass - this is the best sign of good tempering.
But due to the high internal pressure, hardened steel tends to break, crack and crumble when sharpened, so you need to temper it - a process through which internal stress is relieved while the hardness of the metal decreases slightly.
This is exactly what metal drills do! There is absolutely nothing complicated in the process itself - you just need to put the workpiece in the oven and bake it for an hour and a half at a temperature of about 200 ° C. The workpiece must cool down together with the oven!
Making the handle
Before making a handle for a product, you should decide on the appearance, materials and shape. You can use any material that is at hand. A wooden handle is considered a harmonious option.
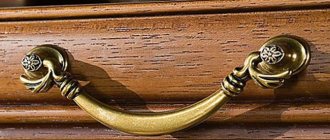
File knife handle
The process includes several stages:
- Selection of materials, it is possible to use different types of wood for a unique design.
- It is necessary to make a bolster, the lower part of the knife. The remainder of a file or other metal is used.
- Wooden pieces are placed on top of each other and glued together with epoxy glue.
- To glue the pieces together better and faster, you need to use a press.
- The excess parts are trimmed with a saw, after which they are processed with sandpaper to the required shape.
- When finished, the handle is varnished for greater preservation; it is possible to use stain to darken it.
It is important to understand that all knives, regardless of category, are considered edged weapons. However, a cutting product whose blade length is no more than 90 cm and whose thickness is more than 6 mm can be removed from the category of edged weapons.
Sharpening is done in the usual way on a grinding machine.
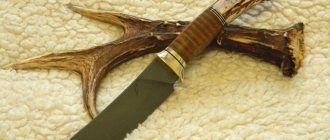
The handle can be made of leather, deer antler or other materials. Installation depends on the form; each type requires an individual approach. The leather belt is tightly placed over the handle area, glued with special glue.
Sawing out the handle blank and preparing for gluing
To finish working with the knife, you need to make a handle. There may be different variations of materials used as a handle. The most popular material is wood. The wooden handle is impregnated with linseed oil to prevent the harmful effects of moisture on it.
Select a flat plank from the wood of your favorite species. The thickness of the board should be at least half a centimeter for convenience. A thick board can be sawn lengthwise. Using the knife blank as a template, markings are applied to the board, including holes for rivets. For a good fit of the future handle to the shank, it is necessary to create a plane of contact using sandpaper.
Handle blank
Proper processing
The initial processing of the knife blade is performed with any available tool. Sharpening a knife from a file can be done on a grinding machine, which will speed up the process and make the blade more uniform across the plane. The initial sharpening does not require ideal parameters, since the etching process occurs after it.
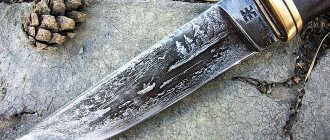
Etching the blade in citric acid
Etching occurs chemically using ferric chloride, which can be purchased at radio components or hardware stores. It is necessary to completely lubricate the product with the solution, or lower it into a flat container with it. The process will give the blade a film formed on the blade, which will provide protection and it is highly not recommended to remove it. At home, you can use citric acid mixed with vinegar for etching.
After all the processes carried out to process and produce a knife from a file, it is necessary to carry out final processing. The blade is carefully sharpened on a grinding machine to give it sharpness. The handle is polished with a solution of wax and turpentine or varnished.
Finishing the blade and handle - how to do it right?
After all these manipulations, you can begin finishing the blade. You can use all available tools that are intended for grinding: sandpaper, metal brushes, felt, vulcanite wheels, a grinding machine, etc. There is no need to be zealous - there is still an etching process ahead. Your task is to give the blade smoothness and bring its surface into a neat appearance.
Before etching, you can attach linings to the handle from the material we have planned, or wrap the metal with a strip of leather, it’s a matter of taste. In the first case, the finishing treatment must be carried out after etching, but leather can be wrapped already at this stage. You will need at least a half meter solid piece. First, do a simple wrap to see how the knife will look in this design, whether the piece of leather is long enough, and how the knife will feel in your hand. If you are happy with everything, unwind the handle and apply special leather glue to the back of the leather strip, carefully wrap the handle, this time trying as hard as you can.
A wooden handle will take longer to process. The holes for the rivets should be filled with epoxy resin, then the handle should be fastened with rivets and clamped in a vice until the resin has completely cooled. Two rivets will be enough. Once the resin has hardened, you can shape the handle, but do not rush into the final processing.
First - etching! If there is a radio store nearby, you can buy ferric chloride, in which the blade is etched until it obtains a gray, matte tint.
The film that forms on the blade will protect it from corrosion, so try not to remove it. If ferric chloride is too rare for you, pickling can be done with improvised means: vinegar, lemon juice or even ground raw potatoes! It is very important to clean the blades of any type of contamination, because when etching, even your fingerprints may appear on it, and then you will have to clean off the oxide film and start all over again.