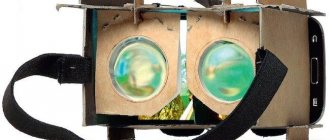
Due to the growing popularity of VR technologies, many people want to join them. Today there are many different variations and models of devices on sale in different price categories. Nevertheless, some users, out of curiosity or in order to save money, are wondering how to make virtual reality glasses with their own hands from cardboard or plastic (which is more difficult)?
This option is suitable, first of all, for those who have a modern smartphone with a large screen and a built-in set of sensors (more about the required sensors below). According to statistics, a considerable part of the world’s population uses such devices. Thus, with insignificant monetary and certain time costs, the user can make excellent three-dimensional glasses with his own hands. We will look at what is needed for this and how all the parts are assembled below.
Google Cardboard
An interesting point is that even Google produces and distributes a simplified design made of cardboard and simple lenses, called Cardboard. Their VR glasses, even in a similar design, are available in several versions that are not difficult to replicate at home.
Moreover, the company itself has made all the necessary information publicly available.
Thus, there is no need to talk about the relevance of the issue under consideration.
Needlework
Take polymer clay. Roll out and seal (our mug).
Adding details and priming.
Temper in the oven and paint
Good gifts to everyone and Happy New Year.
What you need to assemble VR glasses at home
Before worrying about the materials and components of future glasses, you should make sure that your smartphone meets the requirements of VR technology. The phone settings should ensure comfortable work with 3D films, games and other virtual reality projects.
Suitable for such purposes, for example:
- Android 4.1 JellyBean or better
- iOS 7 or higher
- Windows Phone 7.0 and so on
The screen diagonal must be at least 4.5 inches for comfortable and full operation of all applications.
What sensors are needed:
- Magnetometer, that is, a digital compass
- Accelerometer
- Gyroscope
The last two conditions are required for most virtual applications ; otherwise, the user will only be able to view movies. Without these two components, it is not possible to fully evaluate VR technology.
It should be noted that for self-production you will not need expensive or rare components. So, now let’s move on to the list of necessary materials for making VR glasses with your own hands at home:
- Cardboard. It is recommended to use the most dense and at the same time thin variations, for example corrugated cardboard. The cardboard must be in the form of a single sheet with dimensions of at least 22x56 cm and a thickness of no more than 3 mm.
- Lenses. The best option would be to use biconvex aspherical lenses with a focal length of 40-45 mm and 25 mm in diameter. It is recommended to use a glass option instead of plastic.
- Magnets. You will need two magnets: a neodymium in the form of a ring and a ceramic in the form of a disk. The dimensions should be 19 mm in diameter and 3 mm in thickness. As a replacement, you can use ordinary food foil. Alternatively, you can use a full mechanical button.
- Velcro i.e. textile fastener. This material requires two strips of approximately 20-30 mm each.
- Rubber. The length of the elastic band should be at least 8cm, since it will be used to secure the smartphone.
In addition to materials, you will also need some tools: ruler, scissors, glue . Based on your capabilities and ingenuity, some materials and tools can be replaced with alternative options if functionality does not suffer.
Goggles "UK4G-TPNV". Part 2. Completion of the manufacturing process
Hello again, dear Pikabutians and subscribers!
We continue without pause.
19. I will cut out parts of the hinges from such a U-shaped brass profile.
20. For precise positioning during soldering, I made 2 mm holes in the support pads, and holes with M2 threads in the hinges.
21. I didn’t photograph the actual bridge of the nose, but I think everything is clear.
22. Finished bridge of the nose. But she looks pretty skinny, so I decided to cover her with leather.
23. I shape the skin under it, holding a fragment of a file between two wet strips.
25. From a brass pipe 32x2 I grind an eyepiece for 30 mm glass.
26. I make a groove for the retaining ring.
27. Eyepieces with glued markings for drilling.
30. Finishing on a fluoroplastic blank clamped in a drill. And this is done with manicure files.
31. I cut out glass. I once bought a dozen multi-colored plexiglass sheets from Ali and used it. Not quite canonical, but safe.
32. I process the edge, adjusting the diameter along the way. This is a homemade belt sanding machine for a 533 mm ring belt.
33. Cut blanks of belts with templates.
34. Cut out belts. I didn’t take it off with what I cut the ends with. And these are just stationery blades bent around suitable round timbers. I still can’t get around to buying cuttings.
37. I rivet the belt loops.
38. Forming belt loops.
There are no more photos of the process. But I think the rest of the assembly is clear from the finished photos.
All. If you have questions, ask. Whatever I can.
Drawing of virtual reality glasses made of cardboard
As you already understand, materials and tools alone will not be enough to manufacture, much less assemble, an entire structure. Of course, this requires a drawing or simply a template diagram for creating virtual reality glasses.
You can find a template for cutting out glasses below. It can be easily printed and then pasted onto a piece of cardboard. Since the expanded version of the glasses goes beyond the usual landscape format (and consists of 3 A4 sheets ), you will have to carefully and accurately combine all the fragments at the joints.
To download the template to your computer, you need to right-click on the image, and then click on “Save Image As” .
3 parts template
Below you will see 3 large pictures that will need to be printed and then glued onto cardboard so that all the joints are respected.
The finished result on cardboard
This is the final result that you should get by connecting 3 parts of A4 sheet on cardboard.
Cut out cardboard design
This is what we got after we completely cut out the cardboard according to the drawing. Carefully follow the numbers and connect all the parts correctly.
Flaws
Naturally, since this 3D viewing technology is considered outdated, it must have a number of disadvantages that cause this. And the main one is a colossal loss in picture quality. As soon as you put on the 3D glasses and view the first couple of images, the novelty effect will go away and the “distortion” of colors will immediately become noticeable.
The thing is that such a division of the picture into two colors seriously cuts off the spectrum of the available palette in the frame, and even when shooting high-budget works, few people manage to restore the original quality of the frames.
Previously, they tried to cope with this by replacing colors with others, but in each case a large rainbow of colors was lost. Therefore, modern glasses use completely different methods of transmitting two different images into your eyes. Starting from dividing into darker and lighter frames, ending with electronic data processing using special sensors.
But almost any device today is still used only in cinemas, since they are not suitable for home viewing due to the serious strain on your eyes.
Many have felt that same state of fatigue when watching another tape, and this happens due to the fact that your brain and eyes, respectively, have to process too much information in a short period of time.
Where to get glasses lenses
In this matter, it is the lenses that are the most difficult to access component. If you can’t find them in nearby stores and retail outlets, you can search on the Internet.
Among the available and most likely places that may offer such a product for sale, the following can be noted:
- Shops in the “Optics” category. Here the product is measured in dimensions - diopters, and for glasses you will need lenses of at least +22 diopters .
- Stationery stores. They sell loupes (i.e. magnifying glasses) here, 10x lenses should work as an alternative.
- Search on domestic websites and trading platforms, or on foreign online auctions.
- Make it from a plastic bottle (more details in the video instructions)
In the event that the lenses received by the user differ to a certain extent from the specified standard, it will be necessary to either grind the lenses themselves or make appropriate adjustments to the design of the glasses. Often the problem can be solved by including in your design a device for adjusting the distance from the smartphone to the lens.
How to make glasses without lenses
Those who imagine the option of creating VR glasses without lenses can immediately forget about it. Without special lenses, the resulting design will be no different from ordinary glasses or glass . Such a design will not bring any practical benefit, except that it can be used to create a cinema effect.
Goggles "UK4G-TPNV-02"
Greetings, Pikabu, subscribers and sympathizers!
There's a bit of a process. In general, it is not much different from what is in the link. It may be of some interest to make a seamless flange from leather. I'll stop there.
01. Caprolon cylinder with a diameter of 40 mm. I put it on a threaded rod and grind out part of the shape.
05. Trying on. The edge of the hole has already been machined.
07. And this is the molding of the part. It turned out well, without obvious folds.
And a little bit about making eyepieces.
10. I cut out the parts of the eyepiece body.
11. Glued housings.
12. Soaked and stretched onto the pipe for molding.
13. Sometimes it is too lazy or inconvenient to round an edge with an edge cutter. Pre-rounding of edges.
14. Punching holes.
That's all, thanks for your attention.
Step-by-step instructions on how to make virtual reality glasses with your own hands from cardboard
So, when the user has all the materials, tools and a printed template, then assembly can begin.
First step
- Paste the template onto the cardboard
- Cut along the contour
- Bend and fasten individual places
The first step is to glue the drawing onto a sheet of cardboard. The main thing is to be careful and maintain accuracy at the joints so that the dimensions are not distorted. Then all elements must be carefully cut along the contour. By special marks on the drawing it will be clear in which places the structure needs to be bent and in which to fasten.
Second step
- Insert lenses into the finished structure
- Magnet fastener
- Lining cardboard with foam
Next, you need to insert lenses into the already assembled frame, and, if necessary, fix them to increase the reliability of the fastener. Then a strip of foil or magnets is glued to create something like a control button.
To increase the comfort of using the resulting device, in places of contact with the head, the surface can be covered with foam rubber or other softening material.
A budget option
If you want a budget option for homemade glasses, make paper ones. In this case, it is worth taking a frame made of cardboard, because it is easier to glue the lenses to it. You will also need large transparent tape and transparent silicone film, three felt-tip pens in red, blue and green, and sharp scissors.
Description of work:
- Let's draw and cut out the frame from cardboard. Let's attach the empty windows of the frame to the film and trace the outline with some marker or pencil, and then cut out two lenses;
- Next you need to do the painting. Let's paint one lens red, the other green and blue, on different sides. Let's wait until they dry;
- glue the lenses on both sides and secure them to the frame with tape. The red lens will be for the left eye, the blue-green lens is needed for the right eye. So we made an anaglyph product.
Questions and answers
Is it possible to make VR glasses out of paper?
No you can not. Think for yourself, under the pressure of the lenses your structure will simply fall apart, not to mention the weight of the phone itself.
Can they be used for PC gaming?
Yes, they will essentially be no different from purchased alternatives.
I couldn’t assemble the case the first time, what would you recommend?
To begin with, take your time, carefully follow the template, and watch the video example to reinforce it.
Photo example of finished glasses
Using the recommendations from this guide, everyone who wants to make VR glasses with their own hands now knows how to do it.
This is a fairly simple and cheap option that will satisfy the needs of a wide range of users. Once I'm done, don't forget to read the article on how to adjust your glasses for comfortable use.
Goggles "UK4G-TPNV". Part 1. Finished and beginning of the manufacturing process
Hello, dear Pikabutians and subscribers!
I have been looking for a 32x brass pipe for a long time (at least for some time). It was there, but it was expensive, like a cast iron bridge. And one day he spat and crushed the toad. But we need to make something out of it. And did.
These are the goggles called “UK4G-TPNV”. Can anyone guess what it means?
And this is fixing the glass with a retaining ring.
Let's go through the process.
01. I'm making a plasticine model. The desired shape and markings of the front part are glued to the top.
02. I cover the model with paper.
03. I get the approximate shape of the pattern.
04. I vectorize the pattern. After several iterations of “printing-gluing-adjusting-editing” I get a paper model of... what? I will call it the body.
05. Making a matrix for molding leather.
06. Ready set of forms. The punches were sharpened on a lathe.
07. Wet molding. As a result, the matrix had to be redone - I wanted to mold a flange 7 mm wide, but the skin did not want to stretch that much. Made 4 mm. Vegetable tanned leather, Rybinsk tannery.
08. Preliminary result.
09. The final result of molding. The front part of the body with seats for eyepieces.
10. Patterns for the side of the body.
11. I trim the edge of the side of the case by 45 degrees. I do the same with the front part.
12. Glued side part of the body.
13. I paint using the dipping method. Kenda Farben Toledo Super paint. As a master I know (he has a second degree as a skin technologist) explained to me, this paint somehow cleverly interacts with the collagens of the skin and does not damage it.
16. I begin to make the bridge of my nose. Support platforms.
18. Soldered (L-AG20 solder with flux, torch soldering) bridge of the nose. However, I immediately wanted to make it mobile.


