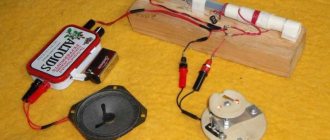
Previously, I made with my own hands a simple loud-speaking radio receiver with a low-voltage power supply of 0.6-1.5 Volts and is not working. Time is running. The Mayak radio station on the CB band went silent. The receiver, due to its low sensitivity, no longer received any radio stations during the day. But when upgrading a Chinese radio, I discovered the TA7642 chip. This transistor-like chip houses the UHF, detector, and AGC system. I connected a ULF on one transistor to the microcircuit and got a highly sensitive loud-speaking direct amplification radio receiver powered by a 1.1-1.5 Volt battery.
Radio
How to make a radio receiver with your own hands?
A do-it-yourself radio receiver includes an antenna, a radio board and a device for reproducing the received signal - a loudspeaker or headphones. The power supply can be either external or built-in. The scale of the received range is in kilohertz or megahertz. Radio broadcasting uses only kilohertz and megahertz frequencies.
Basic manufacturing rules
A home-made receiver must be mobile or portable. Soviet VEF Sigma and Ural-Auto radios, and the more modern Manbo S-202 are examples of this.
The receiver contains a minimum of radio elements. These are several transistors or one microcircuit, without taking into account the attached parts in the circuit. They don't have to be expensive. A broadcast receiver that costs a million rubles is almost a fantasy: this is not a professional walkie-talkie for the military and special services. The quality of reception should be acceptable - without unnecessary noise, with the ability to listen to the whole world on the HF band while traveling across countries, and on VHF - to move tens of kilometers away from the transmitter.
You need a scale (or at least a marking on the tuning knob) that allows you to estimate which range and frequency you are listening to. Many radio stations remind listeners what frequency they are broadcasting on. But repeating 100 times a day, for example, “Europe Plus”, “Moscow 106.2” is no longer in fashion.
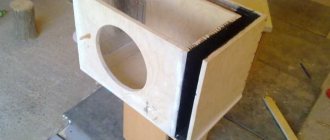
The receiver must be dust- and moisture-proof. This will provide a housing, for example, from a powerful speaker that has rubber inserts. You can also make such a case yourself, but it is hermetically sealed on almost all sides.
Modern radios
Modern devices are very similar to radio receivers in the USSR: they use the same antenna, which produces weak electromagnetic oscillations. High-frequency vibrations from different radio stations appear in the antenna. They are not used directly to transmit a signal, but carry out the operation of the subsequent circuit. Now this effect is achieved using semiconductor devices.
Receivers were widely developed in the mid-20th century and have been continuously improving since then, despite their replacement by mobile phones, tablets and televisions.
The general design of radio receivers has changed slightly since Popov's time. We can say that the circuits have become much more complicated, microcircuits and transistors have been added, and it has become possible to receive not only an audio signal, but also to build in a projector. This is how receivers evolved into televisions. Now, if you wish, you can build whatever your heart desires into the device.
Tools and materials
Will be required as consumables.
- A set of radio components - the list is compiled according to the selected scheme. You need resistors, capacitors, high-frequency diodes, homemade inductors (or inductors instead), low- and medium-power RF transistors. Assembly on microcircuits will make the device small-sized - smaller than a smartphone, which cannot be said about the transistor model. In the latter case, you will need a standard 3.5 mm headphone jack.
- A dielectric plate for a printed circuit board is made from scrap materials that do not conduct current.
- Screws with nuts and lock washers.
- The case is from an old speaker, for example. The wooden case is made of plywood - it will also require furniture corners.
- Antenna. Telescopic (it’s better to use a ready-made one), but a piece of insulated wire will do. Magnetic - wound on a ferrite core independently.
- Winding wire of two different sections. The magnetic antenna is wound with a thin wire, and the coils of the oscillating circuits are wound with a thick wire.
- Power cord.
- Transformer, diode bridge and stabilizer on a microcircuit - when powered from mains voltage. To be powered by batteries the size of a regular battery, a built-in power adapter is not needed.
- Wires for indoor installation.
Tools:
- pliers;
- side cutters;
- a set of screwdrivers for minor repairs;
- wood hacksaw;
- hand jigsaw.
You will also need a soldering iron, as well as a stand for it, solder, rosin and soldering flux.
Radio without batteries
Can a radio have fewer than 10 parts and operate without batteries?
Yes, it can: detector radios are very simple and can operate by being powered only by radio waves. In this article I will describe how you can make such a thing with your own hands, spending no more than an hour on all the work!