Limitless variety
Despite the contrast of its components, the craft is undoubtedly worthy of praise and touches the eyes of true connoisseurs of handmade work. The compositions can be so different and unique that from a distance you can’t immediately make out all the details, but when you get closer, the painstaking work of the author makes you think about repeating such manipulations in person.
Borrowed four centuries ago
The string art direction came from England; the art is not new, but is popular due to its spectacular design and originality. In the past, people used wickerwork on metal parts to add variety to their homes and give their rooms interesting decor. Boards of non-standard sizes were taken, onto which the desired design was subsequently applied; the finished craft decorated one of the walls of the living room or office.
Tools, materials for creativity
To start “embroidery” with isothread, you will need to purchase a piece of plywood or thick cardboard, a couple of small nails, any strong colored threads (floss, iris, knitting, sewing), a hammer, an awl and pliers. The latter will come in handy if the nail is driven in the wrong place. For marking, you will need a pencil to beautifully build complex figures; use a square, compass, various patterns, rulers with circles, diamonds, numbers, etc.
In order to place additional emphasis on one or another part of the image, use paint - acrylic, gouache, or any other. It is also advisable to find or come up with a suitable picture in advance. To easily wind thread onto nails, many craftswomen use a thin hollow tube, a handle without a rod through which the thread is passed. Some handicraft stores sell entire sets of materials and tools for String Art.
Professionals use a cork base instead of plywood - it is softer and has a beautiful texture. Foam plastic is suitable for teaching children string art.
Multifaceted development
Surprisingly, Mary Bull used string art patterns to improve her students’ knowledge of algebra and geometry, the classes gave positive results and the popularity of weaving spread throughout the world. Now this technique is widely used to embody unique landscapes that decorate houses and apartments; various competitions and exhibitions are held where exhibits of the highest quality are presented.
Start
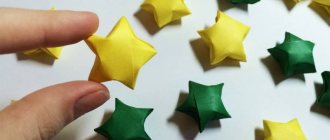
The colors used for this art are red, yellow, green, blue and purple. Although it would be more fun to use sazu in all the colors of the rainbow.
Choose a nail as a starting point. Take a thread, wrap it around any nail and tie a knot. Apply a drop of glue on the knot to do this, it's safe.
Count the nails and try to create an equilateral triangle with the string wrapped around the nails. After creating the first triangle you will return to the starting question again. Just skip that nail and grab the next one. Create another equilateral triangle by wrapping the following nails. Keep doing the same.
Take a thread of a different color. Wrap it around the nail, next to the previous nail (but not the same nail). Continue creating equilateral triangles until all the nails are covered.
Today it is very popular to have at least several hobbies. Our world is developing rapidly and sometimes you want to take your time. Therefore, most begin to master needlework. In this article we want to talk about a new type of hobby of the younger generation. From the title you can already understand what we are going to talk about, namely string art for beginners with diagrams so that you can create beautiful paintings and more.
By the way, this type of hobby is very exciting and not only young people engage in it.
Getting started is easy
Regardless of age, with a great desire to try yourself in something new and interesting, string art for beginners is available to everyone. You can buy all the necessary things in specialized stores or take improvised means. The initial design can be made on one of the following bases:
- Wooden.
- Cardboard.
- Foam.
- Cork.
Every beginner should try all possible suggestions, this will help to settle on the most practical and continue to create with convenience. For joint activities with children and personal training, it is better to take cheap ones; in case of failure or mistakes, you will be able to avoid unnecessary costs and worries.
We add uniqueness to forms
The shape also needs to be changed, depending on the goal, thanks to various geometric shapes, you can create a real masterpiece that will fit into any room and interior.
Of the available items and components, the following should be noted:
- Hammer.
- Small carnations.
- Sandpaper.
- Paint or varnish.
- Multi-colored threads.
Working on a cleaned surface will be more pleasant and convenient. If the intended image does not require it, the background for the panel made of threads and nails occupies a special place in the durability of the entire structure. Cork material may not require strong hammering of the metal frame, which cannot be said about oak boards; you cannot do without a hammer. A large tool is not needed; working with it is not very convenient when it comes to small patterns.
Basic techniques, filling schemes
To master the String Art technique, it is better for a beginner not to immediately take on overly complex products, but to try to make the simplest monochromatic drawings. Beginners will be helped by diagrams where numbers and arrows indicate the sequence and direction of weaving. First, it is advisable to master the principle of filling an angle, circle, arc, since all shapes are derivatives of these elements. Even the most intricate painting depicting flowers, animals, insects, a portrait or a landscape is made up of small and large geometric elements. Volume is obtained by using nails of different lengths, several shades of each color.
This “exercise” is suggested for training purposes. An angle with sides of five and ten cm is drawn on paper, each side is divided into 10 segments, the points are numbered. The lines go back and forth, wrapping around the studs, intersecting in many places. The denser and darker the area being designed should be, the more intersections are made in different directions.
The circle is a little more complicated to fill - first, using a compass, a drawing of the circle is made, the contour is divided into equal parts, about a centimeter long. The threads are pulled at an acute, very acute or right angle to each other. In each case, a different pattern is obtained. The arc is filled in approximately the same way as the corners - both symmetrical and arbitrary winding is allowed.
Add brightness to art technology
You can use paints of different shades depending on the chosen theme.
The varnish applied on top will protect the coating during wet cleaning of the room. As for the metal components, there should be a lot of them. The smallest creations require a minimum of 20 pieces; decorative items, furniture or carpentry types are suitable. Note!
- How to make wooden shelves with your own hands - original design options
- Kinusaiga technique for beginners: what is it, a description of creating paintings from threads
How to weave a figurine from rubber bands: how to learn to weave animals, toys and what you can make from rubber bands on a slingshot
String art technique on plywood
It goes well with paints and stains, achieving the ideal effect is easy and quick. There are times when the background looks nice even without adding shades to it; each artist independently chooses the best option for the future landscape.
Choosing string art for creativity will mean that you have a difficult choice, the abundance of products can easily take you by surprise, and it’s very easy to get confused in front of the counter. All kinds of colors, density and structure attract the eye with their beauty and perfection; you can take a closer look at the following proposals:
- Floss;
- Iris;
- Twisted.
It doesn’t matter what the choice is, but everyone who decides to weave pictures with threads on nails should know that they need extremely strong material, otherwise all the efforts and painstaking work will bring disappointment with numerous impulses.
Winding
By winding threads, paintings of two main styles are created: solid and radial. In the first case, the painting is done on a soft material, such as foam or cardboard. A contour is applied to it using small nails. You can hammer them in with your own hands. Drawing is done by simply winding threads on nails. First, the contours are applied, and then the free areas are filled. The direction of the threads is chosen arbitrarily. The main task is to fill all the space. After finishing winding the threads, the nails should be slightly hammered, but not too hard so that the threads do not come off. This is an important point, since the threads are not additionally fastened with anything and you can ruin everything with your own hands.
With the beam winding method, the warp can be drawn using any previously chosen method. The rays are intended only to give the panel polish and serve as finishing touches. Several small nails are driven or screwed into the picture frame from the inside. The threads are not wound in thick layers; a fan effect is used. From one point, the threads seem to diverge in different directions. They can gradually merge with the main background of the panel, or they can overlap, crossing and creating unique illusory combinations.
It doesn’t matter what type of thread you choose, what technique for creating panels you prefer, be it embroidery on cardboard or appliqué using additional materials and glue, you will do everything yourself or attend a master class for this purpose, the main thing is to have fun. It will come not only from the contemplation of a finished product, but also from the very process of its creation
Give yourself permission to experiment and don't be afraid to get something unconventional - something created with your own hands with real feeling is always beautiful.
There are no mistakes!
Those people who do nothing do not make mistakes. If any defects or irregularities occur, everything can be carefully corrected. In order to remove a bent or jammed metal object in the wrong place, you should use pliers or scissors. A pre-prepared tool will facilitate coordinated processes in creating crafts from nails and threads.
How to further decorate the picture
As additional decor in crafts made from threads with nails, paints are used to decorate the substrate, decorative attachments for the heads of nails, beads, rhinestones, and glitter in the form of a spray. The finished painting is placed in a frame made of wood, metal, plastic, cardboard, or other material. Additional parts made of paper, textiles, leather are secured with glue. The heads of the nails are sometimes painted to match the threads, less often - in a sharply contrasting color. Often used are jute “tassels”, satin ribbon bows, paper, dry (varnished) or polymer clay flowers, all kinds of rivets, “gifts of the forest”, such as acorns, pine cones, dry hawthorn, rowan, etc.
New Year's string art
On the eve of the holiday, string art for the New Year will be an excellent option for people who have tried, it would seem, all possible decorations. A thematic performance will give guests a truly magical mood on the night of December 31st; with a handicraft master class, the room where the feast will take place can be transformed before our eyes.
Owners of a cafe or bar will also find excellent logos and images for their establishment that match the style and decor. Oak with a cup of hot drink at the entrance will definitely interest potential customers, and revenue will only grow. There is no need to spend a lot of money on such mini-advertising, and the effect will be noticeable the next day.
Note!
How to properly make a birdhouse with your own hands from scrap materials: we create an original birdhouse according to sketches
- How to make candles with your own hands: instructions for making wax, gel, scented, homemade decorative candles with a wick
- What you can make from foamiran with your own hands: we create flowers, Christmas tree decorations, snowflakes, three-dimensional paintings (photo + video)
Master class for beginners
String art sometimes causes difficulties for beginners. Step-by-step instructions will help you avoid them. The simplest figures to make using the string art technique are: a car, a letter design and a fox.
Car
First of all, the base is selected. A small board measuring 15 x 20 cm will do; the corners can be rounded. The surface is sanded and covered with varnish or stain. Prepare threads, hammer, scissors, pliers, masking tape. All actions are performed step by step:
- A machine is drawn on a blank sheet of paper, or a ready-made stencil for string art is printed.
- In the picture, dots are placed at equal distances in the locations of the studs.
- The sheet is attached to the substrate with masking tape, and nails are nailed. After this, the picture is deleted.
- A thread is tied on the upper central nail, the tip is pulled diagonally, clings to the next element and further by analogy.
- When all the carnations have been processed, the thread is tied and cut.
In the same way you can make a heart, maple leaves, snowflakes and other pictures. By following the instructions exactly, you can achieve excellent results.
Print the stencil, place the dots in the places where the nails are located. Attach the picture to the base, drive in the nails, remove the template.
Tie a thread on the central nail to create a pattern
When finished, tie and cut the thread
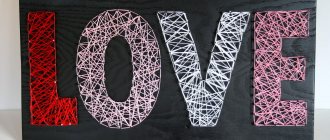
Letters
To work, you will need a standard set of tools and materials. The master class will help you make an original composition using the string art technique:
- The base is sanded and painted in the chosen color. A suitable word, catchphrase or logo is selected.
- Letters are printed or applied to paper.
- The template is attached to the central part of the substrate. Nails are driven in along the contour at equal distances from each other.
- The paper is removed. The thread is secured under the head of the stud and passed to another. This must be done until the elements are completely filled.
- The work is completed by fixing the thread and cutting off the ends.
Letters can be used as decor for photo shoots, themed wedding ceremonies or living spaces. When driving nails, it is recommended to place something under the base . This will protect the surface of furniture and floors from damage.
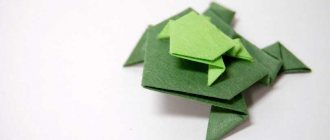
Fox
This cute fairy-tale animal, which is associated with cunning and ingenuity, will be an excellent decoration for your home interior. To make it using the string art method, you need to perform several manipulations:
- A board or piece of plywood of a suitable size is sanded and coated with paint and varnish.
- A drawing is selected. This can be a full fairy fox, its head or a geometric picture.
- The image is applied to the substrate and nailed along the contour with nails. The paper is removed.
- The space between the nails is filled with threads; several colors can be used.
The red fox will be an ideal decoration for a living room or children's room. You can make such a decorative element using the sting art method together with your children.
Paintings made using the string art technique look luxurious. They are suitable for decorating modern interiors and can be an ideal gift for loved ones. The work is useful for children, since string art develops fine motor skills, abstract thinking and a sense of beauty.
Prepare a board Select a design, attach it to the backing, remove the paper Fill the space with threads
Personal preferences
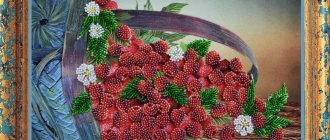
New Year's string art is, of course, good, but even on weekdays, lovers of creativity on the theme of plants can dilute their leisure time with good varieties of flower design. The created masterpiece will definitely not be found on store shelves. Only one owner in this city will have such a thing; exclusivity makes you proud of your own design in a similar style.
How to choose a pattern for a panel
For the first works, it is better to choose large single objects, placing them on the basis of A4 format. For your first job, you don't need to choose something complicated. It is easier and easier to master the technique using simple diagrams. For beginners, the most suitable would be something very simple, a circle or a polygon. After such training, you can make something more complex, for example, a heart or a Christmas tree.
Using threads of different colors for work, even in simple forms, you can achieve a volume effect. Panels with trees, flowers or plants look exceptionally decorative.
To develop a child’s creativity, it is worth choosing a drawing that depicts unusual, non-existent characters.
In this case, a tree trunk with skeletal branches is randomly marked, the location of small branches is outlined, and threads of various shades are selected. Work always starts from the bottom up.
Such string art may well become a decorative element in the setting, and periodic replacement of parts on the panel: fabric birds, flowers or fruits, New Year's decorations, will allow the work to correspond to the season.
Do something new
Drawings using isothread on nails are very popular; such models look quite modern and attract the attention of most connoisseurs of handicrafts. The impressive dimensions of the structures compel, admire, and arouse genuine interest in the technique of dot design; an increasing number of people are showing a desire to try their hand at it.
Such zeal is easy to explain, because the minimum effort spent on making crafts leads to stunning results, and the costs at this time are affordable for any working person.
Panel themes
You can use any variations in choosing the main theme. Here are a few of them:
The kitchen panel suggests:
- Wishing you a good day;
- Image of coffee or tea;
- Inscriptions with basic kitchen associations - tea, coffee, spices, etc.;
- Image of fruits and vegetables;
- Flowers and bouquets.
Panels in the living room and hallway suggest:
- Wishes for a good day;
- Inscriptions about a cozy home;
- Inscriptions with favorite cities;
- Pictures and inscriptions on general topics (sea, recreation, nature, hobbies, etc.).
Panels for the nursery suggest:
- Inscriptions and images with your favorite fairy-tale characters;
- Wishing you a good day and night;
- Optimistic quotes and wishes.
In addition, a DIY children's panel is a good way to slightly change the room of a fast-growing person whose interests change at the speed of light.
Peace in progress
The hustle and bustle of weekdays, all sorts of problems in a team or a bad mood in the evening can simply be dispelled by taking out string art pattern templates and starting to weave; manipulating the blanks has a calming effect and helps you relax. The use of these skills in therapy is proof of its beneficial effects on the psyche and positive effects.
Neglecting such simple and positive opportunities is in good shape, every day will be unwise, good habits will certainly come in handy in difficult times and will help out at the most opportune moment for this. It’s better to start the preparatory steps right away, and time to start will certainly appear.
Selection and preparation of a wooden base
It is permissible to use even rough, unsanded boards as a base, but most often the surface is thoroughly sanded with sandpaper. The most commonly used materials are decorative cork panels, plywood, multi-layer cardboard, and polystyrene foam. If desired, the surface is painted in a light or bright color and carefully covered with paper.
When the canvas is prepared, a drawing is placed on it, holes are pierced with an awl along the contours - nails are later driven into them. It is important to make punctures strictly at right angles - this way the studs will hold tighter. Before you start driving them in, place the board on a slight elevation so as not to accidentally nail it to the table. After applying the markings, the diagram is removed, if pieces of paper remain, they are removed with tweezers, and they begin to fill the picture with threads of a suitable color.
Photos of patterns for paintings made of nails and threads
Please repost
0