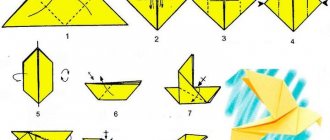
An origami paper tetrahedron is an effective and multifunctional decorative element. Depending on the model, it can serve as an interior pendant, Christmas tree decoration and part of a fashionable wall panel in the Scandinavian style. A tetrahedron is a tetrahedral pyramid with a triangle at its base. Most often, several such figures combined into a composition are used for decoration.
How to make three-dimensional geometric shapes from paper (diagrams, templates)?
Here are several schemes by which you can make three-dimensional geometric shapes.
The simplest one is a tetrahedron .
It will be a little more difficult to make an octahedron .
But this three-dimensional figure is a dodecahedron .
Another one is the icosahedron .
More details about making three-dimensional figures can be found here.
This is what three-dimensional figures look like when not assembled:
And this is what the finished ones look like:
You can make many original crafts from volumetric geometric shapes, including gift wrapping.
So that children can better remember what geometric shapes are and know what they are called, you can make three-dimensional geometric shapes . By the way, you can use them to make beautiful gift wrapping.
- thick paper or cardboard (preferably colored);
- ruler;
- pencil;
- scissors;
- glue (preferably PVA).
The most difficult thing is to develop and draw developments; you need at least basic knowledge of drawing. You can take ready-made scans and print them on a printer.
To keep the fold line straight and sharp, you can use a blunt needle and a metal ruler. When drawing a line, the needle must be bent strongly in the direction of movement, almost laying it on its side.
This is a development of a trihedral pyramid
This is a cube scan
This is the development of an octahedron (tetrahedral pyramid)
This is the development of a dodecahedron
This is the development of an icosahedron
Here you can find templates for more complex figures (Platonic Solids, Archimedean Solids, polyhedra, polyhedra, different types of pyramids and prisms, simple and oblique paper models).
By the way, to calculate the parameters of the pyramid, you can use this program.
By making three-dimensional figures from paper yourself, you can not only use them for entertainment, but also for learning.
For example, you can clearly show your child what a particular figure looks like and let him hold it in his hands.
Or you can print out diagrams with special symbols for training purposes.
So I suggest below that you familiarize yourself with the dodecahedron , both simple and with small drawings that will only attract the baby’s attention and make learning more fun and entertaining.
cube diagram can also be used to teach numbers.
pyramid diagram can help you learn the formulas that apply to a given figure.
In addition, I suggest you familiarize yourself with the diagram of the octahedron .
tetrahedron diagram will also help you learn colors.
As you understand, the above templates must be printed, cut out, bent along the lines, and glued along special narrow strips adjacent to selected sides.
Before you start making three-dimensional geometric shapes, you need to imagine (or know what it looks like) the figure in 3D dimension: how many faces does this or that figure have.
First you need to correctly draw a figure on paper along the edges that must be connected to each other. Each shape has edges that have a specific shape: square, triangle, rectangle, rhombus, hexagon, circle, etc.
It is very important that the length of the edges of the figure that will be connected to each other are the same length, so that no problems arise during the connection. If the figure consists of identical faces, I would suggest making a template while drawing and using this template. You can also download ready-made templates from the Internet, print them, bend them along the lines and connect (glue) them together.
Japanese invention
A real puzzle can be not only the cube itself, invented by the Japanese scientist Naoki Yoshimoto in 1971, but also the assembly of this unusual product. According to this scheme, you need to collect 48 pyramids.
You can clearly see how to correctly assemble this wonderful craft and its transformations in this video tutorial:
Pyramid - development. Pyramid development for gluing. Paper scans
Rectangle, square, triangle, trapezoid and others are geometric figures from the section of exact science. A pyramid is a polyhedron. The base of this figure is a polygon, and the side faces are triangles with a common vertex, or trapezoids. To fully represent and study any geometric object, mock-ups are made. They use a wide variety of materials from which the pyramid is made. The surface of a polyhedral figure, unfolded on a plane, is called its development. The method of converting flat objects into three-dimensional polyhedra and certain knowledge of geometry will help you create a layout. It is not easy to make developments from paper or cardboard. You will need the ability to make drawings to specified dimensions.
Modular triangle
For assembly, it is better to use a large A4 sheet, and then construct from small blanks. The aspect ratio for the module is 1:1.5.
- The sheet is folded in half horizontally, the middle line is smoothed vertically with your fingers, the ends are bent towards the central outline.
- The module turns over, the edges-ears rise up.
- You need to bend the side corners through the main part of the figure.
- The base is straightened, small triangles with raised edges are formed along the lines. The base is bent in half.
The resulting modules are equipped with a pair of corners and pockets, by combining which, inserting into each other in different ways, you can assemble a variety of three-dimensional products.
Defining parameters
First of all, let's determine what the pyramid will be like. The development of this figure is the basis for making a three-dimensional figure. Completing the work will require extreme precision. If the drawing is incorrect, it will be impossible to assemble a geometric figure. Let's say you need to make a model of a regular triangular pyramid.
Any geometric body has certain properties. This figure has a regular polygon as its base, and its vertex is projected into its center. An equilateral triangle was chosen as the base. This condition determines the name. The side edges of the pyramid are triangles, the number of which depends on the polyhedron chosen for the base. In this case there will be three of them. It is also important to know the dimensions of all the components that will make up the pyramid. Paper developments are made in accordance with all the data of the geometric figure. The parameters of the future model are agreed upon in advance. The choice of material used depends on these data.
Complex parallelepiped
A parallelepiped is a complex polyhedron figure with 6 faces and each of them is a parallelogram.
To make a parallelepiped using the origami technique, you need to draw a base - a parallelogram of any size. On each side, draw the sides - also parallelograms. Next, from any of the sides, draw a second base. Add places for gluing. A parallelepiped can be rectangular if all sides have right angles. Then cut out the development and glue it together. Ready!
How is a regular pyramid unfolded?
The basis of the model is a sheet of paper or cardboard. Work begins with a drawing of the pyramid. The figure is presented in expanded form. A flat image on paper corresponds to pre-selected dimensions and parameters. A regular pyramid has a regular polygon as its base and its height passes through its center. Let's start by making a simple model. In this case, it is a triangular pyramid. Determine the dimensions of the selected figure.
Interesting Facts
The tetrahedron is one of the most interesting, from a commercial point of view, Platonic solids. A fairly simple pyramid has been known to everyone since childhood. In Soviet times, milk, kefir and cream were sold in such triangular packages - tetropaks. It was believed that the pyramidal shape kept delicate produce fresh longer.
Triangular packaging is not a Soviet invention at all. In the 1930s, the French popular science magazine Science & Vie published an article about the mysterious properties of the Egyptian pyramids, where the bodies of the pharaohs did not deteriorate, but were mummified naturally. The theory was not supported by serious evidence, but the Swedish inventor Eric Wallenberg was so carried away by it that he created a mini-analog of ancient Egyptian tombs - the same Tetra Classic cardboard packaging. He wanted to reduce the losses of milk traders, but in reality he helped producers of disposable containers. His pyramids were produced quickly, in large volumes and with virtually no waste.
In 1950, AB Tetra Pak was founded on the basis of innovative technology. However, when it turned out that products in cardboard pyramids turn sour almost as quickly as in glass bottles, the Swedes lost interest in Wallenberg's idea. However, the production technology was sold to the Soviet leadership, focusing on its cost-effectiveness and efficiency. This is how the legendary “triangles” with the inscription “Milk” appeared on our shelves. To make transportation of tetrahedron bags no less profitable than production, special hexagonal containers were made for them.
Today, three-dimensional triangular bags (or rather, bags) have been adopted by Lipton. The manufacturer claims that it is replacing flat portion packaging with a bulk one to demonstrate the beauty of the tea leaf opening in the cup. And to show that the bags do not contain scraps and crumbs, as consumers suspect, but a full-fledged high-quality blend.
Development of a quadrangular pyramid
First, let's imagine what the geometric figure looks like, the model of which we will make. The base of the selected pyramid is a quadrangle. The side ribs are triangles. For work we use the same materials and devices as in the previous version. We draw the drawing on paper with a pencil. In the center of the sheet we draw a quadrilateral with the selected parameters.
We divide each side of the base in half. We draw a perpendicular, which will be the height of the triangular face. Using a compass solution equal to the length of the side face of the pyramid, we make notches on the perpendiculars, placing its leg at the top of the base. We connect both corners of one side of the base to the resulting point on the perpendicular. As a result, we get a square in the center of the drawing, on the edges of which triangles are drawn. To fix the model on the side faces, add auxiliary valves. For reliable fastening, a strip of centimeter width is enough. The pyramid is ready for assembly.
Step-by-step instructions for writing the “Treasured Triangle” letter
This technique can be used by: kindergarten teachers, teachers and parents. Triangles can be given to a veteran. It will serve as an exhibit at a crafts exhibition or be part of a military-themed wall newspaper.
By creating a greeting card, the younger generation gains skills in handling paper, scissors and glue. Children develop creativity and imagination. In addition, perseverance is acquired and a sense of patriotism is cultivated.
Materials
It is necessary to prepare in advance:
- Multi-colored sheets of paper.
- Scissors.
- Glue.
- St. George's ribbon.
- Plasticine.
- A tea bag or instant coffee.
Staying safe with scissors
- Never leave them open.
- Transfer only rings forward.
- Do not play under any circumstances.
- Use only as needed.
Rules for working with PVA glue
- Use a brush.
- Avoid collecting excess; what is unnecessary is removed with a paper napkin.
- Apply carefully in a thin layer.
- Avoid contact with clothing, face and eyes.
- Upon completion of the action, the tube is tightly closed and stored in a secluded place.
- Hands and the area where they worked are washed with soap.
When designing, for greater believability, they resort to different shades and “relief” in order to “age” the paper. The words that the author chose as a congratulation are printed out and blotted with a sponge on both sides. Next, coffee is sprinkled over the entire surface of the sheet, the grains of which are dissolved with a moistened piece of foam rubber. The sheet is left to dry.
To add a solemn moment to the message to dear participants of military events in the form of a triangle, it is not forbidden to decorate it by making a composition of the corresponding attributes. A certain length is measured from the St. George ribbon, then it is applied to the corner of the paper in the shape of a triangle, cut and glued. Daisies are cut out of white paper, the edges of which are folded with a pencil.
Leaves are formed from green paper with scissors. The stems are placed on the St. George ribbon, flowers and leaves are glued. The middle parts are decorated with yellow plasticine, which must be rolled into balls. To make them look impressive, they need to be pressed down a little.
As a complement, an inscription is included, similarly processed with a brewed tea bag. Soldiers always looked forward to such “triangles” as if they were cherished news from home, and then re-read them many times.
Construction of a drawing
The development of a truncated pyramid is performed in several stages. The side face of a truncated pyramid is a trapezoid, and the bases are similar polyhedra. Let's say these are squares. On a sheet of paper we draw a trapezoid with the given dimensions. We extend the sides of the resulting figure until they intersect. The result is an isosceles triangle. We measure its side with a compass. On a separate sheet of paper we construct a circle, the radius of which will be the measured distance.
The next stage is the construction of the side ribs that the truncated pyramid has. The sweep is performed inside the drawn circle. Using a compass, measure the lower base of the trapezoid. On the circle we mark five points that connect the lines to its center. We get four isosceles triangles. Using a compass, measure the side of the trapezoid drawn on a separate sheet. We put this distance on each side of the drawn triangles. We connect the resulting points. The side faces of the trapezoid are ready. All that remains is to draw the upper and lower bases of the pyramid. In this case, these are similar polyhedra - squares. We add squares to the upper and lower bases of the first trapezoid. The drawing shows all the parts that the pyramid has. The scan is almost ready. All that remains is to finish drawing the connecting valves on the sides of the smaller square and one of the faces of the trapezoids.
Paper model
Using 30 square sheets of paper (each side measures 7.5 cm), you can make a fairly sturdy version of one of the varieties of this geometric wonder without any gluing at all. If you have material of different colors in stock, you will get a bright and beautiful layout with multi-colored blocks. Instructions for making a stellated icosahedron step by step:
- Fold the sheet of paper in half and make a fold along the fold. If you are using origami paper, you should make sure that the front side is on the outside, as it will be visible later.
- Expand the square.
- Fold the right and left sides of the sheet so that they meet at the fold. You should end up with a rectangle, more like a closet with hinged doors.
- Turn the shape over with the folded edges facing down.
- Make a diagonal fold: the top right corner should meet the left side of the rectangle. You need to roll both “cabinet doors”.
- Turn the paper over so the straight end is facing up.
- Make another diagonal fold where the top right corner meets the layout side. You should get a parallelogram.
- Fold the sheet diagonally where the top corner corresponds to the right corner of the figure.
- Repeat the action on the other side. The bottom and left corners should meet. You will get a small square.
- Then rotate the workpiece so that the shape resembles a diamond.
- Fold the square in half, making a fold that runs perpendicular to the “cabinet doors” visible on the model. So, the first unit is ready.
In total, you need to make 30 such blocks. For example, 10 of different colors.
Development of geometric shapes
Large selection of developments of simple geometric shapes.
Children's first introduction to paper modeling always begins with simple geometric shapes such as cubes and pyramids. Not many people succeed in gluing a cube together the first time; sometimes it takes several days to make a truly even and flawless cube. More complex figures, a cylinder and a cone, require several times more effort than a simple cube. If you don’t know how to carefully glue geometric shapes, then it’s too early for you to take on complex models. Do it yourself and teach your children how to do these “basics” of modeling using ready-made patterns.
To begin with, I, of course, suggest learning how to glue a regular cube. The developments are made for two cubes, large and small. A small cube is a more complex figure because it is more difficult to glue than a large one.
So, let's begin! Download the developments of all the figures on five sheets and print them on thick paper. Before printing and gluing geometric shapes, be sure to read the article on how to choose paper and how to properly cut, bend and glue paper.
For better quality printing, I advise you to use the AutoCAD program, and I give you patterns for this program, and also read how to print from AutoCAD. Cut out the development of the cubes from the first sheet, be sure to draw a compass needle under the iron ruler along the fold lines so that the paper bends well. Now you can start gluing the cubes.
To save paper and just in case, I made several unfolds of a small cube, you never want to glue more than one cube together or something won’t work out the first time. Another simple figure is a pyramid, its development can be found on the second sheet. The ancient Egyptians built similar pyramids, although not made of paper and not so small in size
