Princess
In this master class we will make a doll from corrugated paper. This doll turns out to be very beautiful.
To create a pupa we will need:
- Corrugated paper;
- White paper napkins;
- Glue;
- Scissors;
- Ruler;
- Threads;
- Hair yarn;
- Wire;
- Satin ribbon.
Take corrugated paper of the color in which the dress will be. And cut a rectangle of 15 by 60 cm from it. Glue the sides together.
We rewind it with thread at one end and secure it with knots. You need to wrap about 5 cm. This is the underskirt.
Let's cut another similar piece measuring 15 by 60 cm. Glue the sides together and put the resulting piece on the first skirt. We rewind the thread on top and tie it. This is the second skirt. Thanks to the first skirt, the doll will stand well on its own. And the second skirt will make the dress fluffy.
Cut off the blank for the third skirt. Its width will also be 60 cm, and its height 10. Glue the sides of the skirt together and put it on in the same way as the second one. Secure with thread. You will get such a fluffy bottom of the dress.
Let's make breasts from white paper napkins. Cut or tear the napkin in half and form 2 tight balls and glue them as breasts.
For the hands you need floral wire 24 cm long. We wrap it with a napkin, cutting or tearing it into strips 2-3 cm wide. You can glue it with any glue: PVA, hot gun, regular paper, etc. The handles are ready.
Glue the hands to the top of the dress. Here it is better to take hot glue or “Moment”.
We form the head from white paper napkins, making a ball of the desired size. Then we cover this ball with one napkin and straighten out the folds. We tie the bottom with thread, that is, as if we were making a head out of fabric for a folk doll.
We attach the head to the body, covering the chest and back with the lower part. We cut off the excess. We glue the napkin or tie it with thread under the breast.
For the upper part of the dress, cut a couple of strips measuring 10 by 3 cm. And cover the chest with them, putting them on crosswise and tying them under the chest with thread. Excess ends can be trimmed off.
For the corset, we will also take a piece of 10 by 3 cm and cover the joints under the bust with it. Secure with glue and decorate with a satin ribbon.
All that's left is to do the hair. We wind the yarn for knitting and cut the ends. We tie the middle with the same thread. And glue it to the head. You can decorate your hair with a corrugated paper bow. Just cut off a small piece and tie it in the middle. We stretch the edges slightly. Glue the bow to the hair.
A beautiful and elegant doll made of corrugated paper is ready!
What will you need for work?
- Green and red corrugated paper;
- Scotch;
- Scissors, glue;
- For the head - cotton wool and a paper napkin;
- Threads for hanging toys;
- Moving eyes.
- Ballpoint pens with black and red ink.
I would like to warn you against using a felt-tip pen to create the appearance of a fairy. I initially drew eyes with it, but due to the structure of the napkin, and the cotton wool behind it, the felt-tip pen spread very much, making the eyes ugly. I had to glue moving eyes on top. But if you draw eyes in the form of dots and a smile with a pen, you will get a very sweet and gentle look of a fairy, even better than with purchased eyes.
Fairy
In this MK we suggest making a beautiful and delicate flower fairy doll from corrugated paper. This doll will decorate your home and give you a spring mood.
To create a pupa we will need:
- Corrugated paper;
- Napkins;
- Threads;
- Wire;
- Glue;
- Tape;
- Scissors;
- Ruler;
- Pencil.
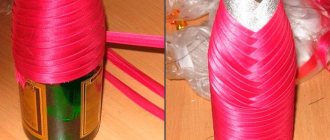
For the dress, cut pink paper 20 cm wide and 10 cm high. Fold it by one third. And we begin to stretch the fold so that waves form and the dress turns out lush.
We do this until the end of this piece of paper. You will get the base for the dress and it will begin to twist itself.
We twist the base into a flower. That is, we just fold the bottom part and we get such a beautiful flower in the end.
We secure the dress with thread to prevent it from unraveling. And we begin to make petals, since our fairy is a flower one.
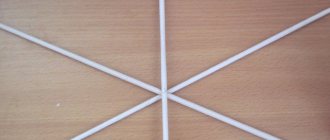
We cut out the petals in the form of droplets, approximately 4 cm high. And we twist the wide part of each petal with a pencil so that the petals have curved edges.
We attach the petals in a circle to the dress. You can do this with glue, or you can tie it with a thread.
This is such a beautiful floral dress for a fairy.
Chop small green leaves. Their height is approximately 2 cm.
We also place them around the circumference of the dress on top, securing them with glue or thread. But it’s better to use hot glue so that you don’t have to wait long for it to set.
To make the doll's head, take a regular white napkin. We crumple it into a ball and cover it with another napkin, forming a head without wrinkles. That is, we make the doll’s head according to the principle of the folk doll.
We tie the bottom with thread.
Take a piece of brown paper and start making cuts without reaching the end. The height of the paper depends on the desired hair length.
Now curl the ends of the hair with a pencil. And glue them in a circle to the head.
Take a smaller piece of paper and make cuts for the bangs. We glue it on top of the head to cover the void. The end result is a hairstyle like this.
For the hands you will need floral wire. We wrap it with a white napkin or corrugated paper, securing it with glue. We do both hands at once. We bend the workpiece in a semicircle.
We glue the finished hands onto the top of the dress.
Now cut off the excess from the bottom of the head, leaving about 1 cm of paper. And attach the head with glue.
We mask all the junctions of the arms and head with green tape.
Let's make a flower for the doll. Take a piece of corrugated paper to match the dress. Its width is 20 cm, height 4 cm. Let's bend it a little and make exactly the same, only small, flower that we made at the very beginning for the base of the dress.
We attach the flower to the wire and wrap its base and the entire wire with tape.
We give the flower to the doll.
The corrugated paper fairy doll is ready!
See also:
Paper flowers
Fairy made of wool
DIY dolls
In order not to forget the address of the page and share with friends, add it to your social networks: Do you want to know news about competitions or master classes?
Tags: DIY dolls, DIY flowers
Attention! It is better to write urgent questions in the comments on the website (form at the bottom of the page) or, better yet, directly by email. There are no notifications about comments from the VKontakte form! This form is more for feedback. 
Tools and materials Time: 1.5 hours • Difficulty: 5/10
Materials:
- 1 wooden bead with a diameter of 4 cm with a central hole;
- 2 pieces of wire with lint (pipe cleaner), each 29 cm long;
- a small ball of wool yarn;
- a small piece of lace 2 cm wide;
- 3 skeletonized leaves;
- 3 leaves of cotton fabric, cut according to the skeletonized leaf pattern;
- ready-made feather wings or 4 decorative feathers;
- 4 small ribbon flowers;
- white and black gouache paint.
Tools:
- glue and glue gun;
- brushes;
- scissors;
- a rectangle of thick cardboard measuring 12.5 x 10 cm.
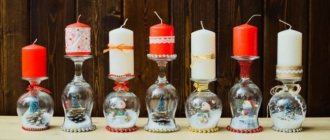
These adorable DIY fairy dolls can be made quite quickly. You can also involve children in the work.