Preparing for work
If you are a happy owner of hamsters, then, of course, you understand that a cramped cage is boring for fast and active animals. Rodent owners often ask questions: how to entertain their pets in a way that is both financially feasible and safe for the animal? How to make a maze for a hamster with your own hands so that the design is reliable and environmentally friendly? Everything is quite simple, just use the materials at hand and your own imagination. Then your pets won’t have to while away all their days in just one cage.
How to make a maze for a hamster from scrap materials
It is not necessary to buy everything to make a game in stores. Often craftsmen make do with what they have at hand.
From cardboard
Such labyrinths are made quickly. But they are short-lived, because the sharp teeth of rodents easily chew through barriers, and the joints themselves fall apart under their weight. However, this option is used as a temporary tunnel.
You can quickly build barriers from cardboard.
Manufacturing rules:
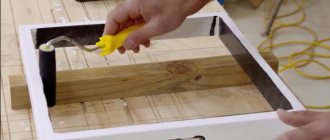
- Select a base box of sufficient size.
- They provide a design drawing with accurate calculations. The layout of the walls and transitions can be drawn with a pencil directly on the bottom of the box.
- Cut out the walls of the passages from sheets of cardboard with holes for transitions. To connect the corners of the structure, vertical cuts are made in the strips: on one half from the top, on the other from the bottom. By inserting one into the other at the places of the cuts, the parts are connected.
- They add rigidity to the structure with the help of overlays on the corners, which are secured with glue.
- The holes are located both near the floor and above.
- As you move through the labyrinth, bridges are installed for ascents and descents, and transitions are made from wooden school rulers or slats.
- The parts are connected with tape, strong threads, glued or screwed with wire.
- The bridges have sides for the safety of the pet.
- Some transitions, if the pet is small, are made from toilet paper rolls or towels.
The basic rule is that all parts must be firmly fixed so that the structure does not collapse during movement.
To play with your pet, do not cover the top of the box. If the animal cannot climb up a steep wall, then such a precaution is unnecessary. But it is better to remove predators from the room during the game - cats, dogs, ferrets. Let small children also watch the hamster from afar, without trying to grab it in their hands, otherwise the animal, after such stress, will never enter the tunnel.
From bottles
Only food bottles are used. It is better to take transparent dishes so that you can observe the animal during games and have time to come to its aid if necessary.
Bottles for the maze must be transparent.
Manufacturing rules:
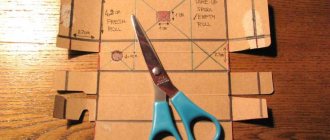
- The bottom and neck of the bottles are cut off, only the middle, which looks like a pipe, is used.
- Connecting L-shaped cuts are made along the edges with scissors.
- They build up the labyrinth by fastening bottles to one another.
- For angular turns, use a container with a bottom. A round hole is cut out near it, into which a pipe part is inserted.
- Connect the parts with tape.
- Inside the labyrinth, the joints are also glued so that the walls of the passage are smooth, without protrusions and burrs.
- The transition to another tunnel is made in a similar way, cutting holes in the pipe.
There can be one or several exits from the maze. It depends on the imagination of the master.
We should not forget about the holes in the walls of plastic bottles - air exchange inside the structure is necessary for the animal.
From a plastic constructor
Can be used to build Lego parts. Building such a maze for a hamster is simple and quick. Even small children can participate in the work. But it is necessary to check the strength of the connection of the parts before using the structure.
A plastic construction set is used for construction.
Plastic labyrinths are stronger than cardboard ones, so they will last longer. But you need to make sure that the rodent does not sharpen its teeth on the construction set parts. If you notice that the animal is chewing the toy too actively, it is better to replace it with another one.
From pipes
The remains of plumbing equipment are also suitable for building a playground for a rodent. The structure is made using the same algorithm as for making bottles. But here the process is simplified by the fact that there are connecting fittings and threads.
You can use pipes to make a play maze for your hamster.
Some parts of the maze must be made transparent in order to be able to observe the pet while playing. The presence of holes in the walls of the pipes for air exchange is a necessary condition for the master.
From books
You can use the covers of old textbooks that have served their purpose as scrap materials for building a labyrinth. They make strong partitions in a sports complex for rodents, as well as walkways for ascents and descents. It's easy to make a hole in the cardboard to move to another compartment.
The disadvantage of this design is its fragility. The rodent will definitely try to taste the toy, so you should not expect that the book maze will last a long time.
From fabric
Such a sports complex will also not last long. But you can use matter not to create a complete structure, but to perform only some suspended transitions.
If a maze made of cardboard or wood has arches located at some height above the floor, you can connect them with a piece of fabric stretched between the exits. Sagging under the weight of the animal, the matter will protect it from falling down. At the same time, in this position, sensing danger, the animal will not be distracted by gnawing on this miniature hammock.
You can make the entire move out of matter. To do this, you need to sew a sleeve from fabric, the ends of which are secured to rings. It is better to make such transitions also hinged.
Option #2 – natural constructor
Small stumps, round cuts and twigs left over from orchard trimming can also be used in the playground. They will serve as an excellent basis for creating a natural designer.
Your child will enjoy collecting neatly cleaned blocks and using them to build multi-level towers and tall castles
Young designers will be happy to build doll houses and reliable fortresses in the forest for soldiers to protect them from tree stumps, and children will build pyramids and multi-tiered structures from round cutouts.
Thinner twigs and fir cones can be adapted to the material to make puzzles in the grass or create geometric patterns
To protect children from scratches and chips when playing with natural material, each part must be thoroughly cleaned with sandpaper to remove chips and sharp edges.
Decorative material for the playground will also be useful: https://diz-cafe.com/dekor/podelki-dlya-detskoj-ploshhadki.html
Option #4 – music wall with xylophone
Sound instruments contribute to the development of children's musical and creative abilities, not to mention the joy that children bring to their home orchestra, organized through their efforts. By combining all kinds of “noise generators”, “rattles”, “rings” into one design, you can build a musical wall.
DIY acoustic instruments will allow your child to plunge into the wonderful world of sound in a new way.
To create a music wall you will need:
- empty cans;
- old cutlery.
- metal roof;
- plastic bottles;
In principle, any kitchen utensil can be used to create sounds. Plastic bottles can be easily adapted into rattles by filling them with old buttons or khaki seeds and apricots, then hanging them from a strong shield rope.
Recent entries. Lilac perennials are beautiful, compact, and do not crowd out other plants. Why don’t take the sellers’ word for it when buying seedlings and how to determine the age of a plant by 3 signs. Tomato seedlings turn purple or whitish: why the color has changed and how to save the plants
A few metal corners and old records hung on an old coat rack will ring a bell every time they touch each other.
To turn walnut shells into “rattles” and plastic caps into “rattles” will require a minimum of effort and skill
By varying the play modes, the child will explore sounds, creating musical images that are close to him and taking his first steps in performing music.
To create softer, but still good melodic sounds, you can even build a xylophone. The instrument externally resembles a small shield, consisting of up to twenty wooden plates connected to each other into a single scale.
The xylophone is assembled from 10-15 wooden blocks. The longest plate can reach 50-60 cm, and each subsequent plate should be 3-4 cm shorter than the previous one
To protect young players from cuts and scratches, each block is sanded down with sandpaper. For each “note,” mark the center with a marker. Moving 4-5 cm from the center in each direction, mark the points for the holes for attaching the rope. A rope is attached along the intended contour, securing it with nails or staples so that the distance between the planks is at least 1.5 cm.
When hanging a xylophone, pay attention to the angle of inclination - it largely determines the sound of the instrument.
Playing with sounds is a sure way to start improvisation, thanks to which a child successfully develops figurative-associative thinking
Such outdoor games will help develop imaginative perception of music, opening up wide opportunities for children to express their “I”.
Unusual games for children: master class
They can also be made from what you have on hand.
For this you will need:
- plastic bag with a zipper;
- rubber figures of fish, algae or pieces of plastic.
- transparent hair gel;
- glitter;
Creation Instructions:
- Use the clear plastic bag that pillows and other items come in. If you don't have one, you will need 2 strong envelopes, which you will insert inside each other, covering the hole at the top with masking tape.
- Pour the transparent gel into the prepared container, pour out the sparks, shake several times.
- If there are deep sea creatures made of rubber or similar waterproof material, place them inside. If not, cut them out of thin plastic.
- The child will be interested in working with such a toy, but do not pour the solution upward so that it does not penetrate through the top hole.
Using the same principle, you can create another unusual game.
For it you will need:
- plastic bag with a closure device;
- dried peas, beans or beans.
- colored electrical tape of different colors;
- scissors;
Cut strips of electrical tape and fold them, stick them on a plastic bag. Place peas or other large grains inside. The child will try to lead them to the makeshift gate, while he will gain the first mathematical skills and counting seeds.
Drawing up a composition plan
Developing a labyrinth diagram is an important and responsible task.
The future attractiveness of your area depends on this. Before you start designing a labyrinth, you should consider all the options for ready-made schemes. From them you can choose a more suitable and interesting option for you.
Methodology and procedure for preparing your work:
1) First of all, you need to choose the most suitable ornament for the site. When creating a maze for the first time, choose a simple spiral pattern to start with. In the future, gradually gaining experience, it will be possible to diversify the site with more complex models.
2) Think carefully about the design of the “heart of the labyrinth” - the central place of the site. A great idea for this is to install a fountain next to a bench or gazebo. An attractive sculpture would also look organic.
3) Choose the type of labyrinth based on your personal preferences regarding the appearance of the site and the availability of various finishing materials.
In modern landscape design, several types of labyrinths can be distinguished:
- Kumba;
— payment;
- fantasy;
- garden labyrinth.
To make the right and proper decision, you need to become familiar with each type of maze, and when choosing, pay attention to the following criteria:
- combination with other landscape forms already used in the neighboring area;
— size of the site area for the labyrinth;
- factory craftsmanship and construction work.
How much does it cost?
The cost depends on many parameters: on the configuration of the labyrinth you choose (height, area and content), its passability, as well as on the presence and type of decor.
Our managers can calculate a more accurate cost, since the figure is calculated individually for each labyrinth. We also have discounts, interest-free installments and a credit offer. You can find out more details from our managers.
Today there is a “ribbon labyrinth” in almost every major city. What is this attraction? If you believe the advertising promises, then this is a real source of positivity for children and adults. Let's try to figure out who will like this attraction.
Memory game
This game is played by 2 to 10 people. 16 cards were released. Every two cards have the same image. One person randomly lays out cards in a square, drawing them out, and the one who will play stands with his back turned. Rotate for exactly 5 seconds and try to memorize the images. It is turned over and the cards are turned over to the other side. Now he needs to turn over the cards and find the pairs within a minute. The winner is the one who guesses several pairs with the same figures. Postcards can be made from cardboard, and any design can be drawn.
PROJECT MYSHKO - sample testing
We used two mice as maze testers, which Martin, the rodent owner, fearlessly donated for this purpose.
Yes, Martin also has a cat living next to the mice at home. And here are our testers!
The mouse den is assembled and ready for testing.
Natural curiosity makes itself felt, and the brave explorer enters the hole.
The entrance bottle seems narrow at first glance, but the mouse can easily turn around in it.
The second tester decided to break the agreement and tried to leave the laboratory.
Meanwhile, our first, bravest mouse was already exploring the unusual hole with all his might.
It looks like he smelled the cheese we left in the feeding block.
Yes, the mission was successful.
But the research didn't end there.
The bottles turned out to be not as tasty as the cheese.
I couldn’t get through the neck, but it’s still interesting what’s on the other side.
As soon as the feeder was removed, a curious tester was right there.
By the way, the labyrinth can be disconnected from the cage, just don’t forget to close the front door
So the second mouse couldn’t resist the temptation to run around in a transparent hole and eat free cheese.
Having walked enough, the mice fell asleep peacefully, curled up together.
This concludes our positive experiment. We would like to thank Martin again for providing the mice to test the maze. Love our little brothers, take care of nature and always remain carefree children at heart. May the positive be with you
Option #3 – twister on the grass
Restless youth will appreciate the offer to play active twister. The main task of the game is to maintain balance by placing your feet and palms in circles drawn on the playing field at a certain distance from each other. The rules of the game are so simple that children learn them in a matter of minutes.
it’s hard not to laugh when trying to complete the leader’s task and reach your home circle with your foot or palm without burying your face in the grass
The beauty of playing Twister is that it's not just fun to play. It is very interesting and fun to watch from the side as the participants try to turn around, taking the pose indicated by the arrow.
In order not to worry about having to open a large canvas every time, the playing field for the twister can be built directly on the grass. To work you will need:
- string and pegs for marking the area;
- spray paint in 4 colors.
- round cardboard stencil;
- a series of strips of thick cardboard;
- 2 small diameter jars;
The playing field circles in a traditional twister set are painted in four colors: yellow, red, green and blue. If such shades are not available, you can use any other color you like. The main thing is that it contrasts with the grassy green background.
When choosing paint for applying circles, give preference to compositions based on latex, vinyl acrylic or water-based emulsion. They have bright and rich colors and do not pose a danger to children's health.
To organize the playing field, select a flat area 4x2.5 meters. Use pegs and string to mark the boundaries of the future field and mark 4 lines to place rows of colored circles. Then, dividing each line into 6 equal parts, mark points to place the colored circles. You should end up with a field consisting of 4 lines, each of which contains 6 circles of the same color.
To keep the colored circles with smooth edges and the playing field neat, use a stencil when coloring the “islands.”
Spray paint over the stencil, line by line on the board. As the paint dries, they begin to make a tape measure. It will indicate which position the player should take. It can be made from the same cardboard. But this can be done much easier. This will require 2 jars. They will have stripes:
- in the first jar there are strips of four corresponding colors;
- in the second - white stripes with the image of the right and left foot and, accordingly, the right and left palms.
During the game, the host simply takes a strip from the cans and, in turn, creates a “paired” task for each of the players.
An exciting game in nature will become a bright attribute of the recreation area and will easily turn an ordinary day into a fun holiday
: Top level
The top level should simply slide into position and should be easy to remove so you can prepare multiple moms of increasing difficulty to make this even more of a challenge! - Cut the bottom of the top tier to match the inside of the bottom tier. — Cut out the appropriate space for the rotor compartment. Leave a small lip so that the marble slides easily from the rotor blade to the top level (on the first try I had to glue this lip as an extra piece).. - Trim the edges of the top level to the desired height so that it extends above the lip of the bottom level so that it can be easy to lift. - At the end of the maze, cut a circle so that after completing the maze, the marble will fall to the bottom for storage and be picked up for a new game.
Outdoor games for children
They are also made from practically nothing. For the following you need to take:
- empty cans;
- strong branch.
- drill or nail with a hammer;
- rope;
- scissors or knife;
- 2 spears;
Step by step production:
- Sharpen the ends of the spears and stick them into the ground.
- Make two holes in the jars facing each other. If you have a drill, drill them with this tool; if not, then put the can on the block, insert a nail inside, and hit it with a hammer several times. You will have a hole of the desired diameter.
- Insert a lace into it and tie its ends.
- Hang the jars on the branch you want to attach to the ends of the spears, like a horizontal bar.
- Here children will throw balls. Let there be more points of contact with smaller diameter cans.
This kind of entertainment is good to organize on a hike, using jars that you carry with you, opening them with a ring so that their edges are not sharp. If there are no balloons, use a crumpled newspaper. These outdoor activities can be done with empty plastic bottles. Store them securely in the resulting cardboard box. Have kids throw rings at them during a shooting competition.
For the next unusual game you will need:
- two plastic containers with handles;
- small ball.
- two types of colored tape;
- knife;
Cut out the bottom of a plastic container; if desired, you can cover it with white acrylic paint. If not, immediately apply strips of electrical tape to the bottom of the bottles. Also, one of them will cover the clean cut, framing it on both sides. Now kids can throw a ball at each other and catch it with the help of these cool devices. Here are a few more outdoor activities you can think about using cans.
Color them. Let the child build a pyramid from this material, then the children will compete in accuracy, trying to climb into such a container using balls. If you make holes in this material, but throw a strong rope here closer to the bottom and fasten it well, then you can make such small stilts.
READ Earning money without investment
What should the design be?
When creating a gaming complex for your pet, you must adhere to several conditions.
Selection of materials
To make a labyrinth, durable materials are required that are resistant to the sharp teeth of a rodent. If in some places the animal managed to violate the integrity of the structure, the damaged part should be immediately replaced so that the animal does not get hurt, cannot escape, or fall out.
Use wood that does not have a paint coating. Not suitable for making PVP and chipboard structures. These materials contain binding additives, the entry of which into the digestive system of an animal can pose a risk of poisoning.
To make a labyrinth you need durable materials.
You can use glue, but you need to place such parts on the outside of the maze. Out of interest, the animal will try to taste what it sees, and the entry of inedible substances into the esophagus can be harmful to the hamster.
It is recommended to fasten the parts with a composition with a non-toxic base, odorless, and insoluble in water, because the labyrinth will need to be washed regularly.
Dimensions
The labyrinth is arranged in such a way that the animal does not feel cramped inside. You shouldn’t make holes into which he has to squeeze through with difficulty. The animal inside should move freely, even if it stands on its hind legs. It is better to make sure that the animal can turn around anywhere and run in the opposite direction.
Design complexity
When making a maze for a hamster, you need to take into account the physical condition of the pet.
Recommendations:
- Small animals and old people should not be offered too long corridors with difficult obstacles. If the animal fails to cope with the steep climb, it may fall and be injured.
- Mature animals can be offered more complex structures, with additional branches and passages, obstacles that he will need to climb over.
- It is necessary to make holes in the walls of the labyrinth to allow air to enter.
- The structure must be collapsible so that it can be cleaned regularly.
- There should be no protrusions inside the labyrinth so that the animal does not try to test the structure.
- It is important that there are no sharp points of nails or screws. Even small wounds on a pet’s body can lead to negative consequences.
- The entrance and exit of the device must be secured inside the cage so that the animal feels safe and does not have the opportunity to jump out. But the structure itself can be located outside so as not to clutter up the living space.
Hamsters should not be given an overly complex maze.
By following these rules, you can make a useful device to keep your pet in good physical shape.
Option #5 – stone cave of the “elves”
All children, without exception, love to spend time building various shelters. They can spend hours digging through the garden, using branches, blankets and curtains, and then decorating their home.
However, such buildings have one annoying drawback - if they inadvertently move during active games, they can literally collapse before our eyes. Take the initiative and offer to build a stronger home for troubled youth.
By building a fairytale elf house, you will give children their own space and give young dreamers the opportunity to develop their imagination
A fairytale cave-like house is easy and fun to build. It is better to choose a place for its placement in an open place that is clearly visible from all sides. Its surface is leveled and cleared of stones and plant roots.
To build an elven house you will need:
- a piece of oilcloth or transparent film 2.5 x 2.5 m thick;
- M300 concrete, sifted sand and water.
- reinforcing mesh;
- metal clamps;
- plastic tube d20 mm;
For work, you can use both metal and polypropylene reinforcing mesh.
From the materials you need to prepare:
- metal scissors;
- protective clothing, gloves and glasses.
- container for mixing the solution;
- plaster spatula;
- spray;
- insulating tape;
The prepared base is covered with a layer of tarpaulin. This will facilitate the subsequent process of cleaning from construction debris and falling pieces of hardened cement mixture.
Material on how to make original garden figurines from concrete will also be useful:
The first step is to build a circle for the base of the frame. To do this, cut a piece of pipe 5 meters long and connect the ends together.
The easiest way to form a circle is to cover the ends of the pipe from one end to the other with a connecting pipe of a smaller diameter, secure the adjacent edges by wrapping them with electrical tape
The vertical arches of the frame are erected from the same PVC pipe d20 mm. To do this, take 4 equal sections of 3.5 m each. Arches are formed from the sections, placing them at right angles to each other. The edges of each segment are attached to the base, evenly filling the spaces around the entire circumference.
Two horizontal beams are fixed on the vertical arches: the length of the lower one is 4.7 meters, the length of the upper one is 3.4 meters. The crossbars are placed on the outside of the frame, fixing them to the arches with electrical tape.
To form the walls of the cave, the finished frame is wrapped with reinforcing mesh. Metal ties will help ensure reliable fastening, which must be done across the entire floor every 250 mm. To create a more reliable structure, the mesh is applied in 2-3 layers.
Having marked the place for the door, cut off the excess part of the mesh with metal scissors and bend the edges. Using the same principle, a small window is made in front of the door.
The walls of the house are “mounted” from cement mortar, placed in a separate container, placed on a mesh grid and evenly distributed over a vertical surface
Apply the cement mixture only with protective latex gloves, the dense structure of which will protect delicate skin from “corrosion.”
When distributing the finished mixture over the grid, do not press hard, otherwise when pressed it will fall through the cells. To create strong walls, the solution is laid out in several layers, maintaining each subsequent time interval of 5-8 hours before application. Take your time at this stage. The painstaking process can take several days. If the plaster dries too quickly, wet the surface with water from a spray bottle or regular hose before applying each subsequent layer.
If the metal base begins to collapse under the weight of the plaster mixture, support the walls with wooden blocks until the solution hardens.
Spreading each layer of plaster and waiting until it acquires the necessary strength, you should use a plaster spatula to correct surface unevenness.
After applying the last layer, all that remains is to slightly level the walls of the cave, carefully cleaning out the defects, trying to preserve their natural appearance
Game - Labyrinth
I offer you “Game - Labyrinth”
“Made by the parents of my students.
Exciting game
which will appeal to both adults and children. Hover your mouse over the maze without dropping the ball!
A game
this is a wooden board. In the foreground there is a clear outline of a large tree; inside the tree there are many holes of different sizes. There is a dotted line between the holes. It starts at the tree trunk and ends at the top of the tree.
A mouse hangs at the base of a tree on two thin ropes. In the center there is a cavity with a small “golden” ball. The mouse must move the ball from the tree trunk along the dotted path. These strings must be pulled vertically, held with both hands
: up, then left, then right, then down a little so as not to fall into the hole, otherwise the ball will fall into the hole and roll to the base of the tree, and the mouse will have to start over.
In order for a mouse to climb to the top of a tree without loss, you must have a good eye, dexterity, and the ability to manipulate both hands at the same time
, persistence and patience.
With this game you can organize competitions and contests.
READ Ways to make money on the Internet
My children are happy with the game.
Many thanks to dad Maria Sheronova.
Related Posts:
Dear Colleagues! I bring to your attention the idea of making an educational game with your own hands. Description: Didactic game “Airplane.
Preschool play is the main activity of children. It permeates their entire life, promoting physical and mental health.
Goal: to create conditions for children’s cognitive interest, to develop attention, thinking, motor skills, and feelings. Didactic game.
Purpose of the game: Set the score within 10, including the number and number 0. Develop spatial relationships like points in this.
I bring to your attention the educational game “Transport”. You can make this yoke with your own hands. In kindergarten he is very small.
In March 2022, an exhibition-competition “Do-it-yourself educational game” was organized and held in our preschool educational institution. We set the goal of the competition.
Summary of GCD using ICT “Playing darts with your own hands” Purpose: to create attributes for the game “Darts” from unformatted material. Objectives: 1) consolidate children’s knowledge about winter sports; 2).
What are the advantages of street labyrinths?
This kind of business pays off quickly.
In just one season you will get your investment back. The main condition is to install the labyrinth in a high-traffic area where many parents walk with their children. An excellent place for such an attraction would be family parks, places near childcare centers, areas near shopping centers, beaches, residential areas where many families with children live. There is no need to spend large sums on promoting a street labyrinth - it literally sells itself. Children, seeing a beautiful labyrinth, will ask their parents to take them there, and their parents will happily agree. Very often, parents, seeing a street labyrinth, themselves invite their children to play in it, since the children will splash out their energy in the fresh air, and the parents themselves will be able to relax at this time.
How are outdoor labyrinths different from indoor labyrinths?
There are no fundamental differences in design.
And you can choose a street labyrinth for yourself from the general catalog of labyrinths on the OtAdoYa website:. But it is worth remembering that street labyrinths must be protected from the effects of weather conditions. Therefore, street labyrinths are often placed under a canopy, awning, or their design includes a roof and walls that protect the attraction from the vagaries of nature. Rain and direct sunlight can visually deteriorate the condition of your maze, and moisture creates an additional risk of injury by making the obstacles wet and slippery. Also, street labyrinths are more demanding in terms of compliance with hygiene standards - you need to monitor the cleanliness of the complex more carefully.
Creating Attractive Paths and Labyrinth Design Features
When creating attractive paths, there are a few specific rules that need to be followed at the design stage:
1) You may prefer more winding shapes when designing a labyrinth.
2) If you still give preference to the classics and clearly verified geometry of all figures, then make the paths rectilinear with the same width along the entire length of this labyrinth.
3) When choosing a material, consider the following nuances:
— the paths will look interesting if they are made of wooden cuts. They will emphasize the beauty and originality of the entire incredible landscape;
— paths strewn with gravel or small pebbles will look more natural;
— excellent options for creating a pedestrian area of considerable width are artificial materials (clinker brick or concrete), as well as large natural slabs.
When designing a labyrinth, the amount of work will be different and depends on the scale of the territory for the labyrinth and the specific type already selected, but still the sequence of stages of this work will remain unchanged:
1) First of all, separate the area to create the labyrinth.
2) Delimit a certain area for the labyrinth using pegs and rope, based on the lines of the selected pattern.
3) Gently and carefully remove the turf from the entire area.
4) Dig up the entire area.
5) Use a rake to level the ground.
6) Beautifully decorate the walking area using selected materials.
7) Following the project with precision, plant plants and lay out stones.
The removed parts of the turf can be laid on free areas.
9) Lightly compact it to ensure the integrity of the soil cover.
And in conclusion, I would like to note that even despite the difficulties in creating a labyrinth, its attractiveness and originality, if properly designed, will constantly delight your eyes and your guests. If you nevertheless make the decision to arrange your own plot in this way, perform all the required work very carefully and accurately, so as not to be disappointed with the result obtained upon completion of the project. Start with the simplest forms, without trying to immediately complete some complex task, and in the future you will successfully expand your own space.
: Lower Level Marble Storage
I decided to go with a 7 1/2” square shape on the side. Cut a square of the desired size from the bottom. From the bottom sides, measure the diameter of the marble and add about 1/8 inch for clearance. Add the thickness of the cardboard and then at least another 1/2 inch for the lips that will hold the top level. Trim the sides to the desired length and glue them in place. I used hot glue, but I later found out that crazy glue works better. Top layer support. Glue the entire inside of the bottom layer. Line a strip of cardboard with the diameter of the marble plus the height of 1/8”. Reinforce the corners with an additional layer. This will give your top level a solid foundation.