During the New Year holidays, themed children's costumes become especially popular, but stores, as a rule, offer identical options that do not always meet our expectations.
And if you want your child to surprise everyone during a matinee or New Year's Eve celebration, you will have to spend time on sewing yourself to create a bright and stylish outfit.
A snowflake is one of the most relevant New Year's images for girls, but creating it is not always easy, since a dress or suit must be lush and airy. But there are still several options, and we are ready to share with you modern ideas for a DIY snowflake costume for a girl.
DIY snowflake costume for a girl, photo
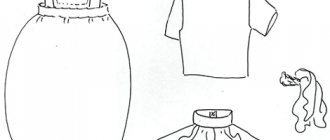
Tulle suit (tu-tu skirt)
Tutu skirt + T-shirt or jacket
- Making a tutu skirt without sewing from tulle is described in detail in this article with video tutorials and photos.
Video tutorial on creating a tulle skirt
Then we decorate the skirt with New Year's toys and plastic snowflakes. We sew tinsel or any other green material onto a T-shirt in the shape of a triangle, a Christmas tree.
We decorate the Christmas tree on the blouse with toys and a star on the top of the head.
Video about making a Christmas tree from a narrow ribbon and beads to decorate a T-shirt
The T-shirt is replaced with a turtleneck or any other suitable sweater.
What to wear on your feet?
As shoes for your baby, you can use shoes, sandals or slippers for sports and dancing. Don't buy high-heeled shoes for a little girl, no matter how elegant they look . It is better to choose shoes with flat soles or 1-2 cm platforms.
You can decorate white shoes or slippers yourself. To do this, you can use fur pompoms, silver rain or tinsel, snowflakes made of tulle, ribbons or lace. Sandals are usually already decorated with beautiful elements, so you shouldn’t overload the look.
Herringbone hairstyle
Braid across the head and you have a Christmas tree, and for those with hair below the shoulders, we recommend taking a look at the hairstyle with a “skeleton” braid, beautifully decorated with Christmas tree decorations, you get a real Christmas tree.
A variant of several tall bagels with a backcomb will turn your hair into a Christmas tree.
Braids and ribbons will make both horizontal and vertical ribbons. Red and green contrast and help achieve the desired effect.
Video on how to create a herringbone hairstyle
Video on how to do a herringbone hairstyle on medium length hair?
Video on creating a Christmas tree on short hair with a ribbon
Training video on how to make a lace-up Christmas tree with 2 braids for medium-length and long hair
Tights, socks, knee socks
White tights or knee socks or socks look very festive, but if you don’t have them, try using those that are available. Supplement them with tinsel or figure out how to divert attention from them, for example, slightly lengthen the dress.
The ruffles in a herringbone dress are a great focal point to make the dress as long as you like.
If you want to add more sparkle, add rhinestones to your tights or knee socks.
Video on how to decorate tights with rhinestones
Block three - headdress
One of the most important parts of a herringbone costume is the headdress. Here are a few examples from which you can choose a suitable addition to your homemade outfit.
- Rain cap. This option is the simplest. Any hat should be tightly covered with rain and decorated with snowflakes or pieces of cotton wool. A crocheted hat is ideal, as it is very easy to attach decorations to it.
- Veil. Everything is simple here too. You will need organza or tulle. A long, narrow piece is gathered from one edge and attached to the hair with ordinary invisible pins. In the central part on top you can attach the same rain or make a lush bow from organza.
If you don’t know what to give your brother for New Year, we’ll help you with advice. Well, in this article - options for gifts for your sister. Here: https://banquettes.ru/calendar/novyiy-god-31/podarki-ng/chto-mozhno-devushke-v-chest.html - a list of what you can give a girl for the New Year.
- Cap. The easiest way is to make it from ordinary cardboard and attach a thin elastic band so that it stays well on your head. If you wish, you can glue any suitable fabric on top of the cardboard. It is better, of course, to use the same material from which the outfit itself is made.
- Felt. A simple Panama hat with a pointed top is sewn from felt and decorated like the entire suit. You can even use pieces of different shades of green, then it will be much more interesting.
- Star. Probably every girl has a regular hair hoop. If you wrap it with rain and attach a traditional Christmas tree decoration - a star - on top, you will get a very simple and wonderful headdress.
If you spend a little time making a simple costume, then your child will be very grateful to you for the holiday gift. In the next video you will find a short instruction on how to make a New Year's Christmas tree costume for a girl, without using any specific patterns https://www.youtube.com/watch?v=0OolKluA4uQ
Headband or crown, magic wand
To completely complete the snowflake look, make a crown or headband for your little princess, which you also decorate with snowflakes. You can use white hairpins and bows embroidered with sequins.
Your little “snowflake” can even have a magic wand if you wish - just glue a thick snowflake cut from cardboard or other material onto a wand up to 30 cm long.
Christmas tree costume for a girl with a fluffy tutu skirt: patterns for girls 3 – 6 years old
It will be convenient for your little one in kindergarten to dance in circles and play with Santa Claus in a Christmas tree costume, which consists of a decorated T-shirt and a fluffy tutu skirt.
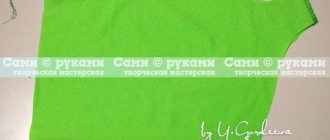
- For a suit, take a white or green T-shirt, preferably with sleeves - lanterns.
- Rain sleeves are sewn onto the sleeves.
- On the bodice, a Christmas tree with a top is made from rain or strips of tulle; toys on it can be made from colored buttons, for example.
Herringbone suit with tutu skirt and white t-shirt.
Herringbone suit with tutu skirt and green t-shirt.
You can read about how to sew the most difficult part of a costume, a tutu skirt, in the article: “How to sew a tutu skirt for adult women, girls, for a girl and a newborn baby? DIY tutu skirts made of tulle, organza and chiffon.”
How to sew a New Year's snowflake costume
sew a New Year's costume for a girl with your own hands. Even today, when there are a huge number of beautiful snowflake and carnival costumes in stores for celebrating the New Year, self-sewing is important.
I went shopping looking for an outfit for my three year old. Maybe it’s still early, or maybe this is the trend. But I really liked the white fluffy snowflake dress , and it costs 1500 rubles. I almost bought it, but several “Buts” stopped me.
DIY Christmas tree costume cape
In winter, when New Year's matinees are held, it can be cool in the music halls of kindergartens. A girl in a Christmas tree costume will not freeze if she has a cape. This element of clothing will also add volume and splendor to the forest beauty’s dress.
Popular articles DIY phone case
For the cape you will need:
- fabric - satin, corduroy, other fabric from which the Christmas tree dress itself is sewn
- braid
- tinsel
- fur pom poms
- satin ribbons
- New Year's decor
- scissors, thread, needles
- centimeter, chalk, ruler, pencil
Cape pattern.
- The cape pattern is made taking into account two sizes: the length of the product and the circumference of the child’s neck.
- Transfer the pattern to the fabric and outline it.
- The cape is cut out, its edges are folded over with braid and tinsel.
- Satin ribbons - ties - are sewn onto the collar. Their ends can be decorated with pompoms.
- Decorate the cape at your discretion to match the style of the Christmas tree dress.
Cape for herringbone costume.
Option for a thick cape for a herringbone costume.
Choosing decorations
Decorating a snowflake costume for a matinee is considered an equally important step. Consider which details will be sewn directly onto the outfit, and which will be used as separate accessories.
For example, a DIY snowflake costume for a girl for the New Year can be decorated with beads, sequins or rain, sewn in the form of a snowflake pattern in the center of the front part. Small snowflakes can also be placed on the sleeves or skirt.
Advice:
If your New Year's outfit has a belt, you can decorate it with sewn or glued snowflakes made of cardboard, felt or other materials that retain their shape.
You can complement your holiday costume with shiny bracelets, bright hair clips, and pendants with snowflakes. You can make a lush hair bow from tulle or faux fur, which will be associated with snow, so it will become a harmonious addition to the image.
With your own hands you can make a stylish decoration based on the most ordinary hoop. For example, it can be wrapped with white or blue ribbons, lush rain, decorated with homemade snowflakes cut from scrap materials, or a bow that suits the style.
A kokoshnik, a hat decorated with beads or beads, a homemade photo, and a crown with rhinestones will also go well with the snowflake dress. The lower part of the outfit will be complemented by snow-white tights or knee socks. You can spend more time and look for these clothing items with snowflake patterns.
Numerous master classes on creating snowflakes deserve special attention. For example, such accessories can be created using a glue gun, with which you apply glue to a prepared stencil of the shape you need. After the glue has dried, all you have to do is cover the craft with acrylic paint or varnish, and decorate it with beads and sparkles.
The next option involves knitting snowflakes with your own hands. If you are familiar with knitting techniques, this process will take very little time, since the costume will need small snowflakes. By the way, thanks to the presence of openings in knitted snowflakes, you can pass them through a thin belt, beads or ribbons. So attaching snowflakes to your costume will not be difficult.
Advice:
To give the knitted snowflakes a stable shape, use PVA glue.
It is applied to the inner layer of the craft if you just need to ensure the durability of the craft, or to the outer layer if you plan to cover the knitted product with additional decor (for example, rhinestones).
You can surprise everyone with a homemade outfit if you transform some elements of the costume with the help of three-dimensional snowflakes. They can be made using the bottoms of plastic bottles. Cut out the desired part of the container, trim the edges so as not to injure the child - and decorate with beads, ribbons, sparkles or regular paints.
If the outfit consists of a fluffy dress or skirt, let the girl feel like a princess: make her a real magic wand using a pencil, a branch, a knitting needle or other suitable shaped part wrapped in ribbons for the base. Decorate the wand with rain and tinsel, and attach a large snowflake to the edge.
What else can complement the outfit? For example, a cape or fur coat. It is advisable to use the same material as for the main suit, or choose a fabric of a similar texture and shade.
In the photo you can see one example of such a cape: a semicircular piece of fabric cut out from a pattern should be sewn on a machine, decorated with ribbons along the edges - and decorated with snowflakes sewn or glued to the surface.
Don’t forget about gloves, because a snowflake is a winter look that is associated with cold. Sew them from light fabric so that the child does not feel hot during the morning party.
It is not for nothing that the snowflake costume is considered one of the most successful images of the New Year holidays, because it not only emphasizes the tenderness of the girl’s image, but also fits into the fabulous winter atmosphere.
We recommend that you spend more time and come up with your own outfit with special details and decorations: this way you will be sure that no one will come with a similar suit. Well, you can adopt some ideas from the sewing methods we suggested, as well as from educational videos of do-it-yourself snowflake costumes for girls:
Quote from the message Hugo_Pugo_crafts
HOW TO MAKE A SNOWFLAKE COSTUME
At first I’ll get a little distracted, otherwise I’ll just forget this thought. I am a fan of both educational sites for children and computer games that allow you to spend time with your child. Therefore, I’m giving a “tip” to the site ( igrywinks.ru
), which provides the most popular ones. Most of the games are for older children, but I also found something to do with my three-year-old daughter. Maybe you will find something interesting for yourself and your daughter.
Let me note right away that we had a number of restrictions on the choice of costume. In particular, girls this year had to be only snowflakes
, and we were asked to design the costumes as much as possible
with our own hands and together with the children
(unfortunately, the daughter’s help was minimal, such as cutting threads for a needle). They said that heroes of foreign films and cartoons, as well as completely purchased costumes without the manual labor of parents and children, are not welcome.
I like this approach, although there were mothers who were angry at the proposal to do something with their own hands and, since the ban on purchased costumes was not strict, they brought their daughters to the matinee in multi-colored ball gowns (but these are isolated cases). There were also parent fans who made everything for the New Year's snowflake costume themselves. I found myself in the middle and present the result of my creativity - by the way, it turned out to be quite low-budget.
The dress - 300 rubles at the nearest market - was originally intended to be worn once for a matinee, so they did not look for the most expensive and first-class model. I just needed a white base. Tinsel similar to snow (3 pieces) for 90 rubles = 270 Volumetric snowflake (split into 3 parts) - 50 rubles. The hairband is very soft, loosely covering the head (this is how it should be) - 30 rubles. Thread, tape, needle, scissors, hair clips, super glue, small silver plastic Christmas tree balls, white hair tie and so on.
Total 650 rub.
Please, here is a photo of the starting dress.
Since the dress had to be decorated with tinsel, I understood that it would hide all possible flaws in the cut and seams. Therefore, the dress was adjusted to size in a few minutes by basting. I made pintucks, reducing the neckline (so that the T-shirt and T-shirt would not peek out from under the dress - I had to wear them, since it was cold in the music hall, and I didn’t want to spoil the outfit with a jacket), I also sewed in the width of the shoulders and the edge of the sleeves (my daughter, well, is too petite and everything hung on it like a sack). The dress also had a “belt” that tied at the back. What I don’t like about these types of dresses is that when you tie the belt, all the beautiful folds move back, the dress warps and sits untidy, and the tummy gets tight and bulges out. Therefore, I also basted the tucks on the front of the dress in the waist area. Now the folds on the skirt are located evenly on all sides of the body.
Next, we move on to the most labor-intensive stage - sheathing with tinsel. This must be done responsibly and relatively firmly and often, so that the child does not inadvertently tear off the tinsel. Here I advise you to do as I do - do not sew tinsel along the very edge of the neckline, sleeve and hem, since the tinsel with its fringe irritates the child’s skin, causing unpleasant sensations and making him nervous. Since the “pile” of my tinsel was long, I stepped back from the edge by 3-5 cm.
Then I attached a purchased plastic snowflake to the chest of the dress with threads.
The dress is ready, the next photo shows the result.
Of course, the hair also needed to be decorated with something to look like a snowflake. The simplest option seemed to me to be with a headband, which I simply wrapped with the same tinsel. At the beginning of the winding and at the end I secured the ends with tape, and in the center with a thread and a needle I secured a voluminous plastic snowflake (one of its parts) - remember, I wrote that I bought a snowflake and split it into three parts. Tinsel perfectly hides all the imperfections of the fastening.
Next, an important point that needs to be thought through is how a three-year-old child will wear this decoration on his head for an hour while the matinee lasts, and at the same time jump, dance, and participate in games. My daughter is unable to withstand the sliding headband and takes it off for five minutes. Therefore, for the matinee, a “hairstyle” was conceived - ponytails, maybe braids, the main thing is that the hair in the area of the headband was firmly pressed to the head and taut. Then we put on the headband and secure it with 3-4 clips, threading them under the stretched hair. Separately, about the clips - these are the remnants of obscenely aged hairpins, from which all the decoration was previously torn off. The tinsel on the rim completely hid them.
I also wanted to decorate the ears, but we remove the clips a couple of minutes after putting them on. Therefore, I sewed the Snowflake “earrings” to the headband - I simply attached it with thread. These are balls - Christmas tree decorations “snow-covered” with tinsel using instant glue. Here there was a problem - I missed the long thread and the earrings did not hang merrily swaying in space, but almost lay on the shoulders.
And here is a photograph of what I have been describing for so long.
Let's go lower and move on to decorating the wrist. To do this, I took a white hair elastic and attached tinsel and a plastic snowflake, its last broken-off part, with threads. The elastic band is chosen so that it does not squeeze the hand. As you can see in the photo, behind the tinsel, you can’t see the gum at all.
We didn’t have any white shoes, so we lightly made up the existing pink dress ones. Everything is also done using threads and a needle.
That's all. The resulting costume looks quite snowy, but at the same time does not resemble a snowdrift, and is also well made and a little Soviet, which I am very pleased with. By the way, no one suspected how low the price of the dress was - the mothers discussed who spent how much on the outfits.
At the same time, I was amazed at how much delight the dress caused my daughter - several days have passed since the matinee, and we are still running around the house in it. Tomorrow, perhaps we’ll go to kindergarten in it, and there we’ll pour some borscht on it. But I'm already ready for this.
And now a tip about decorating our houses with snowflakes for the New Year...
I suspect that most (I mean those who planned this in advance) have apartments and offices already decorated and languishing in anticipation of the holiday. So I want to please those who, in the last pre-holiday days, are going to turn their home or place of work into a fairy tale - awaits you, which is created not only by folding and cutting a piece of paper, but also by simply folding the resulting cuts. In general, follow the link and learn how to make original snowflakes to decorate your windows, walls and other spaces. By the way, you can make these snowflakes together with your children, getting pleasant family communication!
And this is my Thumbelina again with a girl from her group.
Before the New Year holidays there is always a lot of bustle and preparation. As a rule, they start a week earlier, because all kindergartens traditionally hold New Year's parties. The snowflake dress has always been one of the most popular among girls. Every young fashionista wants to wear a snowflake costume to a matinee and be the most beautiful. If you didn’t have time to purchase a ready-made dress in advance or just want to make a snowflake costume for your daughter with your own hands, you will need a little fabric and just one evening.
What if you don’t have time to sew a dress?
To create a Christmas tree costume, you can use a simple green dress or T-shirt, as well as a matching skirt and tights. But this outfit needs to be improved:
- Tinsel is suitable (it is advisable to choose one color), which can be sewn along the edge of a dress or skirt. It is appropriate to use Christmas tree decorative garlands, small bows and plastic toys.
- The simplest solution for decorating your head would be various headbands with bright figures.
- You can wear any shoes or slippers on your feet.
It wouldn’t hurt to ask the child himself what he would like his costume to look like: children often have really interesting and creative ideas. And a costume made according to the wishes of the “customer” will delight its little owner even more.
Unusual interpretations of costume
A simple outfit option with a tulle tutu is a great solution for those who don’t like or don’t want to bother with a sewing machine. If you love and know how to sew, you can choose a more complicated option, but also much more original. I propose to evaluate several worthwhile ideas below.
Has your little one watched the cartoon “Frozen” dozens of times, sincerely worrying about the heroines Elsa and Anna? For the New Year, then it’s worth trying to “tailor” the snowflake costume to the outfits of these particular characters.
Beautiful snowflake wings behind your back can be easily made from ready-made decorations that can be bought at any New Year's toy store. The costume itself is a pale blue dress with a short jacket to match. The length of the dress is at your discretion. In the picture it is short, but if you want it exactly like in the cartoon, sew a floor-length dress.
An interesting unisex option - without a skirt. It is based on a knitted or fur bodysuit, muff and hat. Children under 5 years old look touching in this outfit.
How to decorate Czech shoes for the New Year with your own hands?
We decorate shoes or any other shoes with tinsel, fluff or leftover fabric. Sew mini shoe covers without soles with elastic bands, add decorations like on a dress, skirt or hat.
The second option for decorating shoes is to attach stencils cut from leather or fabric to the front.
A bow in red and green tones is an ideal combination, which we play up both in the hairstyle by weaving ribbons or a hoop and on the dress itself, choosing red Christmas tree toys for decoration.
A chic option is to glue half beads in a circle and add an organza flower. Glue the half beads using glue second and a pencil.
Decorate a dress or top
You can’t do without their image on the dress; decorate only a skirt or top with them, making a beautiful decoration on the belt in the form of one large snowflake.
We embroider the belt with ready-made snowflakes; templates in different colors are sold in sewing stores. Embroider the entire costume with these snowflakes, which will allow you to avoid using a large amount of tinsel and make the process of working on the dress easier.
Allow your future snowflake to take part in the creation of your holiday dress, let her weave snowflakes from rubber bands into decorations for her dress, or make her own bracelet and earrings using ready-made photos and videos.
Don't worry that it's too difficult, detailed instructions will help even a beginner, and step-by-step photos will clarify every movement. Since there are several snowflakes, you can choose a simpler option, and move on to complex ones after creating simple ones.
This will allow your daughter to create a set of earrings and jewelry for her neck, arm, and possibly for her belt, dress, and headband. Click on the link or picture and go to the instructions.
There are no snowflakes for decoration, what should I do?
You will need: PVA glue, a snowflake template, a file and glitter.
- Place a file on the sheet with printed snowflakes or attach it and secure with paper clips.
- Apply a thin layer through a small hole or using a syringe and a needle to create a snowflake design.
- Sprinkle generously with glitter or glitter on top.
- Let dry for -1 day.
- Remove from the file and the snowflake is ready.
- Sew onto a dress or base for a crown.
We sew a beautiful light blouse and cape for the Christmas tree with our own hands
We cut 2 parts from satin or silk. Measurements and shape in the photo. We cut and sew, the straps and neckline are made of velcro. We decorate it with swan down or similar, rain will do.
What to do if you only have a white T-shirt or blouse?
Buy: a sheet of felt and multi-colored small balls at any store, and also a star embroidered with sequins.
You will need: scissors, thread and needles.
We draw a Christmas tree on felt, cut it out and try it on clothes. You can lightly baste it, and then remove it and use it for another costume next year.
We sew or glue small multi-colored balls onto the Christmas tree, and a star on the top; we recommend choosing a red one.
This simple trick will allow you to turn any costume into a Christmas tree, all you have to do is add greenery to the skirt and decoration on the head.
And if you want to get ready in advance and make your daughter wear a mega exclusive dress at the matinee, then take the hook in your hands.
Crochet Christmas tree dress
A spectacular crocheted dress is also suitable for a matinee in the garden, if the threads chosen are cotton, and in a palace of culture, but then you will need a cape or a white turtleneck underneath.
We sew in 1 evening quickly and beautifully according to step-by-step instructions
For mothers of needlewomen who have been friends with the machine for a long time, the following idea and instructions from the author Tatus.
You will need:
tulle in 2 shades of white with polka dots and blue, white taffeta for the dress, silver and white threads, white elastic band, Velcro for the headband 2 cm, bead for the headband, zipper for the fastener.
The main uniqueness of this dress is that the tulle skirt itself, like the sleeves, are put on separately; you decide whether to sew them on or not. The sleeves are an analogue of a 2-layer skirt, assembled with a linen elastic band in 2 layers, only on lanterns, elastic on 2 sides, top and bottom.
Instructions:
- Cut out and sew a dress from an existing one, or take a white T-shirt.
- To cut out a tulle skirt, measure the volume of the abdomen and take a piece 2 times longer to create folds. The height of each layer is approximately 16 cm and 19 cm, leaving 3 cm for the hem under the elastic. The thinner the fabric, the more it is needed, for example, chiffon or tulle, we recommend choosing 1.5 - 2 m.
- We sew it like this: sew the side seams. Fold them on top of each other and bend them 3 cm, and stitch them 2 cm away from the fold so that your elastic fits without creases. The skirt is ready, try it on.
- We sew the sleeves with lanterns in the same way, only we insert elastic on both sides. You will also get them in two layers. When finished, their height is about 10 cm. The width of the sleeve is taken based on the volume of the child’s arm in the armpit area.
- For the bandage, we recommend using a ready-made white bandage or knitted fabric, then a particularly precise fit is not needed, the fabric stretches perfectly. Measure the volume of the child's head, take into account seam allowances of 1 cm and fasteners of 2-3 cm. If you use knitted fabric, then a fastener is not needed.
- We collect the whole suit and put it on. If desired, the sleeves and skirt can be worn directly to the matinee or immediately.
Video on making a snowflake costume for kids.
Costume for very young children
A spectacular crocheted crown will become an accent and highlight in a snowflake costume, and detailed master classes with videos and photos are available
Pay attention to the delicate and elegant crowns, which emphasize children's spontaneity.
Go ahead and find out how to simply decorate them with your own hands using a minimum of time and money.
How to make a Christmas tree costume for a girl from tulle for the New Year with your own hands: master class
The New Year's tree should be lush and elegant. Therefore, the first thing that comes to mind is to make a suit for the girl from airy tulle. It can be purchased in cuts or in skeins. Tulle has many shades, one of them is called spruce. You can also choose several shades of green and combine them.
If you don’t have a sewing machine at home, you can make a herringbone dress - here, which is not sewn, but literally woven. And only individual elements of the outfit are hand-sewn.
For a girl 4-6 years old with a height of 108 - 116 cm, you will need the following materials:
- one and a half meter tulle – 6 – 7 meters
- satin ribbons: medium width - 6 m, narrow - 3 m.
- wide elastic band (2 cm) – 1 m
- beads, rhinestones, Christmas tree toys, foamiran or felt for decoration
Christmas tree costume made of tulle.
You should also have on hand:
- ruler
- tape measure
- scissors
- threads and needles
- glue gun
- stapler
- chalk or soap
Making a Christmas tree dress from tulle: step 1.
Making a Christmas tree dress from tulle: step 2.
Making a Christmas tree dress from tulle: step 3.
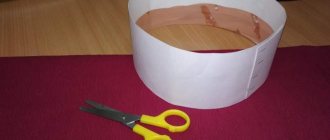
- Depending on the child’s build, tulle is cut into 50–60 ribbons 15 cm wide.
- The length of tulle ribbons is calculated as follows: measure the length from the girl’s armpits to her knees, multiply by two and add 3-4 cm per knot. For example, the distance from the armpit to the knees of a girl is 55 cm, then the length of the ribbon will be: 55*2+4= 114 cm.
- Using chalk or soap and a long ruler, mark cutting lines on the tulle and cut it along them.
- If you take tulle in rolls, cutting is faster and more convenient. It is very easy to calculate how many rolls you need, knowing the length of each tape. For example, if the length is as indicated above, 114 cm, and the roll is usually 22.5 m, calculate as follows: 114/100 * 50 = 57, then 57/22.5 = 2.53. It turns out that you need to take three rolls.
- Measure the girl's chest circumference and subtract 5-7 cm from the resulting value. This will be the length of the elastic band.
- Sew an elastic band, put it on the back of a chair, a plastic bottle with water, which is much more convenient.
- The ribbon is folded in half and threaded under the elastic band. The ends of the tape are pulled into the resulting loop. Tighten the knot well, but so that it does not squeeze the elastic.
- This is done with all tapes.
- A wide satin ribbon is woven between knots of satin stripes.
- Sew the straps to the dress. They can be made criss-cross on the back or made to tie at the neck.
- To make the herringbone dress fitted, consider a belt. It is made from satin ribbon sewn onto an elastic band, or simply from satin ribbon.
- Decorate the dress at your discretion. You can glue or sew bright beads, pebbles or even small Christmas tree decorations onto it.
- The remains of tulle are used to make a head decoration, for example, an openwork cap.
Popular articles March 8 wishes to women in verse
Dress - tutu: Christmas tree.
Another version of the New Year's Christmas tree costume with a tulle skirt - with an openwork top - elastic. For this they take:
- top elastic band of the desired color
- tulle at the rate of 50 sheets of 30-40 cm (depending on the height of the girl) and a width of 15 cm
- satin ribbon
- decor at your discretion
Tulle herringbone dress with ribbed top.
Options for creating a snowflake image
Before you start creating patterns and actual sewing, decide on the appropriate materials, as well as the style of the holiday outfit.
Often a snowflake costume for a girl for the New Year is sewn specifically for a photo shoot. In this case, you will have more options: for example, a long, fluffy dress will be very useful, since the child will not need to constantly move around the room, as happens at children's parties.
If the outfit is needed specifically for a matinee, it is better to choose a more comfortable and practical style.
Advice:
so that you can transform the outfit in the future, you can choose a separate style with a skirt and blouse. Elements of such an outfit can be combined with other clothes.
The simplest method of tailoring involves attaching additional details to the finished garment in the form of accessories, puffy sleeves, the top layer of a skirt, cape and other elements that will create the image of a snowflake. It is advisable to use clothes with a “winter” palette, that is, white, silver or blue.
Consider these DIY snowflake costume ideas for girls:
- sewing tulle onto a dress to create a more voluminous outfit;
- attaching satin ribbons to clothes. They can be gathered in some places to make the snowflake dress more elegant;
- individual parts of the costume can be transformed using cotton wool or white fur, which will imitate a snowball;
- Great for decorating such costumes and rain. It is advisable not to choose bright shades that do not belong to the “cold” palette;
- a very comfortable and warm snowflake costume can be knitted by yourself;
- a delicate image is very simply created by sewing lace onto a festive outfit.
If you don’t have much time or experience in sewing children’s holiday clothes yourself, the following simple method will suit you. Take organza or other easy-to-use fabric and sew a dress from it using ready-made patterns or a skirt gathered with an elastic band.
Advice:
For extra fullness, make the skirt multi-layered. Each new layer can be shorter than the previous one.
For homemade outfits, you can look for winter-themed fabric. Ideally, it should be textiles with patterns in the form of snowflakes.
If you were unable to find such options, you can sew snowflakes to the outfit yourself. They can be made from anything: cardboard, plastic bottles, knitting threads, felt, etc. The main thing is that such accessories do not pose a danger to the child, especially during active pastime.
The rain can be sewn to the edges of the skirt and sleeves. If the outfit includes a vest, you can sew the rain to the inner edging of each of the edges. You can also attach a fluffy collar - and also use additional decor to transform the edging of the fabric.
As for knitted dresses, making them will not be easy. But you can always turn to specialists who will take into account your wishes and create an outfit based on the child’s parameters. If you're short on time, you don't have to make the whole costume knitted: snowflake dresses consisting of a knitted top and a fluffy fabric skirt look good.
Video with a master class on a DIY snowflake costume for a girl with a knitted top:
Lace can be used as an insert in some places of the New Year's costume. For example, make the neckline, sleeves or lower part of the skirt from this material. Dresses with lace sewn onto the fabric along the entire length look very impressive and delicate. In this case, you need to guess with the colors of the materials used: the lace should not completely merge with the base.
A children's snowflake costume can also be decorated with feathers, beads, sequins and other elements. The brighter this outfit is, the better. But this does not mean that you can use a lot of saturated shades to create an expressive image: maintain a harmonious palette, and to successfully implement your ideas, select colors based on photographs of ready-made outfits on such a theme.
How to make a headdress
A girl’s Christmas tree costume for the New Year will be incomplete if you don’t think about how to decorate the child’s head. The top of the tree is most often crowned with a star or icicle. You can use your imagination and realize your ideas.
Tinsel hat
One of the simplest options is to wrap tinsel or New Year's rain around any hat. At the top you can place a red star. And if you additionally decorate the brim of the hat with white wool, this will create an imitation of snow.
Use tulle, nylon or organza
Another simple way is a veil. A light, airy green material is suitable for this. Gather a piece of fabric from one edge and secure it to your hair using bobby pins. Additionally, you can make a decoration in the form of a star or a red bow.
Cap
You can make a cap out of cardboard or felt and decorate it with the same details that were used to decorate the costume.
The star can be made from felt or colored cardboard
Another option: take a children's headband and wrap it with rain or green satin ribbon. Sew or wire a star made from the material of your choice to it. The headdress is ready.
Different ideas for decorating headbands
You can decorate the headband in other ways. Handicraft techniques such as quilling or patchwork using satin ribbons (not to be confused with patchwork) are suitable here.
Tinsel on a wire
But a more complex version of the headdress is the crown. To make it, you can wrap a piece of rigid wire with tinsel and, bending it in different directions, give it the desired shape.
Knitted crown
The following options will be within the power of true craftswomen. This work is, of course, painstaking, but the result will be unsurpassed.
A crocheted crown will stand firmly if it is well starched.
Crown - the highest level of skill
To make such a crown, you first need to make a wire frame and, using it as a stencil, make a pattern from light transparent fabric. Nylon or organza will do. You should end up with 2 identical parts that need to be sewn together and then carefully pulled onto a wire frame. The structure can be secured to the rim. Embroider the finished crown with rain, decorate with tinsel, stars and snowflakes.
What types of Christmas tree skirts are there?
Most often, a variety of fabrics and materials are used to cover the base of the spruce tree. It can be:
- natural, natural fabrics made of linen, cotton, wool, silk;
- felt or felt;
- fleece;
- fur;
- plush, drape;
- sackcloth.
In general, any fabric that is on hand at home or inexpensive, which is sold in any specialized store, will be useful. When choosing the type of base for a skirt, focus on the style in which you will sew it and the style of the interior as a whole.
Agree that the herringbone patchwork rug option should not be chosen for an apartment decorated in a classic or Scandinavian style. But for an eco-house or a rustic-style apartment, such rugs will be just what you need.
Rugs are also decorated in different ways.
Some make them multi-layered.
Others decorate only around the edge. And also in a variety of variations, but we will talk about this in more detail separately.
Some people really like original knitted skirts. They look very beautiful and New Year's cozy. But the time has come not to tell, but to show how to make a skirt for a Christmas tree. Read below and watch master classes on skirts in different options and styles.
Block two - sewing for needlewomen
Here you will have to spend more time and materials, since there is no ready-made base. But the result will be simply amazing.
Tutu
The entire outfit will consist of a tutu skirt and a decorated top. The Christmas tree will be lush, just like a real one. Materials include organza, tulle, satin, elastic ribbon and thread. Of course everything is green.
- The top should be waist-length or even slightly lower. It is not necessary to make it tight, although this option looks much more interesting. To make it, you need to take two identical cuts from satin of the required length and width (child’s dimensions). There is a cutout for the throat on top, and cutouts for the arms on the sides. It is sewn only in four places - shoulders and sides. On the one hand, it is better not to sew it up completely, but to make a zipper or simply attach hooks.
- The top is decorated using tulle. Tapes 10 centimeters wide, gathered at the top, are sewn in layers to the finished product.
- Now the next stage is making a tutu skirt. There is practically no need to sew here. First you need to decide on the length. All further work depends on this. For example, half a meter. You will need a lot of organza. It needs to be cut into narrow strips of about 15 centimeters. Length is two lengths of the skirt (in this case – 1 m) plus a little more for the knot.
- When the strips are prepared, you can work on the belt. It is made of elastic tape. The length is different in each case, because it all depends on the waist size. The measured tape is sewn into the ring. This belt will be the basis for the skirt.
- Now we begin to tie the folded organza strips on the belt with a regular flat knot. You need to tie it very tightly, almost going over the previous knot. When there is no more free space left on the belt, the skirt is ready.
All that remains is to put on your outfit and celebrate New Year and Christmas.
Trapezoid
A very easy option to make, in which you need to sew a simple dress in the shape of a trapezoid. It is better to use thin fabric, such as silk or satin.
Anyone can make a pattern. It is very similar to the top described in the previous costume. Only the length and shape of the product have been changed. Length - just below the knees. The only caveat is that you need to make a lot of small loops along the bottom edge of the dress from the inside. Then, when the product is ready, a thick, rigid wire is inserted into them, which will help the hem not to fall, but to stand. The last step is simply decorating the finished outfit with rain, snowflakes and other New Year accessories.
"Loose" snowflake dress with belt
Let's take a look at another master class on a DIY New Year's snowflake costume for a girl. This outfit is suitable for both little and older girls: based on the pattern, you can adjust the size of the outfit to suit your child.
To sew an outfit of size 44, you will need 140 by 180 centimeters of cotton, the same amount of organza with a silver print, as well as two meters of ribbon, which will be used as a belt.
Take the fabric, iron it well and fold it in half. Make a mark in the center of the fold and set aside the dimensions indicated on the pattern. The upper part of the drawing is the neckline, shoulders and slits for the arms. The bottom of the fabric is cut to create a semi-circular dress.
Creating a snowflake costume step by step begins with transferring all the marks onto the fabric itself. After all unnecessary elements have been cut off, you can begin to create the second layer of the outfit. Take organza and do similar procedures with this fabric. Cotton and organza should be folded face to face, ensuring that the level of the neckline and armholes match.
After that, start stitching the outfit using a sewing machine. Stand back from the edge about 5 millimeters, using pins to ensure the fabric joins correctly.
Make notches on the front neck seam allowance: this will prevent the material from pulling together when turning the outfit inside out.
The seams of the neckline and armholes must be ironed. Next, the allowances are hemmed around the perimeter of the cotton part. To make the outfit look light and airy, you don’t have to tuck the organza allowances.
The next step involves sewing on the sides of the dress. Please note that each layer of this outfit is sewn separately, and the seams should be located inside.
We finish the work by creating a belt, which is very quickly done on a sewing machine. As a result, you will get a very cute dress, like in the photo. By the way, you can make the length of the front and back of the outfit different, and also experiment with the sleeves and the appearance of the neckline.
Here is another example of a themed dress with detailed sewing patterns:
Lesson #2: White Skirt with Flower Applique
Among the ideas for making a skirt for a Christmas tree, there are often options with decoration with fabric flowers along the edges. Here you will see one of the options when both the skirt and flowers are made of white felt, but if you use this technique with a different color scheme you can get new interesting solutions!
Necessary materials:
- Felt fabric
- Scissors
- Glue gun
- Pencil
Step-by-step instruction:
Step 1: Cut out the circle
- Take a piece of felt, for example 1 m x 1 m in size, fold it in four, and cut out a large and small quarter of a circle, as in the previous versions, so that, when you spread the fabric, you get a circle with a hole in the center.
- Then make a cut from the edge of the large semicircle to the small one (see photo) so that you can put the skirt around the tree.
The cut we made on one side can be closed at the end with ribbons or flowers, but since in this case the tree is near the wall, the skirt was simply turned with the cut towards the wall.
Step 2: Cut out the petals
You need a lot of flowers, which means petals too. The photo shows the required shape of the petals; in total, 100+ pieces need to be cut out, because the more flowers, the more voluminous the edges of the skirt will be.
TIP: We recommend that you immediately take good scissors, otherwise you can get quite tired of cutting out so many parts from felt, which is quite dense.
Step 3: Making the Flowers
When all the petals are ready, you can begin to form the flowers. Arrange the petals to form a flower. Here, each flower consists of 6 petals: 4 at the bottom and 2 at the top. Glue the petals together at the center of the flower using a glue gun.
Step 4: Glue the flowers to the skirt
After all the flowers have been made, they need to be glued to the skirt. First glue the first row of flowers along the outer edge of the skirt, overlapping them slightly with petals. Then make the second row closer to the center of the first, slightly overlapping the flowers on the previous row.
- You can make a few more rows , or even fill the entire skirt with flowers!
- The result is a wonderful, elegant skirt using a minimal amount of materials.
Now let’s look at the rest of the ideas, without a detailed description, but from the photographs you can determine the scheme of actions and make equally wonderful skirts yourself!
Fur
Fold the fur fabric according to the principle described above. Then fold again and again. Fold until one small section remains. Remember that the lint must be inside. After this, take very sharp scissors or a special knife and carefully cut the corner.
Focus on the backing to preserve the pile as much as possible. After cutting, unfold the resulting circle and vigorously shake off any remaining lint.
The fur skirt is attractive due to the beauty of the structure of the material. Faux fur is very similar to snowball, so it looks very impressive under the Christmas tree. If you are concerned about the lint fraying, finish the edges with an overlocker, zigzag stitch, or do it by hand.
Successful work and good results!
Found a violation? Report content