Natalya Tsutserova
Master class “New Year’s decorations made of threads”
Master class : New Year's decorations made of threads .
Tasks:
— Introduce a new technique for making New Year’s decorations from threads .
— Develop interest in making New Year's toys
Materials:
- polystyrene foam or thick cardboard.
- woolen threads (different colors)
- sparkles, beads, accessories, etc.
New Year holidays are coming soon . My master class can inspire you to make New Year's toys and garlands. What I offer can be used not only for Christmas tree decorations. And as a gift for friends and relatives, it can be used as a garland or interior decoration .
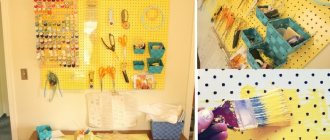
1. To begin with, you can take polystyrene foam.
If there is no foam, I glued together several layers of thick cardboard.
Place the toy template and cling film. So that the finished craft does not stick
2. Stick tailor’s pins along the outline.
3. Unwind a few meters of thread, put it in a bowl and moisten it generously with PVA glue. Moreover, the thicker the thread you choose, the stronger the finished Christmas tree toy will be.
4. Tie the end of the thread to one of the pins. Pull the thread along the contour and wrap it around the knotted pin again.
5. Start folding the thread in loops or randomly and fill in the outline of the star. Fill the whole toy evenly, cut the thread. Be sure to steal a New Year's toy . You can use anything that glitters, manicure sprinkles, beads, beads, etc. In general, whatever your heart desires. Leave the craft to dry for two days.
6. Then remove the foam pins and remove the toy.
Master class on thread applique “By the Stream” Thread applique can be used from the younger group, depending on the complexity of the design and technique. This application is intended.
Master class “Bow for decorating a gift” We often prepare homemade gifts for our friends and loved ones. And to make the gift image complete, I bring to your attention a simple one.
Master class “Flowers for interior decoration” Large flowers for interior decoration made of paper. Dear colleagues, I want to share with you a master class on making large flowers.
Master class on making crafts from threads “Pumpkin - Queen of Autumn” This material will be useful for educators, additional education teachers and creative parents of preschool children.
Master class “Painting from threads “Church of the Ascension of the Lord” The technique of thread applique was used to complete the work. The work was carried out in several stages. First, an image was selected.
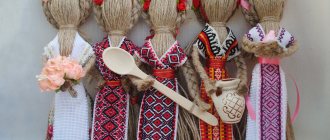
Master class “Doll made from threads “Martinichka”” Master class “Doll made from threads “Martinichka”” Teacher-master: Shaibulatova Svetlana Petrovna Venue: Sovetsky regional local history center.
Master class “Easter card” made of woolen threads Objectives: - educational: be able to create a composition from woolen threads, decorate the product with various materials; — developing: to develop.
Master class on making a talisman doll from threads (senior group) Irina Barinova. Master class on making a doll - amulets from threads. (senior group) Today I would like to bring to your attention a master.
"Little doll." Thread craft. Master class You would like to make such a doll with your own hands. It is not hard. Let's prepare skeins of wool, scissors, glue, and colored beads for work. If.
Master class on creating a soft toy “Chicken” from threads. The photo shows crafts that the children created with their own hands under my guidance. The age of children is from 6 to 8 years. That kind of thing.
—Categories
- FAITH AND RELIGION (50)
- Icons (4)
- Prayers (5)
- Signs and superstitions (19)
- Church rituals (5)
- Church posts (4)
- Church holidays (20)
- CHILDREN (14)
- Children's poems and riddles (1)
- Games and activities with children (4)
- Tips for parents (7)
- LEISURE (15)
- Games, riddles and illusions (7)
- Tests (8)
- LIVING WORLD (53)
- Wild animals (5)
- Pets (34)
- Inhabitants of rivers and seas (3)
- Nature (7)
- Birds (5)
- STARS (19)
- Fortune telling, rituals, mysticism (10)
- Horoscopes, numerology (5)
- Conspiracies and rituals (4)
- HEALTH (63)
- Traditional medicine (29)
- Healthy and harmful foods (13)
- Doctor's advice (25)
- BEAUTY (40)
- Hair, hairstyles (4)
- Fashion (2)
- Beauty secrets (7)
- Losing weight (3)
- COOKING (218)
- Jam (7)
- Desserts and baked goods (60)
- Blanks (23)
- Snacks (29)
- Cooking tips (2)
- Meat (19)
- Drinks (4)
- New Year's dishes (23)
- Vegetables (9)
- Holiday dishes (6)
- Fish (9)
- Salads (6)
- Soups (1)
- PERSONAL (136)
- From my life (13)
- My creativity (96)
- My Love Story (24)
- Native Vladivostok (3)
- VISUALITY (204)
- Patterns and pictures (95)
- Templates and stencils (109)
- NEW YEAR (233)
- New Year's bottles (2)
- Christmas trees (8)
- New Year's costumes (6)
- Christmas crafts (157)
- New Year's predictions (2)
- New Year's toasts and congratulations (4)
- New Year traditions and rituals (10)
- Christmas balls (9)
- New Year's decor (33)
- Snowflakes (6)
- EASTER (40)
- Easter ideas (3)
- Easter crafts (31)
- Easter eggs (6)
- USEFUL KNOWLEDGE (66)
- New in the country (2)
- Cheat sheet for LiRu (45)
- You need to know this (19)
- USEFUL TIPS (93)
- Attention, scammers! (1)
- Tips for car enthusiasts (2)
- Tips for tourists (4)
- Tips for Dummies (2)
- Tips for all occasions (6)
- Economic advice (5)
- POETRY AND PROSE (34)
- Parables and fairy tales (4)
- Russian language (2)
- Poems (27)
- HOLIDAYS (41)
- All holidays (25)
- Congratulations and cards (10)
- PAINTING (136)
- Stained glass painting (22)
- Painting (26)
- Spot painting (75)
- HANDCRAFTS (1198)
- Beads (6)
- Embroidery (49)
- Cross stitch (3)
- Ribbon embroidery (7)
- Knitted clothes (28)
- New Year's knitting (8)
- Various knitting (48)
- Knitting.Patterns (23)
- Knitted toys (7)
- Knitted napkins (8)
- Knitted secrets (9)
- Knitted jewelry (10)
- Knitted flowers (10)
- Bottle decor (76)
- Interior decor (68)
- Decoration (96)
- Decoupage (57)
- Ideas for needlewomen (148)
- From waste material (93)
- From paper (1)
- Made from natural materials (75)
- Modeling (98)
- Modeling from plastic and HF (3)
- Salt dough modeling (1)
- Master classes (608)
- Paper crafts (59)
- Various crafts (195)
- Wedding (6)
- Candles and candlesticks (20)
- Plates (5)
- Braid and cord (33)
- Paper flowers (10)
- Flowers made from ribbons and fabric (10)
- Flowers made of plastic and HF (6)
- Handmade flowers (67)
- Edible flowers (2)
- Sewing (103)
- GARDEN (37)
- Vegetables (3)
- Tips for summer residents (14)
- Indoor flowers (13)
- Garden flowers (9)
- Berries and fruits (1)
- THIS IS INTERESTING (0)
- Great love stories (1)
- Celebrities (8)
- Interesting stories (1)
- Interesting facts (8)
- Psychology (1)
- HUMOR (18)
Shiny ball made of thread and PVA glue
- several balloons
1. Pour PVA glue into a bowl and dilute it with a small amount of water.
* If the glue runs out and you are not finished yet, you can add more water.
2. Inflate the balloons. Their size directly affects the size of your future New Year's balls.
3. Prepare a white thread, tie one end to the tail of the ball and start wrapping the thread around the entire ball. Cover the surface of the ball as much as possible.
4. Dip the ball wrapped in thread into a bowl of PVA glue and water and start turning it so that the glue is absorbed into the thread from all sides.
5. Before the glue dries, sprinkle glitter on the ball.
6. So that the ball can dry, you can hang it on a stretched thread using a paper clip or place it on a jar (without a lid).
7. After 24 hours, remove your Christmas decoration and use scissors or another object to burst the ball inside. Carefully pull out the ball; it will be slightly glued to the thread.
* By making several of these shiny balls, you can decorate your Christmas tree or interior. If you get a few branches, you can hang New Year's balls on them, decorating the branches with tinsel.
Homemade Mod Podge Recipe 2022 - Don't Be Fooled!
I'm so glad you made it here! There are many questionable homemade recipes for fancy capsules, but this is one that is perfectly proportioned! The one who has gone from master to master, and now he is in your hands! I first posted this recipe many months ago (six years ago!) when I was living in London. We currently live in a yurt in New Zealand (seriously!) and I still use this homemade fashion pod recipe every day. I use this DIY for modifications like my drawers with beautiful old wallpaper, everyday crafts with my daughters and in collages that I like to come up with.
In many ways, I'm a hand-clapping optimist. I really have a hard time imagining the worst case scenario and I always think that everything will work out, which is often to my detriment. Otherwise, I'm a doubting cynic. When it comes to brands and their promises, I'm more hesitant than Scooby-Doo smoking batons in Dubiusville. When a product is made loudly, my mind screams, "LIES, ALL LIES!" like some kind of crossed witch.
There are some exceptions:
- Helmans mayonnaise (no other will do. I can eat this with a spoon for lunch.)
Ummmm.
Okay, I guess that's on my list.
So, when I first heard about the superpower creation that is Mod Podge, I tried to ignore the screaming witch and figure out what exactly makes Mod Podge so amazing. First of all, I started by trying to figure out what Mod Podge is. Want to know what this even is?
PVA glue diluted.
That is: Homemade Mod Podge - PVA glue with the addition of water.
PVA (which can be bought in bulk for a few pounds) with water (free)
But people pay a ton of money for this Must Have product for things like decoupage and scrapbooking, which people have been doing for years with thinned PVA. PVA is also known as Elmer's glue, wood glue, or simply white craft glue. It's tacky, tacky, thick, and perfect.
I think the Mod Podge people are trying to trick us all a little.
OK. Now we know, huh?
Homemade Mod Podge Recipe
To make a jar of fake/homemade Mod Podge, you will need 1 cup of glue and 1/3 cup of water. These proportions are perfect - don't mess with them. There are plenty of other online recipes for homemade Mod Podge, but they are TOO WEAK. Carefully! Shake well and use like Mod Podge. For extra shine, add 2 tablespoons of water-based varnish or for extra shine, add a super-fine gloss.
What to do
You can make ANYTHING from this material! This is business! I'm creating left, right and center with my trusty can of homemade modpodge!
Decoupage - Mod podge is traditionally used for decoupage. This stuff works just as well. Scrap armoring is perfect. Sealing - Throw a little of this onto a freshly painted canvas or craft to seal it all.
I've even made hardcore DIY recycled flooring using Mod podge and paper!
Recently I wanted to try making some decorated pegs. I've made a few Christmas pegs with ribbon and scrapers this way, but have found it very difficult to cut the fabric and keep it from fraying. Using homemade Mod Podge on fabric turns it into a papery substance and makes cutting fabric a real breeze - perfect for making hooks, thank you.
Just give the little pieces of fabric a good soak and then let them dry as flat as possible. Then cut them off. It's really cool to make these pegs so simple. And if you're like me and hoard every piece of pretty material, then this is the PERFECT use!
I used some navy polka dots and even some lace, so easy and quick (sorry for the mid-winter night shoot!)
Yellow? I've been using this for several years now and it hasn't turned yellow. After "several years" I can't answer since I haven't done it in years. However, my gut tells me that people have ALWAYS done decoupage, without yellowing things, and modpodgy didn't exist until recently. So yes.
I made a retro fabric bird garland using this technique and repurposed some old tin cans. Waterproof? You can make it waterproof by adding varnish to it. However, if you really want something waterproof, hardcore, I would say you need to use varnish. Not mod podge at all. (Remember that Mod Podge is not waterproof unless you also select the waterproof option.)
How do you think? Are you Mod Podge Die Hard? Or are you generally okay with fake/homemade versions of things?
The best place to buy PVA online is undoubtedly my partners Yellow Moon. You can buy a 1 liter or 5 liter bottle and it will never go away. They also have almost every possible craft you could dream of. This is a craftsmen's paradise.
*sings* I spent most of my years living in a craftsman's paradise... money is the power... money is the power... minute by minute... hour by hour...
Sorry. Totally into 1990s rap.
Tell me about the project you're developing with your homemade podge module!
PS Get more crafty and thrifty posts on Instagram, our Facebook page, Twitter or Pinterest!
Thank you for reading!
DIY Christmas balls made of threads
- thick threads (for knitting, for example)
- a plastic bowl or cup for glue (or another container in which you can make a couple of small holes)
1. Inflate the balloon to the desired size and tie a tail. If you want to make it more round, press it down with your hands.
2. Use a needle and thread to pierce a plastic bowl or cup. This should be done as close to the bottom as possible. You can also simply dip the thread into a container of glue.
3. Pour PVA glue into a container and dilute it with a small amount of water to save glue.
4. Slowly pull the thread through the glue container and begin to wind the ball with it. Since you will be removing the ball after the glue dries, it is better to leave a little space near the tail in advance to pull it out.
5. Once you have wrapped the ball tightly, cut the thread. You can leave a small tail to make a loop and hang the ball on the Christmas tree, for example.
6. Leave the ball to dry. In the natural way it will take 24 hours or a little more. You can speed up the process by placing the ball near the radiator or drying it with a hairdryer.
7. When the glue has completely hardened on all sides, pierce the ball and carefully pull it out.
8. If desired, you can decorate the ball. Try painting it, gluing plastic or paper snowflakes, sequins, or covering it with sparkles.
Another option:
In the shape of a heart
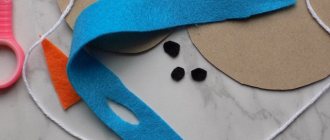
Let's consider another candy bowl, which will be an excellent gift for your significant other, especially those who love sweets. This product will also delight children who adore unusual things. It is noteworthy for its heart shape, which can show your feelings both for the person and for the candies themselves. To create such a candy bowl you will need not only threads, but also toothpicks. Let's take a closer look at the required materials:
- Thick cardboard. It will serve as the bottom for the future product, so you should pay attention to its thickness. The cardboard should easily withstand the candies placed on it;
- Glue "Moment". Instead, you can use any other one, which will also firmly connect the bottom with the toothpicks;
- Directly toothpicks, which will become the basis for the walls of the future candy bowl;
- Multi-colored threads. Don’t be afraid to experiment with the number of colors - their variety will only make the craft more beautiful, you just have to think about color combinations and do not forget that it is important not to overload the overall picture;
- Various beads and rhinestones are perfect for decorating a candy bowl. They will give the craft a finished look.
Prepare the bottom: cut out a heart of the desired size from cardboard. Be careful and try not to touch the inside of it. To make the task easier, you can use a ready-made template and cut according to it.
After this, trim off all the sharp ends of the toothpicks. Try to make them straight and without jagged edges, as they can damage the bottom of the future product.
Glue toothpicks vertically onto the cut out heart. It is worth stepping back a centimeter from the edge, this will give the candy bowl stability.
The next stage is the most labor-intensive - you need to braid the resulting base for the wall from skewers and toothpicks. Do this in zigzags and weave in beads as you go for added beauty.
Finally, decorate the candy dish by gluing sparkles and rhinestones onto it. It all depends on your imagination. In any case, a handmade craft will certainly delight your family, loved ones and loved ones.
How to make a ball of thread: gift wrapping
- a large ball of thread
- acrylic paint and brush
- scissors or stationery knife
- a long piece of tape.
1. Inflate the balloon and wrap it with thread as tightly as possible. In some places, add a little PVA glue to secure the thread.
* The main thing is to wrap the ball so that nothing is visible through the thread. You can cover all the threads with a thin layer of PVA glue.
2. Using a brush, apply acrylic paint to the thread. You should not skimp on paint, because in addition to color, it also holds the threads together well.
3. Hang the ball to dry overnight. If you have nowhere to hang it, you can put it on the neck of the jar.
4. When the paint has dried, burst the ball and pull it out of the “cocoon”.
5. Cut the resulting cocoon in half using scissors or a stationery knife. To make this easier, wrap the ball with one thread of a contrasting color and start cutting along this line.
6. Using a screwdriver, make several symmetrical holes on both sides of the cocoon.
7. Place gifts wrapped in beautiful paper inside.
8. Pull the ribbon crosswise through the holes and tie it in a bow at the end.
Candy for a surprise
- Gather some wrapping paper, tape, a toilet paper roll, clear tape, and scissors.
- Cut a piece of wrapping paper approximately 30cm by 30cm
- Place the sleeve in the middle of the edge of a piece of wrapping paper, stepping back a couple of centimeters, and secure the sleeve with tape as shown in the photo.
- Wrap the sleeve in wrapping paper and secure the seam with tape.
- Tie the edges of the wrapping paper near the sleeve on both sides with pieces of tape at least 40 cm long.
- With the other side of the scissors, curl the ends of the ribbon on both sides.
- To make this craft, take a rectangular piece of colored paper or cardboard and, with your own hands, draw it lengthwise into 7 identical stripes. Step back from the edge and mark 4 lines B and two A. Try to keep the patterns symmetrical.
- Cut out 12 diamonds and scallops along the edges of the craft. Bend the workpiece lengthwise along 6 axes and crosswise along lines B and A.
- Roll up a hexagonal candy, tie it with a beautiful thread and hang it on the Christmas tree.
- There are dragee candies that are sold without candy wrappers. Let's make original small gifts out of them with our own hands using corrugated paper, scissors, toothpicks and thread.
- You don't need any diagram for this. Simply cut corrugated paper into squares and wrap the jelly beans in them. Wrap with thread and trim off any excess long ends with scissors.
- Spread the candy wrapper with two roses. Insert a toothpick into the middle of the craft. Now you can stick this beautiful ball into a cake, pastry, or onto a tree branch with your own hands.
- cardboard;
- a piece of silk;
- satin ribbon or braid;
- sequins.
Today we are making delicious New Year's crafts that can be hung on the Christmas tree.
Gifts don't just need to be invented, made or bought. As experience and research by psychologists show, recipients experience 30% of positive emotions from interesting holiday packaging even before opening it. Wise people have long assured us that the path to the goal is more important than the goal itself. This means that if your gifts, crafts, candies or anything else placed under the Christmas tree are packaged beautifully and originally, the effect will increase by a third. It's not hard to check. Let's make such a huge candy. You will need:
Christmas tree made of threads. Option 1.
- cling film or wide tape
1. Make a cone out of cardboard. To find out all the ways to make a cone for a Christmas tree, go to our article
“Paper cone”
.
2. Wrap the cone in cling film or wide tape.
3. Pour PVA glue into a bowl (you can dilute it with a little water).
4. Dip the thread into the bowl of glue and begin wrapping it around the cone, starting from the top of the head. The thread should not be squeezed too hard - there should be enough glue left on it to attach well to the cone.
5. Leave the craft for 24 hours to allow the glue to dry, or you can use a hair dryer to speed up the process.
6. After the glue has dried, carefully remove the thread tree from the cone.
7. You can start decorating your Christmas tree. Any decorations are suitable for this - sparkles, sequins, buttons, beads, pompoms, etc. You can also place an electric candle under the tree to make it look even more beautiful.
Method with toothpicks
- thick cardboard (any box will do);
- wooden skewers;
- instant glue (hot glue or any other glue will also work, but keep in mind that it must glue the skewers to the cardboard);
- wool yarn or twine;
- decorations to suit your taste.
First we need to create the base of our candy basket. To do this, we draw and cut out the shape we need from cardboard.
It is worth noting that the shape can be any: circle, square or even star.
But be prepared for the fact that the more complex the form, the harder it will be for you to work.
I chose the heart shape.
After this, we cut off the sharp ends of the sticks and attach them to the cardboard base with glue. To be safe, we retreat 1 centimeter from the edge.
For the final step you need yarn and oh-so-lots of patience.
It is necessary to braid the future candy bowl with fiber. And this must be done in zigzags so that everything holds well. You can weave beads in the process.
Next, decorate as desired and you’re done!
In these simple ways we made a beautiful decorative element, practical tableware and just a beautiful thing.
She will definitely delight you and your loved ones.
Well, in turn, I will certainly try to make a candy bowl from threads with my own hands, decorating it in the style of suite design.
And I will definitely show you how this will work out in the end in one of the following articles.
Don't miss the exit.
I hope that the article was useful to you and you will share it with your friends on social networks by clicking on the buttons below.
I always look forward to feedback in the comments.
Thank you all for your attention, and see you next article.
With wishes of inspiration in creativity, your Natalya.
I present to you a master class on how to make a teapot from threads and decorate it with candy flowers. This handmade souvenir will be an original gift for any occasion; it can be filled with bags of delicious tea or your favorite candies. See my DIY tutorial on how to make a balloon with a basket here. I have also prepared many other simple master classes for children - candy-paper bouquets and corrugated paper crafts.
DIY thread tree. Option 2.
- cling film or wide tape
- a garland with lights.
1. Make a cone out of paper. Make small cuts at the bottom, leaving 2 cm between them. The cuts are needed so that you can stretch the thread between them.
2. In a bowl, dilute PVA glue with water.
3. Begin to saturate the thread with glue and wrap it around the cone, threading the thread through the cuts and wrapping the entire cone. Leave the glue to dry.
4. When everything is dry, carefully remove the string tree from the cone. To make this easier, cut off the edge of the base of the cone (where the cuts are). Start slowly turning the cone until it comes unstuck.
5. Glue, sew or staple the ribbon to the bottom of the tree.
6. Place a garland of lights inside the tree. If the light bulbs are small, then they can be secured inside the tree using thin wire or Christmas tree decorations that have wire fastenings. You can also use paper clips.
Here is another photo instruction:
How to extend the life of Super Glue
How many times have you gone to fix something, dug into the back of your tool shed, found superglue, and then discovered it had hardened in a tube or bottle? Most often, probably!
There are many different "flavors" of this type of glue, which is technically called cyanoacrylate glue. These very fast-acting glues are sometimes too good at their job, and this is where storage problems begin. Here are some important tips for increasing the life of your cyanoacrylate adhesive:
- Always close the bottle/tube with a cap. This prevents contamination and moisture in the air can cause the glue in the bottle to thicken/harden.
- Store the adhesive in its original packaging . (The packaging is specially designed to prevent moisture from entering). Moving glue into different containers can also increase the risk of them seizing when exposed to air, which is what they are designed to do.
- Store glue in the refrigerator. (Make sure it is properly labeled and kept out of the reach of children). These adhesives are also often temperature sensitive and may respond to heat by hardening.
- Before use, allow the bottle to reach room temperature before opening the cap. This helps prevent moisture condensation (moisture causes the glue to thicken/harden in the bottle).
Apple theme
For candy. Size approximately 120*65 mm.
I saturate it with oil to get a contrasting color of the wood, fill the cracks with mastic so that they show through in the sun.
Linen candy/cooker bowl. Master Class
So, as promised, I’m showing you my tutorial on sewing a candy/sugar bowl.
It all started when I embroidered a cupcake on linen canvas.
For the cupcake I used antique Japanese melange blue thread.
These threads have a story. I got them from a grandmother who was a needlewoman. It so happened that I had never met her and knew absolutely nothing about her. But, I was lucky enough to become the owner of all her handicraft supplies.
When I still lived with my parents, our neighbor Aunt Sveta often came to see us and knew that I really loved embroidering. And she also had friends who didn’t know what to do with their grandmother’s big bag of thread. They wanted to throw it out. But Aunt Sveta didn’t let them throw it away and brought the whole bag to me.
You can’t imagine how much there was there... Various unfinished embroideries, and rags with printed patterns, and a lot of new (in the sense of not started or even printed) skeins of Leningrad floss.
And skeins of Japanese melange (the manufacturer and a bunch of other hieroglyphs are printed right on the packaging) - I really like these threads!
But the quality of the Leningrad floss leaves much to be desired... The threads are thin and without shine (dull). Now the threads are not the same at all - much better quality. That's why I rarely use those old threads.
But if it suddenly turns out that exactly this shade is needed, then I print out a “new-old” skein and embroider with it.
In general, I carefully store and use all of my grandmother’s stock (unfortunately, I don’t even know her name)!
Let's continue. I embroidered a cupcake. I cut out a square piece (13x13cm) from the embroidered canvas and sealed it with dublerin.
I prepared all the necessary materials: a rag with an embroidered motif, pieces of plain linen, a piece of linen with a pattern, 2 types of lace and bindweed in two shades (+ another piece of padding polyester and a patch).
I sewed blue bindweed onto the canvas with the cupcake.
I cut everything by eye! I sewed a linen rectangle on both sides (along the width of the square).
Then, I sewed long rectangles on the other sides.
I trimmed off the excess fabric. The result was a square 30x30cm.
I stitched blue lace onto the square, thereby marking the center of the future candy/cracker bowl.
I cut out a 30x30 cm square from linen with a pattern. I also cut out padding polyester of the same size. I connected them with pins. I stitched on a blue bindweed and a patch. Next, onto the square with the cupcake, along the intended fold, I basted future ties made of dark blue lace. This square was covered with a square with a patch (face to face). I stitched around the entire perimeter, leaving room for turning. I turned it inside out, straightened the corners well, and sewed up the hole with a hidden seam.
I ironed the resulting “napkin” thoroughly. The result is this chubby candy bowl/cracker bowl/napkin/hot stand. :)
Enjoy your tea!!!
Thank you for visiting me!!!
xxx
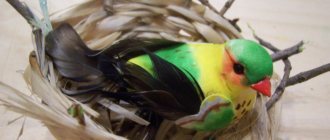
Small birds
Using the technique of motanka dolls, you can make figures of small birds. The simplest ones - chickens - are made from plain yellow threads. More complex crafts made from yarn - bullfinches, tits, sparrows - require the use of threads of different colors.
Connect bunches of red and black (yellow and blue, brown and black) threads so that the yarn of a darker shade is at the top, intercept the threads with a knot in the middle. Bend the dark threads from the right half and connect them with the threads of the left bundle, fix them all with a working knot. Place gray (blue) yarn under the remaining threads - these will be the wings.
Fold the yarn covering them down, forming a loop through which the wing threads are pulled. Connect with bundles tied with a working knot. Carefully bring the wings back and connect all the threads into a common bundle. Glue the bird's beak and eyes. The figurine can be hanging or serve as a real toy. The child will love it, because this craft is made from yarn with your own hands!"Hedgehog". A candy bowl or papier-mâché box.
Good day to all pickabushers!
Today I’ll show you a photo of another one of my works) there are figurines, and this is a box (candy bowl) in the shape of a hedgehog made of papier-mâché.