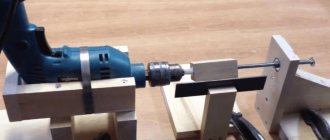
Circular drill device
A ballerina drill for wood is made from carbon, tool, and alloy steels, which are not suitable for processing hard materials: metal, tile, porcelain stoneware.
But they cut drywall and plastic easily. The two-incisor ballerina looks like an ordinary compass. But the design is much more complex. The bracket and cylindrical shank are manufactured in one piece. There are two holes in the bracket. A centering drill is installed in one. A rod is installed in the second. Both are secured with screws.
To set the required diameter, the cutters move along the rod. It has a vernier scale on it. The tool holders are also secured with screws. The incisors are shaped like a knife. The oblique edge of the cutter should be directed in the direction of rotation, clockwise.
If the drill becomes dull during operation, it can be easily replaced. If the cutters are dull, then, having the skills to work on a sharpening machine, you can refill them. The shank of the structure is fixed in the chuck of an electric drill. It is worth remembering that the small power of a power tool may not be enough to work with a ballerina, unlike metal drills.
How to drill a large hole in tiles
The need to drill large-diameter holes in tiles arises when preparing a place for installing pipes and other plumbing communications, as well as for installing electrical sockets. To drill such holes in tiles, special tools are used, which can be a tubular drill, a ballerina drill for tiles, etc.
The ballerina, with which you can create holes of various diameters in tiles, is somewhat reminiscent in its design of an adjustable drill bit used for working with wood products. The ballerina works on the principle of a compass: the central drill serves to center it, and the working cutter, which can move along a special bracket, cuts a hole of the required diameter on the surface of the tile. By adjusting the position of the cutter, it is possible to obtain holes whose diameter is in the range of 30–90 mm.
Drilling a hole with a ballerina
At the same time, the ballerina is unproductive, since you can only work with it at low drill speeds. Moreover, such a tool is not very convenient to use, since it is quite difficult to hold it in one position.
More effective (but also expensive) is a circular tile drill, which is often called a tubular drill. Its cutting part can be coated with diamond or tungsten carbide.
Drilling tiles with a tubular drill without a center begins at low speeds, slightly deflecting the drill from a vertical position
When using a tubular drill, you should adhere to a number of rules:
- perform drilling at a rotation speed not exceeding 500 rpm;
- intensively cool the tool during processing;
- use the tool only on a stationary drilling machine, if its design does not provide for it.
How to make a hole in a brick wall?
If the pipe diameter is up to 25 mm, then the easiest option is to drill a hole
using a conventional hammer drill, selecting a drill of the required diameter.
If you have a half-brick wall, then by drilling with a regular drill in a circle, you can make
any diameter. And then we crush the middle, which will break easily.
Interesting materials:
Why are files not moving to the memory card? Why doesn't Firefox download files? Why is the file format not supported in WhatsApp? Why doesn't the radio see files on the flash drive? Why are the files not displayed on the flash drive? Why can't jpg files open on my computer? Why is a large file not being transferred to a flash drive? Why are files not deleted from my desktop? Why does it say the file is too large? Why does it say when copying to a flash drive that the file is too large for the destination file system?
DIY making
When you don’t have a device at hand that can cut a circle from wood or other material, you can try to make it yourself. To do this, you will need a collet holder and a set of the required size of feather drills. A collet holder is a clamping mechanism that is used to clamp a rotating cutting tool. It can be made from a bolt, the diameter of which depends on the chuck of the rotator, machine tool or drill. The head of the bolt needs to be cut off and sawed crosswise along the thread side.
The center drill is sharpened into a cone, and the cutting drill into a wedge. In this case, the end of the center drill should be 3-5 mm longer.
The drill is held in place by two nuts: one is a clamping nut, the other is a guide. If holes with a constant radius are cut, then the drill can be welded to the holder.
Design and principle of operation
The design of a circular drill is quite simple and mainly consists of three parts:
- a drill responsible for centering the device;
- a fastening rod of a certain length on which the cutting elements are installed;
- cutters equipped with a device for attaching them to a rod, their number ranges from one to three.
This design is used on single and double cutter models. If there are three cutting elements, then in this case the cutters are fixed on a round disk, and to change the radius they move along the grooves. Additionally, some models can be equipped with a protective cover that protects the working person from flying chips or sawdust. It also protects the worker from being hit by fragments when the device is destroyed.
Now let's see how to drill. The central drill needs to be drilled at a pre-designated point. If the materials are durable, for example, iron, tiles or laminate, then it is better to first mark the drilling location with a regular drill. This is done for convenience so that the “ballerina” does not slip on the surface and scratch the top layer.
Next, we cut a path of the radius we need
Again, here you need to pay attention to the material in which the holes are drilled. If it is a tile, then to prevent damage to the facade surface you need to drill at low speed and lubricate the tile with water or machine oil
This will prevent damage to the tiles and the scattering of fragments. Tile panels must be laid on a flat surface, otherwise they will crack under force.
If the tile is already attached to the walls or floor, then you only need to cut through it, and then replace the “ballerina” with a concrete drill. When drilling laminate or veneer, it is difficult to go through the top layer, but then it goes easier. There are no special instructions for wood, iron, plastic and drywall. The last stage is removing the cut out objects.
In addition to the basic instructions, there are a few additional nuances.
- In no case should you put pressure on the tool or lean on it with your whole body: this can damage the device and split the material in which the hole is made;
- “impact” or “perforator” modes cannot be used, only drilling;
- there is no need to let the “ballerina” overheat: high temperatures can deteriorate the coating of the incisors;
- if drilling is difficult, then you should add speed.
To protect your health when working with a device for drilling circular holes, you need to follow simple rules:
- Before starting work, you need to check whether all components of the device are securely fastened;
- You should wear goggles or a mask to protect your eyes;
- clothing should not contribute to getting into the rotating elements;
- If possible, be sure to install a protective grille on the ballerina.
Types of instruments
In addition to the classic two-cutting version of a circular drill, there are one- and three-cutting models. In the design of a single-cut drill, the cutting part is directly fixed to the rod. The cutter and centering lance are equipped with carbide plates. They make it easier for a ballerina to work on tiles.
In three-incisor models, the incisors are mounted on a round platform on which there are grooves. The cutters move along these grooves. They have a scale. Correctly set size allows you to cut more accurately and quickly.
Currently, some models are equipped with a protective grille made of plastic. It improves work efficiency and convenience.
The ballerina for metal is equipped with plates made of hard alloy with sharpening of a cutting turning tool. High cutting force dictates the use of stationary or portable radial drilling machines. Basically, holes are cut in galvanized sheets, the thickness of which does not exceed one millimeter.
How to make a “ballerina” for cutting circles in soft sheet materials
Hello, dear readers and DIYers!
When making various parts for homemade products, sometimes you need to cut a large round blank or hole in a soft sheet material such as leather, rubber, paronite, cardboard.
In this article, the author of the YouTube channel “TEXaS TV” will tell you how he made a simple hand tool to perform these tasks.
Despite the lathe used in the manufacture of some parts, this tool can be made without turning.
Materials. — Round steel, rod — Old drills, M3 screws — Sheet paronite — Abrasive polishing paste, felt, sandpaper — Two-component epoxy glue, machine oil.
The author makes the cutter and needle from a pair of old 6 mm metal drills.
Now radial holes are drilled in the holders for screws that will secure the cutter and needle. Then an M3 thread is cut into them.
A transverse hole for the rod is made in the upper part of the holders. Moreover, in the needle holder it will be deaf, and a thread is cut in it.
In the second, slider holder, it will be through and have a diameter of 8 mm. In addition, a 6-mm axial hole is drilled into it, and an M8 thread is cut into it from the tail part.
Features of working with the tool
The principle of working with a circular drill is simple. A hole is drilled using a centering drill, and then the cutters are put to work. They gradually make a narrow groove, gradually cutting through the material in a circle to the full depth.
The materials used in working with the ballerina are varied: wood, fiberboard, chipboard, MDF, plasterboard, plastic. One common point is that the thickness of the part should be no more than 15-20 millimeters. This parameter is limited by the length of the incisors. Usually the manufacturer indicates the maximum drilling depth on the packaging. If you try to drill into thicker material, you may experience problems with ragged edges.
The use of a tool with one cutter is characterized by runout. This is caused by a lack of balancing relative to the longitudinal axis of the drill. The beating will be especially noticeable when cutting large diameter holes. Cut holes using a drill at low or medium speed. When working on a drilling machine, such problems do not arise.
Also, a laminated or veneered surface can cause inconvenience when working. After passing through the decorative layer, drilling proceeds without problems.
A feature of the circular drill can be considered the ability to adjust the diameter. The distance between the cutters can be set using a scale on a rod or more accurately using a caliper. This is convenient if you need to make a hole without gaps for a pipe or round part.
The spacing of the cutters relative to the center is adjusted individually. It is necessary to align the cutting parts as accurately as possible. This will eliminate unnecessary effort during operation and extend the life of the tool.
Making a ballerina cutter
A ballerina drill significantly saves time when processing (milling) the contours of a cut hole. Processing is carried out automatically using power tools (drill, hammer drill).
Therefore, the physical effort expended when working with a ballerina is also insignificant. Given these advantages, home craftsmen want to have such a tool in their workshop. Moreover, making a ballerina with your own hands is not at all difficult for a competent craftsman.
For this you will need materials:
- Working (metal) plate with dimensions 200x25x4-6 mm.
- Bolts: M8 grade - 2 pieces (in addition to them you need to take 2 nuts and 4 washers) and M10 grade - 1 piece (in addition to them you need to take 2 nuts and 1 washer).
To work you will need tools:
- To mark the work surface: a marker and a ruler with centimeter divisions.
- Painting tape.
- Stationary machine or power tools (hammer, drill).
- Vise.
- File.
- Kern.
- Grinder equipped with grinding and cutting discs.
- Drills for metal with a diameter from 9 mm to 10.5 mm.
- Keys: open-end and adjustable.
- Screw clamps.
Step-by-step instructions on how to make it yourself
- Marking and processing of the work plate.
- Creation and processing of working grooves.
- Manufacturing of cutters.
- Connection of cutters to the working plate.
- Marking (gradation) of the finished drill.
- At the first stage, we cut a 20 cm long strip from the metal sheet. This will be the basis of the tool being created.
- Using a drill with a diameter of 10.5 mm, we drill a through hole on the machine in the pre-punched center of the work plate.
- Stepping back 1 cm from the drilled hole to the edges of the working plate (at the same level as the central hole), we make marks (punch) on the plate for future drilling.
- The distance between the marks must exceed the diameter of the holes that will subsequently be drilled. This precaution will help preserve the drill.
- Using a grinder cutting disc, you need to create two oblong grooves by combining the existing holes. The working plate is in a vice during this operation.
- Using a file (square or flat), we process the resulting holes. The free movement of the incisors will depend on the thoroughness of this operation (we remove irregularities, hangnails, and tubercles).
- Pressing the work plate tightly against the table (we use clamps or a vice), we smooth out all the irregularities and sharp corners with a grinding disc. We insert an M10 bolt into the central hole and screw one of the nuts onto it from the reverse side.
- We put the second nut (lock nut) on it and press it tightly using an open-end (or adjustable) wrench. To make the cutters, we wrap the upper parts of the M8 bolts with masking tape. We fix the bolt heads in a vice.
- Using a grinder's grinding disc, we cut off the thread, processing the bolt on both sides until a metal handle 4-5 mm thick is formed.
- The pointed ends of the bolt, shaped like a one-sided hook, will serve as the working cutters of the drill. The resulting cutters must be inserted into the grooves, having previously been laid with washers on both sides.
- This will increase the area of their contact with the working plate.
- The rod of the future tool and the cutters should be located in opposite directions. The thread sections remaining on the side surfaces of the bolts will allow you to screw on the nuts and secure the cutters tightly.
- Using a ruler and a marker, we mark the entire plane of the working plate, making marks every 0.5 cm. Later on these marks it is necessary to make notches that will be clearly visible during operation.
How to choose and what to pay attention to
Choosing a high-quality circular drill is quite easy
The main thing is to know the main points that you should pay attention to first, but also not to lose sight of the little things
The design is a very important point: a wood ballerina comes with one chisel or two or more. For frequent use, it is better to purchase an option with two or three cutting elements. It is easier to work with such devices and the quality of the processing performed will be at an acceptable level.
It would not be superfluous to be able to replace individual parts. Inexpensive circle drills can have a solid shank with a permanent center drill and rod.
Metal, its quality determines its strength and ability to withstand workloads. High-quality tools are made from high-strength steel or alloys. The shank and cutter holders are shaped using a machine tool. The rod is usually stamped and made of the same metal.
Cheap options often use soft metal or alloys, which can be brittle. Under load, parts may become deformed or break. Such a tool will not last long and it will also be difficult to achieve accuracy from it.
The quality of workmanship, the main feature is the absence of backlashes and distortions. All parts must fit together and be securely fastened with fixing screws.
The markings of a high-quality ballerina's barbell are stamped. Sometimes the divisions are highlighted with bright paint for better visibility.
Cutters and high-quality cutting elements are made from hardened tool steel. They are secured to the holders with rivets or soldering. Solid cutters with holders (made of the same metal) quickly become dull and are not durable.
Manufacturer, when choosing any tool and consumables, preference should be given to well-known and long-proven brands and brands. The most common are Topfix, Stayer, Irwin, Strum.
Purchasing an adjustable circular drill for use at home, or if you need to drill several holes, is completely worth it. This eliminates the need to purchase an expensive tool that may only be needed a few times.
Advantages and disadvantages
The advantages include:
- possibility of changing the centering element;
- equipped with two types of centering elements;
- cutters can be sharpened;
- no additional processing required;
- reliable design;
- the locking screws are fixed by a cone;
- The screws are tightened using a hexagonal socket wrench.
Among the disadvantages it is worth noting:
- poor sharpening of cutters;
- on inexpensive models, when processing large diameters, breakage is possible;
- A high power drill is required.
Criterias of choice
Before choosing a “ballerina”, you need to know its main advantages over other devices for cutting large holes, be it crowns, jigsaws, etc.
Advantages of adjustable circular devices:
- the ability to replace the central drill or lateral incisors at any time;
- reliability of design;
- if necessary, cutting elements can be sharpened;
- adjustable hole width.
Now let's look at the parameters you need to pay attention to when purchasing
- Reliability. It is unlikely that you will be able to determine this criterion visually, so it would be better to check the quality certificates for the products from the seller. For low-quality goods, they most likely will not be available.
- Workmanship. Before purchasing, you need to carefully inspect the device for shells, chips and other flaws. The cutters must be well and accurately sharpened. If the drill is very long, then you need to check whether it is even. Usually these defects are visible immediately and by eye.
- Package. Quality products from well-known manufacturers usually come with bright and good packaging. There will be no grammatical errors in the text accompaniment. None of the well-known brands can afford to package their products poorly.
- Price. Cost can also be considered an indicator of quality. Inexpensive models last a very short time.
Famous brands care about their reputation, and their products will meet all quality criteria. Therefore, it is better to contact official dealers so that the money is not wasted.
The following video talks about the ballerina drill.
What is a ballerina
The cutting tool, commonly called a ballerina, also has a more professional name - “circular adjustable drill with cutters.” The drill is located in the central part of the tool and is used to center the hole. The radius of the circle that the cutters will describe is measured from the center line of this drill.
To equip ballerinas, drills of the first or auger type are used, since a conical tool does not cope well with ceramic materials and can slide off their surface. The result of such slipping can be damage to both the tool itself and the surface of the tile.
Ballerina on tiles differs from a nozzle designed for drilling holes in wood materials
How to draw ellipses
An ellipse is a rather complex shape, but to draw it on paper, you only need two thumbtacks, a piece of string and a sharpened pencil.
Attach two buttons to the surface of the workpiece at some distance from each other. Take a piece of rope, tie both ends into a knot and hook the rope onto the button heads. Now, with a pencil, draw a line that the stretched rope allows you to describe. You can change the shape of the ellipse at your discretion.
The distance between the two focal points of the ellipse is indicated by buttons. If you guide a pencil within the boundaries assigned to it by a rope, then the outline of an ellipse will appear on the paper.
The ellipse shape can be larger or smaller, thicker or narrower, depending on the distance between the buttons and the length of the rope.
Use of special drills
Special drills for ceramic tiles are used in cases where it is necessary to create a hole of small diameter. As such a tool, if you need it to make just a few holes in the tile, you can use a regular wood drill, sharpening it sharper, but a metal drill equipped with pobedit tips is better suited for these purposes. The resources of the latter, if it is provided with high-quality cooling, will be enough to make more holes.
Among the inexpensive drills for ceramics, with which it is convenient to create holes for dowel fasteners, spear-type tools should be distinguished. Using one such drill, the diameter of which can be up to 12 mm, you can create up to five holes in the tile. When using this tool, you should keep in mind that you can drill tiles with it only at low speeds of the drill.
Varieties of spear-shaped drills for tiles and ceramics
You can also drill tiles to accommodate dowel fasteners using drills equipped with carbide plates and toothed cutters. The latter differ from conventional carbide-type drills in that their cutting plates have a one-sided and sharper sharpening. The disadvantages of using such tools are that it is quite difficult to obtain a high-quality result with their help, and before drilling, the center of the future hole must be punched.
A pen tool for drilling tiles is more convenient to use. The advantages of such a drill are that before using it there is no need to pre-core the tile, and it is much easier to aim it at the center of the future hole. Using tile drills, the cutting part of which is shaped like a feather, you can make holes with a diameter of up to 30 mm.
The most expensive, but also characterized by the longest service life, are spear-shaped drills, the cutting part of which is coated with diamond. It is advisable to purchase such expensive and reliable drills when a large amount of work needs to be done with their help.
Tubular tile drills with diamond coating
Experts advise adhering to the following recommendations when drilling holes in tiles intended to accommodate dowel fasteners.
- Once the tiles already attached to the concrete wall have been drilled through their full thickness, the tile drill should be replaced with a concrete tool. In this case, the drill or hammer drill can be set to impact mode. This approach can significantly extend the service life of a drill designed for working only on tiles.
- To prevent accidental damage to a tile fixed to a concrete base when driving in a dowel, the hole in it must be larger in diameter than in the concrete.
- In order to drill a hole in the seam between two tiles without damaging them, you should choose a tool whose diameter is smaller than the width of the seam.
- When hammering in a dowel, you must act very carefully so as not to accidentally damage the surface of the tile.
How and with what to cut out curves and circles
Cutting round holes in plywood
Often, when repairing or installing various wooden products, it is necessary to drill a perfectly round hole. In this article we will try to highlight all the ways in which such a hole can be cut. Options with the use of special tools, as well as without them, will be considered.
How to cut plywood
A hacksaw with a very narrow blade, a jigsaw, a drill saw and a round file are among the hand tools that can be used to cut curves.
It is the narrow blade that provides maneuverability to the hacksaw, but for the same reason it is extremely difficult to operate. You must have a steady hand and an attentive eye to prevent deviations from the markings. However, do not try to work quickly. On the contrary, it is better to advance in small spurts. This will help you hold the saw handle more confidently and guide it exactly along the given line.
It is better to cut out small round or oval holes and “narrow” curves using special tools - a drill saw and a round file, which can also be used to clean out curves.
However, the most suitable tool for cutting rounded parts and holes is an electric hacksaw. Its advantage is not only that it saves energy and time. The included set of interchangeable blades with different teeth allows you to choose a blade for sawing almost any type of workpiece, be it wood, plywood or chipboard. In other words, an electric hacksaw can rightfully be called a universal tool.
Where and what drill is best to buy?
As for foreign-made tile drills, the domestic market offers mainly American, Polish and German models. Their price is much higher than domestic ones, and the packaging is more beautiful. In terms of quality, they are not much different from Russian ones. Therefore, there is no need to overpay. A separate price category consists of the so-called “professional” tile drills. Not everyone can afford them. But they are also very easy and convenient to work with. Their appearance is also simply amazing. The soldering of the plates is carried out with the highest degree of care and precision, the joints are almost invisible. The tip is sharpened in such a way that it is simply impossible to replicate at home. In addition, these tile drills also differ from ordinary ones in that they have a set service life, during which they cannot become dull. After its expiration, the drill loses its “professional” status and, after sharpening at home, can be used as usual.
Specifications
Carbon steel is used to make the device. It is an alloy of carbon and iron. The amount of carbon determines the strength of the tool, its ability to resist load. For greater wear resistance, less sensitivity to overheating and deformation, some manufacturers add chromium, silicon, tungsten, vanadium, and molybdenum to the alloy. For example, the P6M5 marking indicates that the steel from which the cutter or drill can be made contains 6% tungsten, 5% molybdenum, this increases strength.
For strength and increased service life, the drill tip can be tipped with carbide. Such devices give a cutting depth of 30 mm, and without soldering - 25 mm.
Comfortable operating speeds for the tool will be from 1000 rpm to 1400 rpm.
The ballerina, depending on the functional accessory, makes holes whose radius ranges from 20 to 150 mm, while the diameter of the cut circle will be 2 times larger. For example, using a tabletop drilling machine or drill, a ballerina for metal allows you to cut or drill holes in metal with a radius from 22 to 105 mm. The thickness of the material being processed should be up to 14 mm. The material can be steel, cast iron, brass, bronze, aluminum.
Other tools used for the same purpose
In addition to the ballerina, other devices can be used for processing wood:
| Tool | Features of design and use |
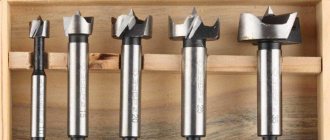
| Feather drill | It is a rod with an expanded blade in the shape of a spatula and a spear-shaped tip. |
Drilling range from 10 to 60 mm, maximum depth – 150 mm.
The quality of the edges is relatively low.
Set of crowns of different sizes
How the tile cutting process is performed
There is a certain algorithm that should be followed when using a tool for drilling holes in tiles, like a ballerina.
- First of all, on the front side of the tile it is necessary to mark the center of the future hole, for which you can use a regular core.
- The cutter or cutters of the ballerina, which will do the main work of cutting the material, are installed and fixed at the required distance from the axis of the central drill.
- It is advisable to lubricate the area of the tile on which the cut will be made with machine oil. In this case, you should make sure that it does not fall into the center of the circle, which can lead to the drill slipping.
- The drill, located and rotating in the center of the future hole in the tile, must pass through its surface before the cutters, so it must be longer than their protruding part.
- The tile in which the hole is made using a ballerina must be firmly fixed on a flat surface of a wooden board or drywall. To ensure such fixation, you can use ordinary clamps.
- Drilling the hole is carried out at low speeds of the tool, and it is advisable to constantly water the groove formed on the tile with machine oil.
- After the cut in the tile has been made to more than half its thickness, and the central drill has passed through the material being processed, the product is turned over and similar processing is performed on its reverse side.
- The tile is drilled to the end from the back side, and the edge of the resulting hole, which may not be too smooth, is processed using a file, emery cloth or a grinding machine.
Despite the fact that the holes made with the help of a ballerina do not have very smooth edges, it is quite reasonable to use it to perform not too voluminous work. In addition, the uneven edges of the holes will later be hidden by external panels of electrical outlets and other decorative elements.
Peculiarities
The main feature of the ballerina drill (its full name sounds more than impressive - “adjustable circular drill with cutters”) is the ability to change the diameter of the circle being cut. The distance between the cutting elements can be adjusted using an auxiliary scale on the mounting rod. If maximum accuracy is required, then you will have to use a caliper. This is quite convenient when it becomes necessary to make a hole for a pipe or other round part without backlash.
The second distinguishing feature is the number of incisors. It can be from one to three, and the quality of processing of the edges of the cut holes depends on this. If you purchased an adjustable drill with one cutting element, then you need to be prepared for the tool to “beat”. Vibration increases with increasing diameter of the cut hole: the larger it is, the higher the runout. This is due to the fact that there is no balancing relative to the longitudinal axis.
Ballerina for wood and other drills: review of designs and features of use
Everyone who works with wood with their own hands sooner or later has the need to make perfectly even large holes. A standard drill will not help here, and using a jigsaw does not always allow you to maintain the optimal shape and quality of the edge.
It is in such a situation that the ballerina mentioned in the title is used, as well as some other devices. We will talk about them in this article.
These devices will be useful where a conventional drill will not help.
Characteristics of metal for drill
The drilling process is the mechanical and physical impact of the drill, therefore the raw material from which it is made must have properties such as:
- Strength. This will ensure drilling through thick layers of wood.
- Fatigue strength. It characterizes the drill’s ability to withstand cyclic loads when in contact with wood.
- Plastic. Allows you to carry out operations to prepare the drill for work.
- Hardness. Determines the durability of the metal.
- Heat resistance. Preserves the mechanical properties of the drill when heated at high drilling speeds.
- Corrosion resistance. Possibility of drilling into raw wood.
We are sure that you will find this article useful about what types of concrete drill bits are available for a rotary hammer.