A DIY guitar stand is a device that can and even should be made at home. Before you design a stand yourself, think about what kind of stand you need and why. The type of accessory depends only on personal preferences and capabilities.
A musical instrument requires careful handling. There are special stands for storing a guitar while the musician is not using it. They differ in the method of fastening. The stands help securely secure the instrument and save space in the room.
How to do it yourself?
The DIY wall stand for guitar is a fork-shaped bracket. In order not to damage the guitar neck, it is rubberized. The fastener is the optimal placement of a musical instrument in the room. The guitar is fixed vertically on the device. This method is considered the most reliable, aesthetic, and cheapest.
What you need
To make a guitar mount on the wall with your own hands, you will need the following materials:
- timber (plank) 20 mm thick;
- rod for making a slingshot;
- bolt with nut for attaching the slingshot to the base;
- stain, varnish or veneer and varnish;
- sandpaper for cleaning a wooden block.
Components alone are not enough. In order for wood and metal to turn into a product, you need the appropriate equipment:
- screwdriver (screwdriver);
- drill;
- set of drills;
- two dowels.
Attention! If you have several guitars, then there may also be several wall mounts.
If you have the listed material, devices, and sufficient experience in creating such products, you will get a decent fastening.
Step-by-step instruction
Wall mounts are the most reliable, optimal option for placing a musical instrument. In case of the necessary performance of a piece of music, the six-string can be easily removed from the fastener and ends up in the hands of the musician. A fastening in the form of a grip can be purchased for 300 rubles in a store and safely secured with dowels on the wall.
There is a more creative way - you can make a guitar holder with your own hands thanks to step-by-step instructions:
- Take an MDF beam or a 20 mm strip. The length of the beam should be 26 cm, width – 8 cm.
- For beauty (optional), you can glue veneer onto the timber. If you take a plank, you can cover it with stain and varnish.
- Technological holes are made along the edges of the plank at a distance of 4 cm. A hole is also made in the center for attaching a slingshot.
- A recess is made on the back side of the strip for fixing the nut.
- The slingshot is made from dozens of reinforcement. Its edges are curved towards the top.
- The base of the slingshot is welded to a bolt, which will subsequently secure the slingshot to the base of the block.
- After securing the slingshot to the base, a place for mounting on the wall is installed.
- Holes are made in the wall, dowels are installed and the product is secured.
- Finally, the musical instrument is fixed to the mount.
Attention! The slingshot itself must be covered with soft material so as not to damage the neck of the instrument.
Wall fasteners can be made from laminated chipboard. The back part of the fastener and two side walls of the fastener are cut out from the remaining sheets. The width between the walls should be slightly larger than the width of the neck, but less than the base on which the pegs are placed. In order not to damage the paintwork of the instrument, you can stick rubberized material onto the fasteners from the inside. It will protect the body of the musical instrument from scratches.
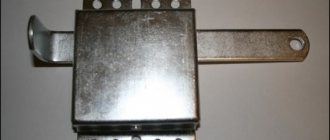
If you have very little time, then such a mount can be assembled from a sewer pipe clamp. As we know, it consists of two parts. We need one that is fixed to the wall with a dowel. By making a hole in the wall and screwing the clamp with a screw, you get a fastener that is additionally wrapped with electrical tape or a foam pipe. Everything is ready - you can use it.
MasterGitar.com
The main difficulty in gluing a stand at home is the need to have special clamps. If you find it difficult to buy or make special metal ones, then there is a very original option from our forum members.
Cleaning the deck under the gluing stand
First you need to outline the frame on the deck. The stand is already positioned on the studs. Slightly lifting the edges of the stand with a point, scratch or use a sharp pencil to draw a frame on the deck.
You can cover the stand window from applying varnish, just as you can scrape off the varnish within the frame of the window.
There is a technique for using a mini router for cleaning. The cutter is set in such a way as to remove literally several dozen varnish.
It often happens that after repairing or tearing off a stand, there is an uneven surface of the deck, torn out with meat. You can choose 0.5 mm of the body of the deck, as if sinking the stand into it. With careful work, this is not at all visible, but there is no need to use epoxy resin or any complex inserts with additional adhesive seams. Again, using a mini router, you can make the window bed for the stand absolutely flat.
What glue should I use to glue a guitar stand?
If the surface of the deck and stand are exactly adjacent to each other, then it can be glued with high-quality wood glue or special adhesives such as Titebond, or with epoxy resin. By wood glue we mean hide, bone or fish glue. Reading an article about adhesives
You cannot glue with elastic adhesives, since this is a so-called constantly loaded gluing, and very strongly, and if the glue stretches, the stand will soon come off.
If the surface of the deck has various kinds of defects and you are prejudiced against epoxy resin, then you can use intermediate inserts. If there is no prejudice, then epoxy resin is suitable, because it will fill all the unevenness and will not shrink.
The rear part of the stand must be adjusted especially carefully. She's the one who comes off. The front part of the stand, on the contrary, is pressed into the deck. The shift can be ignored, since the gluing resists it best. The main problem is the back part, which is trying to come off.
Clamps for gluing the stand
The stand must be pressed with special clamps through the hole in the deck. Three clamps reaching from the voice box to the stand. Press the middle and edges.
From the deck side, from the inside of the body, it is necessary to ensure uniform pressure, covering the entire area under the stand. A special hook thing is attached to a clamp, which presses the deck, but allows the fan springs to pass through. It is advisable to put pressure on the springs themselves; this can be achieved by inserting something like foam into the gaps.
Pressing only on the springs is a bad option, since the deck will move in waves between the springs.
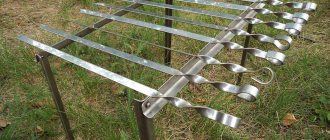
Special installation for gluing a guitar stand
Our forum members came up with and made a very interesting device for pressing the stand, which is made from ordinary sticks with an F-shaped clamp.
Several photos of Nikolai's device.
Advantages and Disadvantages of Wall Mount
The positive aspects include the following:
- It is easy to install, fastened with 2-4 screws.
- Convenience and comfort in a small space.
- Determines the place of a musical instrument.
- The fasteners are nice and aesthetic. The interior design will not be affected.
- The soft covering of the bracket will protect the guitar from scratches and damage.
- Securely fixed to the wall. There is no fear that the guitar will break.
There are practically no negative aspects to this mount. The only downside is the dust that settles on the guitar if it is rarely used. Each instrument requires maintenance, so dust will be wiped off the instrument constantly.
As you can see, the positive aspects dominate the negative ones. This means that a guitar wall mount is a must-have item in a guitarist’s home.
Some subtleties
Before you make a floor-standing guitar stand with your own hands, you should think about how it should be suitable for any shape of musical instrument body. They can be classic or custom-made, and you need to take into account the peculiarity of the shape.
You should not make the guitar stand too heavy; you will probably have to move it from place to place. The most ideal weight is approximately 5 kg.
Using expensive materials is not very advisable, because if you have money, you can always go to a specialized store and buy a guitar stand there.
Recommendations and tips for making a holder
To ensure that the fastener meets all requirements, you should follow the recommendations of specialists when manufacturing it:
- If pins are used instead of a slingshot, then the distance between them should be narrowed so that the tool does not slide to the floor.
- If a musical instrument of decent weight will be attached to the wall, then a more massive block should be used for fastening.
- To avoid damaging the body of the guitar, rubber and foam tubes are installed on the fasteners.
- It is not recommended to install the fastener above the battery. Also, direct sunlight should not fall on the musical instrument.
Considering the above, do not forget the common truths. When caring for a musical instrument:
- Air humidity of 40-60% is suitable for storing a guitar. You can achieve favorable conditions with a humidifier.
- Air temperature also affects the condition of the wood of a musical instrument. An air temperature of 19-25 degrees is ideal for storing a guitar.
- It is recommended to vacuum your favorite tool twice a year.
- The best way to store a guitar is on a wall mount.
Careful, proper storage will keep the guitar intact. A guitar wall mount is a great way to permanently display your instrument. Do-it-yourself fasteners will provide reliable protection against unforeseen situations. The guitar will delight you with its wonderful sound for many years.
Good day to everyone who has a lot of money, today I want to tell you about a small project I completed with my son.
Namely, design development, production and assembly of a guitar stand.
What do you need to make your own guitar stand?
An A-shaped floor stand is popular. With its help you can place the guitar in a vertical position. They are made from various materials.
On a note! Poor quality metal or plastic coating can ruin the body of the guitar.
It’s easier to make a stand from affordable and easy-to-use materials, such as wood. When making your own stand you will need the following:
- plywood;
- several wooden slats, boards;
- foam;
- screws, nails;
- wood glue;
- furniture varnish.
Design
Initial data
Design
Having brainstormed the options (of which there were not very many in general due to point 2 of the initial data), we decided to make a stand
for placing guitars.
The first solution was to take 6 plastic water pipes: make two bends in each, cut out special fasteners from steel - ties and put it together.
The option is quite workable, but the manufacturability (as I imagined that I would have to bend 6 pipes with high precision with my hands and a construction gun - my mood immediately dropped noticeably) and the aesthetics of the solution leave much to be desired.
The second option was to use a threaded rod (for example M10x1000, price about 70-100 rubles), a large-radius plastic pipe, make the upper and lower supporting parts of the structure from 3mm-4mm steel and cut a thread in the central part for the rod or weld a nut. Manufacturability increases significantly, aesthetically it looks easy. But doubts arose about the rigidity of the structure: the support point (even if a large washer and an additional nut were added under the upper part) is small and distortions are quite possible, and the weight also began to confuse: according to calculations, 3 - 4 kg. It worked out roughly, and that was without guitars.
Guitarist foot rests
Guitarist foot rest
A footrest has long been a useful and practically necessary attribute for beginning guitarists, as well as professionals. Sometimes people who purchase a guitar think that a footrest is not such an important accessory for learning, but this is more likely due to inexperience and lack of information. The stand allows you or your student child to form the correct position behind the instrument, which determines the position of the hands, the development of motor skills and technique in general.
How it works?
When a person picks up a guitar and places it on his right or left leg (depending on the type of guitar), he discovers one nuance - a gap between the leg and the instrument, or rather the shell (side part) of the guitar, which during the playing process leads to that the guitar slides and rolls, and that the instrument is not fixed tightly and can dangle from side to side. Often, in order to compensate for this, beginning musicians follow the path of least resistance and sit cross-legged, which also leads to disastrous consequences - curvature of posture, rapid back fatigue, numbness in the legs and clenching of the hands.
The footrest allows you to develop the most comfortable, natural fit for the body and provide your hands with maximum freedom and comfort, especially when it comes to a child.
The stand is a must for those who have chosen to play a classical guitar, which involves sitting with the instrument placed on the left leg, standing on an elevated platform. The supply also turns out to be convenient for playing guitars with metal strings of the folk or dreadnought body
Device
The footrest has comfortable rubberized feet that do not slip on parquet or tiles, and do not damage linoleum and carpeting. Also, the area of contact with the foot has a relief and non-slip texture. The stand is adjustable in height using the “ironing board” principle, so you can adjust a comfortable height to suit your height, the height of the chair, or the presence/absence of a heel on your foot.
What types of stands are there?
1. The most common, durable and inexpensive option is the metal stand mentioned above.
2. Wooden footrests are less common due to lower strength and higher cost.
3. A stand for classical guitarists, attached directly to the instrument with suction cups. It is widespread mainly among classical guitarists; in fact, it was developed specifically for them. It has its pros and cons in terms of ease of use. Not recommended for beginners.
Build result
The result was quite a beautiful and neat design (thanks to the 0.1-0.2 mm gaps in the tongue-and-groove joints).
Strong and reliable - since the lower base is quite wide. The stand is equally stable with one guitar or three.
The groove under the fingerboard in the top panel is made with a slight negative angle for additional fixation.
The LED strip inside looks beautiful.
Design
Initial data
Design
Having brainstormed the options (of which there were not very many in general due to point 2 of the initial data), we decided to make a stand
for placing guitars.
The first solution was to take 6 plastic water pipes: make two bends in each, cut out special fasteners from steel - ties and put it together.
Answers on questions
Are the wall mounts suitable for electric and bass guitars?
You can easily find and buy holders suitable for all types of guitars, but you must take into account the dimensions, shape and weight of your instrument.
Is hanging a guitar dangerous?
If the guitar is properly secured and hung in a suitable location, there is no danger.
What to do if the guitar suffers greatly from changes in humidity and temperature?
Build result
The result was quite a beautiful and neat design (thanks to the 0.1-0.2 mm gaps in the tongue-and-groove joints).
Strong and reliable - since the lower base is quite wide. The stand is equally stable with one guitar or three.
The groove under the fingerboard in the top panel is made with a slight negative angle for additional fixation.
The LED strip inside looks beautiful.