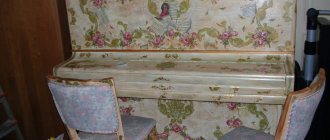
A kanzashi box will decorate a dressing table or chest of drawers; you can store jewelry and all kinds of small items for handicrafts in it. Jewelry, whether it is a gift from a loved one or created with your own hands, needs to be stored somewhere.
It is not necessary to buy storage devices in the store; use our master class to make a kanzashi box with your own hands. If you're completely new to the technique of making ribbon flowers, take a look at our post on this hobby to learn the basics.
We invite everyone else to immediately start creating ribbon beauty!
Kanzashi for beginners: technique, master classes, step-by-step photos
Recently, the kanzashi technique has been gaining momentum in popularity, which is not difficult for beginners to master. There are a large number of master classes on the Internet, where each stage is described in detail and with step-by-step photos. This allows you to quickly and effortlessly create real masterpieces. In fact, kanzashi are flowers made from satin ribbons. They served to decorate the hairstyles of Japanese girls. Today, this technique is used to make hairpins, headbands and various decorative elements.
We recommend reading:
On a note! Since geisha were forbidden to decorate the Japanese traditional costume, as well as their arms and neck, the girls were left with the only area for self-expression - their hair. That is why they tried to decorate their hair in a more interesting way, creating kanzashi from silk ribbons with elements of silver and gold.
Varieties of kanzashi
Several varieties of kanzashi are known. In domestic countries, Hana Kanzashi . Such jewelry is made on the basis of hairpins, hairpins, and sticks.
Flowers made of satin or silk ribbons are attached to them. Jewelry varies in size, material, shape.
A subspecies of Han Kanzashi is Shidare , which is a structure from which flowers hang on threads or chains.
When flowers are formed into a round shape, Kusudama . This decoration is rarely found in domestic countries, but has taken root in Japan.
Tips and examples
After completing the work, check how convenient it will be to use the box - for example, whether the lid is stuck or whether the decor is in the way. Also try shaking the product and tugging at the glued elements. If something falls off, make it more durable.
Satin ribbons can be used to decorate not only a box, but also various children’s decorations, greeting cards, or even be used to decorate a holiday table. Before starting work, you can look at examples on the Internet, so that you can then combine several techniques at once, add something of your own and get a truly unusual product that will appeal not only to you, but to everyone around you.
DIY sombrero made of cardboard
Styles of women's jackets
Master class on kanzashi: mastering easy technique from scratch
The original art of creating accessories from fabric with your own hands is gaining more and more popularity. With the help of simple tools and materials you can make your own jewelry.
In this article you will find a detailed description of several products and the technique of their implementation, as well as the main elements that you can use to realize your own ideas.
Kanzashi master class is the best find for beginners!
Let's start simple
If you are the first to encounter the kanzashi technique, then first let’s define the basic requirements.
Like any type of needlework, here you first need patience and perseverance, the desire to achieve an ideal result.
The process of creating a box from kanzashi petals
It will take you a lot of time to create such a box. Therefore, you will need the following materials, which are described below:
satin ribbons, their width should be from 2.5 to 3 centimeters. Having a ribbon of this width, be prepared for the fact that creating a petal will be more difficult than if the ribbon were 5 centimeters. But with such neat preparations, the craft will look a hundred times better. Choose the color of the satin ribbon yourself. It can be pink, white or blue shade of the material. Such colors always remain in trend;- Preparation is still required. Wooden or birch bark would be perfect;
- glue gun;
- a ribbon or braid of sufficient length that will act as a base in the kanzashi box;
- scissors, paper with a ruler, matches.
We have decided on the materials, and now we can begin our master class. Take a pre-prepared piece and cover it with satin ribbon. It is not necessary to do such manipulations perfectly; anyway, this part of the work will not be visible under the petals. The main thing is that you seal the surface without gaps:
Keep in mind that it is necessary to seal not only the outer surface, but also the inside. For the inside, you can use felt instead of satin. Felt will definitely look much more interesting than simple satin:
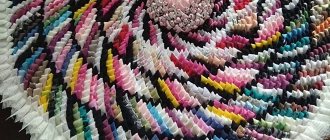
Look at the photo to see how the kanzashi box is decorated. Now let's move on to creating the petals. They are made according to a standard formula using tweezers for greater convenience. Tweezers will help you do a better job, since you will need to hold and scorch workpieces measuring 2.5 by 2.5 centimeters with fire.
In the next picture you will be presented with a diagram according to which kanzashi petals will be made. This is one of the simplest ways. Fold the resulting square in half, and then do it diagonally again:
Bring the edges together and singe them with a match. Make sure that the workpiece does not have time to melt, but rather is tightly connected. Now cut the back corner and singe this element with fire again. Each new petal must be made with a double tab, but only on one side. Otherwise, all errors will be immediately visible.
Once all the elements are ready, you can start decorating the box in the kanzashi style. Carefully glue the petals, but only so that the glue is as invisible as possible. When you finish this time-consuming process, take a ribbon or beautiful beads and cover the elements at the top:
The lid for the craft also needs to be decorated. In this work you can show all your accumulated imagination and not hold it back. The photo shows only an example of how to decorate a lid using the kanzashi technique. You can do it the way you like by adding beads, sequins or even beads to the surroundings:
It remains to make a few touches and the chic jewelry box is completely ready. All decorative elements that adorn the craft must be attached with hot glue.
The video lessons that will be shown to you below will clearly show the options for kanzashi boxes made by experienced needlewomen.
Interesting ideas
Take a circle of corrugated cardboard and glue paper circles to it on both sides. One of them should be cut with a small margin. Do it as shown in the photo. Next, you need to cut out the circumference of the lid, the height of which is equal to a couple of cm. Any of the edges must be processed with a hole punch or cut out yourself. Place the circle on the box and glue a paper strip to it. Thanks to this method, the lid will fit tightly to the main body of the box.
For this method, the first step is to cut a strip from the reel, the height of which is 0.5 cm. It is this strip that will serve as the basis for the lid. You need to glue beautiful decorative cardboard to the top and on the sides. You can glue lace on the side parts.
Features of the box
It’s not difficult to make a Barbie box with your own hands. The principle is to make a storage container - a box. It is made from any materials that can stick together. They are subsequently covered with fabrics: velvet, chiffon, lace, ribbons and much more. The finished shell is decorated with various elements: beads, buttons, rhinestones and sparkles.
You can create such beauty yourself if you have free time and desire.
Barbie herself will be attached to the lid, but without legs. Her skirt is the box that is made first. Options with clothes from different eras look beautiful and elegant. These are fluffy skirts, lace, corsets, hats and jewelry.
There are many options for creating a box doll.
External design depends on the imagination of the master.
Important! There is no need to buy a ready-made dress for the doll. When making boxes, clothes for Barbie are made independently
We embroider a wonderful box with ribbons
Draw a sketch according to the size of the box lid. We take the gift box and peel off the excess thickness from the inside of the side of the lid and from the outside of the box wall. This needs to be done, because when gluing the sides they will thicken so much that they will no longer be able to close.
Transfer the design to the fabric. Use a special felt-tip pen for this, which can be easily removed with a wet brush or disappears on its own within a couple of days.
First we embroider small, non-voluminous details.
Using a brush and water, wash off the remaining felt-tip pen from the finished embroidery and dry it with a hairdryer.
Then we embroider larger and more voluminous ones.
From a thin lining fabric of a suitable color, cut out a bias tape, approximately 5 cm wide and length equal to the circumference of the box. We glue the bias tape along the inside of the box to a depth of about 1.5 cm. I used glue very reminiscent of the Soviet BF6 glue. It doesn't get wet through.
We wrap the free edge onto the front side of the box and do not secure it with anything. It will secure later when I glue on the main side trim.
We take the main fabric and glue the top cover in the same way. Only when gluing the inside side, we very carefully adjust the bias tape to the very joint, there should be no gaps left, finishing work.
Preparatory work
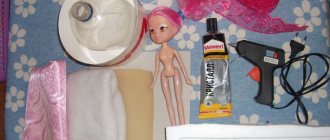
Before you start working directly on the box, you need to do some preparatory work: cut off the lower part of the doll’s body slightly below the waist line; the height of the bottle or bucket is adjusted so that it matches the length of the legs, and the future product looks proportional. Next, the part is cut into two parts. If you take a plastic bottle for work, it will be most convenient to work with the neck and bottom. Therefore, they measure it from the top and bottom, and throw out the middle. So, when the materials for the base are prepared, assembly and decoration begin, which results in an original doll-box. MK would be very appropriate here.
A simple option with a plastic bottle
We are not unique in our desire to decorate our home with dolls. Our ancestors successfully did the same. They made dolls from scrap materials, and they served as amulets for the home, protectors of adults, children and the family hearth. They were often used in religious rituals, to decorate the house, and simply given to children for games.
The easiest way to make a doll is from a plastic bottle. This process will bring children and parents many pleasant minutes spent working together, and the result will be a baby’s favorite toy - a doll or rattle for a younger child.
To work, you will need a plastic bottle, a new nylon stocking or cotton sock and foam rubber. The bottle is cut into three parts and the upper and lower parts are connected with tape, after pouring peas, beans or rice inside. This will create a noise effect, and it will be much more interesting to play with the doll.
Decor ideas
To make crafts made from tape reels look even more elegant, you can decorate them with buttons, beads, and lace.
- To make the box look vintage, use decoupage cards with motifs in the form of old letters, music books or postcards for decoration. After pasting the box with decoupage, cover it with a layer of varnish with a craquelure effect. This varnish will create cracks on the surface and “age” the box. Ivory lace will add an additional vintage flair.
- To make a bright box, add glitter or pearl to the coating varnish. Using gold leaf and special glue, you can create a gilded effect.
- Instead of covering paper, you can use fabric. Moreover, the combination of different textures and density of matter looks very advantageous. For example, the bottom layer is light satin, with dark lace on top.
- A folk-style casket can be made using jute or linen bag fabric for decoration. An additional decoration, in this case, will be cross-stitching of floral motifs or ornaments.
- You can make a male version of the chest. For example, as a box for storing watches, cufflinks and tie clips. For finishing a man's box, materials of darker colors and denser textures are suitable.
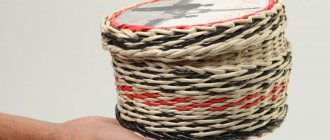
How to make a box with your own hands from tape
There are no tricks in making the base for the box, now you will see for yourself. To do this, we first need thick cardboard and a sleeve of wide tape.
We attach the sleeve to the cardboard ones and draw a circle, cut it out and adjust the size of the cardboard base so that it covers the “ribs” of the sleeve, but does not go beyond them. We need two of these cardboard circles, exactly the same. One will serve as the base, the other as the lid of the future box. Now we need to trace one resulting circle on felt and cut out the same circle, only from felt.
Warm up the glue gun, apply glue to the cardboard circle and apply a felt circle to it, gently press with your fingers, leveling it so that the felt base sticks well to the cardboard. Now this base of the box needs to be glued to the sleeve so that the felt side is inside the box and is its bottom. To do this, lubricate the ribs of the sleeve with hot glue and quickly apply a cardboard-felt base.
It turned out to me like a cookie, with pink filling. If you use hot glue, then everything needs to be done very quickly, because it hardens instantly and sometimes this really interferes with the work. This time I wanted to use crystal glue in addition to hot glue, but it disappeared somewhere, then it turned out that my husband just put it away in a safe place). Therefore, I had to do everything only with hot glue. If you have the opportunity to use moment crystal glue, feel free to take it; when gluing a box, it is much more convenient to use.
The second step is to cut out a strip of felt, the width of which will correspond to the height of your tape sleeve, and the length will be equal to the circumference of the sleeve. We need this strip to finish the inside side of the box. When this part is cut out, we also glue it to the inside of the bushing using hot glue or instant glue. The bushing itself must be greased gradually and also gradually covered with a felt strip.
At the third stage of creating the box, we will deal with its external decoration. To do this, cut a strip from a pink ribbon 5 cm wide, which is equal to the circumference of the sleeve plus add a couple of centimeters, it is better that the tape overlap each other than not be enough.
The tape needs to be glued to the sleeve in such a way that there remains a strip about 1 cm wide at the bottom that is not glued. We do this in order to carefully make the top of the box and cover the visible cardboard with tape.
I used hot glue again, but when gluing the satin ribbon, it’s better to use the crystal; after drying, it is not visible on the fabric. When we have glued the tapes, we need to hide the visible cardboard, so we press the protruding tape inward along the top and glue it with glue.
Now you need to cover the bottom of the box with a 1.2 cm wide satin ribbon with gold trim around the edges. We also cut a strip along the circumference of the sleeve and glue it to the bottom with glue. I decided to glue an openwork braid to the bottom part, I don’t know if I’m calling it correctly, but you’ll understand from the photo what I’m talking about. I also used hot glue when gluing. With this edging it turned out elegant, in my opinion.
Now it's time to work on the lid of the box. I will cover it with a 1.2 cm wide satin ribbon with a shiny border around the edges. Since the diameter of the lid of the box is 8 cm, the strips were cut into 8 cm long, their edges must be singed on a candle so that the ribbon does not fray.
Now in a circle, clasping the lid on both sides, so that a piece of tape reaches the middle of the circle on one side and glue strips on the other side. Our task is to glue the strips more or less evenly, so first you can glue a cross of strips, as it were, and then then glue the lid on it.
Now we determine which side of the lid will be internal and which external. On the inside of the lid, where there were taps of the tape, I cut out a heart from a brocade ribbon and glued it in the middle, thus, the issue with the joints was resolved, and the top of the lid will then be covered with kanzashi flowers.
In order to attach the lid to the box, I cut two strips of pink satin ribbon 1.2 cm wide, the one that I pasted over the lid, first glued them to the lid, and then trying them on so that the lid could easily open and close, glued them inside the box itself.
In general, in a good way, this part should have been hidden at the stage when we glued the felt to the inside of the box, but this was the first experience in creating such a craft, so I’m learning as I go). Honeycomb and our do-it-yourself box made from scotch tape is ready, all that remains is to decorate it beautifully with kanzashi flowers.
Materials
To repeat the master class, you will need:
- an empty reel of wide tape (preferably 5 cm high) - it can be successfully replaced with any cardboard tube, which you simply have to cut with a knife. You can make a chic box if you cut a wide linoleum tube into pieces!
- binding or regular corrugated cardboard
- scrapbooking paper – 1-2 sheets 30x30 cm.
- edge punch
- decor for the lid
- PVA glue
- double sided tape.
Examples of other works additionally use felt and lace. The master class is quite simple and does not require any special skills or abilities.