Car travel has long been one of the favorite types of recreation. At the same time, for long trips, motorhomes or campers are often used, which are a temporary place to spend the night or carry out some household operations. You can either buy such a car trailer-device yourself or build it yourself if you have the time, tools and materials.
A new type of holiday with a camper trailer
A large number of various projects allows the car owner to make the right choice. Often, a design is selected based on the number of its possible inhabitants, the need for autonomous operation, or is planned based on a small budget.
Construction of a motorhome and caravan
Regardless of what type of motorhome the traveler decides to make on his own, it is important to ensure that it has minimal amenities such as sleeping places and an area intended for cooking/eating.
Inside the minibus or trailer is equipped with:
- shelves and cabinets designed for storing things;
- gas stove connected to a cylinder;
- washbasin.
It is recommended to equip the motorhome with a bathroom combined with a small shower, which is especially important for those who like to travel long distances.
Thus, you can make sure that a family of travelers lives comfortably even in a homemade house made from a sturdy trailer.
A do-it-yourself tent trailer will also appeal to fishermen who like to go out for a quiet overnight hunt.
The length of the motorhome should not exceed 4 m
Homemade mobile home: how to legalize the construction
You not only need to learn how to build mobile homes on wheels yourself, but also ensure that the construction is properly documented. Registration of a self-made camper trailer is carried out at the Automotive and Motor Research Institute.
As soon as the owner of the vehicle receives the documents, they need to be brought to the traffic police. To obtain the necessary certificates and permits, you will need to visit the above organizations several times.
Traveling by motorhome has long been practiced in America, however, in our country, such a hobby has only just begun to develop rapidly.
A DIY camper from a trailer will allow lovers of long trips to comfortably spend the night in nature and cook their favorite dishes right in the trailer. A campervan for traveling can be bought at a car dealership, however, not everyone can afford to allocate such a large amount from the family budget. But this is not a reason to deny yourself pleasure. After spending a little time, money and effort, you can build a summer cottage trailer with your own hands and go explore distant countries.
Selection of materials
A single-axle trailer, the maximum load of which does not exceed 1000 kg, is used as the base on which a homemade house on wheels is built. Due to the fact that there are weight restrictions, the choice of material will not be as extensive as we would like. The frame part of the structure is made of pine beams, the cross-section of which is 50 mm.
The walls of the structure can be made of 10 mm moisture-resistant plywood, or you can use impregnated plywood, which reduces the hygroscopicity of the material and prevents it from rotting. The floor is constructed from stronger plywood sheets (12 mm), which are used in the construction of tables in the country and beds.
Galvanized steel is ideal for exterior cladding. In order to hem the sheets to the frame beam, you will need self-tapping screws. The overlaps are sealed with silicone sealant, and the outer corners are reinforced with aluminum corners. Silicone is also used as additional sealing of corners.
Galvanization must be coated with a layer of paint.
There are many materials that can be chosen as insulation. Between the outer and inner layers of plywood you can lay:
- glass wool;
- foam;
- Styrofoam;
- polyurethane foam;
- extruded polystyrene foam.
When giving preference to glass wool, it is worth considering that over the years it will cake, so it is advisable to purchase more rigid insulation materials.
Transforming a trailer into a motorhome will require quite a lot of time.
To cut a window, you should use a power tool
Useful little things
- An alternative to galvanized plywood is external cladding made of corrugated sheets. Country houses from modular containers are often built using a similar scheme.
- Do-it-yourself repair of a summer house trailer usually comes down to periodic painting of the galvanized surface. Old paint is removed with washes. In those few cases when the wheels, fenders or suspension of the trailer are damaged, spare parts for the trailer camper are purchased at the nearest auto store.
Brake lights and fenders are easy to find at an auto store.
- The simplest way to organize ventilation is to provide a pair of hatches in the door covered with a mosquito net (bottom and top).
Manufacturing technology
Below you can familiarize yourself with the manufacturing technology used to make a motorhome from a trailer with your own hands.
Internal layout
The transformable camper can comfortably accommodate 2-3 people. It is important to plan the space of the motorhome in such a way that each occupant has a sleeping place, and make a layout drawing. In addition, you will need to take care of installing a small kitchen, as well as:
- gas stove;
- ovens;
- shells;
- cabinets designed for storing cutlery/dishes.
All equipment must be securely secured, lockers must be closed. Otherwise, when driving on the roads, everything will change its place.
If you have enough space in your travel trailer, you can install a microwave and grill.
Inside the trailer motorhome there should be a bathroom in which a washbasin, shower and dry closet will be installed.
The frame of the building is best made of pine bars
Floor, bottom trim
The sides of the trailer must be removed to leave a level surface. In cases where there is no doubt about the rigidity of the horizontal base, floor joists and trim can be fixed directly to it. A thin flexible sheet is scalded with a frame made of corrugated pipe (section 50×25 mm).
The bottom frame made of timber, laid around the perimeter, is fixed to the base using bolts. The side bars are connected with lags, maintaining a step of 20 cm. The structure can be assembled on a stand and, after completing the installation work, pull it to the base of the trailer.
Galvanized corners are used to attach the logs to the harness. The bars must be soaked in two layers of hot drying oil. Using cold drying oil, you will need to heat each layer with a hair dryer. The insulation is placed between the joists, and the floor is covered with plywood, which is secured with self-tapping screws.
Having made a trailer house with your own hands, you can relax for a long time on the sea coast without paying for renting a hotel room.
Sheathing, insulation
The ends of plywood and its outer sides require protective impregnation. Experts advise applying at least 2 layers of hot drying oil. Insulation is fixed in the grooves formed by the frame and inner lining. After this, you can move the skin of the mobile home.
The finished frame begins to be sheathed from the inside. The plywood is attached with self-tapping screws, the length of which is 32 mm (step 25 cm). Self-tapping screws are purchased galvanized, since black steel will quickly rust, leaving untidy streaks on the walls.
Each hole for self-tapping screws must be pre-drilled. In addition, they need to be countersunk so that the caps do not cling to clothing. If possible, you can use self-tapping screws with semi-countersunk heads.
DIY trailer house
The inside of the plywood is sanded before varnishing and after the first layer is applied. You should avoid any moisture, because against the background of this, lint will appear on the top layer of veneer and the surface will become rough.
A similar scheme is used to assemble the door. The finished structure is hung on galvanized hinges. The locking functions can be performed by a pair of bolts/door lock.
At the final stage, the exterior finish is galvanized. It is fixed with self-tapping screws along each frame bar, the length of which is 25 mm (step 10 cm). Corners can be used to cover corners. The area of each joint is sealed with sealant, which will prevent water from flowing in.
The amount of work during the manufacturing process of the structure will be large, so it would be a good idea to purchase a simple vibrating sander in advance.
Gas and electricity
To make traveling by car comfortable, you should make sure that the motor home has electricity, gas and water. You need to plan the location of the electrical wiring on the drawings, thinking, first of all, about where to place the external connector for charging the battery. When choosing a battery capacity, it is necessary to take into account the expected travel range and the load on the electrical network.
Gas cylinder in a motorhome
To prepare a delicious lunch or dinner, as well as heat your RV, you can use a gas cylinder. After completing the process of equipping the kitchen, you will need to install a hood with a ventilation system.
The installation of the gas system and electrical network in the car should be carried out by specialists with appropriate experience.
Of course, this will not be free help, but do not forget that incorrect installation can lead not only to injuries, but also to death of the traveler.
Communications in the motorhome
The lack of basic amenities such as a bathroom, shower and kitchen will make any trip a real challenge. It is important at the planning stage to decide on the location where the amenities will be located. It is advisable to give preference to an automatic water supply system and install tanks for it.
An interesting option with a remote shower
If you do not provide a place to store water, the kitchen will not be as comfortable as possible for the traveler. Most often, special containers with water are filled with a pump that supplies it to the tap. Inside the box located under the sink, place a container that will serve as a sewer. Motorhomes can also be equipped with a shower and a dry closet.
When choosing furniture, you should give preference to small and compact options, because the camper will not have as much space as you would like. By installing folding beds for relaxation and sliding tables, you can significantly save space. To ensure safety during movement, the structures are securely fixed to the walls.
Furniture for motorhomes can not only be purchased in a store, but also made with your own hands.
Roof installation
Before you begin installing the roof, it is worth laying out the fiberboard on the upper parts of the walls. After the rafters are installed, you can nail the fiberboard and fix the plywood sheets on them.
The width of the structure should not exceed 2.55 m
Trailer painting
The external and internal parts of a home-made mobile home trailer are coated with a layer of primer and painted with semi-gloss exterior paint.
You should first make sure that all irregularities/holes are filled with putty. Generally, 1 coat of primer and a couple of coats of paint are sufficient to protect the wood portions of your trailer.
Interior decoration and furniture selection
The inside of the trailer needs to be wired for outlets and lights. After this, you can sheathe all the fiberboard and seal the seam area with sealant.
The process of choosing furniture should be taken seriously. It is important to correctly calculate the dimensions of the trailer so that you can fit the necessary items into the homemade mobile home from the trailer. Most often, campers are equipped with:
- tables with benches for the dining area;
- beds/folding sofas (when choosing, you should take into account the traveler’s full height so that your stay is as comfortable as possible);
- wall cabinets with removable plywood shelves on which you can store food, personal items and bed linen;
- washing
It is worth considering that while the motorhome is moving, the furniture will be subject to increased load. That is why it is important to purchase high-quality and durable furniture with reliable fittings and a minimum number of moving elements.
Interior arrangement
It is advisable to check before the trip whether the lockers open during sharp turns. Otherwise, during travel, the contents of the boxes will constantly be scattered throughout the cabin.
Advice! Furniture in a homemade motorhome is firmly fixed at 2 points - on the wall and the floor surface.
Towbar for Mitsubishi Outlander: which one to choose, user reviews
When planning a long road trip, you should definitely equip your motorhome with a kitchen area and install a portable refrigerator. You need to put a stove in the kitchen where you can cook a delicious lunch.
The interior decoration is done in such a way that even in the event of strong shaking during movement, the furniture does not fall and its contents do not fly out onto the floor.
Having an additional battery and a 500-watt inverter will be very useful. The wiring is laid in such a way that it fits into each socket that produces 220 V (if an inverter is available). Thus, the traveler will be able to use the same devices as at home and charge his laptop/mobile phones.
In order to save energy, LED lighting is selected.
In cases where the roof is not radius, experts advise making it a slight slope on one side. Thanks to this, the roof will dry out faster after rain and there will be no risk of water flowing into the living module liner in the trailer. Using aluminum corners (40x40 mm), you can close the side joints and fix them with self-tapping screws.
Each internal seam is sealed with transparent white silicone sealant. Secure locks are installed on the doors, and blinds are installed on the windows.
When starting to build a motor home, you must first create a project
Technological process
Making a tent van for a GAZelle with your own hands is not such a difficult task. First, the frame is welded, the posts of which are attached to the bottom through embedded plates. The covering material is calculated according to the length of the sides and cut according to the required dimensions.
It should be noted here that covering material from a single piece of which you can get a finished awning does not exist in nature. Therefore, the fabric will have to be sewn on a machine, leaving 4-5 centimeters of margin along the bottom edge for installing eyelets.
In conclusion, we would like to add that our company produces awnings and frames for GAZelle and cars of domestic and Western production. Our specialists work only on individual projects, guaranteed to carry out work of any degree of complexity.
Using a Gazelle and an old bus
It is necessary to begin remodeling a minibus by completely cleaning the body from seats, upholstery and dirt. After this, you need to cut out all the holes for windows, ventilation, and so on.
The further sequence of actions will be as follows:
- Leveling and cleaning all damaged surfaces. To do this, use a metal brush, hammer or special equipment to level out dents. If necessary, you need to weld the corrosion areas where holes have formed. Then they are cleaned and primed to prevent further rust formation.
- The interior is carefully insulated, including the floor and ceiling.
- After the thermal insulation coating, it is necessary to sheathe everything with waterproof plywood.
After such work, you need to install gas, electricity, water supply, install a bathroom and furniture. To securely fix the furniture, it is necessary to install thick plywood on the walls in advance. Furniture needs to be attached to it. As an option, you can install reinforcing strips on the floor and fix the set to them.
If such a house is made not from an old trailer, but from a gazelle or a bus, then the chassis needs to be brought into working condition. Then such a structure will actually be mobile.
Dimensions
A reasonable minimum size of trailer required for our purposes is 2300x1600 mm. Such dimensions will allow you to build a comfortable enough sleeping place for two people inside and leave some space for a table for a washbasin and/or a gas stove.
A two-axle trailer-dacha will provide much more comfort; however, the price of such a trailer will be double or triple. Its dimensions (up to 4.5 meters in length) allow you to build a full-fledged country house with a washbasin, kitchen and toilet.
A reasonable minimum height of a structure is generally 2 meters. The height can be adjusted depending on the size of the owners: it is clear that a very tall person will not want to constantly cling to the ceiling with the top of their head.
Furniture
Despite the fact that at present it will not be a problem to purchase ready-made furniture for a motorhome, according to reviews, it is not able to satisfy all the requests of car owners, especially those who create a motorhome on wheels according to their own drawings. Therefore, the best option is either to manufacture it yourself or to order it individually from a furniture manufacturer.
In most cases, it is more optimal for a motorhome to make your own furniture. Since for a small motorhome, for example, based on a standard gazelle or UAZ, not much furniture will be required, and it is not particularly complex, you can save money at this stage of the work. For the proper level of comfort in a motorhome, as a rule, the following furniture structures are made:
- dining table; to save space in a small motorhome, it is better to use a folding version;
- kitchen table with sink and work surface;
- open shelves or drawers located under the ceiling of the motorhome;
- If you have a toilet in a motorhome, you will need to make a partition with a door.
When a KamAZ or a bus is taken as a base for a motorhome, the amount of furniture listed above increases. When making a motorhome on wheels with your own hands, to facilitate the task of determining the type and quantity of furniture, you can use special computer programs, or draw a detailed plan for the future layout of the motorhome on paper, where you can clearly indicate not only the type of furniture, but also its location.
You can see how the most expensive mobile home can be decorated in the photo - you can clearly see how sophisticated and comfortable the interior decoration can be.
When building a mobile home with your own hands, you should pay attention to the quality of materials. Thus, for furniture it is advisable to use moisture-resistant materials that are resistant to household chemicals, since cleaning in any type of motorhome - a bus, trailer or gazelle - will have to be done quite often
offers the service of converting minibuses and minivans into motorhomes. You yourself choose the van and chassis that best meet your requirements for the weight, dimensions and speed characteristics of the motorhome.
The conversion of minibuses into motorhomes is carried out by specialists in Moscow who have undergone training at enterprises and specialized tuning centers in Germany. To build a camper, equipment and accessories used in the mass production of motorhomes are used.
The base for a motor home can be:
| Peugeot Boxer | |
| Citroen Jumper | |
| Fiat Ducato | |
| Mercedes Sprinter | |
| Your van | Any other van that has been examined by a service center |
Set of works for converting a van into a motorhome:
- Insulation of the van body (thermal insulation)
- Inserting glass and hatches into the body of a minibus
- Manufacturing furniture for a motorhome from lightweight furniture board laminated with veneer
- Interior decoration of minibus walls with lightweight plywood covered with leather
- Laying electrical wiring, installing lighting and electrical equipment inside the minivan
- Installation of gas equipment and heating systems for motorhomes (Truma, Alde)
- Installation of a toilet block and shower cabin of a motorhome
- Formation of the kitchen area of the motorhome and installation of a refrigerator, sink, gas stove, hood, oven, microwave oven
- Installation of any additional equipment at the client's choice: air conditioning, audio and video equipment, satellite TV, navigator, solar panels, awnings and other equipment for the motor home
Registration of conversion of a van into a motorhome
At the very beginning of the article, we mentioned that the motorhome must be properly decorated so that no problems arise on the roads. Therefore, before starting construction, it is worth agreeing on your plan and obtaining permission for the conversion.
There are many nuances in this process: weight, cargo or passenger vehicle, number of passengers, what will be inside, and so on. Sometimes it’s easier to seek help from a licensed company that will help you prepare documents.
After you have built a motorhome with your own hands, you need to obtain a certificate of compliance of the vehicle with the changes made to its design with the safety requirements of the Customs Union. And after that, contact the traffic police, where the car will be inspected and changes will be made to the title.
Be patient, as bureaucratic matters are not done quickly, and you may have to change something several times. However, once you've completed this step, you'll be the proud owner of a legitimate DIY motorhome!
- Share on Telegram
- Share on Vkontakte
- Share on Facebook
- Share on Instagram
- Share on WhatsApp
- Share on Email
Step-by-step instructions: how to build a motorhome with your own hands from scratch
Choosing a van or trailer
The very first thing to do is to find a vehicle that suits you. What's your budget? Are you only going to use it on weekends or are you going on a long trip? Do you love off-road adventures? How many people will be traveling and what amenities do you need? You can find any inexpensive used van and start building a motorhome based on it.
It's worth noting that a van is not the only type of motor home. Perhaps a trailer-trailer or a camper module for a pickup truck is more suitable for someone for recreation. Before you start building the perfect motorhome with your own hands, you can familiarize yourself with all the advantages and disadvantages of each type of motorhome in our article.
HOME ON WHEELS: HOW TO CHOOSE AND WHAT YOU NEED TO KNOW
Let's figure out what kind of motorhomes there are and how to classify them by size. After all, what can be installed inside directly depends on this.
| Passenger van These are vehicles built on the basis of a passenger car. These vans are the most budget-friendly and are great for short trips. These include Volkswagen Caddy, Renault Dokker, Renault Kangoo, Lada Largus, etc. |
| Medium-sized van These vans are already more spacious, some models, like the Mercedes Marco Polo, have a lifting roof, and traveling in them is much more comfortable. This also includes the famous Volkswagen California, Renault Trafic or Opel Vivaro. There are many mid-size vans on the market, and their main advantage is their compactness, so you can easily drive them around the city and drive into almost any parking lot. |
| All Metal Cargo Van Minivans are the largest but also the most expensive vans on the market. They are designed to carry heavy loads, so they have a lot of space, you can stand at full height and easily travel in comfort for a long time. In such vans you can install several sleeping places, a shower and toilet, and all the amenities necessary for life. These include Ford Transit, Mercedes Sprinter, Fiat Ducato, Citroën Jumper and others. |
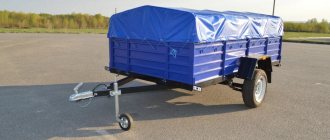
| Mini Trailer A small teardrop trailer or other option (including an off-road trailer) is a good option if you already have a touring vehicle and are planning small outings. Inside, space is limited, but you can equip such a trailer with almost everything you need. |
| Large caravan trailer Ideal for large groups, families with children and those who have a powerful car to pull such a trailer. There is a lot of space inside, and this is a real full-fledged home - with a shower, toilet and everything you need for long trips. |
| Module for a pickup truck A favorite option for lovers of off-road adventures! Complete freedom, you can go where most people cannot go, having with you comfortable living and recreational conditions. |
So, someone chooses a van for themselves, and someone chooses a trailer (for example, a used one, for further conversion). For our very first motorhome, we decided to try the second option. However, this step-by-step instruction is suitable for absolutely any van or pickup module.
We found a fairly cheap version of the trailer, which was already about 18 years old and which had been sitting at the campsite all this time. Of course, it wasn’t very good inside, but we were going to rebuild it!
This is what we took on the day of purchase
Remove everything unnecessary and clean
Before starting construction, if this is not a new vehicle, then it is better to disassemble everything to scratch - remove the seats, cabinets, shelves, wiring and check for rotten parts. This applies to both the metal body and wood (if we are talking about a used trailer).
What happened in the beginning
If this is not a new van, then you need to pay special attention to the condition of the body. The most common problem is rust. Body corrosion is a serious matter, which can lead to the car rotting and driving it will be simply dangerous. It is important to get rid of all traces of rust before warming and soundproofing the van!
There are several ways to remove rust from a car. The most common is mechanical. To do this you need:
- wash the body thoroughly
- clean off rust and remove all paintwork
- sand the surface with sandpaper or a grinder
- clean and degrease the affected area
- apply anti-corrosion paint
- after drying, paint over it with car paint
It should be noted that if the damage was serious, then you may need a primer and fiberglass putty. If there are cracks and dents on the body, they also need to be addressed. The most important thing is to completely remove all traces of damage and rust, otherwise it may appear again, especially in cold climates and if the car is constantly parked outside.
If we are talking about a trailer-trailer, then you will have to work with wood. Particular attention should be paid to the shower and toilet area (if there was one), since over many years of use, moisture has most likely accumulated here and mold may have formed. In our case, this happened, which we only found out when we dismantled the wall!
It's better to disassemble and take out all the old furniture and disassemble the shower
Plan your new RV
This is one of the main points! It’s great if you are a designer and can immediately plan out the entire space and sketch out a plan on paper or even create a 3D project in programs such as AutoCAD. Unfortunately, we are not designers, so at the planning stage we heavily used the Internet. And be sure to decide for yourself what you need in a new motorhome:
- Bed
- Kitchen
- Table
- Fridge
- Cabinets and shelves
- Work zone
- Shower and toilet
- Place for a pet
- Relaxation zone
- Solar panels and panels, switches, etc.
Take all the dimensions and figure out how everything can fit using cardboard models of a bed, shelves, table, etc. - this is the easiest way if you do not know how or do not want to use modeling programs on a computer.
A great resource for finding cool ideas, in our opinion, is Pinterest. You can hang here for several hours, but you will definitely find something you like. Save it to your desktop, phone, or print it - whatever is convenient. The main thing is to have inspiration and ideas on how to build a mobile home with your own hands!
Ideas for inspiration
Windows, hatches and pipe openings
After the body is processed, it's time to start planning where the openings for windows and hatches will be. If a hood is installed, you will need an opening as close to the kitchen as possible. Skylights are a great way to add light to a motorhome, making them great to have above the kitchen and in the shower room. In addition, to avoid excessive condensation after taking a shower, it is simply necessary in the bathroom area.
Some people like to sleep and look at the stars, so you might want to make a hole just above the bed. In addition, windows and hatches can be of different shapes—people often install porthole-shaped ones on the rear doors of cargo vans.
We had a gas heater in the trailer, so we needed a hole in the floor for ventilation. Moreover, if you already know how the water supply will be installed, you can immediately drill the necessary holes for the inlet/outlet of water and pipes.
Be sure to cover any openings on the outside (with plastic or thin plywood) while you are working on other things to keep dust and moisture out of your van or trailer!
To install windows and hatches you will need:
- Marker and measuring tape
- Electric jigsaw
- Silicone
- Hatches and windows
Thermal insulation and interior trim
Sheathing and insulating the interior (whether you have a van or a trailer) is a critical step in building a DIY RV. This may not be the most fun part of the project, but it does require some patience because there will be a lot of different shaped pieces to cut out.
Proper heat and sound insulation of the interior will allow you to use the motorhome all year round, which is very important. It is necessary to insulate the walls, ceiling and floor, and special attention should be paid to areas in the area of windows and hatches. What does good insulation prevent?
- Cold
- Heat
- Condensation
- Noise
Insulating a van or trailer should be done with high-quality materials, taking your time and avoiding the formation of “voids” and “bubbles” between the metal and the insulating material. Moreover, to avoid condensation, it is necessary to add a waterproof material to the insulation, which will prevent the formation of steam when there is a large difference between the external and internal temperatures.
Currently, there is a huge selection of materials to suit every taste and budget. When working in a van, you will have to combine straight, rigid insulation sheets and a more flexible material for working with parts.
We will tell you how to insulate a van yourself, as well as what materials are best to use in a separate article.
As for the final cladding, it can be done either immediately after heat and sound insulation, or it can be postponed until the installation of the entire energy system. In this case, you can hide the wiring.
Once the van or trailer is insulated, all that remains is to move on to the final surface layer. This is what will be the finished walls of the motorhome and its aesthetic part. Here you can use plywood, wood or lightweight PVC materials, depending on what you like best. For walls and shelves, you can use thinner material, from 5 mm, and for the floor, choose something stronger, at least 10-15 mm. On top of the selected material you can add paint (it’s best to choose matte) or someone even glues wallpaper (yes, this is also very popular!)
It is worth noting that when using a motorhome, scratches may appear on the walls over time, so it is better to choose matte paint and then, if necessary, simply touch up the damaged area rather than changing the wallpaper.
Water supply for a mobile home
In addition to what you'd like to see inside your new RV, you'll want to carefully plan for important things like the water system.
You can buy two tanks of the required volume for clean and gray water, make the necessary holes in them, supply water and drain. Installing plumbing and plumbing in a motorhome yourself is much easier than making an energy supply system. The main thing to remember is that everything must be done hermetically and efficiently in order to avoid further leaks.
To install a complete water supply system you will need:
- Clean water tank (preferably installed inside the car/trailer)
- Gray water tank
- Hoses, fittings, check valve, filler neck
- Pump
- Hydraulic accumulator
- Boiler
- Shower tray, kitchen and shower sink
You can read about how to install a complete RV water system with hot shower here.
We bought a 90 liter clean water tank
Furniture installation
After the thermal insulation and final paneling of the van is completed, you should measure everything again and begin building or assembling the finished furniture. This process can be combined with the installation of a water supply system, since sometimes it is necessary to make adjustments to the original dimensions in order to “fit” the space for the boiler, canisters or hoses.
Plywood drawers and seats
It is better to opt for lightweight materials such as plywood and PVC, especially in invisible parts, so as not to spoil the aesthetics and not load the van or trailer with excess weight - under the ottomans of the sofa or bed, inside the cabinets, etc.
The visible parts can be made of wood (such as a countertop) or other materials that you like. A good option is ready-made modules with a built-in kitchen, sink and countertop, made to fit the size of a specific van model.
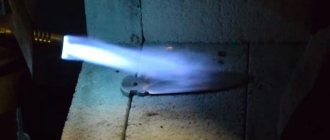
Motorhome gas supply
Gas is a must-have item for every RV. The kitchen, most boilers, and many heaters run on gas. In some cases, it is better to contact a professional to install gas in your motorhome. However, if you only need it for the kitchen, then you can do it yourself. It is worth noting that to install gas you need to buy special gas equipment and hoses.
The gas cylinder must always be in an upright position and installed in a sealed cabinet to prevent leakage in the cabin. It is necessary to drill a hole in the floor, at least 10 cm in diameter, and install a ventilation grill so that the gas can escape outside in the event of a leak.
For your own peace of mind, you can install a gas sensor in your motorhome, which is very inexpensive, but can greatly help out in the event of a leak.
How is gas installed in our motorhome?
Electrical supply in a motorhome
Electrical power is the hardest part of building a DIY RV. If you are not an experienced electrician, then it is better to entrust this stage to professionals. Incorrect wiring can easily cause a fire and burn out a car, and unfortunately there are many such cases. However, if you have a good understanding of electricity, you can install the entire system yourself.
Here you need to carefully consider where to install the switches (including 220 V sockets, 12 V switches, external power supply to the van), how the devices will be connected, where to put the inverter and how many batteries to install.
For maximum independence and autonomy, you should consider installing solar panels that will allow you to use everything you need wherever you park. Modern panels charge even in daylight, so residents of northern latitudes should not worry that the sun does not appear often in your climate.
We will tell you what you need and how to install an electrical system in a motorhome or trailer in a separate article.
A convenient thing: if you don’t want to bother with electricity and wires, then just buy a car inverter. Then while driving you can easily charge mobile phones, cameras and even a computer.
Super convenient to carry this in a camper
A simple solution: if you don’t yet have electricity in your motorhome, but you really want to go out into nature, then you can buy a set of garland lights and hang them around the perimeter of the camper. And carry spare batteries with you.
Here is the idea for light bulbs from the same Pinterest
Toilet in a mobile home
The toilet is a really important thing in a motorhome or caravan, perhaps even more important than hot water. With it you really feel the difference between just a car and a “home”. Many people don't think about installing a toilet in their minivan, especially if they only travel on weekends, but let's face it, it's an integral part of life! And when you’re stuck in a traffic jam or caught in heavy rain for several hours, you really feel the difference.
Well, if we are talking about long journeys, then there should be no doubt. In addition, special dry closets for mobile homes are sold already in a set with everything necessary. All you have to do is screw it to the floor!
Toilet and shower in our motorhome
A simple solution: the first thing that comes to mind is a shovel!))) But seriously, small dry closets that can even be installed under the bed are now becoming very popular.
Example of a toilet that stows under a bed or in a cabinet
Complete the decor
Don't skip this last step! This is exactly what will make your camper a cozy home. Firstly, if you're going to be spending a lot of time in your motorhome, you'll need a comfortable bed or sofa bed with pillows and ottomans. They are easy to sew, even if you don’t have a sewing machine.
Secondly, don't forget about the curtains. For a motor home, it is always better to sew them with elastic bands and ties so that while driving they do not constantly fall and bunch up. It's also a good idea to install mosquito nets so you can sleep with the windows open.
Curtains and mosquito nets underneath
If you are traveling with your four-legged pet, then make sure that he has a cozy and comfortable place. After all, he will also have to spend quite a lot of time there.
You can expand your motorhome endlessly! And the more you travel, the more useful things will come to your mind. For example it could be:
- plastic boxes for storing food and things
- hooks for clothes and shoes
- compact broom and dustpan
- food containers and bags
- camping utensils
- first aid kit
- ropes
Storing dishes Storing clothes and other things
The list goes on and on! The main thing to remember is that space is limited, so don't take extra things that you won't use.
Useful extras
Once you start traveling in a self-built motorhome, you will soon realize whether you need to add anything. You may need an additional roof rack or awning so you can sit outside when it's sunny or rainy.
Over time, you may want to add sleeping space to the roof of the van or attach a rack for bicycles or snowboards/skis. There are an infinite number of such extras, everything depends solely on material abilities. In our opinion, if you go on long trips, you should think about such things as:
- Roof rack and car box
- Ladder
- Additional luggage rack on the towbar or hanging metal box
- Marquise
- Air conditioner
If you are a fan of off-road adventures, then the van or trailer should be additionally equipped (suspension, wheels, snorkel, winch, underbody protection, etc.). In addition, you will have to carry sand trucks, spare tires, a can of gasoline, and you will need more space to store all these things.
Popular models
Let's look at different models of tent trailers from well-known manufacturers. Each has its own technical features that affect the cost and popularity among buyers.
Camp-let
The Camp-let tent trailer is made in Denmark and is designed to accommodate four people. The front and side panels are quickly removable. The base is made of fiberglass; there is a rubber-band edging along the sides. The model has three varieties:
- Camp-let Basic is made of gray cotton and acrylic. The awning is supported by reliable hinge elements. On an area of 17 m2 there is a living room and two sleeping compartments; there is no kitchen module. The veranda has a waterproof floor. There are curtains on the windows.
- Camp let Classic. A kitchen module has been added, which has the following equipment: a stove with three burners, a 13-liter tank, a 12-volt sink pump, compartments for dishes, a countertop. There are mosquito nets on the windows in the kitchen and bedroom. The awning is made of durable and breathable acrylic fabric, which creates a pleasant climate inside the tent. The area of 18 m2 can be expanded by adding a guest module with additional beds. The Classic set includes a wardrobe with a rail, a lambrequin with pockets, a sun canopy, and wind protection screens.
- Camp-let Premium has a reinforced structure and sophisticated design. New features include latex mattress covers, a canvas luggage compartment, roof rails, recessed headlights, and a canopy over the tent entrance. The color of the awning is dark blue, the roof and windows are blue. According to the test results, this model was recognized as the best of the entire line.
Trailer tent Camp-let Basic
Trailer tent Camp let Classic
Trailer-tent Camp-let Premium
Without cargo, the trailer weighs 250 kg, the loaded weight reaches 550 kg.
Rapido Flyer
Travel trailer from a French manufacturer. The weight of an empty trailer is 400 kg, when filled it is 650 kg. The package includes six beds, a gas stove, a dining table and a clothes locker. There is a spare wheel, a gas cylinder, and a wrench for supports. The frame is galvanized, the trailer is equipped with a brake mechanism.
The tent is designed for the summer season and is painted beige.
The Rapido Flyer tent trailer is designed for summer holidays
"Picnic"
Motorhome from a Russian brand, adapted for Russian roads. Capable of transporting loads up to 750 kg. Under the awning there are two rooms with double beds. The kitchen has a two-burner stove, a pull-out stainless steel sink, and a 12-volt pump.
The interior is protected from drafts, rain, insects and dust. It is possible to install three types of suspensions and reinforced hubs on the galvanized frame.
The impact-resistant fiberglass material from which the body is made does not transmit ultraviolet rays, does not require special care, and is easy to repair.
Trailer-tent “Picnic” from a Russian manufacturer, capable of transporting loads weighing up to 750 kg
Podium for speakers: make it yourself or buy it
In the process of manufacturing a motor home, the vehicle owner tries to install various durable materials, which is a serious mistake. It is important to use lightweight materials during the construction process so that the car can easily pull the finished structure.
The second, no less common mistake that is made when building a motor home is ignoring the recommendations regarding ensuring maximum protection for the external surfaces of the trailer. It is advisable to apply at least 2-3 layers of primer and paint, which will increase the life of the homemade camper.
You should also avoid exceeding the dimensions of the main platform of the trailer selected as the base. Otherwise, difficulties will arise during the registration process with the traffic police.
It’s not always possible to register a homemade camper
Isothermal booth made of sandwich panels
These vans are mostly used in conjunction with additional refrigeration equipment. Polyurethane foam is used as insulation material here. It is pumped under pressure between the inner and outer panels. This allows you to significantly improve the characteristics of the booth, and also ensures high strength and reliability of the entire structure.
Using special formulas, you can calculate the thickness of the body wall so that the temperature is maintained throughout the trip. Such preservation is especially important for the transportation of medicines and perishable food products. Here you need to maintain it close to zero degrees. An isothermal booth is a thermos that reliably maintains temperature.
Such bodies are produced for popular brands of truck chassis. These are Mercedes, Gazelles, KamAZs, MAZs, GAZs and other cars. But most of these vans are created for Gazelle.