For many centuries, chests were important elements of the interior; they could be found in almost every home, regardless of the wealth of the owners. Chests, having various sizes and shapes, were used during travel to store valuables and household items; They were also passed on as inheritance, often with a dowry collected for the bride.
Recently, the fashion for chests has been revived; now they can be increasingly found in houses and apartments . They are sold in many interior stores. But if you wish, you can make a wooden chest with your own hands, since there are a huge variety of different options.
DIY wooden chest
Decorative chests: practical applications
There are many options on how to make a trap chest, or a large chest for children's toys, a woodpile in the form of a chest and a jewelry chest.
Capacious and compact products are decorated in accordance with the chosen style and for this you can use modern decorative materials.
Presentable appearance and practical spaciousness, proper organization of internal space helps to use all the capabilities of such products.
For holiday greetings, you can make a small and attractive money chest, which will be perfectly complemented by a bouquet of flowers and a greeting card.
How to make a magic chest with your own hands using a template
If you have a finished product, for example, packaging for a sweet gift, you can use it as a blank.
To do this, unstick the seams and lay out the cardboard chest to a flat piece. Place the stencil on the cardboard and trace along the outline. If you need to make a smaller or larger chest with your own hands, just change the size of your diagram proportionally. Another way is to find a template on the Internet, print it to the desired scale and also trace it along the outline.
Whichever template option you choose, the steps for creating the chest itself will be as follows:
- So, in front of you is a contour blank, which you transferred to cardboard for the chest in any way. Cut it out with a knife or scissors.
- Draw along the fold lines with a sharp but not cutting object, for example, a knitting needle or a non-writing ballpoint pen, or make small indentations or cuts in the form of a dotted line. This step will allow you to carefully bend the thick cardboard without creasing the material.
- Fold the flat pattern into a three-dimensional structure and glue all the seams.
- The next stage will be decoration. By the way, some elements should be attached before assembly, for example, fabric if you are going to cover the chest with it.
What can you use cardboard chests for?
Not complicated technologies and a step-by-step procedure on how to make a chest from a box, described in this article, will help you make a chest yourself.
Such universal and thematically designed crafts can be used for different purposes, it all depends on the functionality, decoration and purpose of the finished product:
- for storing jewelry and money, small souvenirs;
- as a storage system for children's toys and treasures;
- as gift packaging for different sets;
- as a decorative decoration and design addition.
An antique-style chest or small chest is highly decorative and perfectly decorates the room.
To preserve its presentable appearance for a long time, you should carefully follow the manufacturing technology of the craft and select the right materials for manufacturing and decoration.
Useful tips
When choosing a chest model that you plan to make with your own hands, you need to pay attention to the option that will fit perfectly with the interior of the house.
Expert advice:
- For a retro style, a restored element that has no cracks or abrasions is perfect.
- Vintage style, on the contrary, requires a worn product with chips and scratches.
- To prevent the design from being too conspicuous, the room needs to be supplemented with objects that will match the style of the chest (lamp, paintings).
- If the room is designed strictly in white colors, and the structure is of some other shade, then it can be repainted in the color you need.
When creating a wooden craft, its final processing is very important. This includes sanding, tinting and varnishing. If there are still cracks on the surface of the product, they must be hidden using putty intended for wood.
Homemade decorative chests are usually placed in the bedroom, living room and children's room.
In the bedroom, the product can be installed near the bed, placing linen, towels, a blanket with pillows or jewelry there.
In the recreation area, the structure can be used as a coffee table, on which you can place a vase of flowers, a book or a newspaper.
In addition, such a decorative element can be placed in the bathroom, and jars of cream, shampoos, cosmetics and much more can be stored in it.
Jewelry chest manufacturing technology
To make an old-style chest yourself, you do not need special knowledge or a lot of time; the creative process is based on several stages.
To implement them and obtain the planned result, you must follow all recommendations from experienced craftsmen and designers:
- the choice of idea is based on one’s own taste and preferences, taking into account the intended purpose of the craft;
- depending on your own skills and abilities, you need to select the right materials and tools;
- special attention is paid to the selection of the method and method of fastening the individual elements of the future chest;
- correctly selected accessories and fittings make it possible to significantly increase the decorative value of the craft;
- technologies for interior and exterior design involve the use of different finishing materials.
Based on these tips, you can choose an idea, decide on the theme of the chest design and begin implementing your plans.
At each stage, you don’t have to limit your imagination, because the most daring experiments help you get an ideal and excellent result that can amaze even a master.
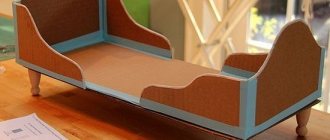
How to make a lid
If you decide to make Santa Claus's chest with your own hands, drawing a pattern yourself, you will have to work a little on the lid of the product.
For the first time, you can create it in the form of a separate part that is glued to the box base. Work like this:
- Draw two halves of a circle with a diameter that matches the width of the lid (or base box).
- Draw circles of larger diameter around the workpieces. These will be the gluing allowances.
- Cut out the resulting two semicircles and make cuts along the allowances and bend them.
- Draw a rectangle with a width equal to the long side of the base box. The length will be determined somewhat more difficult: you need to measure the perimeter of the arc of the resulting semicircle (without allowances) and add to them the distance for gluing to the base (back) and the allowance for the front part so that the lid overlaps.
- Draw another rectangle equal to the size of the bottom. Don't forget about the gluing allowances too.
- Cut out all prepared parts.
- Glue the elements into a three-dimensional structure and attach to the base.
Selection of materials
The technology of how to make a chest from cardboard or plywood can differ significantly in the way materials are processed.
For beginning craftsmen, the optimal solution would be to make a practical craft from a ready-made cardboard box, and after practice, you can begin to use more practical materials.
Tools for work
Depending on the selected idea and materials, you will need to prepare tools to apply the technology for processing them yourself.
The standard set is a stationery knife and scissors, glue with good adhesive properties, additional accessories and paints and varnishes.
Assembling the chest
The procedure for making a chest for wood begins with cutting the source material in accordance with the selected sketch into individual elements.
Working with packaging cardboard is simple and convenient; it bends perfectly and is suitable for forming any configuration; it is easy to glue and decorate.
Chest decoration
If we are making a chest for money or jewelry, then it is necessary to decorate it beautifully not only on the outside, but also on the inside.
To do this, you can select different materials and cover it entirely with paper or wallpaper with an appropriate print, use self-adhesive film or acrylic paint, and bronzing technologies.
Decorating Basics
This stage in the creation of our pirate props is the most interesting, because there is a whole flight of imagination that cannot be limited. What will the created mysterious chest be like?
When decorating the casket, we use any colors you like. If you use dark paper for the inside, the chest will become mysterious, and if you use dark paper on the outside, there will be a gloomy effect. You can also use printed pictures with pirate attributes: crossed bones under the skull, flag, ships, anchors and chains. The same can be painted using acrylic paints. Scraps of antique maps will look great in decor. To age a map, you need to take a printed picture, tear it up and make it look antique with coffee.
The chest can be decorated with coins, shells, stones, ropes, sparkles, rhinestones, pieces of wood, nets and whatever comes to mind. If you want to imitate a wooden structure on the surface of the chest, then glue small pieces of cardboard or a crumpled sheet of newspaper. You can use beads as shown in the picture.
Below are photos of how you can decorate pirate chests.
Thus, in a few hours you can create a light and effective pirate chest, which will definitely become a bright detail at a party or in the interior of a child’s bedroom.