How to make pomegranate juice at home
Ingredients
Steps Print
- Use fresh and heavy grenades. Look for grenades that feel heavy for their size. The heavier they feel, the more juice they will contain. Don't worry about split or cracked fruit, as cracks can be a sign of extremely ripe and juicy pomegranates. Avoid pomegranates that are soft-spotted, slimy, or too light for their size. A medium-sized pomegranate yields about 1/2 to 3/4 cup of fresh pomegranate juice. Large fruits may yield a glass or more.
- Remove the seeds. Using a very sharp knife, cut the sides of the pomegranate and peel from top to bottom. Cut off the top or end of the stem, pull the fruit apart and remove the seeds. Unlike when you peel pomegranates to eat them, you don't have to worry about peeling off every piece of membrane or breaking apart all the seed tufts. Although you need to remove all the peel, as it can give the juice a bitter taste. Remove any large pieces of membrane so that they do not interfere with the juice being extracted from the seeds. Do all this over a large bowl.
- Place the pomegranate seeds in a bag. Set aside the bowl with some of the juice you obtained while extracting the seeds from the fruit and transfer all the seeds to a sealable, durable plastic bag. Because you are going to crush the contents. Be careful to use a good quality bag, as thin or torn ones may tear, leaving all the juice on your kitchen counter. Once the seeds are in the bag, get rid of as much air as possible before sealing the bag. If you want to drink the juice immediately after making it and want the juice to cool, refrigerate the pomegranate seeds in the bags for 20-30 minutes before the next step.
- Crush the seeds. The rolling pin perfectly squeezes the juice out of the seeds. While you crush the seeds to get all the juice, you need to do it with a little softness and finesse so you don't tear the bag. Work the seeds slowly and steadily until you begin to see the juice pooling in the bag and the pulp being removed with a movement.
- Strain the juice. Cut a small hole in the bottom corner of the bag and strain the pomegranate juice into a glass or other container. The juice will run out at first, then you may have to squeeze the bag to get all the juice out. Next, cut a large hole and pass the juice through a strainer. Mix with the reserved juice that you got from peeling the pomegranate. You can try putting the discarded pulp and seeds in a cheesecloth and swirling it until some of the remaining juice comes out. Although this may not yield much juice. The juice can be stored, covered and refrigerated, for several days. But in fact, it is perfect as soon as it is cooked.
Frame
As a basis for the manufacture of the body, a foam rubber insulating pipe of insignificant thickness is taken, which is cut into pieces in the form of small cylinders. To make airsoft grenades, it is enough to divide the material into pieces about 10 cm long. However, much in determining the appropriate parameters depends on the size of the firecracker used.
To make it easier for the filler to rupture the body during an explosion, small cuts of 3-5 mm are made along the entire perimeter of the future projectile.
From the same foam insulation, circles are cut out that will serve as lids and bottoms to hold the internal contents of a homemade grenade.
Grenade using modular origami technique
How to make a spear with your own hands: from wood and paper?
If everything related to pyrotechnics causes justified concerns, you can make an origami grenade from 3D modules. For children's war games, such an imitation is quite enough. A modular grenade is an original gift for February 23, Airborne Forces Day and other “men’s” holidays.
You will need:
- 80 green modules, size 1/32;
- PVA glue.
Step-by-step instruction:
We assemble the 1st and 2nd rows from 8 modules. We close the resulting chain in a circle. We turn the part inside out so that the walls are almost vertical. In this case, the bottom of the “grenade” will resemble a daisy.
We fasten the next rows with short sides to long ones. Thanks to this technique, the workpiece takes on a barrel-shaped shape. In total we collect 8 - 9 rows. This is quite enough for the grenade’s silhouette to become expressive and recognizable. We make the handle from 8 modules, folding them in a “chain”. And glue it between the elements at the top of the figure.
We get something similar to the American Mk II hand grenade:
For reference
The Mk II fragmentation grenade (Mark II) appeared in service with the American army in 1918. By that time, the US Armed Forces, which entered the First World War on the side of the Entente, had already demonstrated their technical backwardness and poor organization. President Woodrow Wilson, having familiarized himself with the weapons of France and Great Britain, instructed the commander of the expeditionary forces, General John J. Pershing, to urgently begin military modernization.
American engineers were one of the first to develop the Mk I grenade, taking as a model the French F1 model, popular at the front, with a ribbed body and a capsule-type igniter. However, the projectile, created in a hurry, was structurally far from perfect. To activate it, complex manipulations were required, which in battle conditions did not always give the desired effect. In addition, 7 seconds passed between ignition and explosion - quite enough for the Germans to send American grenades back to the Allied positions. The fragmentation of the corpus also raised questions: 4 rows of 8 columns. When it exploded, the grenade produced few fragments and was therefore ineffective.
The improved Mk II model replaced its predecessor in 1918. Military engineers modified its body, increasing the number of rows to 5, and redesigned the ignition system. The Mark II grenade was loved by the armies of many countries, “went through” two world wars and was finally decommissioned only in 1967. Until the US-Japanese conflict in the Pacific, combat Mk IIs were painted bright yellow to distinguish them from training ones. However, during battles in the Philippine Islands, it was noticed that grenades in hot, humid climates quickly became moldy, causing them to smoke heavily and also make loud noises in flight. The Japanese reacted to the attack before the explosion occurred and threw the shells back. To avoid this, the Mk II began to be painted in dark olive tones.
Using the origami technique, you can make not only a grenade, but also a bomb from paper:
Where did the “limonka” come from on Russian soil?
Most likely, the prototype was the Mils grenade from the First World War. At that time it was the most advanced weapon in its class. This assumption is probably not without a grain of truth, since the shape and design principle of the fragmentation jacket are surprisingly similar. However, there is another point of view.
F. Leonidov believes that the immediate model for assembly was the French F-1 (!), which was put into service in 1915 and... the English Lemon grenade (one of the versions is why the F-1 grenade is called “lemon”). But no one can prove whether this is really so.
In principle, this is not so important, because the design of the fuse is originally domestic, and the high technology of production is a tribute to the Soviet weapons tradition. Both English and French samples from WWII are much more difficult to manufacture and more expensive
Review of the handicraft grenade "Khattabka"
Basic ways to protect the population from damaging emergency factors
Detailed photos of the Khattabki grenade from VOG-17 and VOG-25
The “Khattabka” grenade got its name from Russian military personnel in Chechnya in 1991-2001, named after one of the field commander Khattab, who fought on the side of “Independent Ichkeria”. The Khattabka grenade often appeared in the media: the terrorist attack in Moscow on Dubrovka, the storming of a school in Beslan. Often appears during CTO when apprehending terrorists. To create grenades, as a rule, shots for the VOG-17/30 AGS and grenades for the VOG-25 under-barrel grenade launcher (and its other modifications) were used. The design and characteristics of the VOG-25 and VOG-17 explosions are designed to a greater extent to injure enemy personnel with shrapnel wounds and distract healthy soldiers from the battlefield to provide first aid and evacuate a wounded comrade.
The standard impact detonator was removed from the grenade and replaced with an UZRGM (standard fuse for RGD-5 and F-1 type grenades). The mass of explosives in the VOG-17 is 20-40 grams less than the F-1, so the Khattabka is inferior in power to the F-1 grenade. You can often see how a “khattabka” from VOG-17/30, after conversion, has a cartridge case with an expelling charge, which is of no use. A grenade was made from VOG-25 in approximately the same way - by replacing the standard detonator with an UZRGM fuse. The mass of the explosive was also inferior to the F-1 grenade, and the lethal effect was less, since aluminum fragments have less mass and strength. “Khattabkas” were used by Chechen militants like simple grenades. They were also used as mine traps and as tripwires. Often, grenades were additionally equipped with another safety device - a piece of medical plastic syringe, which was placed on top of the safety lever. The safety lock made from a piece of a syringe was convenient because during the fight there was no need to waste time bending the tendrils of the safety pin, although this upgrade is a kind of “trick” for the Khattabok, which does not affect the ease of use, since the tendrils can be bent before the fight The question remains why the militants converted captured VOGs to create the Hottabok, if their conversion requires UZRGM fuses, and they come complete with F-1 and RGD-5 grenades in wooden boxes, which means that the grenades also ended up in the hands of militants? Having full-fledged grenades, why waste time creating weaker grenades? According to some reports, fuses for grenades are taken from training grenades, which are not subject to strict accounting and their number is significantly greater than the number of grenades.
Technical characteristics of the Khattabka grenade from VOG-17/30
| Explosion speed | no data |
| Scattering of fragments | no data |
| Radius of continuous damage | 3.9 meters |
| Fuse | remote 3.2-4.5 seconds |
| Weight of explosives | 36 grams, usually TNT |
| Weight | approximately 0.4 kg |
| Dimensions | 143x30mm |
Technical characteristics of the Khattabka grenade from VOG-25
| Explosion speed | no data |
| Scattering of fragments | no data |
| Radius of continuous damage | no data |
| Fuse | remote 3.2-4.5 seconds |
| Weight of explosives | 42-48 grams, usually TNT |
| Weight | approximately 0.35-0.4 kg |
| Dimensions | 130x40mm |
Armament
The performance characteristics and design of the F-1, RGD-5, RGO, RGN grenades and UZRGM, UDZ fuses are given.
Hand fragmentation grenades are designed to destroy enemy personnel with shrapnel in close combat (in open areas, in trenches or communication passages, when fighting in a populated area, in a forest or mountains). Depending on the range of scattering of fragments, grenades are divided into offensive (RGD-5, RGN) and defensive (F-1, RGO). Hand fragmentation grenades are equipped with UZRGM (modernized unified hand grenade fuse) and UDZ (impact-remote fuse) fuses.
Is it possible to transport homemade airsoft grenades and collect them at training grounds?
How to make a smoke bomb from flour and soda
If you took it to the test site disassembled, it is not an IED. But as soon as you put it together at the test site - an IED. Accordingly, if there are police officers at the test site, or someone gets injured from your homemade product, there will still be liability. And significantly higher than if these injuries were received from certified pyrotechnics. Therefore, the conclusion is: no, of course you can play the simulations yourself. But always remember that your actions fall under Article 223 of the Criminal Code of the Russian Federation, the terms for which are not even toy.
pyrotechnics, homemade airsoft grenades, IEDs
tell friends
Help the project
German "Molotov cocktail"
What is it for?
In terms of economy, before the outbreak of World War II, Germany was known as the country with the strongest chemical industry. The achievements of the Germans in this area were enormous: new types of rubber, numerous surrogates for fuel and explosives. Alas, in the 1920-1930s, all this scientific splendor was already working for the coming war. In 1942, a new piece of equipment for Wehrmacht soldiers appeared in the Reich - the Blendkorper chemical grenade.
The first version of the Blendkorper smoke grenade was designated H1. However, it turned out to be not very convenient, as a result of which the Germans had to modify the chemical reagent, as well as the glass container itself. As a result, the H2 grenade appeared. They were fueled with calcium chloride, titanium tetrachloride and silicon tetrachloride. When all three liquids were mixed and came into contact with air, a smoke screen appeared, the effectiveness of which was quite comparable to conventional smoke bombs.
At the same time, the chemical grenades did not cause any fire, however, the smoke was very caustic and sometimes could even force the tank crew to abandon their vehicle if the bottle broke on the armor near the technical or inspection holes.
Source
Manufacturing process
Take 3 matches, apply glue to them with a heat gun and glue them to the box. You need to make 4 such blanks. On the side opposite to the heads, glue a match to the blanks. Then again take three matches, apply glue on top of them and spread it so that the matches stick together. These parts of the fuses are glued to the transverse match on top. After drying, the workpieces are additionally glued from the end. Then the fuses are torn off from the box. Firecrackers are being prepared. To do this, use a utility knife to remove the labels and glue the ends with a gun, without touching the ignition head. Igniters are made. To do this, cut off the graters from the boxes and glue them using double-sided wide tape to the prepared part of the plastic bottle. To avoid lifting the grater when pulling out the igniter, the edges of the grater are first glued with double-sided narrow tape, then additional simple narrow tape is applied on top. Then the workpiece is cut so that four igniters are obtained from one grater: first in half, and then along the grater
Important: when cutting the grater, do not bend it in half, as this will break it. A lot of such blanks for fuses, firecrackers, and igniters can be prepared, and directly during the manufacture of grenades they can be quickly cut and connected. Then the fuses are cut with wire cutters and glued to the firecrackers with a glue gun so that the bottom of the match heads is flush with the end of the firecracker
It is more convenient to glue the fuses on the side of the leftover paper from the box. Place the igniters between the matches of the fuse and clamp them with thin tape. The fuses are ready. The body is made by winding paper onto a mold of the required size. The paper is fixed with thin tape, and it can be wound at small intervals (about 5 mm). The bottom is folded into an envelope and secured crosswise with tape. Peas or used airsoft balls are poured into a prepared paper grenade (which is worse, because then, willy-nilly, the enemy is supplied with “ammunition”). Then the fuse is inserted all the way, the top is also folded into an envelope and the entire body of the grenade is tightly wrapped with narrow tape.
https://youtube.com/watch?v=iF4xf08tEMA
The grenade is ready!
This design of the fuse provides a complete guarantee that the firecracker will ignite and the grenade will explode, while the fingers will remain intact.
Fixing the body with tape will protect the paper from tearing when dropped, but will not prevent the balls from being released when a grenade explodes.
https://youtube.com/watch?v=lqgjnnoaQfg
When using such grenades, one should not forget about safety measures: avoid cases where grenades explode in the hand (this can lead to burns and even tear off fingers), and do not allow children to play with grenades.
Master Class
each of us is a Master
Papier-mâché garnets.
Many people have known about papier-mâché since school, but, unfortunately, due to the condensed nature of the school curriculum, they are not always familiar with this interesting technique well enough. But it allows you to create wonderful things with your own hands.
I would like to present probably the simplest option, where from absolutely cheap materials you can make unusual items for home decor (certainly no one will have these). I will only add that everything in the photographs was done by children, albeit under my guidance. The task was both simple and complex at the same time: to make papier-mâché pomegranates indistinguishable from living fruit.
In the end they turned out like this.
What do you need for work? In addition to desire and a few real grenades (as models), you will need PVA glue, old newspapers, toilet paper, a handful of plaster or alabaster and acrylic paints.
Then pour PVA glue into any container (plastic lid for jars, for example) and dilute it 50/50 with water. It’s all very simple: tear off small pieces of toilet paper, soak them in an adhesive solution and stick them on the ball, and so on, piece by piece, layer by layer. We watch how the shape of the future pomegranate gradually increases and when the sizes of our ball and fruit are approximately equal, we pause and postpone the work, allowing the product to dry thoroughly. If you put it on a warm radiator or stove, then after a couple of hours you can continue working
The next stage is truly creative. Now you need to look carefully at living fruits and repeat all the characteristic features of their shape.
Pomegranates, however, like apples or plums, have dents somewhere, flattened places or even ribs, as in the above photograph. So now you need, having examined your product, decide where the top will be and where the bottom will be, how many ribs, and where they will be located and what other features are.
To “grow” the ribs, paper soaked in glue must be used for modeling, i.e. no longer glue the leaf to the surface, but having previously molded the desired fragment in your fingers, glue it to the workpiece in the right place. All defects are gradually corrected and a figure similar to a real fruit is formed.
The tail is molded separately and glued at the very end.
Now all that remains is to prime the product with plaster, paint it, and varnish it, but it’s best to do all this after the paper has dried. Work must be interrupted again. Therefore, it is advisable to work on several products in parallel.
We dilute gypsum or alabaster powder with water to obtain a creamy solution and lubricate the surface of our future masterpieces with it. You need to work with alabaster very quickly - in 5-10 minutes the solution will turn into stone, but with gypsum you don’t have to rush.
The purpose of this operation is only one - to hide the texture of the paper and make the surface smooth. As a result, you should get such “beauties”.
After the primer layer has dried, you can begin painting. Well, there is no longer a single recipe; what you see on a natural fruit is how you paint it. I personally try to go from light to darker, but the children painted as they wanted (I corrected it a little) and it didn’t work either.
Now all that remains is to varnish our pomegranates and you can use them to decorate any corner of the house.
Source
How to make a paper grenade?
Airsoft players are usually interested in making paper grenades. They make them themselves so as not to waste money on ready-made analogues. In principle, making a paper grenade with your own hands is not such a difficult task. Let's try to master one of the options.
Paper grenade - master class
Grenade body
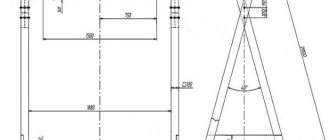
How to make such a grenade out of paper? Quite simple. Its body is made of cardboard. It has the shape of a cylinder, the height of which is equal to the height of the firecracker. To make this paper grenade, we need to print the following diagram on cardboard.
Cut out this figure, taking into account that the length of the solid part should be enough to roll it into a cylinder with a margin for a small allowance on one edge (up to 1 cm), since we will be gluing with an overlap.
The length of the triangles (protrusions) should be approximately 1 cm greater than the radius of the base of the cylinder. To roll this workpiece into a cylinder, it is advisable to use a mandrel.
All straight edges need to be glued together with an overlap, and then begin to bend the triangular protrusions along the dash-dot line shown in the diagram. Glue them one to the other. To strengthen the bottom, you can glue a circle of paper to it. Do not touch the second bottom of the cylinder yet.
Fuse and bursting charge
We will need:
- petard;
- matches;
- single sided tape.
Take a few matches and tape them to the firecracker so that all the heads are in contact with each other, leaving only one match in contact with the burning part of the firecracker.
Pin and trigger mechanism
We will need:
- plastic bottle;
- paper;
- scissors, stapler;
- threads;
- double sided tape.
First, cut a 5mm wide strip from the bottle and bend one side of it to form a loop. Secure it with a stapler - it is through this loop that you will pull the pin.
Next, cut a strip from the match striker along the width of the plastic strip, glue it with double-sided tape to this strip on the other side of the loop. Wrap the strip with threads to the firecracker on the side where the striker is located, while it should be pressed only to the first match. The striker will be pulled out, lighting the match.
Grenade assembly
To finally assemble the grenade, you will need:
- glue;
- peas;
- sharp knife.
So, let's move on to the final stage. To do this, cut out a rectangle in the finished bottom of the case approximately in the center with a knife - we will need to insert a plastic strip into it. We insert it with the ring forward. Next, apply a little glue to the end of the firecracker from the pin side, thread the pin into the hole in the bottom and glue the end of the firecracker.
We place our body with the open bottom up, pour peas inside and glue the second end. We close the second bottom in the same way as we did with the first. The top of the finished grenade is covered with paper. Now our homemade grenade is ready, we can go to “war”.
Origami - paper grenade
There are other ways to make a grenade out of paper; they are suitable for more peaceful purposes - to develop your abilities in the art of origami. Such grenades do not explode; they perform a purely decorative function. Your child can play with them with other boys, imagining themselves in battle. To make it, use the following diagram.
Another way to make a grenade is from a foam egg.
To make this grenade you need to have:
- foam egg;
- dark green paint;
- marker;
- brush;
- ring (receipt) from an old keychain;
- glue;
- cardboard;
- cutting knife.
We cut off the top part of the egg, paint it in a checkered pattern like on a real pomegranate, and use this design to make slits on the egg. We paint it carefully. Then we cut out a fuse from cardboard, attach it to the grenade, securing everything with a pin. The grenade is ready and it looks quite realistic. You can supplement your paper “arsenal” with a paper machine.
Real bomb
A paper ball toy that gains volume after being inflated with air is one of the symbols of childhood. They usually pour water into it and then throw it forcefully onto the asphalt so that the splashes fly away. In the summer heat, a “water bomb” is not only a fun activity, but also a way to cool down a little. Interestingly, in China and Japan, where the art of folding three-dimensional balls of paper supposedly originated, they were used as lanterns or fly traps. And the British were the first to try pouring water - in the textbook “Making Paper Toys,” which appeared in 1937, there is a detailed description of this fascinating process.
To make a “bomb with a secret” you will need:
Exploding elements must be as safe as possible, that is, they must have a low charge force.
Step-by-step instruction:
The “bomb” expands, gaining volume.
Now you need to slightly enlarge the hole through which the air was blown. Part of it may come out and the figure will not be so round.
Using a funnel, fill the “bomb” with plastic bullets about ¾ full.
We put some kind of fireworks inside, for example, stopin powder or a mini-rocket. In the second case, you need to remove the stick, which usually stabilizes the flight of the device.
We bring the cord out through the air hole.
Carefully set it on fire and move away to a safe distance from the “bomb”.
You also need to make sure that the paper does not catch fire. It is best to use waxed craft paper, thin foil or baking parchment - they are the most fireproof.
Preparing a charge for a paper grenade
To prepare the charge and fuse, take matches and tape them to the firecracker. In this case, the matches should touch each other with their heads, and only one of them should be in contact with the part of the firecracker that is to be ignited.
Now you can proceed to preparing the trigger mechanism and checks. To do this, a strip is cut out of a plastic bottle, the width of which should be approximately five millimeters. One end of this strip is fastened with a stapler in the shape of a loop. It will come in handy when you pull the pin. Also, a brown strip is cut out of a matchbox and glued to the other end of a previously prepared strip of plastic. The same end should be tied to the firecracker so that the cardboard strip from the matchbox is in close contact with the first match.
Comments:
| [ all articles ] |
| © Tula city public organization of special forces veterans “ZAKON-GRIF”, 2005 – 2022 Copying site materials is possible only with a mandatory link to the site. |
tel. : (4872) 700-032, 701-774, +7 960-611-55-11
There is no need to prove the usefulness and even the necessity of gaming airsoft grenades in close combat, especially when storming buildings. The main problem is that firecrackers, which are usually used to play grenades in airsoft and man-made games, have zero entourage. Therefore, the idea of creating a more or less entourage shell for firecrackers that have already been tested in practice arose quite a long time ago.
Structure of a grenade
The lemon grenade, like most anti-personnel grenades, contains three main parts:
- Frame. It has an oval shape with a ribbed surface made of thick cast iron. When ruptured, the rib layer scatters into fragments of a certain mass and size, which have an initial speed of 730 m/sec. Total weight 600 g.
- Substance for explosion. TNT with a mass of 60 g is used. Trinitrophenol is sometimes used. In this case, the ability to destroy increases, but the shelf life in warehouses decreases; if the period expires, an explosion may occur. The explosive is separated from the metal casing by paper, varnish or paraffin.
- Fuse. His UZRGM brand has a universal structure and is suitable for other types of grenades. The fuse hole is covered with a plastic plug during weapon storage.
Malfunctions and repairs
You can determine that a unit requires replacement by characteristic clicks, similar to the blows of a small bumper.
Typically, the picture of node death is as follows:
- When turning 90 degrees and sharply pressing the gas, loud dull clicks appear to the right or left of the driver (whichever side the sound comes from is where the malfunction is hidden). When starting sharply, driving in a straight line and changing lanes, there are no extraneous sounds yet;
- If you continue to drive without eliminating the defect, the knocking will intensify and occur when you press the gas, even with slight turns of the steering wheel, and then even when starting off and driving straight;
- Jamming and "explosion". The hinge housing or separator bursts and the car loses the ability to move independently. This can seriously damage parts of the engine, suspension and braking system. By the way, such consequences occur extremely rarely. More often than not, it ends in simple immobilization.
The separator in this grenade burst and the balls simply fell into the boot, depriving the car of a chance to move. So here is the answer to the question “what is a grenade in a car?”
- it turns out that this spare part, like its explosive namesake, can “bang”, disabling it and causing damage. Interestingly, the spare part is not repairable. Therefore, even if the disease is detected in the early stages, it will have to be completely replaced.
Myths about homemade starkball grenades.
Having read the latest topics about homemade imitations, with some surprise to myself, I came across some misconceptions regarding the legality of their self-production.
Myth 1: the composition used in firecrackers is not an explosive.
As the name suggests, this is a myth. Why? Because firecrackers contain gunpowder as a moderator and potassium perchlorate mixed with magnesium as a pyrotechnic composition. Both gunpowder and potassium perchlorate mixed with magnesium (and other perchlorate explosives) are quite explosive substances.
Myth 2: After all, imitations are sold freely and firecrackers can also be bought, which means imitations can also be bought. There is a huge difference between certified pyrotechnic products and IEDs based on these products - certification. If a pyrotechnic product is manufactured in accordance with GOST R 51270-99 Pyrotechnic Products and certified in accordance with GOST R 51271-99 Pyrotechnic Products.
Methods of certification tests" for classes from 1 to 3 - you can buy these products freely (this is how 4 Corsair is certified, as well as products from Strikecard and other manufacturers), if they are certified for classes 4 and 5, then you, if they are certified for Class 4 and 5 then you, if you do not have a license issued for the enterprise, should not sell them and there is liability for selling without a license. The pyrotechnics crust allows you to work with 4-5 graders in a company with a license and, as people say, shoot fireworks.
If you have manufactured a device yourself, even in accordance with the first standard, but have not passed certification tests in accordance with the second, you have made something incomprehensible that explodes. Accordingly, any police officer has the right to detain you and seize your products for forensic examination.
Well, then everything depends on your luck, because the main features of the IED classification are:
1) one-time use - our homemade products fully satisfy this parameter.
2) use of explosion energy - our homemade product fully satisfies this parameter.
3) manufacturing in both industrial and homemade (handicraft) ways - as we see, an uncertified product from a factory is also an IED.
4) intended for hitting people or destroying, damaging various kinds of objects for criminal purposes - here you will laugh, but causing damage with balls is still a defeat. plus, from the influence of 4 corsairs you can get hearing damage and this is also a defeat for people, and if your grenade also smolders after the explosion, then everything is completely bad.
5) the explosive charge and the means of exploding it must be structurally combined with each other into one material and technical system suitable for explosion - hence the conclusion: if you assemble everything into one device and transport it like that, it is an IED.
If you drilled a hole in a firecracker and inserted an electric match - an IED.
comparison table
(WARNING:The specific values in this chart are now out of date. Some of them and or may be false.)
Glossary
Please note that this is still in alpha stage and all bugs in the mining data codes have not been developed yet. The data was made not necessarily in the know)))
Disclaimer: The information displayed is under constant control. Game mechanics can and will change. Crew Wikipedia cannot and does not guarantee up to date values. Nominal values are not real-life representations of effects or damage and have been modified/simplified for viewing readability and satisfaction. Properties: Calibrates the size of the explosive from the front Drag, pull scales the value of how much drag it will add to your plane when placed on the outside (0 minimum 100 maximum) High explosive: Damage rating is possible average damage over maximum HE-radius Radius, volumetric explosions distance. Everything in the radius takes damage. Fragmentation: The damage rating is a representation of the total combined damage against the chance of a fragment to hit an object within the radius. Radius is the maximum range of shrapnel fragments traveling; Not everything in the radius takes damage, this could be due to luck or the fragment was stopped by something before it reached the target
bombs
| people | Mass spectrum (nominal) | Name | caliber | Drag, pull | Damage Rating | Radius | Pen | Damage Rating | Radius | Pen |
| Bomb properties | high explosive | fragmentation | ||||||||
| Germany | 1000 kg | SC 1000L2 | 450 | 33 | 360,4 | 30m | 250mm | 94,4 | 150 m | 15mm |
| 250 kg | SC 250Ja | 285 | 16,9 | 6.3 | 10 m | 100 mm | 111 | 80m | 12mm | |
| 50 kg | SC 50Ja | 152 | 4,3 | 3m | 35mm | 51,3 | 40m | 10mm | ||
| 500 kg | SC 500K | 392 | 23,7 | 100 | 25m | 160mm | 100 | 120m | 15mm | |
| 10 kg | SD 10C | 152 | 0,8 | 0,3 | 5m | 8 mm | 15m | 5mm | ||
| 10 kg | SD-10a | 152 | 0,8 | 0,5 | 5m | 10mm | 15m | 5mm | ||
| Japan | 250 kg | mod.25 tk 2 | 285 | 16,9 | 6.3 | 10 m | 100 mm | 111 | 80m | 12mm |
| 500 kg | Maud. 50 tk 2 | 392 | 23,7 | 100 | 25m | 160mm | 100 | 120m | 15mm | |
| 800 kg | Maud. 80 tk 1 | 450 | 49,6 | 640,9 | 40m | 250mm | 94,4 | 150 m | 15mm | |
| 250 kg | Enter 92 mod. 25 | 285 | 16,9 | 6.3 | 10 m | 100 mm | 111 | 80m | 12mm | |
| 500 kg | Enter 92 mod. 50 | 392 | 23,7 | 100 | 25m | 160mm | 100 | 120m | 15mm | |
| 100 kg | Type 94 mod. 10 | 267 | 9,3 | 0,9 | 6m | 75mm | 102,3 | 45m | 12mm | |
| 50 kg | Army Type 94 mod. 5 | 152 | 4,3 | 3m | 35mm | 51,3 | 40m | 10mm | ||
| 60 kg | Enter 97 mod. 6 | 152 | 4,3 | 3m | 35mm | 51,3 | 40m | 10mm | ||
| 250 kg | Type 98 mod.25 | 285 | 16,9 | 6.3 | 10 m | 100 mm | 111 | 80m | 12mm | |
| 800kg | Enter 99 mod. 25 | 450 | 49,6 | 640,9 | 40m | 250mm | 94,4 | 150 m | 15mm | |
| 800 kg | Navy Type 99 No. 80 mod. 1 | 450 | 49,6 | 640,9 | 40m | 250mm | 94,4 | 150 m | 15mm | |
| USSR | 100 kg | FAB-100 | 267 | 9,3 | 0,9 | 6m | 75mm | 102,3 | 45m | 12mm |
| 1000 kg | FAB-1000 | 450 | 33 | 360,4 | 30m | 250mm | 94,4 | 150 m | 15mm | |
| 250 kg | FAB-250M-43 | 285 | 16,9 | 6.3 | 10 m | 100 mm | 111 | 80m | 12mm | |
| 50 kg | FAB-50 | 152 | 4,3 | 3m | 35mm | 51,3 | 40m | 10mm | ||
| 500 kg | FAB-500 | 392 | 23,7 | 100 | 25m | 160mm | 100 | 120m | 15mm | |
| 1500 kg | FAB-1500M-46 | 450 | 33 | 2452,7 | 70m | 450mm | 94,4 | 150 m | 15mm | |
| 3000 kg | FAB-3000M-46 | 450 | 33 | 8493,2 | 100m | 500mm | 94,4 | 150 m | 15mm | |
| Great Britain | 453 kg | 1000 lbs G.P. | 392 | 37 | 100 | 25m | 160mm | 100 | 120m | 15mm |
| 453 kg | 1000 pounds GP tk 1 | 392 | 37 | 100 | 25m | 160mm | 100 | 120m | 15mm | |
| 453 kg | Thousand pounds MS tk 1 | 392 | 37 | 100 | 25m | 160mm | 100 | 120m | 15mm | |
| 113.4 kg | 250 pounds | 267 | 5,4 | 13m | 78mm | 100,6 | 48m | 12mm | ||
| 113.4 kg | 250 lbs 43 | 267 | 5,4 | 13m | 78mm | 100,6 | 48m | 12mm | ||
| 113.4 kg | 250 pounds late | 267 | 5,4 | 13m | 78mm | 100,6 | 48m | 12mm | ||
| 226.8 kg | 500 pounds | 285 | 16,9 | 15,7 | 16m | 100 mm | 111 | 80m | 12mm | |
| 226.8 kg | 500 lbs 43 | 285 | 16,9 | 15,7 | 16m | 100 mm | 111 | 80m | 12mm | |
| 1.815 kg | tk 2 cookies | 450 | 100 | 4955,1 | 80m | 400mm | 87,6 | 200m | 15mm | |
| UNITED STATES OF AMERICA | 453.6 kg | 1000lb AN-M65 cone | 392 | 37 | 100 | 25m | 160mm | 100 | 120m | 15mm |
| 453.6 kg | 1000 lb AN-M65A1 | 392 | 37 | 100 | 25m | 160mm | 100 | 120m | 15mm | |
| 45.4 kg | 100 lb AN-M30A1 | 152 | 4,3 | 1 | 8m | 50 mm | 51,3 | 40m | 10mm | |
| 907.2 kg | 2000 lb AN-M66A2 | 450 | 49,6 | 640,9 | 40m | 250mm | 94,4 | 150 m | 15mm | |
| 113.4 kg | 250 lb AN-M57 | 267 | 9,3 | 4,1 | 12m | 75mm | 102,3 | 45m | 12mm | |
| 226.8 kg | 500 lb AN-M64A1 | 285 | 16,9 | 15,7 | 16m | 100 mm | 111 | 80m | 12mm | |
| France | kg | 100 kg No. 1 | style=”background: #E6E6FF” | style=”background: #E6E6FF” | style=”background: #FFE6E6″ | style=”background: #FFE6E6″|m | mm | style=”background: #E6E6FF” | style=”background: #E6E6FF”|m | mm |
| kg | 200 kg No. 1 | style=”background: #E6E6FF” | style=”background: #E6E6FF” | style=”background: #FFE6E6″ | style=”background: #FFE6E6″|m | mm | style=”background: #E6E6FF” | style=”background: #E6E6FF”|m | mm | |
| kg | 500 kg No. 2 | style=”background: #E6E6FF” | style=”background: #E6E6FF” | style=”background: #FFE6E6″ | style=”background: #FFE6E6″|m | mm | style=”background: #E6E6FF” | style=”background: #E6E6FF”|m | mm |
The second technology for making paper grenades
We'll tell you how to make a grenade out of paper in a different way. It takes longer than previous technology. However, the result visually resembles a real grenade. There are also few items used for manufacturing. We don't need anything super complicated for this. So, how to make a grenade out of paper using this technology? To prepare our craft, you need to take an egg from polystyrene foam and cut off its upper part. Then, based on it, we draw cells, like on the original grenade. According to this drawing, you need to pick out the egg and paint it. You need to choose paint of a color that matches the color of a real grenade. Next, all explosive parts are cut out of cardboard. All this is fastened together, and a check is hung on top.
These simple methods answer the question of how to make a grenade out of paper at home, as well as what additional materials are needed. All this is not difficult to do, you just need to use your imagination and be patient, and there are plenty of tools for preparing your home. We hope that these methods of making a grenade are of interest to you, and you will try to translate these ideas into reality. Happy crafting!
Tags
made of paper. made of paper. made of paper with your own made of paper made of paper made of paper. Origami Origami from the original grenade.the art of origami.from the original grenade.The ABC of origami or Origami for Origami from Origami techniques
origamineed more with your handsglueinstructions and we makeproductsneed helpdiagram wewillmastercommentschildrenthenmaterialsusecraftsneededtechnicianlikemodulesgluepreparationfinishedtechnology
Paper models: domestic transport
Format: PDF, JPG, Scanned pagesGenre: OrigamiLanguage: Russian Description: Many designs of domestic cars and trams for gluing from paper. The set includes: ZAZ: 969, 966, 968a, 968MP, 1102″Tavria”, 1105″Dana”, 1103″Slavuta”LuAZ: 969A, 1302, 13021-08, 13021-04,VAZ: 21011, 2106, 210 4 , 2107, 2121″Niva”, 2131″Niva”, 1111″Oka”, 1111″Oka-Lady”, 2101″CityMotorsport”, 2101″CityMotorsport” (in Nürburgring “combat” livery), 2102, 2103, 2108″Web Hobby", 2109 DPS, 21099, 2108″Natasha", 2113, 2114, 2115, 2114 DPSGAZ: 66, 3302″Gazelle", 2705″Gazelle", 3221″Gazelle" (“Minibus…
15Sep2017
Assembly
At the final stage, take a firecracker with matches and a fuse grater attached in advance. The explosive element is placed in the housing and fixed to the bottom of the product. For a secure fit, the end of the firecracker is treated with strong glue.
Finally, the structure is tightly closed with a prepared lid made of insulating material. The connecting surfaces are impregnated with glue and pressed.
Essentially, this homemade grenade is ready. Just wait until the glue dries.
Device
Filler. The filler for the balls is a mixture of water, glycerin, propylene glycol, titanium dioxide, starch and 2 types of polyethylene glycols. This substance is water soluble. To give the filler color, use 6 food colors in different proportions. Fluorescent pigments are also used to make traces of the ball visible in the dark. The filler is thick enough that it does not run off the surface of the target. The dye does not leave stains on clothes after washing.
Shell. The capsule of paintball balls is made of gelatin - a mixture of protein substances of animal origin. It is odorless and tasteless and can be transparent or yellowish in color. When placed in cold water, gelatin does not dissolve and swells; As a result of heating, a sticky solution is formed from the swollen gelatin, which hardens into a jelly, so it is recommended to store paintballs at a temperature of +20°C...+22°C and a humidity of less than 65%. The gelatin shell of the balls can withstand instantaneous acceleration from 0 to 324 km/h in a 35-centimeter paintball marker barrel.
Quality requirements
It is desirable that airsoft grenades meet the following requirements:
- Complied with the rules of the competition.
- They had a damaging element that is felt upon contact with uniforms, but does not cause harm to health.
- They were distinguished by the low cost of manufacturing materials and ease of assembly.
- Corresponded to factory samples according to design.
- They acted as an effective means of intimidating the enemy during the battle.
Appearance
In fact, the main thing for a hand-made grenade is functionality. However, if desired and if you have free time, the product can be given a more attractive appearance.
It is enough to use colored self-adhesive tape as a winding for the body. Naturally, it is much easier to paint the product with a spray can. However, housings made using porous insulation material as a base absorb the dye too much, like a sponge.
So, take adhesive tape and divide it into pieces, the size of which is sufficient to tightly wrap the body of a homemade grenade. After pasting, holes are made in each sheet, which make it easier to break through the body during an explosion. It is recommended to cut the tape with some allowances, which will be sufficient to further strengthen the bottom and lid of the product.