Timely repairs and replacement of failed elements will help prolong the operation of your two-wheeled friend. In order to lubricate bicycle parts, clean the chain and adjust the gear with minimal time, it is advisable to build a convenient rack, and you can do this with your own hands, without the need for professionals to drive the bicycle.
Wooden bicycle stand
Tired of struggling with repairing a bicycle that constantly falls to one side? So, it’s time for you to make a stand for repairing two-wheeled vehicles. We have collected the most popular options for arranging reliable accessories for bicycles for every taste with your own hands.
Types of bicycle stands
A traditional stand design involves a design that secures the rear rim in a suspended format.
The product is made from both metal and durable plastic and wooden beams. The shape can be square or in the form of a trapezoid, triangle; experts consider the U-shaped type to be convenient. Any stand must be stable and not wobble. The wheel located at the front of the bike is dismantled. A bicycle stand for the rear wheel can be like this:
- a hook fixed to a vertical surface, for example, on a wall - the bicycle is secured to the frame, wheel or saddle. This option allows you to place two-wheeled vehicles even on a balcony door or in the corridor;
- folding stand - if you can sacrifice free space in the garage or on the balcony, this is the most convenient option for storing a bike. The floor bicycle stand is easy to move and, when not needed, folds down to a compact size;
- fittings on the bar - the bar is screwed or nailed to the wall, 2 pins come from the plate, onto which you can even fix several bicycles.
Bicycle stand
Tips for a cyclist: choosing a bike repair rack | CRONUS - French bicycles
The material was prepared based on the publication of experts from the BikeRadar .
When purchasing a new bike repair rack, you should first of all answer a number of questions.
Should it be portable and compact for storage? What loads should it withstand? How sensitive is your bike's frame and seatpost to mechanical damage? What types of bikes will you need to secure in it? The answers will help you decide which stand will be optimal for you. The budget, of course, should not be discounted either.
Types of repair racks
There are two main types of bicycle repair racks - those mounted on the frame tubes or mounted on the bottom brackets. And the final choice may largely depend on the type of bike you own.
Racks with pipe fastening
This is the most common type of repair rack. It allows you to fix the upper, lower, seat tubes of the frame or the seatpost. As a rule, you can quickly install a bicycle in such a rack, but it is not suitable for all models. Non-standard pipe profiles may interfere with reliable fastening.
In fact, this would be the optimal type of rack unless you own a super-light carbon racing road bike. It will allow you to perform any work from bicycles in comfortable conditions.
Racks with fastening to the carriage-dropouts
This type of rack is most often seen in professional workshops or cycling teams. They allow easy access to all components of the bicycle and at the same time rotate it 360 degrees for the fastest and most efficient work.
It is also worth noting that this version of the rack is more compact, which means that with or without a bicycle it will take up less space at home, in the garage or in the car.
This is a very convenient stand, but let's be honest, even most shops and workshops now use the type that we have already described above.
But not everything is so wonderful. When working with such a rack, you will most likely have to remove one of the wheels or both of them from the bicycle each time.
Portable or stationary?
Portable repair stand
If you don't have a permanent workspace, the thought of a portable repair rack can be quite appealing. You can also easily take it to the dacha, to a friend’s garage, or even to competitions.
For some riders, the ability to compactly store and transport a bike repair rack may be a deciding factor in their purchase.
However, do not think that all portable stands are equally convenient and compact. Our personal favorites at the moment are models from the Feedback (they are the most compact when folded) and ParkTool (which, while being smaller, offer a slightly more rigid design).
Making a wooden stand with your own hands
Wooden stand base
A wooden stand can be made by following the step-by-step tutorial provided above for the metal stand. But there is another option - a stand for repairing and tuning a bicycle with inclined beams secured in the form of a cross.
To arrange a wooden product, prepare boards, a wooden plate intended for beams, a saw and hacksaw for metal, a drill, fasteners, a grinding machine, and a varnish composition. Experts call the structural components of a wooden bicycle rack:
stops - two parallel boards; crossbar - stops are fixed on it, which hold the entire structure; beams positioned at an angle, in the form of hockey sticks
In this case, it is important to maintain an angle between the short and long parts equal to 60 degrees.
Wooden stand details
Before processing the boards, the stand for bicycle repair is drawn by the master schematically on a sheet of paper, after which measurements are applied to the drawing. Focus on the length of the beam close to the length of the frame; the thrust part should be 1.5–2 times the diameter of the rim. The crossbars are arranged so that they protrude on the sides of the stops, securely fixing the product under the weight of the bicycle. The optimal pitch between stops and beams placed at an angle is slightly larger than the thickness of the wheels.
Step-by-step assembly of parts
The rack for repairing a bicycle with your own hands is assembled in stages:
- Cut the bars to the required size. To make the beams smooth, without sharp corners, process them with a jigsaw.
- Using a drill and self-tapping screws, attach the transverse components to the stops. It turns out that the cross is what the product is supported on.
- Fix the beams at an angle to the stops with the short ends on the outer sides.
- The stand is almost ready, now combine the parallel bars with transverse boards, this will allow the bike to be held firmly on the stand without the structure swaying. Try to place at least four cross pieces along the entire length of the beam, with one at the top end.
- Sand the product on a machine and cover it with an even layer of varnish.
The only caveat is that a wooden stand can only be used for storing a bicycle. Repair work will lead to the accumulation and sticking of dirt, which is extremely difficult to clean.
Wooden wheel stand
Metal stand for rear rim
Necessary materials
The option of arranging a metal stand for the rear rim is one of the most time-consuming. The triangular format of the product is taken as a basis, which is also suitable for solving the issue of reliable installation of a bicycle bike.
The do-it-yourself bicycle repair rack is divided into several functional components:
- triangular structure consisting of U-shaped components;
- fasteners securing the frame stays on top, or clamps attached to the bushing.
The simplest fastener is frame fastening; craftsmen also experiment with clamping onto the rim itself, but this method requires patience and skill. To avoid distractions while working, prepare the following tools and materials in advance:
- fittings;
- plates made of durable sheet metal;
- a machine that bends metal;
- machine for welding parts;
- spray paint;
- primer mixture;
- rubber plates.
Ceiling mount
If the walls are already occupied, there is no hallway, a free floor is a luxury, it’s worth fixing the bike buddy to the ceiling. In practice, this is a hook; the front wheel or 2 hooks are hung on it, from which 2 cables protrude, ending in two smaller hooks.
There are 2 hanging options:
The first option includes suspension for:
Then it will hang vertically to the ceiling, which works in apartments with high ceilings or when you need to hang it on a small piece of furniture - a shoe closet in the hallway, a door.
It is possible to place the bike horizontally to the ceiling, but we need to think about whether we want to place it there after every ride, this could be problematic.
Equipment is hung on cables and hooks by the front wheel or saddle.
There are systems that are pulled up to the ceiling using a cable, completely freeing up the space below. Before purchasing, you need to check whether the cables are long enough. The bicycle should not hang too high; sometimes it is enough to hang it above the level of the furniture.
The ceiling, like the wall, must be covered with paint that is resistant to dirt and damage.
Making a stand
Bicycle Frame Support Bracket
Making brackets for securing a bicycle to a rack is the most labor-intensive operation at first glance. But in reality, there is nothing complicated here.
The upper support is made of a tee. The end part of the tee is cut to fit the radius of the pipe and glued with PVC glue.
To glue the support, a tee cut in half was used.
The lower support is made from a cross. A piece of tube with a diameter of 2 inches for pvc or 50-63 for PPR is glued onto the crosspiece. Length
Assembling support legs and crossbars
Here I think everything is clear to everyone at once; soldering and gluing pipes is one of the simplest operations.
Tube sizes are listed above in the materials list.
To maintain alignment when gluing or soldering, you can apply a mark to the pipe and the fitting.
Making supports for a bicycle frame
After the stand is glued or soldered. We carry out finishing and fitting to the bicycle frame.
We solder pipes with 2 corners, with 2 tees. don't forget about the plugs.
Use an engraver to cut the hole for the bottom carriage.
Don’t forget to adjust the gap between the lower support mount and the bicycle sprocket.
After all the adjustment operations, the bike repair rack is ready.
The design is not without its shortcomings - but the main thing, as they say, is the idea; if anyone has any wishes or suggestions, please add them in the comments.
Video
https://furni-info.ru/kreplenie-velosipeda-na-stenu.html
https://www.cyclepedia.ru/content/veshaem-velosiped-na-stenu
https://aktsport.ru/velosiped/kreplenie-dlya-velosipeda-na-mashinu.html
https://aktsport.ru/velosiped/nastennoe-kreplenie-velosipeda-svoimi-rukami.html
https://rem-stroitelstvo.ru/kronshtejny-dlya-velosipeda
Bicycle wall mount - 2 simple options
DIY bicycle rear wheel stand
In principle, it is quite possible to make a stand for the rear wheel yourself. For this, it is best to use metal or wood. However, in the case of metal, you will most likely have to use welding. But anyone can make a wooden stand.
Manufacturing instructions
In order to make a stand for the rear wheel of a bicycle with your own hands, you must follow these steps:
- To begin with, a rectangular frame is knocked together with nails, which will serve as the base of the stand. The width of the frame should be slightly larger than the dimensions of the rear wheel hub of the bicycle.
- After that, two slats are nailed on the inside, which will serve as holders. The length of the slats should be 3-5 cm greater than half the diameter of the bicycle wheel. The distance between the slats must exactly match the width of the bushing.
- For more careful storage, the holder slats can be covered with felt or rubber.
- That’s basically it – the stand is ready. The ends of the sleeve are placed on the holder rails. The wheel does not touch the ground, and the bicycle is in a stable position.
Thus, you can organize bicycle storage in a variety of ways. You can hang your bike from the wall or even from the ceiling using a special hook. You can buy a special stand or stand. Or you can avoid spending money at all and make a stand for the rear wheel of the iron horse with your own hands.
Types of bike racks for storage
The design of bicycle racks can vary significantly. This determines not only the method of fixation, but also the requirements for the place where it will be placed. We invite you to get acquainted with the existing varieties and their distinctive features.
There is always a suitable place on the wall for a bicycle
Parallel wall mount
In this case, the bicycle frame is parallel to the wall. Wheels below. The method is quite convenient to use. To remove the mechanism from the wall, you do not need to make any additional effort. Relevant when storing multiple vehicles. Takes up a lot of free space.
Convenient to store several bikes at once
Perpendicular wall mounting
Here the bike frame is perpendicular to the wall. A suitable option for a small room. The vehicle can be placed between furniture, the front door or a refrigerator.
Unused space behind the door is allocated to accommodate the bicycle.
Mounting a bicycle to the ceiling using a lifting mechanism
If the room has high ceilings and a small area, a mount with a lifting mechanism may be the best option. Various fasteners can be used for fixation. The most convenient option in terms of operation. To send the vehicle for storage, the user does not have to make significant physical efforts.
Having installed the bicycle, the fasteners are lifted up
Features of fastening shelves depending on the type of wall
When installing fasteners for shelves to the wall, you should take into account the characteristics of the material from which the base is made. The higher its strength, the more securely the hinged structure will be fixed. Soft wood and brittle plasterboard surfaces are not capable of providing quality support. The methods for attaching shelves to them and the type of fittings used differ.
Concrete wall
To drill a hole in a solid concrete surface, you need a hammer drill. The work must be performed using a special concrete drill, the diameter of which is selected according to the size of the dowel. The depth of the hole must match the length of the fastener.
Plasterboard wall
When working with gypsum boards, 2 methods are used:
- The first is suitable for already erected structures, however, suspended structures installed in this way can only be used for decorative purposes. Heavy objects cannot be placed on them. In this case, holes are drilled in any place where you want to fix the shelf on the wall. The most reliable fixation in a fragile material is provided by a specially shaped dowel - a butterfly. It is inserted into the hole, and when a self-tapping screw is screwed into it, the wings of the dowel open. They distribute the load over the entire adjacent area of the gypsum board, so the material does not crumble.
- The second requires preparation at the stage of creating a plasterboard partition. When constructing a frame on the line where it is planned to install wall shelves or other heavy hanging pieces of furniture, additional crossbars are made. They are attached to vertical posts. This improves the rigidity of the entire structure. The fasteners are then screwed strictly into these crossbars.
Top Articles: Electric Bicycles
Hidden shelf mounts allow you to create additional storage space with minimal disruption to your interior design
Installation can be done independently, however, it is important to correctly calculate the load and select hidden fittings according to it
Racks or stands
Stands or racks are an interesting, non-standard solution. The service stand allows you to hide your bike in a hard-to-reach place.
This option is suitable for people who independently care about repairing their own two wheels. The device allows you to comfortably repair breakdowns. The stand is ideal for service work:
You can pedal freely on the rack, so it’s easy to adjust the rear, front derailleur, and set the brake.
The rack hooks should be covered with rubber protectors, this will eliminate the risk of scratching the frame.
The stand can have adjustable height and tilt angle. The adjustable height of up to 145 cm and the 360-degree installation range of the frame make it an indispensable tool for repairs and adjustments.
Materials and tools
pipes and fittings
Diameter of pipes and fittings (PVC 1 1/2 PPR 40)
- Pipe 38 cm long - 4 pcs. (for the base)
- Pipe 90 cm long - 2 pcs. (for legs)
- Pipe 41 cm long - 1 pc. (bottom support)
- Pipe 130 cm long - 1 pc. (retractable support)
- Pipe (PVC 2″ PPR 50-63) 8 cm - - 1 pc. (for support)
- Tee - 3 pcs.
- Angle 90 degrees - 2 pcs.
- Plug - 3 pcs.
- Crosspiece - 1 pc.
- glue for PVC pipes
Tools:
- pipe cutter;
- roulette;
- chisels or engraver;
- pencil;
- file;
- sandpaper.
Elevation bike straps
Not quite the usual way to hang a bike, although quite obvious.
A very simple set that costs $10 will allow you to hang your bike at the level you need. But there are several obvious disadvantages: mounting to the ceiling, which is not convenient or practical for everyone, and an abundance of cables, which will not look very nice in the room. Although who knows, with a successful selection, such a mount will look very profitable and stylish.
In general, there are a huge number of options, the most important thing is that it’s very easy to do something similar yourself.
No special effort is required here, and wood products will always be beautiful and practical.
We did not consider absolutely all devices for securing bicycles, because there are several dozen of them, but we only showed you the most interesting ones, and most importantly, we gave free rein to your imagination. Any shelf made with your own hands will always be better than the one you bought. And at the end - a stylish key hanger.
Bicycle wall mount
The modern market offers many different types of bicycle racks, depending on the type and brand of car, and the method of mounting.
However, to buy such a rack, the bike owner will have to shell out a tidy sum. Is it worth spending the extra money and is it possible to mount a bicycle on the roof of a car with your own hands? Let's try to figure it out.
Nowadays there are many different types of bicycle racks depending on the type and brand of car.
During the Soviet era, having your own bicycle was the dream of every boy, and girls also willingly used this type of transport. Over time, fashion changed and computers appeared.
If previously it was impossible to drag a child home after a walk, now it takes a lot of work to drive a young couch potato out of his indoor den into the fresh air. However, these days, when work is becoming an office routine and time is precious, the bicycle is once again becoming relevant. One might even say that he is experiencing a second youth.
With the purchase of a bicycle, the happy owner faces some problems, the main one of which is the transportation of the bicycle itself. It's great if you have an SUV with a spacious trunk that can accommodate your two-wheeled friend, but what if you need to transport several bikes or have space in the trunk for personal items?
To solve this problem, you need to install special fasteners, which come in several types depending on the method of fastening to the car, namely:
The last three methods are relatively expensive and require certain conditions, so they are used infrequently. Let's consider the most universal and cheapest mounting method - on the roof.
Roof mounting is the most versatile, easiest and cheapest way
Manufacturing stages
It will take approximately 6-10 hours to assemble a bicycle with four hands. You will need a stand to make it more convenient to assemble the structure. The stand can be replaced with improvised things - for example, this role can be performed by a stepladder with shovel handles attached.
Creating a bicycle at home with your own hands completely from scratch is a very difficult task.
It is important to choose the pipe material, take care of the welding machine and a set of other tools. Next you need to choose the correct ratio of the carriage, steering, symmetry, calculate the angles
If you make a bicycle from scratch, then the best option would be a chopper - a bicycle for leisurely riding over short distances. If you need a tourist or sports model, you should select all the necessary components and assemble it.
The first step is choosing or creating a frame. The wheels are fitted to the main structure and the fork and handlebars are attached. Further steps include seat placement and securing the wheels securely. Immediately before use, the fork must be lubricated.
Frame assembly
The easiest way is to pick up a ready-made part. But it should be remembered that the shape and material of the element will affect further design. Options include: steel, titanium, aluminum, carbon fiber frame. For example, the main material for mountain two-wheeled vehicles is aluminum alloy. Instead of the previously popular alloys 6061 or 7005, improved versions with impurities (magnesite or scandium) began to be used.
A homemade bicycle frame can be created from profiles, pipes or plates. First you need to work out the sketch, displaying all the main nodes (preferably in a 3D editor). The main task is to see the actual dimensions of the parts, evaluate the geometry of the structure and eliminate errors. For example, placing the top tube too high can cause operational problems.
Making the frame is more challenging. The bicycle drawing will tell you how to combine the frame elements. When assembling the structure, follow approximately the following sequence:
- prepare seven pipes (two short and four medium);
- the lower main one is welded to the carriage shell. It should be attached to the lower edge of the head tube;
- the seat tube is welded to the bottom one, selecting the required angle of inclination;
- the seat and front ones are connected to the main upper one;
- the lower stays are welded to the carriage glass;
- fasten the upper end of the seat profile to the edge of the lower stays.
Pressing in the fork and making dropouts
The fork is selected taking into account the future use of the vehicle. For mountainous terrain, a soft part is suitable, which involves the presence of shock absorbers. If you want to create a road model or a bike for city walking, forks are not used due to excessive weight.
for a soft design you need to consider the following points:
- move;
- method of fastening brake pads;
- supported wheel diameter.
Pressing the fork is done in a horizontal position:
- installation of bearings;
- cones are fixed;
- the washer is placed on the shock absorber rod;
- the locknuts are carefully tightened;
- The steering wheel is located at the base of the fork.
An important point that will increase the reliability of the future bicycle is the fastening of hand-made parts. There should be no defects, even minor ones. Otherwise, the safety of the structure will decrease, resulting in an increased risk of injury.
Then you need to weld the dropouts under the rear wheels. Using a metal plate, several parts are cut out. Using a jigsaw, create recesses (according to the diameter of the wheel axle and fixing nuts). The element is connected to the frame (welded). The landing recesses must be located at the same level, otherwise the wheel will not fit on the dropouts.
Installation of other elements
Transmission components are selected ready-made, because it is difficult to make a speed switch or chain yourself, not to mention building components at the level of well-known brands. Therefore, for a homemade bicycle, a classic transmission or one with a planetary mechanism is selected.
Next steps:
Installing the carriage and debugging the connecting rods and pedals. The steering wheel is secured with a bolt. Before using the vehicle, the fork must be lubricated. The seatpost is installed vertically into the tube and secured with a clamp and nut. The carriage is placed in a glass. When the chain is mounted, install the wheels. The seat is attached using welding technology
But if you need to expand the functionality, you can create a removable structure. An important condition is that the wheels are securely fastened. Fixation is ensured using nuts and locknuts.
How to choose a bike mount on the wall: basic criteria
To choose the right model, you need to consider many different factors. We invite you to familiarize yourself with the criteria that will help you make the right choice.
Storage can be done in different ways
Depending on the wall material
Before purchasing, you should check the strength characteristics of the wall on which you decide to place the bicycle. If the material has a low density, its load-bearing characteristics will be low. For example, a plasterboard wall can hardly be called a suitable option for placing a bicycle
In such a situation, you should pay attention to racks or choose a ceiling mount
Free-standing structures are the best option for weak bearing capacity of the wall
Depending on the suspension height of the bike
This criterion can affect the ease of use of the design and how harmoniously it fits into the interior. The location of transport near the floor will not allow rational use of the available space. When it is in the center, you can safely walk under the steering wheel, but the pedals will still get in the way. In this case, it should be taken into account that the bicycle will have to be constantly raised to the selected height, which is quite difficult for those who are in poor physical shape.
A suitable height can be found experimentally
How to choose?
When choosing a bicycle holder for a mobile phone or smartphone, you should consider the following points.
- Vehicle type.
To travel over rough terrain on a mountain bike or fat bike, it is better to choose from the very beginning closed cases from which the device will not fly out when moving. For city and road models, open and plastic universal mounts are suitable. - Number of closed sides.
There must be at least 3 of them, otherwise if the wheel hits a bump, the device may simply fly out of the holder. Most often, repurposed car phone mounts are double-sided. - Smartphone type
. If the device’s processor gets very hot during operation, it is better to forget about completely closed sealed cases. This problem most often occurs on Android smartphones. - Mounting type
. If you just need to have your phone within reach, you can get by with a regular frame mount. But when it comes to using the device as a navigator or you need to quickly answer calls, it is better to give preference to open designs with a location on the steering wheel.
Taking these important points into account, you can choose the holder that is most convenient for use on the road and securely attach it to your bike.
The following video provides an overview of 8 models of phone holders for bicycles from the GUB brand.
A bike phone holder is a surprisingly useful all-rounder. Any phone holder can solve many problems at once:
- Place your phone in front of your eyes so you don't miss a call or text message. Many cyclists will forever remember the moment when a mobile phone, hastily taken out of a deep pocket, fell to the ground, and the call was already over.
- Use GPS maps quickly when you don’t need to stop and take a long time to launch the corresponding application on your mobile device. All travelers, probably, when wandering in an unfamiliar place, remembered the invaluable navigation function on smartphones.
- Keep track of time using a large widget on the phone screen, and not on the small dial of your wristwatch.
- Easily plug your headphones into your compact player and listen to music on the go. Their wiring will always be visible, and you won’t accidentally snag it. It is also possible to listen to music through the speaker, which is very difficult when the phone is in a pocket or backpack behind your back.
- Implement the DVR function while traveling around the city or simply record an interesting video about your trip.
- Get extra protection from rain by placing your mobile device in a case with a holder.
Most phone holders come with a 360-degree rotatable frame that allows you to hold your phone in either a vertical or horizontal position.
A bicycle phone holder will be a useful device not only for cyclists, but also for motorcycle owners. In the same way, a phone holder on a motorcycle will allow you to quickly see who is calling on the screen, and then quickly answer the call while driving, naturally, if you have a Bluetooth headset or regular headphones.
A navigator is a useful device not only for bicycle owners, but also for motorcyclists. A phone mounted on the handlebars with a GPS navigator turned on will allow you to monitor both the road and the correct direction of movement when driving a motorcycle. And a DVR on a motorcycle is even more important than on a bicycle, since motorcycle drivers have more responsibility.
Top articles: What is a bicycle cock?
Video - Tips
https://furni-info.ru/kreplenie-velosipeda-na-stenu.html
https://provelofans.ru/vibor/kreplenie-dlya-velosipeda-na-stenu.html
https://velofans.ru/raznoe/raznovidnosti-krepleniy-velosipeda-stenu-vyboru
Bicycle wall mount - 2 simple options
https://rem-stroitelstvo.ru/kronshtejny-dlya-velosipeda
https://veloinsider.ru/soveti/krepim-velosiped-na-stenu-sposoby-i-vidy-krepezhej.html
https://velosmak.ru/kak-povesit-velosiped-na-stenu
How to make your own bike rack
- Metal stand for rear wheel
- Wooden bike stand
- Assembly procedure
- Tripod stand
- Let's sum it up
- Kurgan trailers official website: price, range
Hello, friends! Today on the agenda is a DIY bike rack.
Comfortable as well as practical design. Performs 2 functions simultaneously. This is a fastening option for storage, and also an assistant for repair work.
Over time, knee repairs become boring. Frankly inconvenient. And without maintenance and repair, bicycles will quickly fail. There is a solution. This is a DIY bike repair rack.
This is a special device. Allows you to fix the transport in the desired position. This way the master can leisurely clean it, repair it, and simply store it.
There is a wide range of ready-made designs on the market. But you can also assemble it yourself. It's not that difficult. We suggest considering several options.
We make the fastening with our own hands
It’s not difficult to make a wall-mounted bicycle holder with your own hands. You need to be smart and spend very little time.
This solution allows you to make a unique, exclusive accessory. You will need to purchase wide 15 mm thick plywood measuring one square meter, wood glue, varnish, as well as elements for fastening. To make a bicycle mount yourself, you need to take the following measurements:
It is necessary to make drawings of all parts. This will allow you to avoid mistakes during manufacturing in the future.
The plywood must be cut as indicated in the drawing. After this, you should assemble a “draft version” of the box. Under no circumstances should they be combined.
Draw cutouts for the pipe on the sides. Here you need to be extremely careful to avoid mistakes. Then the finished parts need to be glued together.
Before this work, remove any dirt and degrease the surface. Remaining glue is removed immediately. The top panel is secured with hinges.
Then you will get a box. If you do this at the base, there will be a shelf. Holes are cut out for fasteners.
The product is ready. All that remains is to give it a presentable appearance. Here you need to use your fantasy and imagination.
It’s not at all difficult to choose a bicycle rack and make it with your own hands.
You need to initially determine for yourself the criteria that are the most important and significant. Modern capabilities allow you to realize absolutely any idea. Fastening a bicycle to a wall or ceiling will allow you to securely fix the vehicle, as well as provide high-quality and safe conditions for its storage.
Nine examples of DIY bike racks with photos
25.01.2016
After a long summer cycling, whether in the city or in the country, when you arrive home, where will you put your bike away? Where will you store it and in what conditions until your next bike ride? Maybe on the staircase or in the hallway among your boots and slippers? Show respect to your “faithful horse” by placing your bike on a homemade convenient rack or bike rack.
We invite you to familiarize yourself with nine options for homemade bicycle racks with photos and bicycle holders.
Simple DIY bicycle rack made of wood
The process of making this wooden bike rack is very simple. You can see this for yourself by looking at all stages of production in the photographs of the bike rack. Can be used for three bicycles. Source
Photo of a wooden bike rack
This is more than a bike rack, it's almost a sculpture. Everything ingenious is simple! Minimum materials, minimum effort and, as a result, an impressive high-level bicycle rack. Source
Homemade bicycle hanger
- One resourceful person saw a wonderful design for storing bicycles by hanging them by the front wheel. This bike hanger cost $269 in the store.
- and he decided to make it himself for only $90. Here's what he got:
Simple bike rack made from pallets
If you happen to have two wooden pallets lying around and need bike racks, you can easily fit two pallets under a bike rack for up to eight bicycles. Source
Homemade wooden bicycle rack for 4 bicycle spaces
In my opinion, this is the most elegant solution for bicycle parking. Source
Bicycle rack made of PVC pipes
There are a lot of different instructions for DIY crafts made from PVC pipes. Here's how to make a bike holder from such pipes; this design will cost you only $9.
Bike rack trainer
This is a brilliant solution, transforming your bicycle into a wonderful exercise bike. And the bike is installed and is useful while it’s standing.
Bike service stand
A very elegant solution for damaging a bicycle. Unfortunately detailed drawings of this bike rack are not available, but for a skilled carpenter I don't think this is a problem.
Bicycle stand from METHOD studio
This bike rack was custom made and billed as "THE WORLD'S ULTIMATE BIKE STORAGE." All you need is a small bundle of copper pipes, add a basket from the store and the bike storage stand is ready.
Source: https://velogor.ru/blog/devyat-primerov-veloparkovok-izgotovlennykh-svoimi-rukami.html
Floor Stand Installation Guide
If you want to take a more difficult path, please! Cut 2 pieces of reinforcement 10, each 0.5 m long, and get to work creating a floor structure for storing a bicycle; you don’t need to take the transport to professionals, everything can be done without leaving home:
- Using bending equipment, make 2 bends - in the letter P or in a trapezoidal shape, you should get legs.
- Bend the ends of the arcs, make sure that the angles in the two planes coincide, otherwise the distortion will lead to instability of the product. A drawing, at least a schematic one, will help simplify the work. Aim for the legs to be vertical.
- Make a bend at the base of the machine - stability is achieved by supporting it on 2 strips of reinforcement, and not on four points.
- Finally, the reinforcement can be welded together.
- The lugs that secure the bike can be attached to the trunk or the rear wheel of the bike - whichever is more convenient for you.
- Place the bike on the stand and check the stability of the product again.
- All that remains is to saw off the excess ends, and the floor stand is ready. If desired, paint the product.
Step-by-step guide to creating a triangle post
The first stage involves creating the most accurate drawing; this requires the following measurements:
- stop length;
- lateral ribs;
- “tails” onto which the plates are later fixed.
Your task is, armed with a bending machine, to make products based on the indicated measurements. The bend passing along the ribs is made larger, so that they are located at an angle to the very end. The “tails” are directed vertically, the parts must be the same.
Metal stand for rear wheel
What to do next?
- Weld the “tails” to each other. To ensure accurate and accurate welding, adjust the products one to the other.
- Place rubber bands on the plates and heat until they are fixed to the metal base. This simple method will prevent scratches on the frame when mounting your bike. Leave an empty area at the ends of the plates for subsequent metal welding.
- After the “tails” are welded, use a welding machine to fix 2 metal plates on each side; these are the holders.
- A do-it-yourself bicycle repair stand made of metal is not very attractive, so experts also recommend priming the product and then painting the stand with a can of spray paint in the color you like.
Rules for hanging a bicycle
Before you decide to purchase or mount the brackets yourself, read the mounting rules.
The height of the room is important. In apartments with high ceilings, you can hang a two-wheeled horse from the ceiling; in rooms with low ceilings, wall mounts for storing bicycles will be useful. You need to choose a place that provides easy access to the bicycle.
It weighs a lot, it will take effort to remove it from the hook, you may need a stand. Rarely used bicycles (for example, for racing) are suspended at high heights. Look for brackets that have protection for hooks and protruding parts, protecting the equipment from damage. If the chosen model is without protection, you need to buy it or make it yourself. In small apartments where there is not enough space on the wall, you can think about a bracket that rises to the ceiling.
You need to choose a place so that sand and dirt falling from wheels and wings do not contaminate the furniture. The height is important to prevent family members from touching the tires with their heads. The load capacity of the hanger should match the weight of the bike
Pay special attention to the correct screwing of hooks, pins
Attention! You should not hang your bike on the balcony. In our climate, a bicycle left outdoors will quickly deteriorate.
Humidity and low temperatures can cause corrosion. If it is not possible to hang it in the apartment, you can do it in the basement or garage
In our climate, a bicycle left outdoors will quickly deteriorate. Humidity and low temperatures can cause corrosion. If it is not possible to hang it in the apartment, you can do it in the basement or garage.
Bicycle repair rack made of plastic pipes
Authorization on the site
How to easily and quickly make your own bicycle repair rack from PVC or polypropylene pipes.
Amateur cyclists who have to repair or maintain a bicycle know how difficult it is to do this without a special lifting rack to secure the bicycle at a convenient height during repairs.
Professional racks are expensive, but you can make a simple homemade one, the materials for which will be leftover pvc or plastic pipes, for example, after repairs.
Making a tripod stand in the garage
Let's move on to the last type of stand that you can make yourself - a tripod design.
We use a regular metal pipe as a tripod and fittings for the legs. A welding machine and a bending machine are required, as in the case of making a triangular stand. For hanging you will need two metal plates, a drill, a bolt and a hook.
Work progress: 1. Cut three identical reinforcing bars.
2. Bend on both sides: the tails are strictly vertical for welding to the tripod, the stops are horizontal. It is not necessary to make stops if the legs were made exactly the same length - the structure will stand up straight anyway.
3. Weld the legs to the tripod using tails.
4. Bend the plates in a semicircle. Leave the edges. The semicircles must completely fit the size of the post.
5. Use a drill to make holes in the edges of the plates for the bolt and hook.
6. Place the plates against the tripod and tighten them with a bolt on one side until they stop. If the fastener does not hold and falls off, insert rubber gaskets between it and the post.
7. Hang the hook under the bike on the other side of the mount.
The floor tripod stand is ready. We check it in action - the fasteners should not fall off under the weight of the bike. Otherwise, it needs to be tightened or a new one made. The design can be painted upon request.
How to make a tripod stand
Structural details
If a metal and wooden stand for bicycle repair is beyond your capabilities, then you can build a tripod structure on three legs. The legs are replaced by strong fittings, and the role of a tripod is played by a metal pipe.
The equipment and tools you will need are a welding machine and a machine for bending parts. To make a pendant, experts recommend using 2 metal plates, a tool with a hook, a drill and a bolt.
Tripod stand
Storage Shelf Options
A unique solution from an aesthetic point of view for hanging a bicycle in an apartment would be to use a shelf that can be decorated in various ways (flowers, books, etc.).
Bicycle racks come in two types:
Shelf for hanging a bicycle from the frame
Bicycle rack with saddle holder
Making and installing a shelf yourself is easy. The production of the shelf is carried out according to a scheme similar to the production of the cabinet. The shelf is fastened to special corners fixed to the wall.
Thanks to the simplest devices presented in the article, storing a bicycle in a small apartment does not cause any problems.
TOP best stands, comparison and description, reviews
Let us take the liberty of compiling a unique hit parade of bicycle storage systems. Here are comparative descriptions of the most popular ones.
Bicycle stand X17
The X17 stand is one of the most popular floor-type models.
It is a structure made of metal tubes, made in the form of a triangle, on the top of which the rear wheel hub is placed. It is very light weight and takes up minimal space. Designed for bicycles with wheel diameters from 20 to 28 inches. This stand can be used in almost any environment. It is suitable not only for storage, but also for minor repairs.
Bike Hand Stand YC-97
It would be more correct to call this model not a stand, but a bicycle rack.
It is a curved structure on which the entire bicycle is placed with the wheels resting on special rollers. This allows you to store the bike in a vertical position, which during long periods of inactivity causes minimal damage to the tires and mechanism of the iron horse. Despite the fact that the dimensions of the rack are quite impressive (700x200x70 mm), its weight is only 2 kilograms. This makes the stand easy to transport, and its form factor is designed in such a way that it itself takes up minimal space.
Rack (stand) for bicycle PRO 26
A practical, lightweight and compact stand is made of 4 mm thick metal sheet.
The sheet is curved at an angle of 90 degrees, and the upper part is equipped with two rubberized holding pins. The rear or front wheel of a bicycle fits between the pegs and holds the bicycle upright. This stand can be used absolutely anywhere. Moreover, you can even take it with you and use it, for example, while relaxing on bicycle rides or other “rides”. The stand is designed for bicycles with a diameter of 26 inches.
Brackets for hanging on the frame
A simple, cheap way - 2 hooks of appropriate length and strength. You need to install the hooks at a distance from the wall so that the pedals do not scratch the wallpaper or paint. Before screwing in the hooks, you need to make sure that the selected wall has the appropriate load-bearing capacity. Hangers with frame.
The advantage of hangers is the ability to fold them after removing the bike, saving space. What is important is the shoulder or length, which needs to be adapted to the bike. Hangers often have adjustable spacing, making them more versatile.
Folding hangers save space
Their quality is important; the hinges must be strong so that they do not break during intensive use.
Materials plus tools
The husband admitted that the manufacturing process itself is quite simple, so even the most inexperienced craftsman can cope with the task.
So, what materials will you need?
Rospotrebnadzor announced a new test for rapid diagnosis of COVID-19
“Brilliant, as always”: Renata Litvinova commented on Zemfira’s new album
Spring at home: Aeroflot cancels about a hundred regular international flights
- Metal wall from a crib. It is advisable that the rods be round rather than square. You can use wooden ones, but then the structure will be short-lived.
- Boards (8 pieces) sawn. 6 parts 1.2 meters long, 2 parts 50 centimeters.
- Corners for fastening.
- Metal hooks.
- Self-tapping screws.
- Drill and drill bit.
- Dye.
- Aluminum pipe fastener.
Materials for mounting a bicycle on the wall
You need to find oblong stones, about 15 centimeters long.
The width is at least 5 cm, so that the bicycle wheels do not slide off them. We take a Pobedite drill, which is used to drill into concrete. Equal in diameter to right angle anchors. Drill two holes at the bottom of each stone.
If the side of the stones does not fit snugly against the wall, you can level this side with an angle grinder. Natural stones can be processed quite easily with concrete discs. Then we carefully wash and clean the stones; they will serve as a decorative element on the wall and at the same time as stands for bicycle wheels.
Metal rack for the rear wheel - cook quickly
A triangular stand for the rear wheel is a classic version of bicycle racks. Sometimes even this simple device is enough to once and for all solve the problem of how to securely place a bike.
The design consists of U-shaped parts paired in a triangle, clamps for the upper stays of the frame or clamps for the bushing. Let's look at how to make a stand with frame fastening. This is much easier than inventing a clamp for the wheel itself.
To work you will need:
- fittings;
- metal plates;
- bending machine;
- welding machine;
- spray paint + primer;
- rubber plates.
At the first stage, a drawing is drawn up with dimensions: mark the lengths of the stop (the thrust part of the U-shaped part), side ribs and “tails” - the plates will subsequently be attached to them.
Using a bending machine, make products according to dimensions. The bend of the ribs must be made more so that they are at an angle to the stop. The “tails” look strictly vertical. We make sure that both parts are identical.
Next, they are welded together along the tails. Before welding, carefully adjust the products (it is clear that they will not be absolutely perfect, but you need to try).
We take metal plates and prepared rubber pads. Place the rubber bands on the plates and then heat them until they stick to the metal. This is necessary so that the frame does not scratch on the metal plates when installing the bicycle. We leave some “bare” metal at the edge of the plates for welding.
Weld two metal plates - holders - onto the sides of the welded tails. The product should look like this:
Just looking at the picture it is noticeable that the stand does not look very nice. To fix this, prime and carefully paint the product with a can of paint. That's it, the stand is ready.
Convenient place in the closet
This is a suitable solution for families in which more than one person uses bicycles.
It is worth considering installing a small built-in wardrobe in the hallway. You can hide your cycling equipment in a closet. Bicycles are placed in several ways:
Thanks to this, they take up less space; you can put several pieces side by side. This solution is quite complex, but provides better conditions - the walls do not get dirty, placement is quick and easy.
In the economical, less advanced version, it is enough to install the mount on the door in the apartment. You can use an existing niche - under the stairs, in the hallway, or create an additional “wall” from a wardrobe. Sliding doors are easy to install and we can adapt their size and color to your interior.
This is a fun way to use a little free space that we didn't know about until now. Bicycles are hung vertically, just like in built-in cabinets. You don't need a lot of space to safely store your equipment.
What is a bike stand for?
Despite the fact that most parts, components and assemblies of a bicycle are made of metal, plastic and other fairly durable materials, a two-wheeled machine is still quite vulnerable.
In particular, a long period of downtime “on your own two feet” (especially in winter) can negatively affect the quality of bicycle tires, which tend to crack and deform. In addition, a bicycle takes up quite a lot of space, especially if we are talking about a small apartment or room.
Thus, a bicycle stand is designed to perform two main functions:
- the ability to store the bike in the right place;
- storage security for components and mechanisms of the “iron horse”.
Let's take a closer look at what bike stands are and how they perform their functions.
Where to buy and at what price?
These products can be purchased at any store that specializes in selling bicycles.
Manufacturers have also released bicycle lifts, which are very convenient for mounting a bicycle under the ceiling. The most common of them are Veloangar and TBS SW Bicicle Lift. The cost of a bicycle lift varies from 800 to 3000 rubles.
The simplest hooks cost several tens of rubles, the most expensive ones exceed 1000.
It all depends on the size, material, load-bearing properties and manufacturer. The rule here is that the better the quality, the more expensive. The cost of brackets varies from 300 rubles to several thousand.
Prices, choosing the best option for an amateur cyclist
Of course, the choice of stand largely depends on the conditions in which the bicycle will be stored.
Placing a two-wheeler on a balcony or in a garage is one thing. And it’s a completely different matter to store an iron horse in the hallway of a small apartment. But in any case, the amateur cyclist strives to make his choice, taking into account the following criteria:
- strength and durability of the material from which the stand is made;
- stability, including with a bicycle placed in it;
- the most affordable price.
Or maybe in the room?
If it is not possible to install a bicycle in the hallway or basement, you can store it in the living room. A simple way is to hide it behind a screen.
You can easily choose a fastening model that matches other interior elements and will become an interesting addition. It is enough to purchase an effective bracket, a suitable platform, and lay down a simple rug, thanks to which we will effectively protect the floor from possible damage and dirt.
The bicycle should not be considered as an element that reduces the area of the apartment.
You can make it a decorative element. It should not interfere with daily activities.
Then it does not bother us, while at the same time acting as an interesting addition to the interior. The solution is ideal for cycling enthusiasts who love to contemplate their two-wheeled friend.
Furnishing a small apartment requires a lot of creativity, especially for cycling enthusiasts who have to find additional storage space for cycling equipment. Lack of storage space should not be a reason to refuse walks or sports.
There are many opportunities to incorporate a bicycle into your interior without interfering with your daily life. How to do this so that the apartment does not turn into a garage? It will take a little ingenuity and free space so that we can easily store equipment during and after the cycling season.
If it is not possible to find a place for a classic bicycle, you can look towards a folding model. After folding it is small enough to fit under a table or in a closet
The advantage of folding models is low weight (important if we have to lift them up the stairs), the disadvantage is the price (if we are looking for a safe model with a really durable design)
Although the size of a bicycle is quite significant, this does not mean that it cannot be stored in an apartment. Modern technical solutions come to the rescue:
In addition to the traditional holders that immobilize the bicycle wheel in a special rail, there are versions mounted on:
They allow you to place equipment in different positions using the available space.
Methods and types of mounting a bicycle on the wall
Cycling enthusiasts do not know where to place their sports equipment at home. Which bike mount to choose on the wall? And is it possible to do it yourself?
If there is no garage and to save space in the house, it is recommended to install fasteners. The owner of the vehicle must know how to properly store it, and how it can be installed against a wall or under the ceiling.
To do this, it is recommended to follow a number of simple rules:
Alternative methods
My husband really wanted the stand to be portable from place to place.
In the future, we plan to make the yard covered (partially, not completely), so that things and bicycles can be left outside all summer. Now, when it rains, the stand is moved under the roof visor. If you don't want to make a wooden frame, you can always use a metal lattice and screw it directly to the wall.
Again, you can use aluminum pipe fasteners and a drill, or you can weld the stand with a welding machine.
But this method has one drawback: it will not be possible to move the “parking lot” to another place; the wall will suffer greatly from manipulation.
And here’s one more piece of advice: please do not install such a stand in hallways or on the street. It is intended for use in places where people you trust live. If desired, you can make a frame from metal pipes, and then bury it in the ground and fill it with cement for reliability.
And to keep your bikes safe, you can always use an anti-theft lock.
We decided to do without additional protection, since we knew that none of the neighbors would steal a child’s bicycle. On the contrary, everyone came out to offer their help. And they even gave away the metal grate for free, having taken it from an old unnecessary crib. And others even bought paint.
The kids really love the stand. They now put bicycles in their parking spaces.
We are even thinking about writing names on the hooks, and also giving the children fake driver's licenses. I'm sure they will feel grown up and important, and will also learn to take care of their things and keep them in one place.
other methods
If the basic fastening methods are not suitable for a certain apartment, then you can use additional options:
- A convenient place is in the closet. It can accommodate several units at once, as well as all the necessary accessories for using the bicycle. Typically used in a large family where there are several people who like to ride two-wheelers. You can place not only children's, but also adult samples in the closet. Usually, for convenience, the closet is installed on a warm balcony or in a large hallway. It is not recommended to use if the apartment is small. When making the cabinet, good materials are immediately used, and it will withstand the loads.
- Stand for one wheel. This unit takes up very little space in the apartment, but at the same time securely secures the transport. The main disadvantages are that a good special device is quite expensive, and cheap plastic ones break quickly. The stand does not save space in the apartment at all, since the bicycle will still stand on the floor in a certain place indoors. The equipment is used to prevent vehicles from rolling or falling.
Wooden bike stand
You can also make a wooden stand. Moreover, a similar algorithm is often used as with a metal holder.
But there is a more interesting design. Here you need a set of:
- boards;
- wooden plates for beams;
- hacksaw, jigsaw or saw;
- drills;
- wood drills;
- self-tapping screws;
- sandpaper or sander;
- varnish
This will be a convenient repair stand, as well as an excellent option for storing a bicycle. Moreover, the structure will be assembled with your own hands. And this is doubly pleasant.
The system will consist of the following elements:
- stops assembled from 2 parallel boards;
- one crossbar onto which the stops are fixed, and the entire structure is supported on them;
- inclined beams reminiscent of a hockey stick.
In the latter case, an acute angle of 60 degrees is set between the short and long elements.
Before cutting out the boards, it is better to draw the stand on paper and indicate all the exact dimensions.
Typically the length of the beam is the same as the length of the frame. The stops are 1.5 or 2 times larger compared to the wheel diameter. The cross members will protrude from the sides of the stops so that the stand does not expand over time due to the weight of the bike.
The distance between the stops and inclined beams is made slightly less than the thickness of the bicycle wheels.
Assembly procedure
Now you can start assembling the stand or rack.
- Cut the boards to the required sizes. Use a jigsaw to make beams and smooth out the corners;
- Having previously drilled holes with a drill, use self-tapping screws to connect the cross members with the stops. This forms a cross. Base for stand;
- Sequentially fix the inclined beams to the stops with their short ends. Fastening occurs from the outside;
- The stand is almost assembled. It is necessary to tie parallel beams together. Here you need cross boards. This will keep the bike on the stand. Along the entire length of the beam, 3-4 boards are enough. Install one of them at the upper end;
- Go over the assembled structure with a grinder and fine-grained sandpaper. Complete the procedure with 2 coats of varnish.
The result is a universal stand that is suitable for repairs, as well as for temporary or seasonal storage.
However, during repairs, dirt can get on the wood and spoil its appearance. Applying 2-3 layers of varnish will create a stain-resistant protective layer. You can wash off the dirt with a regular damp cloth.
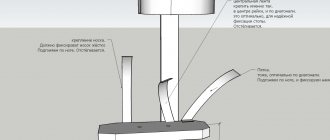
Biped carriage (central)
They are also sometimes called symmetrical running boards .
These are the best models for bicycles used on long hikes. They are, of course, a little heavier than their one-legged counterparts, but they have one undeniable advantage: they provide the most convenient and stable parking of all the previous ones. It is much more difficult to tip over a bike with this side stand than a bike with a side stand.
However, it should be noted here that if at a halt you place your “pedal horse” sideways to the wind, then, having a large windage due to loaded bags and backpacks, the likelihood that it will fall is quite high and no step will hold it. So, you should always park your bike in the wind.
Some bikers specifically select the height of such footpegs so that the front wheel does not touch the ground. This results in a stable system of three fixed points. Two points are the legs and the third is the rear wheel. And three points, according to the laws of geometry, uniquely define only one plane. At the same time, the front wheel slightly raised above the ground saves the bike from the bad habit of falling when it turns.
Another note from life: after you attach the kickstand to the bike, check that it stands upright, without tilting to its side. If necessary, adjust the legs slightly to bring the bike into an upright position.
For an empty bike, a slight sideways tilt is not a problem, but for a bike with a heavy backpack, this can lead to frequent falls.
They come with both fixed legs: move one leg and both immediately move together, and independent legs. When using them, you can put the bike on one or two legs. True, in this case it is not always convenient to use. To put the bike on two legs, you have to run around it.
When installing a symmetrical footrest, ensure that the right foot does not touch the chain at all speeds.
Carriage or center steps.
They are perfect for regular city and mountain trips without a lot of things and backpacks on the trunks. For children's and teenage models.
They are usually bolted to the bicycle frame on a special bridge between the rear stays just behind the carriage unit. Almost always, manufacturers provide a ready-made hole on this jumper for such fastening.
Their advantages:
- It is easy to install - just screw one bolt.
- Conveniently located. Get off the bike and the stand is already under your foot, no need to reach for the rear wheel.
- With the correct length, the bike stands quite stable, since it is located near the center of gravity of the unloaded bike .
On a touring bike, which is loaded with backpacks during a hike, especially at the rear, the center of gravity is raised and shifted towards the trunk. At the same time, even when the bicycle tilts at a slight angle to the side, a moment of gravity arises, tending to drop the backpack and, along with it, the bicycle, to the ground. In this case, the side stand at the carriage begins to play the role of a center around which the bicycle rotates and falls. This can only be avoided if you clamp the front brake, for example, with a rubber band on it and the steering wheel.
For this option, a step mounted on the rear wheel axle or on a feather is better suited. This is a more sustainable option, although not ideal.
Mounting methods
Bicycle storage is a real problem for apartment owners in a multi-storey building. If there is no spacious garage on site, then cycling enthusiasts use special bicycle mounts for the wall, which are very different from each other. But before choosing a place for your bicycle, you need to follow a few simple storage rules:
- In winter, it is forbidden to leave a bicycle in a cold room - metal parts contract when overcooled, which reduces their strength.
- Sunlight is also not the best option. Heat has a particularly bad effect on rubber.
- Be sure to use special covers or a regular cape made of thick fabric. This will protect the parts from dust, snow and rain.
- While the bike is not in use, all parts need to be lubricated and dust free.
- If the bike is modern and has spring shock absorbers installed, then it is advisable to weaken them so that they retain their original properties and do not weaken over time.
Once all the requirements are met, you can begin choosing a bike mount for the wall. For a pedal, frame or wheel - the choice is individual.
Frame parallel to the wall
A vehicle standardly placed near a wall will take up quite a lot of space. In order not to get dirty when passing by the wheels, the bicycle must be hung at a short distance from the floor using fasteners. This type of bike rack is convenient, even if there are several of them in the house.
Frame perpendicular to the wall
This type of construction is very convenient, since the transport will take up very little space in the apartment. But the installation itself requires a lot of free space. The ideal option for placement is a corner of the wall behind the front door, geyser or refrigerator. To avoid constantly hitting the bike, the wheels are placed closer to the wall.
Above the ceiling
Mounting your bike to the ceiling is a smart and efficient way to store your vehicle. Using this method, you can free up much more free space than in the previous two cases. A system of brackets is used, with the help of which you can effortlessly raise and lower the bike to the ceiling. Typically this option is used if the room has high ceilings. A ceiling mount for a bicycle involves the use of hooks or brackets.
On the balcony
It is convenient to place the bicycle on a loggia or balcony, if the apartment has one. But here it is necessary to take into account temperature changes that are typical for open space. Transport is usually placed right next to the partition separating the street from the apartment, or a bicycle rack is used on the balcony. But there are also negative aspects - you will have to carry it through the entire apartment. This is very inconvenient, since there is a risk of the wheels staining the carpet.
Homemade bike carrier
I like to do all sorts of homemade things)) So, for a long time, or briefly, based on the Thule Sprint XT, I made my own rack for transporting a bicycle on the roof of a car. I'm happy with the result