A cordless screwdriver is a convenient mechanism that allows you to quickly complete repairs. Instead of a heavy drill on a wire, it is better to take a lightweight screwdriver that can cope with the same tasks without being tied to one place.
They have one problem - the batteries fail. There are many reasons for this:
- Long downtime. Modern lithium-ion batteries require periodic charging and discharging. They dramatically lose capacity if left idle for a long time.
- Temperature changes. Li-Ion does not tolerate high temperatures well. Therefore, there are recommendations for storing these batteries in the refrigerator. But they cannot work in such conditions.
- Overdischarge. The protection system can cause the batteries to discharge to zero and to resurrect them you need to apply a large current to the input.
If the battery wears out, you can buy a new one in the store. But you can try to restore the old ones. In 85% of cases they can be repaired.
Troubleshooting
The most common cause of failure is the failure of only one element. They are connected in series, which means that even a drop in capacity on one battery will lead to a complete malfunction of the entire battery. In this case we will need:
- Screwdriver. Usually the body is connected with Phillips screws. Some models have foolproof protection and may have stars with an anti-vandal system, triangles or even spanners.
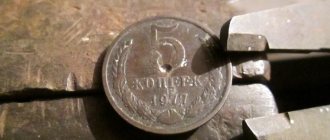
- Multimeter. Any model is enough, even the cheapest DT-830. Since measurements are carried out in millivolts, Soviet pointer voltmeters will not be suitable.
Next you need to follow the instructions:
- The battery is disconnected from the screwdriver. It must be fully charged.
- The body is disassembled.
- Now you need to remove all the cans. There are more of them in Ni-Kd, since the rated voltage of one section is less.
- The voltage is measured at each bank. For nickel-cadmium - the nominal is 1.2 volts. For lithium ones, the normal voltage is in the range of 3.6-3.8 volts.
- After the measurement, you need to see which banks have the voltage reduced. For example, if two lithium batteries have a voltage of 3.8, and one has a voltage of 3.5, then it is the one that is defective.
- The battery is assembled and installed in the tool. Now it needs to be set to zero.
- The battery is disassembled and the voltage is measured again. If the voltage on the proposed element is significantly lower than on the others, it means it needs to be replaced or repaired.
Reviving the screwdriver. Everything for converting a screwdriver to 18650 lithium-ion batteries
The screwdriver battery will sooner or later get tired and will need to be replaced. Buying a new battery is justified in a situation where the tool costs a penny. But if you have something more or less decent, or an old Ni-CD battery, then it definitely makes sense to replace dead 18650 batteries with new ones or completely convert nickel screwdrivers to lithium ones.
Of course, as in any business, there are some nuances here, but if your hands are at least minimally straight, then converting a screwdriver to lithium yourself is not at all difficult. You just need to know what to buy for remodeling and understand the basic nuances of the process. And it’s easy to buy everything on Aliexpress to convert a screwdriver to lithium.
Why 18650 Li-ion? The advantages of lithium batteries are obvious:
- high energy density per unit mass
- low self-discharge
- virtually no memory effect
- availability and price
By the way, if you like to read , then there is a great option to save money! book service , the largest in Russia and the CIS countries, gives the fourth book as a gift when you buy three. Personally, I have been buying books there for about 5 years now. The price tag is already affordable, but with such a bonus it turns out to be quite small. There is a convenient application for reading and listening to books. The link above is one of my selections, which has a bold, updated promotional code.
Reworking the screwdriver battery. What you need to know:
1) The screwdriver requires high-current 18650 batteries (ideally - Sony/Murata VTC5, VTC5A, VTC6. Acceptable - Samsung 25R), or less high-current batteries connected in parallel (if space allows).
2) You should absolutely not use old laptop batteries or just different batteries. All 18650 batteries in the assembly must have a minimum variation in capacity and other characteristics. Of course, buying a high-current 18650 battery on Aliexpress is the easiest solution. Just keep in mind in advance that the model name will have nothing to do with the cell inside. 4 batteries purchased in one lot from one seller may differ significantly in capacity and internal resistance. Although the link below will be a good option for those who don’t want to solder.
The ideal option is to buy 18650 from a trusted seller on the same avito, or order 18650 on nkon. In the latter case, you will have to pay 10 euros for delivery, but the batteries will be 100% original and much cheaper than buying locally (which will reduce the delivery fee to zero). Personally, I have been buying batteries from this store for many years.
I did an article on how to choose a 18650 lithium-ion battery, if you are interested, read it here
3) The batteries are connected to the BMS board strictly sequentially: first 0 V, then 4.2 V, 8.4 V, 12.6 V, 16.8 V. If the BMS is broken, it will not work!
4) 18650 batteries in the assembly must be charged equally. It is best to charge each battery separately and then assemble it into an assembly.
5) How to calculate how many 18650 lithium batteries are needed instead of nickel ones? In general, the calculation is as follows: 2-3 NiCd = 1 lithium, 5-6-7 NiCd = 2 lithium, 8-9-10 NiCd = 3 lithium, 11-12-13 NiCd = 4 lithium
6) Lithium batteries very susceptible to overheating. The ideal option is spot welding. Soldering also works quite well. How to solder 18650? The most important thing is that you want largest sting possible Reduce the contact time between the tip and the 18650 battery to a minimum and do not overheat the latter. Otherwise, the process is no different from any other soldering. It is best to get your hands on those old batteries that you will be replacing.
BMS board
For 3\4\5 x 18650 batteries 100A with balancer
BMS (Battery Management System) – battery management system. The BMS board is extremely important when converting a screwdriver to lithium. Why is it needed and how does it work? It controls charge and discharge, preventing overdischarge and overcharging of the screwdriver battery; it has a built-in “balancer” that separately charges each Li-Ion battery in the assembly. The latter is extremely important! There are BMS without a balancer! 3S - 12v, 4s - 14v, 5s - 18v To choose a BMS board, you must take into account that the minimum current must be 30A, otherwise it will go into protection.
The BMS board option in the link is 2-3 dollars more expensive than some basic versions, but you get 100A instead of 30A or 40A. In my opinion, in terms of functionality, this is the best BMS board from Aliexpress and deserves this symbolic overpayment.
Ready-made 18650 battery assemblies
Buy here
For those who don’t want to solder, you can buy ready-made welded 18650 screwdriver assemblies on Aliexpress! S – number of batteries in series (voltage increase), P – number of batteries in parallel (capacity increase). Thus, for a basic 12V screwdriver you need to buy 3S1P or 3S2P (increase the capacity), for an 18-20V screwdriver - 5S1P / 5S2P (lots of capacity). Read below for descriptions of battery models.
I am 100% sure that there will not be any VTC6 on the link, but even what is there allows you to count on normal operation, the reviews are good.
Power indicator
Buy here
A simple and useful thing that shows the battery charge.
Mini spot welding machine
Buy here
If you have no desire to solder or make your own spot welding machine from microwave offal, then this tool can help you out. Despite its extremely compact size, it is completely functional and can be a great help. Especially in a situation where you need to cook somewhere on the spot where it is inconvenient to drag a full-fledged apparatus.
Welding tape for 18650 batteries
Buy here
If buying ready-made battery assemblies is not interesting to you, then you will definitely need a tape to connect the batteries. Of course, you can buy it locally. But if you are still waiting for the same BMS board from Aliexpress, then it makes sense to order everything else there and save time on shopping trips.
CC/CV charging module
Buy here
But this CC\CV module is needed for those who decide to convert the screwdriver to lithium. The old charger will not charge and you will need this small unit. If you have a multimeter, you can adjust it using it. If spending an extra couple of bucks is not a problem, then you can ensure maximum visibility of all parameters, from voltage to current, and buy a version with a display.
Power supply for charging
Buy here
Attention! The Li-ion assembly must be charged strictly with a charger for lithium batteries! Nickel charger will not work! To buy the required charging unit, you need to multiply the number of batteries in your assembly by 4.2. Those. 1x188650 – 4.2v, 2 – 8.4v, 3 – 12.6v and so on. There are a lot of different power supplies on Aliexpress, just search for Power supply 4.2v (or some other required voltage)
18650 battery holder
Buy here
Far from being the most important part in your assembly. To prevent the batteries from shaking, you can also use some options made of foam rubber and heat shrink. But, if you want everything to be beautiful and neat, there is nothing better than these holders.
Silicone wire
Buy here
Of course, you will also need a wire. And, I’ll tell you straight, a good piece of good quality, soft silicone wire will come in handy even without altering or repairing the screwdriver. I have a meter of black and red at home, and this supply has helped me out a lot more than once.
Well, that's all. Aliexpress has absolutely everything you might need to replace old 18650 batteries in a screwdriver with new ones or convert a screwdriver from nickel to lithium-ion batteries.
Here's another important point. Often, delivery from Ali will take a long time. It’s worth looking at products for converting a screwdriver to lithium here on Yandex Market.
If you work with a screwdriver or any other tool, you'll probably need a good headlamp. Now on Aliexpress it is possible to buy a really inexpensive and good model: with built-in charging, light with good brightness and color temperature, and a magnet at the end (ideal for working under the hood). If you're interested, here's my full review and comparison of Sofirn SP40
I hope the text was interesting. I invite you to subscribe to my:
Review channel on UTUBE
Group in , where before publishing reviews, I post announcements of some materials from them, publish promotional codes and coupons for some interesting flashlights + talk about the release of new models.
Telegram channel with the latest discounts and promotional codes!
General recommendations for repairs
How to restore a screwdriver battery? You need to have a basic understanding of electrical engineering. The battery circuit is simple. A regular series circuit (plus is connected to minus).
When repairing Ni-Kd, the following recommendations should be taken into account:
- They have a memory effect. The classic scheme for commissioning such batteries is 3 full charges and 3 discharges to zero. The new element must go through the same buildup.
- Similar element. So that it does not get out of the circuit and does not break the battery at all, the new element must fully correspond to the previous rating.
The lithium battery of a screwdriver can be repaired at home, if you consider the following:
- They cannot be soldered. Intolerance to high temperatures will result in a condition beyond repair. To do this, you need to use resistance welding (it heats the electrode for a short time without harming the battery). If there is no access to the CS, soldering is allowed with a very powerful soldering iron of 100 watts or more. The movement must be fast and precise.
- Same models. Now there are several main manufacturers of lithium batteries, which are used in popular foreign models of screwdrivers, such as Hitachi, Makita and domestic ones: Interskol, Zubr.
Cool ideas and lifehacks for using a screwdriver at home
In addition to the listed mechanisms, a screwdriver can also be used to implement other ideas on the farm. This hand-held power tool will help you automate the opening of an entrance gate, make a winch for a car, or make scissors for cutting metal. If you attach an attachment for cutting tin to it, you can turn an ordinary rubber boat into a motor boat, and modernize the process of drilling holes for ice fishing. In addition, everyone knows that a screwdriver is used as a drive for a mixer, meat grinder or juicer.
After reading the article, the reader gained knowledge about the unconventional use of a screwdriver. Now he can use this hand tool to create carpentry equipment, improve children's vehicles and other useful things in the home.
Replacing cans in the battery
How to repair a battery for a screwdriver? The easiest way to revive the battery is to replace one of the cans.
You need to find a defective element with low voltage. To do this you need to use a tester.
Instructions on how to check a screwdriver battery with a multimeter:
- A regular multimeter has two probes - red and black. There are two contacts at the opposite ends of the can (plus and minus).
- The tester selection lever is set to the “constant voltage” mode. If the multimeter has automatic selection of values, this is enough. If it is not there, you need to put the lever in position “20”.
- The probes are applied to the contact pads and the voltage is measured. The screen shows the actual voltage. If there is a “-” sign in front of the numbers, then the probes need to be swapped with each other.
- Each bank is checked using this algorithm.
Carpentry workshop equipment
A few more interesting suggestions on how to make equipment for home carpentry using a regular screwdriver.
Wood lathe
When making wood products, it is difficult to do without a lathe. You can build it yourself. A flat wooden workbench is ideal for the bed. A screwdriver can be used as a headstock and rotation drive. You need to place the tool in a wooden bed made from a block in the shape of a screwdriver and secure it with a clamp. The block can be secured with a clamp, and if the machine is constantly used, screwed with self-tapping screws. A tooth mandrel must be inserted into the chuck. The tailstock is made of two bars with an adjusting screw, which is sharpened to a cone. It is installed opposite the fixed screwdriver so that the axis of the tool coincides with the axis of the tailstock adjusting screw. The back support structure is secured with a clamp. If you plan to process large parts, then the fastening should be more reliable. The tool rest can also be made from a block, securing it to the workbench with a clamp. A primitive lathe for the home workshop is ready.
Bench Drilling Machine
Another equally important piece of equipment is a drill. It can also be made from a screwdriver. To do this you will need a used screwdriver. From it you need to take a motor with a gearbox and a cartridge. Now you need to make two clamps from textolite, which will perform the function of fixing the drilling head of the machine. To achieve maximum alignment of all holes on the clamps, it is better to process them together, in one installation. Then you will be able to avoid distortions.
Bushings with internal threads are used as limiting posts. They must be the same size, corresponding to the distance between the clamps. After this, another clamp is made from textolite and two bosses from caprolon. They are drilled off-center, resulting in two eccentric bushings. The clamp is installed on the rod and the backlash is selected using eccentrics. After this, install a wooden lever on a spring so that the drilling head returns to its original position. To supply power, you must use a transformer with a power of more than 150 watts and an output voltage similar to the screwdriver you are using. After this, you need to install a diode bridge and a capacitor, and install the drilling head on the frame.
Manual router from a screwdriver: step-by-step instructions
It can be converted into a hand router. To do this, you do not need to purchase expensive materials. Everything you need can be found in the workshop or garage, practically under your feet. To make a manual router from a screwdriver, you will need pieces of thick plywood or chipboard, a clamp for attaching the tool, fasteners in the form of bolts and self-tapping screws, plumbing tools and a feather drill for wood. In the latter case, you can use a drill bit.
Assembling a homemade router is quite easy. To do this you need:
- From pieces of the selected material, cut out a base, a vertical stand on which a screwdriver will be attached using a clamp, a stop and a gusset to impart rigidity to the structure. The dimensions of the parts are chosen arbitrarily, in relation to the dimensions of the power tool.
- Using a pen drill, drill a Ø 40 mm hole in the base for free access of the cutting tool to the processing area.
- Make a clamp according to the diameter of the hand tool.
- Using a clamp, secure the screwdriver to a vertical stand so that its chuck is a few millimeters from the base.
- Install the stiffener.
- Secure the screwdriver with the stop on the vertical stand.
- Install the cutter into the tool chuck.
The screwdriver cutter is ready for use. Such a machine cannot become a full-fledged replacement for a manual milling cutter due to its low power and low spindle speed, but it will solve the problem of milling small parts in a home workshop.
Circular Saw
In addition, for your carpentry workshop you can make a circular saw from a screwdriver. To do this, you need to make a working surface using a sheet of chipboard or thick plywood. You need to make a cut in the tabletop to allow the circular saw to exit. The screwdriver must be securely fastened to the underside of the work surface using metal or wooden clamps. In the same way it is necessary to mount the shaft
It is important that the saw blade extends above the working surface of the table by no more than a third of its diameter
Adding distilled water
Restoring the battery of a screwdriver with topping up must be done with a completely discharged battery. Non-CD batteries are covered with paper. If there was evaporation, there will be noticeable marks on the surface.
After measuring the voltage, you need to completely discharge all the banks using a 12 volt light bulb. After this, the voltage is measured again. Those elements where it dropped to 0.7 are faulty.
To add distilled water, you need to make a hole in the side of the jar. A groove is made with a very thin drill (0.5-0.7 mm). You need to make sure that it doesn’t go inside and damage the plates.
A small amount of water is poured into a syringe with a thin needle. After this, the hole must be sealed with epoxy resin or sealant.
Now the battery can be pumped up. Each block must be discharged to zero again by connecting 1.5 volt light bulbs to them. When the procedure is completed, the battery is assembled and it is necessary to carry out 5 charging and discharging cycles.
Possibility of recovery
When it comes to a failed lithium-ion battery, the only way to get your screwdriver battery working again is to replace it with a new one. This is the best possible option in this case, since batteries of this type do not have any memory effect, and the reason for their breakdown is associated only with the chemical decomposition of the filler. However, the cause of the malfunction may also be hidden in a violation of the device’s control circuit.
Therefore, to accurately determine the cause of a breakdown, two methods are used:
- Install another, working control circuit, and try to start the device. If the verification method helped, then the reason lies precisely in the breakdown of the circuit.
- Using an adjustable charger, connect the jar to a current of 4 V and 200 mA. An increase in the nominal value on it to the specified 3.6 volts indicates complete serviceability. The cause of the breakdown must be sought either in neighboring batteries or in the control circuit.
To identify a faulty element, you need to check each bank of the screwdriver battery pack Source ytimg.com
Repair and replacement of battery elements
Do-it-yourself screwdriver battery repair can be more extensive. For example, converting Ni-Kd to lithium. To do this, you need to purchase several Li-Ion batteries and a charging board. The number of batteries must correspond to the original voltage rating.
As practice shows, most screwdrivers can be easily converted from one type of battery to another, without any problems. Thanks to its increased durability, resistance to constant use and larger capacity, your old screwdriver will last much longer.
Did the article help you?
Flashlight
From an old broken cordless screwdriver you can make a powerful flashlight that runs on battery power. To create this homemade product you need:
- disassemble the drill body and remove the motor, gearbox and chuck from it;
- instead, an LED lamp of the appropriate size with a power of 5-12 W must be installed in the groove. For this you may need a G 5.3 cartridge.
Due to the battery capacity, such a flashlight can work for a long time and is well suited for those who experience frequent power outages.
Manual router from a screwdriver
To convert a screwdriver into a manual router, you will need a sheet of plywood or chipboard, a clamp, fasteners and a feather drill (crown) for woodworking. To attach the future router using a plywood clamp, a stand and stop are made. Their sizes depend on the dimensions of the screwdriver.
Using a drill, a hole with a diameter of 40 mm is drilled in the central part of the rack. It will provide access to the cutting part of the milling cutter to the workpiece being processed.
Secure the screwdriver to the stand with a clamp. In this case, you need to leave a small gap (2-3 mm) between its cartridge and the stand. Secure the cutter in the chuck.
A homemade hand router has little power. Its spindle rotates at low speed. Therefore, the router can be used for processing small workpieces.
Sources:
https://go-radio.ru/ustroysTVo-zaradki-shurupoverta.html https://crast.ru/instrumenty/chto-mozhno-sdelat-iz-dvigatelja-ot-shurupoverta https://tehnopanorama.ru/instrumenty/ chto-mozhno-sdelat-iz-starogo-shurupoverta.html
Generator
The design of the screwdriver is such that a small improvement is enough to get electricity while traveling. you remove the board with the electric regulator from the inside of the screwdriver All that remains is to clamp the homemade handle into the cartridge - the generator is ready!
Manual milling machine: step-by-step instructions
If, when working with wood, you have the task of cutting out a groove or a circle, you should not go out and buy an expensive router. By being resourceful, you can simply solve this problem and turn the screwdriver into a manual router, creating with your own hands a lower frame - a structure that would hold the tool vertically. Production attachments for milling with screwdrivers (drills) are on sale, but purchasing them is not always financially justified.
The most readily available materials for the home craftsman are plywood and wood blocks. From these we will make a frame-attachment for milling, following the instructions step by step:
- Let's create the lower part of the bed. Let's take plywood 8 mm wide and cut out of it a ring with an outer diameter of 10 cm and an inner diameter of 5 cm. For this work, we use a screwdriver with a “crown” for wood.
- At the edges of this ring we will screw two wooden blocks of 4x2x10 cm with screws. We will place the made structure with the blocks up. It will resemble a stool placed with its legs up.
- Let's create the highest part of the bed. Let's cut out another ring from plywood with an outer diameter of 9 cm and an inner diameter of approximately 4.5 cm (to fit the size of the screwdriver ).
- We screw the upper part of the frame to the bars with the lower part with self-tapping screws.
- We put the attachment-frame on the screwdriver body. It fits tightly into the round hole in the top of the frame.
- We insert the required cutter into the chuck and adjust the cutter cutout. We tighten the cartridge.
The hand router is ready. You can get to work!
The homemade design of the milling attachment described above - the frame for the screwdriver - allows you to hold the tool free of weight and strictly vertically. And the lower part of the bed performs a supporting function when performing milling work.
Children's vehicles
Creating children's vehicles that move without applying physical effort to them has always been and remains a fascinating task for men who love to tinker with tools in their own garage or workshop. Of course, it is worth noting that some of these cars require adult supervision in order to avoid collisions, injuries and various troubles “on the roads.”
Electric scooter and electric bicycle
It's hard to deny a child the pleasure of riding a scooter. But what a surprise and happiness it will be when he sees this scooter in an improved, or rather “self-propelled” form. No physical effort is required to ride. Just a smooth road and balanced movements.
So how can you make an electric scooter with your own hands while spending a little money? Options may vary. The only thing they have in common is that the source of movement, the engine, is a screwdriver.
The structural part can be made individually, from an old overcooked bicycle with an extended handlebar or from a scooter. But the most important thing in an electric scooter is the motor part.
Let us summarize the principle of its operation. There is a drive sprocket with a rod driven inside it. This rod is installed in the screwdriver chuck.
The screwdriver turns the drive sprocket, which transmits rotation through the chain to the second sprocket mounted on the wheel. What could be simpler? Each master decides differently how to attach a screwdriver to a bicycle. It all depends on possibilities and imagination.
The on-off system is displayed on the steering wheel. Many different solutions have been invented for this: cable systems, hydraulics from a hose and two syringes. All you need to do is turn the screwdriver on or off using a handle or button on the steering wheel. It makes no sense to list them and delve into their technical features; let this remain the prerogative of motorists.