“The process of how to make a bench press bench with a stand for a 2-in-1 barbell at home has already been described in detail. That is, the stand itself (stand) and the bench press are one whole. This is the simplest option, not taking into account the possibility of not doing a rack at all and putting the barbell on the floor between approaches, which is very inconvenient and difficult, especially without a partner.
Here we will consider another option for what a homemade bench press can be. This time we will show you how to make barbell racks with adjustable height and separate from the bench. Plus, this bench press bench according to the drawing will be equipped with a leg grip tube, which will make it possible to use it for various other exercises, for example, pumping the abs or performing triceps extensions.
In principle, everything can be freely combined and your homemade bench press bench can be either one whole with a stand (2 in 1) with adjustable height, or, on the contrary, separate parts with a fixed and non-replaceable height. It can also contain a tube for gripping with legs, or be without it. But it’s up to you to decide, but now look at what should happen in this version (Fig. 1):
Rice. 1. Homemade bench press bench and barbell rack with adjustable height
Homemade Bench Press Bench
Rice. 2. Drawing of a homemade bench for bench press
In the figure, the upper number indicates the part number in the table, and the lower number indicates the number of such parts. Of course, the covers for the pipes are far from the most necessary part here and you can do without them.
This homemade bench requires approximately 3.2 m of square profile steel pipe - this is its most expensive part. The fastenings with which the board is attached can be made simpler (Fig. 3).
Rice. 3. Simplification of fastening
This simplified mount simply needs to be attached through the 2 middle holes to the pipe, having also drilled it beforehand accordingly. Now, let's move on to how to make a homemade bench press barbell rack with adjustable height (Fig. 4).
Rice. 4. Drawing of a homemade barbell stand
It’s similar here - the top number denotes the part itself, and the bottom number to which it is attached. As for the rectangular profile pipes, which are shown in the figure, it will be much easier to find them with a metal thickness of exactly 2 or 3 mm than 2.6. It is advisable to use 3 mm for reliability; the difference in price will be approximately 1 USD. more expensive per meter, but you need less than 1.5 m of them for both homemade rod racks. The main load will still fall on square pipes, and it is worth trying to find them with a metal thickness of more than 4 mm, although they are more often found with a thickness of 3.
Holes for wedges can be drilled according to the drawing below for each of the pipes (Fig. 5 and 6).
Rice. 5. Holes in outer pipe
Rice. 6. Holes in the inner tube
As you can see, only 2 holes are made in the outer pipe (40 x 40mm), and 8 in the inner one. But their diameter, as well as the distance between them, is no longer so significant. Here it is already possible to do it differently (fewer holes in the inner pipe or a larger diameter), but it is important that the diameter of the holes for reliability is not less than that in the drawing. And if, for simplicity, we fix the height of the rod stands with one wedge on each, then it is desirable that the thickness of the holes, like the wedges, be at least 2 times greater. In this case, of course, it is not necessary to make 2 holes in the outer pipes.
Rice. 7. Wedge drawing
The wedges, of course, for convenience, can be made thicker and one for each rack, and not 2, as in the drawing. But if you make them from a nail, which is probably the easiest way, then you can choose 200 weave. There will be a thickness of 6 mm, as in the drawing, and the length will be enough. But in this case, it is better that each homemade barbell rack contains 2 such wedges. If you want to use one at a time, then choose something thicker.
As for the holders, you can make them as in the drawing (Fig. 8). But for simplicity, you can replace them with stags welded from thick steel reinforcement in the form of the letters “Y” or “U”. But if you have a sheet from which you can cut, of course, it’s easier to do so.
Rice. 8. Drawing of a rod holder.
DIY barbell stand. The stand is not collapsible, adjustable in height, has an H-shape, and is stable. In general, come in, look at the photos, read, at the end, as usual, there is a video, you can watch it, if you are interested, you also need dimensions, write comments, I will definitely answer.
Hi all! In this article I will describe the process of how my brother and I made a “Barbell Rack” with our own hands. As always, our material is not new, so making the bottom stand was not quick. I wanted to highlight that the project is not complicated:
The main material was F57 pipe; — also some F40 pipe; - sheet of iron 6mm thick; — Rod Ф10mm — 20cm; — An iron strip is usually used as grounding.
In the photo, as you have already noticed, I prepared our pipe blanks.
Please note that on a pipe with a diameter of F57 I cut out such a galley. Why did I do this? A good question with a simple answer. For a larger area of contact with the pipe on T-shaped inserts, this is simply an irreplaceable cutout.
We assemble our blanks by welding and get this H-shape. And let's call it the lower part of our rack. And so we assembled the lower part, now we need to refine the welding areas. We remove all uneven welding and slag, clean it and grind it a little. One note: do not get carried away with cleaning the weld seam, as this will weaken the seam, which is unacceptable for this rack. The stand must be durable and withstand heavy loads.
Well, this grinder is noisy and keeps ringing in my ears)), I had to buy headphones, which I always ignored and thought it was a cheap show off*, I admit, I was wrong and have corrected myself))
When I bought it, I felt all the charm of working with an angle grinder.
These are the hooks I ended up with. The most important thing is the thickness of the iron and for us it is 6mm. The shape of the hooks can be different, it all depends on your imagination, just do not forget about the strength - this is your safety in the future.
We welded our hooks and in my opinion it turned out not bad, but most importantly it was durable.
Let's move on to the upper part of our rack; it is adjustable in height, which also increases the number of exercises, that is, such as squats, soldier presses, presses in the lower position, at an angle, and so on...
We used the F-40 pipe so that it fits into the F-57 pipe without much effort.
On the top part we attached a rocker like this, one part of which was cut off. When making this rocker, you need to know the diameter of your neck, that is, you need to take into account that the neck is free (not pinched) in the lower position.
To fix the position we need, we need to make holes in the bottom of the rack and in the top. We used drills with a diameter of Ф10 mm. The number of holes depends on what level, that is, height, we need the bar, in my case I was lucky because I only have two of them)).
Having drilled it out, we assemble them in place and get this wonderful rack for the barbell.
Then we need to give it a more beautiful appearance by cleaning it from rust, corrosion, old paint, then sanding it a little and preparing it for painting. We try to do it according to technology: first we degrease our stand, then apply primer and after a while, when the primer has dried, we will need to apply paint. I used this primer and paint.
Tadam!!! This is what happened after our efforts, don’t judge strictly.
Homemade barbell rack at work.
Thank you all for viewing this article.
Also, here is the video that I promised you:
And also for those who were very interested, here are the dimensions of the rack for the barbell and the previously laid out bench for bench press at different angles:
Thank you!!!
Aksyonov Nikolay, Ufa
Sometimes there is a need to exercise at home without going to the gym. You love sports, but you can’t afford a subscription because you: are not satisfied with the price, are irritated by the constant crowd of people with their “bacteria”, equipment is always busy during rush hours after work, you live far from the “center of the economy”, travel time exceeds the permissible standards, there is no fitness center in your locality at all. If you are in this situation, then it is better to think about your own exercise machine. By following your own anti-crisis program, you can stay in shape and perform strength exercises on homemade exercise machines. One of the instructions on the site already described the process of making a bench press. Today I’ll tell you about its main accessory – the barbell rack.
Thanks to this step-by-step instructions, you will be able to make a barbell rack, consisting of two modules and made from available materials - wood. Let me make a reservation right away that this instruction is for informational purposes only, the quality of the final assembly, as well as the maximum permissible weight of the rod are under your responsibility. In my experience: I didn’t put more than 45 kilos on it, I don’t have that many “pancakes” and I don’t have a direct goal of becoming a pro bodybuilder. But the design turned out to be quite rigid, thanks to the cruciform shape - rolling and swaying are minimal.
Materials and tools:
From left to right:
Step 1: Cutting wood with a jigsaw.
Having bought a 40mm square beam of standard length at a hardware store, we hasten to cut it into the blanks indicated above. Next, the ends of four 40x40x500mm blanks need to be rolled on both sides. To do this, take a compass or any cylinder with a diameter of 40 mm and apply it to the end of the workpiece, trace it with a pencil.
Next, it is necessary to make additional reinforcing ribs of the structure, two for each beam. To do this, take two untouched blanks 40x40x1000mm and cut them in half, only at an angle of 45 degrees for future ergonomics.
Step 2: Making the cross groove.
It's time to make 40x20mm grooves in the center of four rolled 40x40x500mm blanks. We need this so that the cross-shaped base of each of the racks is as stable as possible. Mark with a pencil the location of the future groove.
Using a jigsaw, make two cuts to the center of the block.
Using a chisel and a rubber mallet, hollow out the groove:
Then we screw two blanks with a beveled angle of 45 degrees to this rack - our stiffeners, so that a cross is formed in cross-section.
Having thus obtained the base, we attach it to the lower end of our rack:
Follow the same steps to assemble the second stand. We put the barbell down, hang the weights, and see what happens in the end.
Squat racks are a necessary attribute for safe and comfortable barbell work in the gym or even at home!
Typically, the most commonly used device is the barbell squat. It will be enough to add a bench to the racks in order to get a full-fledged sports bench for performing bench presses, however, the supports in this case should have a small height so that it is convenient to remove the apparatus during the exercise.
In addition, the design can be used to perform the “military press” and other variations of the press in a standing or lying position. In general, racks can be called a universal training device, moreover, which you can make yourself.
Making a wooden machine: instructions with step-by-step photos
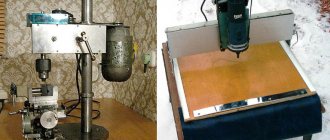
The easiest machine to manufacture is considered to be made of wood. The disadvantage of the design is the weak strength of the material. Wood becomes deformed due to changes in humidity. Over time, play appears on the rack. It is advisable to use a wooden machine only for vertical drilling of holes.
The procedure for assembling a wooden structure is as follows:
- A plate will be required for the bed. It is made from edged boards 20 mm thick. You can sew plywood on top to get a perfectly flat area. The size of the plate is selected individually. If the machine is intended only for vertical drilling, then a frame with dimensions of 50x50 cm will be sufficient. To perform milling work and drilling at an angle, the dimensions of the plate are increased to 100x50 cm.
- A 20 cm wide stand is installed vertically on the bed. Its height depends on the dimensions of the drill. Usually, boards 50–70 cm long are enough for a stand. The part is fixed to the side of the bed or on the plate itself. In the second case, the rack is reinforced with a support.
- The carriage is made from a board. The length of the workpiece varies from 50 to 70 cm, but usually the dimensions are selected to match the drill model. On the back side of the carriage and the front side of the stand, telescopic furniture guides are fixed, serving as a movement mechanism.
- The drill can be secured to the front side of the carriage with clamps, which is not very reliable.
- To firmly fix the drill, it is better to make a block. The unit consists of a piece of plate, perpendicularly fixed to the carriage with steel corners.
- For the block, take a square piece of board. A circle is drawn in the center. Its diameter should be 0.5 mm less than the thickness of the front part of the drill.
- The circle is cut out with a jigsaw. The socket is given ideal smoothness using a round file. The finished block is fixed to the carriage. A cut is made in the front and a screw clamp is installed.
The carriage with the block is installed on the rack, connecting with elements of furniture guides. All that remains is to make the control handle.
Types of racks
To perform strength exercises, as a rule, two main design options are used:
- squat racks;
- safety racks.
The first option consists of two frames connected to each other. The long side of each of them is equipped with several stops that hold the neck of the projectile. If difficulties arise while lifting with weights, the athlete can use the limiters at the bottom of the frames.
Squat racks are identical to the design described above, with one difference - they are not as high and are more suitable for squats with a weight on the shoulders.
A variant of racks with separated frames without a connecting element is used, although not so often. This option is not the most successful due to the increased instability of the structure. When working with such a device, it is important to ensure that when the projectile returns to its starting point, the frames are symmetrical with respect to each other.
Moreover, a base that is too light can lead to the projectile falling and, as a result, injury. The only solution in this case may be to strengthen the racks - using bolts with which the structure will be screwed to the floor.
In order to avoid problems when working with racks, it is better to make them in the form of a solid structure based on the telescopic racks themselves of a relatively small height. The main disadvantage of the device may be the proximity of the connecting beam to the athlete’s legs in a position where he needs to remove the apparatus from the racks. Therefore, if you plan to make the structure yourself, place the cross beam a little further.
Approximate diagram for making racks
Before you start making a reliable, practical and convenient design, choose the option that suits you in the gym and take the dimensions from it. Prepare your supplies and begin the manufacturing process.
Connect the profile pipe to the channel (use a welding tool) without using bolts. The welded structure will be more durable and reliable. As for the number of holes in the frames, you can make them based on personal preferences - along the entire length, for example. The last hole should be at your height.
To make projectile holders, you can use a metal strip of a convenient width: from 4 cm to 8 cm or more. Its thickness is about 3 - 4 mm. The optimal width of the strip is 6 cm. Cut the strip to the required dimensions according to the drawings, and then clamp it in a metal vice so that its upper part protrudes by 10 cm.
When choosing a profile pipe, try to choose products with the thickest walls possible. The best option is a pipe with a thickness of 3.2 - 4 mm. Due to this, it will be possible to reduce the backlash, the racks will be more stable. Keep in mind that the thickness of the profile pipe affects its cost.
In order to make barbell squat racks, you will need the following materials:
- Channel length 2.4 m (8x4 cm)
- Profile pipe 1.8 m (5x5 cm)
- Another type of profile pipe with dimensions 4 x 4 cm, length 2.4 m
- Metal strip 0.4 m
- Pins 0.5 m long
To insure yourself against shortages of materials in the process of making racks, round off the above dimensions by a few centimeters, working with a margin. If you have the opportunity and desire, in addition to racks for squats with a barbell, to make several more useful structures for training, then purchase more profile pipe - this is the basis for most homemade structures in strength training. The same power frame is made on the basis of a profile pipe.
Please note that squatting with a barbell on racks without depth stops can cause injury! That is why we strongly recommend making structures with side bars or pins at the height of the simulator for safety.
It is worth considering additional design options for squats with a barbell - with supports in front, on which you can squat without being able to stand up, and put the barbell down. Improving the design in this way is not difficult at all. It will be enough to weld two profile
pipes of the letter “L” in front on each side.
If possible, try to get access to basic rack drawings, which you can try to get from a machine builder or even do it yourself. Having basic drawings at hand, you can easily change and improve the design depending on your personal needs.
Let us add that by modifying the devices in this way, you will make it universal and be able to provide it with the functions that a power frame performs. But remember that homemade squat racks, even the best ones, can never become a worthy alternative to a cage. That is why it would be much more logical to spend time and energy on making a high-quality power rack, with the help of which, in addition to squats, you can safely work on a number of exercises.
A good barbell rack is very important for all kinds of exercises: weighted squats, seated squats, calf raises, holding weights, and so on. For those who do not really like working out in gyms, performing all kinds of exercises becomes problematic. The main problem is the barbell rack. It is this equipment that is often so lacking to conduct effective home workouts. But if it is so important, then why not do it yourself with your own hands.
Does this idea make sense?
Before you learn how to make a clothes hanger with your own hands, you need to figure out whether such a “game” is worth the candle. A master who has not yet engaged in such creativity may have quite a lot of concerns. In fact, this method has enough advantages, which is better to be sure of before making a decision.
if a feather flies onto the balcony it is a sign
Simple tools do not require highly qualified craftsmen; all that is required is attentiveness, accuracy, and precision in fitting parts. The biggest advantage of doing it yourself is the uniqueness of the item made, its originality, which all guests will certainly appreciate.
Why do you need to make a stand yourself?
Why do you need to make a stand yourself if you can find a decent stand that will be of high quality and practical in online stores or? First of all, a manufactured stand will cost three or even four times less than a store-bought one. All you need is to have all the tools and be able to use them.
Secondly, your own stand will suit all personal parameters. There will be nothing superfluous in it, and the design can suit any conditions of your own apartment.
Accessories
Before you begin, you need to decide which homemade design is suitable for certain operating conditions. Most often, to assemble a high-quality frame, you need to prepare the following parts:
- Bolts for secure fixation.
- Hardwood that can withstand any loads placed on it without deformation during operation.
- Keys.
- Metal corners.
- Fastening materials.
- In some cases, a chipboard may be needed.
- For strong and reliable fastening of the angle grinder, a profiled metal pipe is suitable.
- 12V relay.
- Tools for fixing bolted connections.
- Drill.
It is also worth considering that only the bracket that was assembled using a welding machine will have the highest strength characteristics. But it is precisely thanks to the bolts that you can create a collapsible structure that can be moved to any other place.
Layout
So, the decision has been made - the barbell rack will be homemade. Before starting work, you need to think through everything carefully. For greater accuracy, it is best to make a drawing. The barbell stand must be proportional. Load-bearing structures must support the entire weight; for this, everything must be calculated and plotted on the drawing. In addition, the drawing will help you avoid buying too much. Since materials are usually bought by eye with a reserve, and this is all money. What is important for a homemade stand is low price. So it is better to first draw up a plan in which the future stand should be described.
How to craft diamond armor in Minecraft
Diamond armor in classic Minecraft (without mods) is considered one of the strongest. And as many have already guessed, to create it we need diamonds. This material is obtained from diamond ore, which in turn is mined with a pickaxe. This is one of the rarest natural rocks (or blocks) found in the game. Their veins can be found from 1 to 16 blocks below the surface. And to get a pure diamond, you need to smelt diamond ore in a furnace for a long time.
To make diamond armor and place it on the stand:
- To create a diamond helmet, place diamonds on the workbench in the first row in each cell. And also in the second row through one cell;
- To create diamond armor in Minecraft, place diamonds in all cells except the middle one in the top row;
- To get diamond leggings, place diamonds in all cells except the middle one in the middle and bottom row;
- Diamond boots are created by placing 2 diamonds vertically in the two outer rows, as in the screenshot.
Diamond ore can be found under lava. But in order to be able to work with it, you need to brew and use a potion of fire resistance. Lava can be poured into a separate pit until the entire excavation site has been checked. Once the diamond armor is ready, it can be placed at home. But first, make a stand for your armor in the Minecraft game for your home.
What a DIY barbell rack should look like
The rack must be practical and compact in order to be suitable for the “harsh” conditions of the living space. That is why the described projectile has so many devices and amenities. The secret is to have the rack also serve as parallel bars. All this should be foldable and adjustable in length and height. It is thanks to these features that a conventional barbell rack turns into
Alternative options
Variations of the front squat with the barbell secured on the chest using crossed arms and straps can be used at the initial stage or for those involved in bodybuilding or powerlifting. If the goal is to master the technically correct body position for weightlifting, the athlete must seriously address forearm stretching and shoulder and hand mobility.
Forearm stretching exercises are included in each complex with a front squat, and are performed at the beginning of the workout for 10-15 minutes. Usually this stage is not very popular for beginners without good stretching and mobility, but it is necessary in the process of physical development of the future athlete.
Materials for work
You don't need a lot of materials for a stand. It will still be cheaper than in the store. So, for work, first of all, you will need two types of profile shapes (types of rolled metal). In order to change the height and width of the rack itself, you need to insert one pipe into another, so one must be smaller than the other. The mechanism is simple: another protrudes from one pipe, and its position can be adjusted, thereby lowering or raising the level of the rod.
In order for the structure to withstand the entire load, one type of 40 by 40 millimeters and a cross section of 2 millimeters will be enough. Its length is 5 meters. The second (retractable pipe) should be 30 by 30 millimeters, 2 millimeters in cross section and 3 meters long.
Another important part is the neck holder. It will require two 6-mm sheets of steel 50 by 200 millimeters.
To make the bars, you will need a small pipe measuring 30 centimeters. Since there will be two handles, it is best to take two pipes of 15 centimeters each.
You will need a couple more bolts (act as the regulator itself). They should not be too thin, otherwise the heavy weight will simply bite them. The most optimal thickness of such bolts is 8 millimeters. Since the entire structure is made of metal, it will seriously scratch the floor and rattle. To cause less damage to the apartment and not disturb the neighbors, you need to stock up on rubber stands. These are pieces of rubber 5 millimeters thick. This device makes the entire structure more stable and, therefore, reliable.
Original ideas for wall models
What and how to make a clothes hanger with your own hands if you choose a wall-mounted type? The easiest way is to use a wooden element to which hooks purchased in a store are attached. The work in this case consists of several stages. This:
Before fixing metal products in a wooden base, holes with a diameter slightly smaller than that of self-tapping screws are pre-drilled at the fastening points.
A classic wooden base and standard purchased hooks are a traditional option that doesn’t have any “zest.” The product turns out to be quite nice, but ordinary, unremarkable. Some owners are not happy with this result.
Candidates for the role of hooks
In this case, it is difficult to name those items that are not tried to be used as elements for storing clothes and accessories. The hooks become:
The list goes on, as most small items can be made with hooks. However, the main task in this case is to “see” this element in familiar things.
Base for hooks
Yes, you can come up with an interesting shape for the design and use it as a hanger:
However, some authors do not stop at this list; they go in a completely different direction. Perhaps one of the most unconventional “hanger inventions” can be considered snowboards, or old skis to which hooks are attached, but of a standard shape.
Human imagination knows no bounds, so there are a great many ways to make a clothes hanger with your own hands. For those who are not very attracted to overly “creative creativity”, it is better to watch the following video:
Source
Closer to the point, or How to make a foundation
Almost the entire load goes to the base. It must be very strong and stable. It should also be collapsible so that it takes up less space in the apartment. So, let's start making the base of the future rack. The first step is to cut the metal profile into the required length bars. The base is the part into which a smaller (30 by 30) profile will then be inserted, which will hold the bar. It will look like a big T.
First you need to prepare all the tools. The base will need two bars 700 and 300 millimeters long. To do this, you will need a thicker profile (40 by 40). Two bars need to be welded in the same letter “T” so that 15 centimeters remain from the middle of the longer one in both directions. This design will ensure maximum stability. A hole is drilled in a 30-centimeter block for a bolt - it will adjust the width.
You need to mark the middle of the letter “T”. It is there that the next block 850 millimeters long should be welded. From this bar there will be another one, on which the bar will lie. But under a heavy load, the block can bend, so you need to weld an additional block 550 millimeters long from the base to the middle of the rack. It will serve as additional support. It is welded at an angle so that it connects the vertical and horizontal bars. At the end of the vertical one you need to make a hole for the bolt. It should be no smaller in diameter than the bolt itself.
A similar design is made using the same principle.
Making a Stone Slab in Minecraft
Next we move on to crafting the slab. For this we need a stone. It can be obtained in the dungeon. Just start digging down to find the underground rock. Extract stone from it to create slabs.
Any plate for a stand can be crafted in Minecraft as follows:
- You will need a workbench. Open your inventory and look for a stone or cobblestone in it;
- Place 3 cobblestones in a row in the middle of the workbench;
- Take the finished slabs from the window on the right.
You only need one slab to create a stand in Minecraft if you only want to make one stand. Stone slabs can also be useful for other tasks. For example, to build your own house. Or a strong shelter that will protect you from enemies.
This is interesting: how to build a beautiful house in Minecraft.
How to do the rest
Before welding, you need to bend the sheets of steel so that they look like a hook. “Hooks” are welded to bars (30 by 30) 900 mm long. It turns out 2 long bars with a hook at the end. The pipe joint is welded behind the hook - future beams. The same is done with another profile.
Every 5 cm a hole with a diameter of a bolt is drilled. Thanks to these holes, the barbell rack can adjust its height.
The height can already be adjusted, but how to change the width? To do this you will need a profile (30 by 30) with a length of 1100 millimeters. Holes are also drilled on it with a center-to-center value of 5 centimeters. Its place is in a larger profile (40 by 40), namely in the small block of the base of the letter “T”. Moving out from the base, it can adjust the width of the rack or bars.
Important nuances
When deciding to create such a device with your own hands, you need to consider the following important points:
- moving elements must be tightened extremely tightly. For effective operation of a self-made drill attachment, it must have the ability to select a suitable reach and stroke. Moreover, if the guide post has quite a significant weight, then this only simplifies the process of creating holes.
- In some cases, the stand can be used in combination with a vice, thanks to which you can fix the workpiece. In this case, such a design can easily be converted into a full-fledged drilling machine. Moreover, it is not necessary to purchase such a vice in order to expand the functionality of the equipment. If you have enough experience, you can also make them yourself.
Instructions for crafting god's armor
Vigre has a lot of unusual things such as the armor of God. In the standard client of the game there is no such feature, so you need to download a modified game. For example, here is this link. Only after installing the mod, incredible things will be available that you may not have heard of before. So, to create armor you will need a regular workbench, as well as obsidian, which can be obtained in the “Adventure” and “You” modes living"
- We set up a workbench convenient for us to replace the stacks when creating the rack
Set up a workbench to create a new one
- We place one obsidian in the corners of the workbench
- Next, we place the quartz blocks also on the edges so that there is only one cell left in the middle, empty
- Then we take a regular workbench and place it in the last cell
As a result of this, we will get a special workbench on which we will create the armor of the god in Minecraft. We will place it next to the regular workbench.
In the inventory you can see how unusual it is on the super bench. We need nine cells of whole Ions to create a special type of protection
Your character should also have diamond armor and redstone armor. From these we will make god armor
Now we open the inventory and begin to create a stand using the same principle
- The edges of each cell of the new workbench are laid out in front of the stone
- Next, we will need diamonds. They need to be placed underneath, just as shown in the screenshot.
- Now you need to place the ender pearls in the corners in the number of pieces
- How to place gold bulls in the screenshot All you need are pieces
Place the gold bulls as in the screenshot
Place a
diamond helmet in the middle of the workbench. To the right of the workbench a special helmet will appear, which is called "" It is one of the items in the god's armor set. This is not an easy armor that can be placed in a tincture and is also an excellent boost for our abilities
Creation of stone slabs
Next, let's move on to crafting slabs. For this, you will need a stone. It can be mined in the dungeon. Just start digging down to find an underground rock. Get the stone from it to create slabs.
Any plate for a stand can be crafted in Minecraft as follows:
- You will need a workbench. Open your inventory and look for a stone or cobblestone in it.
- Place the cobblestone in the middle of the workbench
- Take the finished slabs from the window on the right
To create a stand, you will only need one slab if you want to make only one stand. Stone slabs can also be useful for other tasks, for example, for building your own house or a strong shelter that will protect you from enemies
Armor stand for Minecraft: how to do it and why you need it
In the game, there are a lot of ordinary things. For example, you can create a sofa or a table in it. In other words, you can do everything the same way as in real life. You can also create shelves and a hanger to store things. how to make a stand for armor in Minecraft in this article
General information and purpose
The armor rack is designed for storing armor. There are three types of these racks: the usual rack with arms and the small rack with arms. First, you can put on only armor; second and third, you can also put on weapons. The armor rack is often used as a scarecrow by putting heads on it. In order to hang the tincture of armor, you need to go to the item and press RMB. In this case, the items will be located on it. The same is done in order to remove them. Among other things, this item can be used as a display case
How to make an armor stand for Minecraft
To create a stand, you will need six sticks, one slab of stone, Sticks can be obtained by laying out the boards on the workbench. The slab of stone is obtained by placing nine stone blocks on the workbench. Then all the ingredients are placed on the workbench in the appropriate order.
Source
What is an armor rack and why is it needed?
In Vigre, there are a huge number of items that the player can use, used as decorative decorations. The armor rack is used for approximately the same purposes for which we use a regular hanger in the house. That is, the tincture can be put on any armor in Vigre. It resembles that city effigy with sticks in place of the hands. The tincture can be put on almost any item that can be put on the player.
You can use an armor hanger as a stand and collect heads on them as trophies. You can place an item on his right hand, for example a sword. Click the "Pose" button
Total of these commands To place infusions of your own items you need to press the “Put on” button It can be installed on the cart All functions will be preserved This structure can be broken by shooting it with an arrow from an arrow If armor or other items were equipped they will remain intact
Components of stands in Minecraft
In almost any thing, it consists of other things. For example, in order to create wooden boards and the player needs the wooden blocks, which in turn can be chopped into a forest of trees. Also, a durable stone consists of two elements of a smooth stone slab and sticks. First, let's find out how to craft these items
To create a stick in Minecraft you also need wooden blocks
- Sticks can be crafted without a workbench by chopping wooden blocks from wood. Sticks will require six pieces, which means wooden blocks are not enough
- Press the key on the keyboard and select the boards from the inventory
- Two blocks need to be placed in non-craft vertically, no matter which side
You will also need any boards for crafting for the stand. Now click the cursor with the mouse on the stick on the wrong side to create the first batch. Take them and move them to your inventory
How to make an armor stand
Once you have the necessary ingredients to create a stand, you can begin the process of crafting an armor stand, you will also need crafting, as creation involves more material than for creating simple things like a stick
- Open your inventory and select a slab. It needs to be placed in the bottom row in the middle cell on the sides, place it on the stick.
- In the middle row, place the stick in the middle
- In the top row, place a stick in each cell as seen in the screenshot
When you add the last element, a rack will appear that can be placed in your inventory and immediately used as a way to store your trophies or armor in Minecraft
There is a natural environment where the stand is degenerating. This place is outside the village when visiting the armored house if you win.