How to make a drum grinding machine yourself?
Sanding various wooden parts is a necessity faced by everyone who wants to make repairs in their home, or create some decorative element with their own hands.
Of course, you can sand small parts with regular sandpaper, but to cope with a large amount of work, you should change the sandpaper to a grinding machine. It will help to significantly save time and quickly bring the part into the appropriate form. One such useful device is a drum sander.
Classification and structure
Drum-type grinding devices belong to calibration class machines. This type of grinding machine is most often used for working on wood, but it can also be used to process other materials.
A cylindrical grinding wheel (drum) allows you to calibrate boards and slats of various lengths and configurations. The blank can also be made of different materials: chipboard, veneer, etc.
Structure of the grinding apparatus:
- Cylindrical grinding drum.
- Feeding device.
- Dust removal device.
- Working surface.
- Drum speed converter.
- The motor that drives the grinding cylinder.
- Bed for fastening key components of the machine.
- Drum height regulator.
- Operator protection device.
The main structural elements of a drum machine are listed here. Depending on the specific model of the device and the specifics of its purpose, the configuration may vary slightly.
Main device models
Drum-type machines can be purchased ready-to-use. There are several of the most popular and widespread brands for the production of these devices. It makes sense to present their individual models.
JET Company. The American company specializes in the production of modern machines of various types, including drum machines. Its product line includes several grinding machines with a cylindrical working wheel.
- JET DDS-225. This machine is one of the most powerful devices of this type in the manufacturer’s line. It is used both in home workshops and in small industries. A characteristic feature is the double sanding drum. The cost of this machine is appropriate - from 150,000 rubles.
- JET 10-20 PLUS. Compact grinding device that allows you to process up to 50 centimeters of surfaces. Perfect for small home workshops. The cost does not exceed 25 thousand rubles.
- JET 16-23 PLUS. It is considered one of the most versatile machines of its type. It is used to process building materials, kitchen appliances and even musical instruments. Most often, such a machine is used in small furniture production enterprises.
Corvette 57. A machine made in China, which is distinguished by fairly high build quality and wide functionality. The machine is designed for grinding flat surfaces of wooden workpieces and turning parts to the required dimensions. The machine has a fairly affordable price - 24 thousand rubles.
In addition to these machines, there are also good options from German manufacturers. It is worth noting that, depending on the price, German companies also offer corresponding sets of capabilities for their devices. The minimum amount for which you can purchase a grinding machine in the basic configuration is 15-16 thousand rubles.
: step-by-step manufacturing of a drum sanding machine.
How to make a grinding machine with your own hands?
If you can’t pay quite a lot of money for a decent version of a drum sanding machine, then you should try to make it yourself. For a person who is well versed in mechanics, this is not a very difficult task. In addition, this way you will be able to save significant financial resources.
In order to assemble a drum sanding machine at home, you need to acquire the following parts:
- Grinding drum. A cylindrical device can be created on the basis of “garbage” building materials. For these purposes, even pieces of wooden blocks are often used, which are evenly attached to a special metal axis using glue. In this case, special attention should be paid to the tight fit of these bars to each other. The drum can also be made on the basis of a polyvinyl chloride pipe with a diameter of up to 10 cm, which is placed on an iron rod with a diameter of 1.5-2 cm. It should be slightly shorter in length than the rod itself. We insert special plugs with holes for the rod into the ends of the pipe. We recommend securing the plugs with screws. We thread and secure the rod. We wrap a thick layer of rubber onto the pipe, onto which the sandpaper will be attached.
- Engine. It is best to use a working motor from an old washing machine (as well as pulleys, belts, etc.). The optimal motor power should be from 200 to 300 W. It is desirable that the motor is also asynchronous and single-phase. RPM level – 2000-3000.
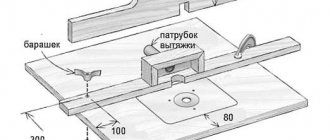
- Frame. The design should be simple and convenient. It is best for the machine body to consist of two side panels, a spacer and the table itself. Particular attention should be paid to the strength and rigidity of the work table, which should not be deformed when the workpiece being processed is pressed onto the drum. The desktop must consist of a base and a moving part.
Once the main parts of the machine have been assembled separately, you can begin the final assembly of the entire machine. First of all, you should attach the motor to the bottom of the machine body in place of the pre-drilled holes. The grinding drum is installed in the upper part of the housing and attached to two bearings, which are located on the side walls of the housing.
Then we attach special pulleys to the drum and motor and tighten the drive belt. After all the necessary preparations with the electrical wires, we fasten the desktop with special bolts that will hold it at the required level. Experts strongly recommend installing a protective casing on the machine.
It is worth noting that creating a drum grinding machine yourself also does not come without certain costs. First of all, this concerns your time, but the machine will cost you less than a factory one only if you have a working motor. Without an engine and certain skills, it is almost impossible to create a cheap analogue of a branded machine.
Homemade sanding drums
Hello to all DIY lovers, every DIYer who to some extent works with wood probably has a separate device dedicated to sanding, be it on a sanding machine or by hand, but sometimes it happens that the part being processed has a round shape or it needs to be sanded inside . In this article I will tell you how the author made sanding drums with his own hands, with the help of which finishing work will not be a burden.
To make this homemade product we will need the following materials:
*Wooden planks, their thickness may vary, for an average drum it is 15-20mm. *Steel rod or ready-made bolt. *Washers and nuts. *Sandpaper. *Carpentry and PVA glue. *Crowns or so-called ring drills. *Erasers for banknotes.
First step.
In order to start work, we need to decide on the dimensions of the drum, after the dimensions are selected, we select a crown for that same size. Using a bit installed in a drilling machine, we drill out 5 round blanks; you can change this number depending on the desired height and the thickness of the blanks themselves.
Second step.
Armed with PVA glue, glue the adjacent surfaces of the finished round blanks and clamp them to each other using a vice, maintain gluing accuracy so that one bar does not extend beyond the edges of the other. At this stage, the strength properties of PVA glue will be sufficient. Wait for it to dry completely, then fasten the bolt in the middle into the drilled hole and tighten it on both sides with nuts, having previously placed a washer on both sides.
Third step.
This stage requires a grinding machine or sandpaper; the first method will be easier and faster. We clamp the bolt with the finished drum into a cordless drill and grind it with coarse sandpaper, gradually moving to a finer grain size, thereby giving a smooth surface to our drum.
Source
Drum sanding machines for wood: video, do it yourself - Turner
In this review, the master shows how to make a drum grinder with your own hands using simple and affordable materials.
To make a sanding machine you will need plywood 20 mm thick, as well as some other materials.
First of all, the master cuts two pieces of plywood. Having placed a gap between them, the author connects them using four door hinges.
Wooden blocks must be attached to the bottom sheet of plywood, which serve as limiters for the top sheet and as supports for the shaft.
Main stages of work
The next step is to screw two guides to the bottom sheet of plywood.
Between them, the author installs a movable support platform, with which you can adjust the angle of inclination of the top sheet.
Housing bearings are attached to the side posts, into which a wooden shaft is inserted.
Then you will need to install the electric motor (the master made a separate platform for it, which is attached to the base).
At the last stage of the work, all that remains is to wind a sanding belt of suitable grain size onto the shaft.
The advantage of this design is that large furniture panels can be sanded.
For more information on how to make a drum grinder with your own hands, watch the video on our website.
Rate this post
Drum grinders
It’s nice for any home handyman to feel like he has all the necessary tools when doing his favorite job. Branded items collected into a collection with his own hands, his wealth and his pride. He takes care of it, carefully selects it and dreams of replenishing it in the form of a gift or a homemade machine.
Drum sander Jet DDS-225Jet DDS-225 - 2 sanding drums for coarse and fine grinding in one pass
Wood carving or home construction, cooperage or making homemade musical instruments - everything requires a high-quality instrument. Including for its finishing. The drum grinding machine is the crown of the entire set of tool equipment.
After it there will simply be nothing to collect if it is from the Jet Plus family. A good workshop, created over many years of effort, is a real pride of its owner.
Calibrating drum grinding machine Performax 22-44Drum grinding machine ZSM 405
Machine design
The drum-type grinding machine belongs to the group of surface grinding equipment. It is intended for finishing all kinds of wooden and wood-containing materials with abrasive sandpaper of various grain sizes. The technological cutting process takes place at high speeds and with a large release of abrasive dust and dust from the cut part of the workpiece.
The use of powerful ventilation systems allows you to work on such drum equipment in relatively comfortable conditions. Structurally, such woodworking equipment is:
- portal or console type mechanisms; on console-type drum machines it is possible to produce parts with their rotation, which increases the processing width;
- the portal design of drum machines increases its rigidity, allowing you to work with maximum operating parameters without reducing accuracy;
- stepless cutting depth adjustment;
- with adjustable or stationary feed speed;
The process of sanding wooden materials consists of the following technological methods:
- selection of sanding belt of appropriate grain size in accordance with the required finish; for maximum removal or peeling – 36 units;
- for the standard process – 80 units;
- finishing or final processing – up to 220 units;
- it is possible to wind tape of various grain sizes on equipment with paired cutting drums;
The use of abrasive paper of various grain sizes on paired shafts makes it possible to obtain the best quality indicators in one pass. Especially when processing wood with your own hands.
Work principles
The drum grinding machine is quite simple both in performing technological operations and in its maintenance. The operating procedure is as follows:
- set the necessary cutting parameters;
- with your own hands, thread the emery cloth onto the cutting drums equipped with its tensioners;
- calibrate the cutting part; such an operation is necessary for accurate alignment of the working drum relative to the feed table;
- This process is carried out using 2 calibrated wooden blocks located along the width of the feed table under different sides of the drum;
- Having achieved symmetrical contact between the main shaft of the 2 bars, they proceed directly to the technological process of manufacturing the part itself.
Highpoint Sander Drums Corvette Sander Drums
After several passes, in order to maintain performance and surface quality, it is very useful to carry out preventive cleaning of the abrasive belt yourself with a special pencil. All similar machines are equipped with this pencil, including models 10-20. It can also be purchased separately.
Homemade drum sander
This drum machine for wood has a specific, very practical purpose. It is not universal and its rather rare use in ordinary farms does not contribute to the growth of popularity. The relatively high cost, dimensions and difficulty in pre-setting make such equipment a poor stepchild among grinders, drills and vibrating machines.
Sometimes it makes sense to make a similar tabletop grinding machine with your own hands, using the lightweight Jet series of drum equipment as a basis. The design of such a homemade drum mechanism is not complicated:
- the frame and body of the main cutting part are made of multi-layer plywood or good wood with a thickness of 10 to 20 mm;
- The engine from an old washing machine, disassembled with your own hands, is also well suited for these purposes;
- It will be quite difficult to make a snare drum; although it will be homemade, the functions will remain the same; the grinding drum of a homemade machine is made of a thick-walled plastic pipe of a suitable diameter (like the Jet model 10-20 Plus);
- the main axis of the cutting unit is made from a calibrated metal rod (up to 20 mm);
- with their own hands they fit wooden plugs under the plastic pipe and the central axis;
- a homemade bearing assembly will have to be ordered from specialists;
- Having assembled the drum assembly and fixing its parts together with 10 fasteners, paste them with a rubber sleeve;
- the hand-made serving table, on the serving side, is mounted on piano hinges;
Sequencing
The main stages of this work are:
- Sandpaper cutting.
- Installing a sheet of metal in a vice.
- Trimming the ends of the tape.
- Removing abrasive from its corner.
- The final stage is gluing.
Let's look at each of them in more detail.
DIY endless sanding belt KSL-1300
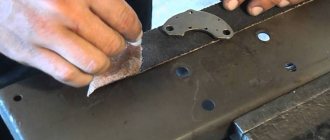
Trimming
The tape is cut with any tool, you can use ordinary scissors. Before starting preparation, you need to make a cut line on it using a ruler and pencil (it is required that it be as even as possible).
Installing the support in a vice
During the entire gluing process, it will be convenient if a thick piece of metal is inserted into a vice; corners will need to be laid out on it during preparation and gluing. Therefore, you need to firmly secure it in them.
Preparing the corners of the tape
The end of the sandpaper is laid out on the prepared area. It needs to be cut at an angle. At a distance of 3-4 cm from the edge, draw an oblique line with a pencil.
The second end is simply cut at a similar angle.
Removing abrasive
At a distance from the edge of the prepared end to approximately 4 cm, it is necessary to remove the dust from the sandpaper.
You need to prepare a tape with the same thickness, about 10cm in length.
Next, the algorithm of actions is as follows:
- the gas burner adjusts the fire supply under the metal “table”,
- it heats up simultaneously with the sheet of paper placed on it,
- when everything is warm enough, the burner turns off,
- the hot corner must be coated well with a silicone corner to the drawn line,
- A piece of sandpaper is firmly applied on top and secured firmly (you can put some kind of press.
Gluing
When the gluing area is ready, it can be fastened to the second end.
The manipulations will be similar to the previous stage:
- The site and material are heated using a gas burner.
- A hot, clean area is coated with silicone.
- The second end is overlapped on top.
- A load is placed on the resulting circle, under which the joint will dry out.
This way you can get an excellent homemade belt for your sanding machine. This method is the fastest, unlike other similar ones, since silicone dries much faster than the glue used in similar methods. You just need to have the tools and material for this.
Wood sanding machine: how to make it yourself?
1-Disk machine 2-Belt machine 3-Drum machine
A disk machine is a rotating disk on the surface of which an abrasive (sandpaper) is fixed. Grinding is done by applying the edges or side surfaces of the part to the disk, for which a table or support bar is installed approximately in the middle. This design is optimal for sanding straight or convex edges.
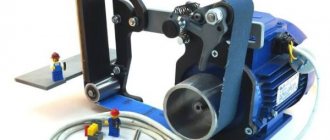
The belt type consists of two drums mounted either vertically or horizontally. One of them is drive, the second is tension. The abrasive is a loop of sandpaper that is glued together using a template.
The loop is installed on both drums and tensioned. After starting the engine, it forms a constantly moving strip of abrasive. Sanding occurs by pressing the tape to the surface of the part using a special clamp (“iron”).
It moves left and right, ensuring that the sandpaper is pressed against all areas of the surface being treated.
The drum machine is used for grinding concave edges. It is a rotating cylinder of relatively small diameter (6-8 cm), on which the abrasive is installed.
The simplest designs are disk and drum. Making a tape machine is much more complicated, but its efficiency is much greater. Such installations allow high-quality grinding of panels and large-area parts, ensuring high surface quality.
To install a tape machine in a workshop, you will need a large area, which must be taken into account when choosing a design.
Features and Specifications
The main feature of wood sanding machines is a specific method for adjusting the quality of processing. It occurs by changing the grain size of the abrasive.
Typically, the process begins with sandpaper with a coarse grain, then successively reduces its size and completes the procedure by sanding with fine sandpaper.
In total, 2-3 shifts are used, but there may be more gradual methods.
The second feature is the method of installing the abrasive. If a pre-glued loop is installed on a belt machine, then a circle of sandpaper must be secured to a plane on the disk structures. The best way is to use Velcro, but the easiest way is to stick the abrasive onto adhesive or double-sided tape. The second method is simpler, but also more expensive.
The technical characteristics of each machine are slightly different from each other.
For disk installations:
For band machines:
- Tape width.
- The size of the working base (the distance between the centers of the drive and tension drums).
- Loop speed.
- Range of movement of the desktop in the vertical and horizontal plane.
- Length of the blank for gluing the loop.
For drum machines:
- Working cylinder diameter.
- Cylinder height.
All these parameters depend on the planned productivity, the size of the installations, and the size of the parts being processed. It is necessary to take into account the volume of expected work, the size of the parts, and the specifics of processing.
The cleaner the surface should be as a result of grinding, the better the quality of the machine should be made. Beats, irregularities and other defects will cause scratches that can significantly deteriorate the quality of processing.
Advantages and disadvantages
The advantages of grinding machines include:
- Quality and speed of processing.
- High performance.
- The ability to obtain the surface of the desired roughness.
- The ability to process not only the wood itself, but also pre-grind the finishing layer.
The disadvantages are:
- Release of a large amount of dust, requiring the organization of a dust removal system.
- Large quantities of consumables (abrasive) of several sizes.
- Difficult to manufacture and maintain (this especially applies to belt installations).
Considering the existing shortcomings, before starting assembly, you need to decide how necessary the machine is. If it will be used only occasionally, it is not practical to spend time on manufacturing - you can get by with hand tools.
DIY options
Let's look at how to assemble different types of grinding machines:
Disk
The easiest way to create a disk machine is an electric drill mounted on a table with a grinding wheel installed. Another available option is to fabricate and install a sanding disc onto the circular saw shaft. In this case, it is necessary to assemble a device to reduce the rotation speed (a system of reducing pulleys or an electronic device).
If you need to make a machine from scratch, you will have to assemble:
- Support platform with stand for electric motor.
- Stand or work table.
- A disc for installing abrasives with the possibility of mounting on the motor shaft.
As a rule, plywood disks are made, which are installed on the shaft using a coupling and threaded fastening. This unit will have to be ordered from a turner. The height of the table should be such that the disk mount is below its plane.
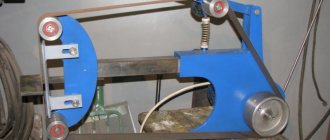
Tape
To assemble such a grinding installation, you need to proceed in stages:
- Assemble the frame. It consists of two pedestals on which a drive drum with an electric motor and a drive drum with a tension device will be installed.
- Connect the cabinets with a frame on which the desktop will move (horizontally, perpendicular to the movement of the belt).
- Assemble a work table lifting device to adjust the height when processing large parts.
- Make a device for moving the “iron”.
- Make a protective casing and connect the dust extraction system pipe to it.
- Assemble the electrical system for starting and stopping the machine (start button, automatic machine, etc.).
The greatest complexity is presented by the drums for installing the abrasive, the tension devices for them and the table lifting/lowering system. They will have to be partially ordered from a turner, and partially assembled on site. It is unlikely that you will be able to find ready-made units, since they are very specific and rarely found on common mechanisms.
Drum machine
The simplest option would be to install the electric motor so that its shaft passes through the hole in the workbench. To do this, you need to assemble the frame in the form of a support platform with a stand and a vertical plate.
Holes are made on it and the electric motor is attached. The drum is installed on the shaft using a threaded fastener. The easiest way to make it is from wood, or use a section from a plastic sewer pipe.
Sandpaper is wrapped around the drum and secured with screws or small nails.
In all cases, it is necessary to ensure a low speed of movement of the abrasive. It is necessary to choose electric motors with a number of revolutions of no more than 1000. Band machines are especially dangerous. At high speeds, the edge of the belt can cut through any material and cause serious injury.
Material selection
The easiest way to make a machine at home is from wood. However, it should be borne in mind that it is light in weight and is not able to dampen the beating of the machine. Therefore, you will need high rigidity of the connections and strong fastening of the frame to the floor. Another option is a metal frame made from an angle, channel or I-beam.
Such a machine is more massive, heavier, vibration and beating will be easier to dampen. However, you will need welding work, cutting workpieces and other operations with metal, which is not accessible to everyone. The final choice is determined by the capabilities and preferences of the owner.
Popular models of factory machines
Let's look at the most popular models of grinding machines:
Disc (disc)
Jet JDS-12 220 V
Stationary machine with a massive cast iron frame. Capable of dampening vibration or beating when it occurs. Disc diameter - 30 cm. Engine speed - 1400 rpm. The table can be tilted from +15° to -45°.
S089A
Chinese disc grinding machine. Compact type, with a disc diameter of 305 mm and a power of 800 W. The base is made of cast iron. The work table has a slot for moving the stop with the ability to rotate at a certain angle to the disk.
Einhell TC-US 400
A combined type machine combining disc and belt types. The diameter of the disk is 15 cm, the blank for gluing the loop is 914 by 100 mm. The belt speed is 276 mmmin, the drum rotation speed is 1400 rpm.
Tape
Jet EHVS-80
Vertical type machine (drum axes). Tape speed - 16 ms. The blank for the loop is 116 by 2260 mm. Machine weight - 110 kg;
ShLPS-6M
Stationary grinding machine with horizontal belt arrangement. The diameter of the pulleys is 34 cm. The maximum size of the part during processing is length 2.5 m, width - 1 m. Table lift height - up to 40 cm. Belt blank - 7470x160 mm. Weight - 670 kg.
Drums
Jet JBOS-5 220 V
A drum machine that provides spindle rotation with simultaneous reciprocating movement in a vertical plane. Rotation speed - 1400 rpm, number of lifts - 30 pcs.min. The desktop can be tilted up to 30° to the horizontal;
Proma BO-25 25000370
Compact grinder with 370 W power. Equipped with a square work table measuring 37 by 37 cm, with the ability to tilt up to 45°. Spindle rotation speed - 1400 rpm. The weight of the machine is 35 kg.
The number of designs and models of grinding machines is constantly increasing. New developments are appearing with increased processing capabilities and quality. Manufacturers take into account the shortcomings of existing devices and produce more advanced, modified samples.
Care and maintenance
The operation of grinding machines is accompanied by the release of large quantities of dust. To remove it, powerful local exhaust units are used.
If they are disabled, the equipment cannot be used - this threatens the health of the employee.
However, it is impossible to completely get rid of dust, so after finishing work you should immediately thoroughly clean the machine using an industrial vacuum cleaner and brush.
The abrasive is replaced as it fails or according to technological processing conditions. To maintain productivity, you need to have a supply of ready-made discs with installed sandpaper, or glued sanding belts of different types. They are stored in a closed cabinet so that dust does not accumulate and the surface of the tape does not deform.
During operation, a significant charge of static electricity is generated. To remove it, high-quality grounding is required. It is necessary to periodically check its condition and restore if necessary.
Do you want to assemble a grinding machine yourself?
Of course! Not particularly
Let's sum it up
A homemade grinding machine requires sufficient space in the workshop and requires significant quantities of abrasive. When deciding to independently manufacture such a device, you should carefully weigh the need for this and your capabilities.
There are three types of design:
- Disc machines . Easy to make, can be made from a circular saw.
- Drums . Compact devices, ideal for grinding the edges of concave parts.
- Tape . Capable of grinding planes, providing high quality surfaces. They are the most difficult to manufacture due to the large number of specific components and parts.
Manufacturing a machine will require the use of certain tools and materials, the choice of which is determined by the capabilities of the owner. You won’t be able to do it entirely on your own; some components will have to be ordered from a turner. It is important to ensure a low speed of movement of the abrasive so as not to create the risk of injury or destruction of the workpiece.
What you should know when choosing a tape
To obtain good polishing quality, it is necessary to navigate the grinder parameters, equipment characteristics and features of the surface being processed. When selecting a sample, it is necessary to analyze the following parameters:
How to glue tape on a grinder with minimal runout
- what type of product is needed (coarse, medium, fine or diamond abrasive);
- calculate the belt speed (it must withstand a shaft rotation speed of more than 1500 rpm);
- determine what abrasive resistance the selected specimen has;
- find out the value of the maximum permissible elongation and tensile strength (products with an indicator of at least 15% are considered good);
- on what basis the abrasive is applied (by what method and its composition);
- use the marking to determine the length of the tape;
- whether the width of the belt suits the dimensions of the machine used.
Calculation of parameters and assessment of the main characteristics of the grinder must be made before purchasing the product. This will get rid of problems that may arise when replacing it or using it incorrectly.
Drum grinders
It’s nice for any home handyman to feel like he has all the necessary tools when doing his favorite job. Branded items collected into a collection with his own hands, his wealth and his pride. He takes care of it, carefully selects it and dreams of replenishing it in the form of a gift or a homemade machine.
Drum sander Jet DDS-225Jet DDS-225 - 2 sanding drums for coarse and fine grinding in one pass
Wood carving or home construction, cooperage or making homemade musical instruments - everything requires a high-quality instrument. Including for its finishing. The drum grinding machine is the crown of the entire set of tool equipment.
After it there will simply be nothing to collect if it is from the Jet Plus family. A good workshop, created over many years of effort, is a real pride of its owner.
Calibrating drum grinding machine Performax 22-44Drum grinding machine ZSM 405
Properties of abrasives
As is known, abrasive materials are characterized by high hardness and are used to treat the surface of a variety of materials. Harder abrasive grains are recommended for deep processing. If you arrange the abrasive grains in descending order of hardness, you get the following chain: diamond – garnet – quartz – aluminum oxide – silicon carbide – electrocorundum. The abrasive is applied to the base in several ways.
Gluing sanding tape for grinder
- Open pouring. With this method, 60% of the surface of the base is covered. It is recommended for soft materials with low density, prevents clogging of gaps and the appearance of lumps.
- Closed pouring. 100% of the base surface is covered. This method is necessary when sanding metals and hard wood.
DIY drum grinding machine
03.05.2018
A grinding machine can be used to process various workpieces or products.
It is necessary to perform the finishing operation of surface treatment.
Machines of this type are widely used in the woodworking industry, but they can also be used at home.
If necessary, you can create your own sanding machine for wood. Let's look at how you can make your own belt sander, and what types it comes in.
Design features of the machines
If you wish, you can also make a metal grinding machine with your own hands, which differs from the model designed for processing wood only in the type of abrasive belt installed. The design features of the belt grinding machine are the following:
- The drawing provides for the presence of two drums that tension the abrasive belt and set it in motion. One of the drums is the leader, the second is the slave.
- A do-it-yourself drum sanding machine for wood is created by installing an electric motor as a drive. Modern motors can have different rotation speeds. Homemade models may have replaceable pulleys and a V-belt drive. By changing the diameter of the installed pulleys, you can change the rotation speed of the abrasive belt.
- Some models of surface grinding machines have a belt tension system. Due to this, grinding of workpieces and products is significantly simplified.
In general, we can say that the sanding equipment of the type in question has a simple design that will be highly reliable.
Principle of operation
A homemade metal grinding machine can be as good as the industrial version. Considering the principle of operation of such a device, we note the following points:
- Feed rate is an important indicator that should be taken into account when creating a design. Sanding at higher speeds allows you to achieve a better surface quality. Using a disc sander or a hand-held machine, a special grinder or drill with a special attachment cannot achieve such a high quality of processing.
- The force with which the product is pressed against the abrasive belt. The clamping force determines the processing speed of workpieces and parts.
- Due to the rapid movement of the abrasive material, mechanical surface treatment is ensured. A cylindrical grinder works on approximately the same principle.
Processing of workpieces and parts is carried out by pressing them against the abrasive belt as it moves. The main rotation is transmitted through the drive to the driving drum, the driven one is designed to fix the tape.
Homemade model
If you really want, you can make your own calibration machine or disc-type grinding equipment. Home-made options are much cheaper, and productivity can also be high.
To create a grinding machine you will need:
- An electric motor that creates rotational motion.
- Rollers, due to which the belt is secured.
- A reliable frame that becomes the base.
- An abrasive belt, due to the movement of which the surface is processed.
Considering the features of creating a grinding machine with your own hands, we note the following points:
- The electric motor will not be difficult to find. It can be removed, for example, from an old washing machine. For home use, a motor operating from a 220 V network is suitable. You can also connect a three-phase motor to a regular network, but this can cause many problems.
- The frame is made independently from thin sheet metal or channels. The connection of individual elements is carried out by welding. A screw connection for creating a frame is not suitable due to the fact that vibration can cause the connection to loosen.
- Often the electric motor is connected directly to the drive drum. It is worth considering that in this case the electric motor is not protected from a sharply increasing load. The driven shaft is mounted on an axle and two bearings. The efficiency of the equipment depends on how freely it rotates.
- Inexpensive shafts can be obtained from chipboard. It is worth considering that such shaft options are not designed for heavy loads.
- You can eliminate the possibility of the belt slipping on the drums by applying rubber to the surface. You can use an old bicycle tire for this.
- Sanding belt can be purchased at a specialty store.
Today you can find quite a large number of drawings that can be used to create such equipment.
They are all about the same.
Before performing work, you should decide what size the workpieces and products to be processed will be.
Types of grinder belts
Sanding belts for grinders are classified according to the following indicators:
DIY/ how to glue sanding tape on a grinder
- purpose (type of operation performed, quality of processing);
- geometric parameters (length and width);
- permissible speed;
- type of abrasive;
- method of applying an abrasive coating;
- the company producing such products;
- cost.
Based on the type of operations performed, grinder products are divided into four categories:
- pre-processing (creation of finished forms or blanks);
- rough surface treatment;
- preparatory operation before final grinding;
- fine or final polishing.
Each operation uses its own sanding belt. The solution to the first problem is carried out using a rough (stripping) tape of grade P24. For roughing, smaller grades P36 are used. Preparatory operations are carried out on P80–P120 belts. Finishing is carried out using belts of the smallest abrasive. For this purpose, diamond tapes of grades A3k0–A100 can be used.
Based on the type of sanding material and the method of its application, the abrasive belt is divided into categories.
The following is applied to the surface as abrasive chips:
- natural stone (for example, silicon carbide or garnet);
- ceramic chips;
- alumina;
- diamond chips.
It is applied to the surface in two ways: open or closed. Each of them provides a certain degree of coverage of the substrate. The first applies abrasive to no more than 60% of the surface of the abrasive material. The second provides full coverage.
The geometric dimensions of the grinder abrasive belt depend on the technical characteristics of the grinding machine. The main parameters are length and width. All of them are standardized and have several established sizes. They are available in two widths: 50 and 100 millimeters. Length is a more variable value and is equal to 610, 915, 1230, 1600, 1800 millimeters. For some specialized machines, a belt of a given size is produced: 2000 mm with a width of 50 mm.