Today, store shelves are full of a variety of glues of different prices and compositions - I don’t want to choose! However, there are those who prefer to make it themselves, which, by the way, saves a lot of money.
In this article we will tell you how and from what to make glue from improvised materials, and it is no worse than in the store.
Paste - a traditional flour recipe
Paste is perhaps the best wallpaper glue. It is based on flour. It is absolutely non-toxic and safe for children. It can be used at home.
One liter of it is enough for about 2-3 rolls of wallpaper.
To make it you will need:
- Two containers: for mixing glue and for water.
- Flour - 6 tablespoons per 1 liter of water.
- Water - 1 liter.
Let's start making:
- Take the first container, pour water into it and bring it to a boil.
- At this time, in another, thoroughly mix the flour and cold water until it becomes liquid sour cream, so that there are no lumps.
- Without ceasing to stir the mixture of flour and water, we begin to pour boiling water into it in a thin stream.
- Mix everything well, bring to a boil again, set aside and then let cool.
The consistency of the mass will resemble thick jelly. If there is suddenly no flour in the house, then ordinary starch will do instead, and the quality will not suffer from this. They can easily replace wallpaper glue from the supermarket.
For the sake of experimentation, before applying it to the surface of the wallpaper, take small pieces and adhere them to each other.
It is also great for working with different types of paper, such as cardboard.
Main components of the compositions
The composition of the adhesive is the most important factor determining its adhesive properties. Now on packaging with mixtures you can see shocking compositions, replete with a variety of components.
However, in Soviet times, the glue was based on simple and accessible substances, and one could only envy the strength and reliability of the finished composition. The glue of yesteryear was made to last for centuries, as evidenced by many things from that era that have survived to this day.
Previously, flour or starch was used as a base. These products are excellent binders. However, to impart special properties to the mixture, additional components are required:
- Ceramic slabs require cement;
- rubber glue uses dissolved rubber;
- Gelatin must be present in stationery compositions.
Sometimes, to give special strength to homemade glue, ready-made dry mixtures are added to the main components.
Depending on the purpose, there are different options for how to make glue.
DIY PVA
In second place in terms of efficiency and popularity is PVA glue, which is rightfully considered universal, since the scope of its use is quite extensive. The good news is that no special technology is used in its manufacture, which means we can weld it at home.
What we need:
- Distilled water - 1 liter.
- Photographic gelatin - 5 g. (sold in photo stores).
- Pharmaceutical glycerin - 4 g.
- Flour - 100-150 gr.
- Ethyl alcohol - 20 ml.
Preparation consists of 2 stages:
- You need to soak the gelatin in a glass of water for a day.
- The manufacturing process itself.
After the gelatin has swollen, we begin the process:
- Place distilled water in a water bath, add gelatin and flour pre-mixed with water.
- Mix everything well.
- Bring to a boil, but do not boil! Gradually it will turn white, similar to thick sour cream.
- At the very end, add ethyl alcohol and glycerin. Be sure to stir the mixture constantly until it becomes fairly thick - about 10 minutes.
- After the mass has cooled, it can be used for work.
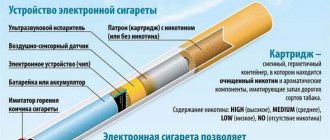
Determining the type of plastic
The type of plastic is indicated on each product with a special symbol. In the process of creating the code mark, the developers decided to apply it so that it would not be visible, so to see the corresponding symbols, you will have to carefully inspect the product.
Plastic can contain a large number of different substances, including very dangerous ones. If you learn to determine the composition of a material by labeling, then in the future you will protect yourself from purchasing harmful material and using it to store food.
Wood glue
This look is ideal:
- For the tree.
- For paper.
- For cardboard.
- Other materials are made from cellulose and sometimes even plastic.
There are two disadvantages of wood glue:
- Shelf life in liquid form is too short.
- The smell is too strong and quite bad. But if you boil it in advance and turn it into a gelatinous mass, it will be stored much longer. Then, if necessary, you can cut off the desired piece, melt it on the fire and use it.
Of all the methods for preparing this type of glue, four can be distinguished:
Recipe 1
- We take regular wood glue, grind it and soak it in water until it swells and resembles jelly.
- Next, place it in a special container (cloth). In the absence of one, you can take an ordinary tin can and place everything in a water bath over low heat.
- Using a wooden spoon or stick, stir the mixture continuously to avoid burning. If the mass acquires a yellow tint, it will lose its adhesive properties.
- After the mixture has become liquid, dilute it with vodka in the ratio: 720 g. glue and 950 gr. vodka.
- Next, add 12 grams of powdered alum per 100 grams of glue.
It perfectly glues surfaces and also has moisture-repellent properties.
Recipe 2
- Mix glue and water in a glass bottle in a 1:1 ratio.
- Bring slightly to a boil, then remove from heat and pour into a ceramic mortar, in which, using a pestle, grind the mass to a jelly state.
- Place it on a plate, let it cool and cut into desired pieces.
- If necessary, mix it with vodka in the following proportions: 720 grams of glue and 360 grams of vodka. Bring to a boil, cool.
Recipe 3
- Take 1 liter of water, 1 kg. wood glue, 1 liter of 9% table vinegar.
- Place this mixture in a water bath and bring to a boil.
- Pour 1 liter of vodka into the continuously stirring liquid.
Recipe 4
- We dilute glue and water - 1:1.
- Place in a water bath and heat the mixture until thickened.
- Add 1 part glycerin and 1 part glue (the amount of glue is equal to that taken earlier).
- Place on low heat and heat until the water evaporates.
- Then put it in molds and let it dry.
- Before use, dilute with water in equal proportions.
Gluing plastic
In order to properly glue plastic yourself, you must adhere to the basic rules:
- Firstly, be sure to degrease the plastic surface for a better gluing effect. For these purposes, you can use a solution of laundry soap or alcohol.
- Secondly, remove the smooth surface with sandpaper, this will increase the area of the parts to be glued and the glue will set faster.
- Thirdly, if the surface of the parts to be glued is small, it is recommended to apply glue to it with a brush with artificial bristles.
- Fourthly, control the amount of glue, it is advisable to avoid excess protruding beyond the surface of the parts to be glued.
- Fifthly, the parts should be pressed against each other very firmly, but at the same time carefully, since the plastic is easy to break under strong pressure.
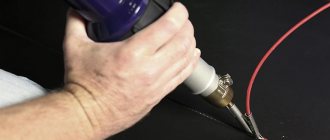
Foam glue
Since recently, panels made of foam plastic and other similar materials have increasingly begun to be used to insulate walls. When choosing an adhesive on which to place the panel, it is worth remembering that solvents, such as acetone, easily melt it. Therefore, in order not to rack your brains over the choice of adhesive, you can use the carpentry one described above.
As an option, for such purposes there is an equally effective and very easy recipe for cottage cheese glue: just mix cottage cheese and slaked lime in equal proportions.
Important point! Use it as needed as it gets hard very quickly.
General information
In order to avoid unpleasant consequences, it is necessary to choose the right glue; plastic may look the same, but have different characteristics. For the best effect, it is preferable to abandon universal adhesives and opt for a specialized adhesive suitable for a specific type of plastic.
ADVICE:
You can repair a broken plastic part without glue; to do this, you should use dichloroethane, which serves as a universal solvent, and when plastic shavings are added to it, it acquires the properties of an adhesive.
Main types of plastic
Knowing the type of plastic before starting to repair a broken product is a must. If the adhesive composition does not match the plastic, then most likely, instead of gluing, you will end up with a part with dissolved edges. It is very easy to find out the type of plastic; manufacturers mark their products with a special symbol that looks like a triangle with a number inside; next to such a sign there may be a letter designation.
- 1 (accompanied by the letters PET) – polyethylene terephthalate or thermoplastic polyethylene. It is widely used in the food industry as transparent packaging film, containers or bags. It has increased strength and at the same time is very plastic when exposed to any temperature.
- 2 (accompanied by the letters HDPE) – polyethylene with low pressure technology, which is the most durable material. Most often used for packaging bags.
- 3 (accompanied by the letters PVC) - non-food plastic, which is better known as polyvinyl chloride. It has a fairly wide range of applications: linoleum, window frames, buckets, as well as any items that are in constant use.
- 4 (accompanied by the letters LDPE) - a plastic related to polyethylene, characterized by high-pressure technology, characterized by an increased number of hydrocarbon chains. Material with this marking also has a wide range of applications, from water pipes to food and water bottles.
- 5 (accompanied by the letters PP) – polypropylene. The material, which can withstand temperatures up to 150 degrees, is used for the production of heat-resistant tableware, medical devices, syringes, toys, as well as goods subject to boiling.
- 6 (accompanied by the letters PS) – polystyrene. It has received two popular purposes at once, it is used in the manufacture of disposable plastic tableware, and is also the basis of foam plastic.
- 7 (accompanied by the letters O) - all other materials that are not included in the main groups or plastic that cannot be recycled.
ON A NOTE:
There are cases when there is no marking on the product, but even under such conditions it is possible to understand the type of plastic. Differences come to the rescue when burning plastic; each type has its own specific smell, color of smoke and its amount; more details about all the nuances of combustion can be found on thematic forums.
Glue marking
In order to select the most suitable adhesive, the markings of the main types of plastic are duplicated on it, but sometimes the standard triangular icon is abandoned in favor of a letter designation. Some of them coincide with the markings of plastic, for example, PP - polypropylene, PVC - polyvinyl chloride, PS - polystyrene. Others have a different designation: PC - polycarbonate, PMMA - plexiglass, PA 66 - polyamide, PE - polyethylene, ABC - acrylonitrile copolymer, PUR - polyurethane. By adhering to the correct choice of adhesive composition, you can achieve a durable connection between plastics.
Casein
The casein version is also good for many materials, particularly for gluing leather or wood.
The process of its preparation includes two stages:
- Isolation of casein itself from low-fat cottage cheese.
- Preparation.
Stage 1
- To get low-fat cottage cheese, soak it in a soda solution (1 liter of water and 1-2 tablespoons of soda) for 20 minutes.
- Then the cottage cheese is washed well in running water, squeezed out and dried until hard.
Stage 2
- Pour casein into a flat bowl.
- While stirring the mixture, gradually pour in a thin stream of water (proportions - 1:2). The mass should be thick.
- Then mix the mixture thoroughly by hand or using a mixer (about 30 minutes).
The glue obtained in this way will perfectly adhere to the necessary materials.
It also cures quite quickly, so try to use it within the first three hours.
Special glue for fabric
Women who are actively involved in needlework and constantly gluing some elements onto fabric know how important it is to have the right product at hand in time.
Here are three easy options for making your own glue:
1 option
Ingredients:
- Flour - 3 tablespoons.
- Water - 1 glass.
How to do:
Dilute the flour in a small amount of cold water and pour a thin stream into a glass of boiling water. Bring to a boil.
Option 2
Ingredients:
- Flour - 1 tbsp. spoon.
- Potato starch - 1 tbsp. spoon
- Sugar - 1 tbsp. spoon.
- Water - 1 glass.
How to do:
Mix all the ingredients thoroughly (so that there are no lumps) and bring to a boil.
Option 3
Ingredients:
- Gelatin - 1 pc.
- Flour - 2 tbsp. spoons.
- Sugar - 1 tbsp. spoon.
- Water - 1 glass.
How to do:
It is necessary to soak the gelatin in 1/3 water in advance overnight. In the morning, mix gelatin, sugar, flour in the remaining 2/3 of the water and bring to a boil.
The glue must be stored in a tightly closed container in the refrigerator.
Results
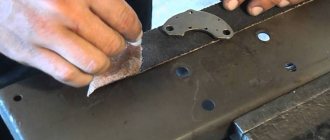
Foam glue can be used for exterior finishing of house facades. For example, for waterproofing the base, fastening roofing felt, blocking the opening of a sewer pipe in the country. Also, the glue works well in contact with tiles and asbestos-cement slate. If there are cracks, they are treated with an adhesive composition on both sides, and a fabric-based patch is applied on top. This patch can last at least 1.5 years.
Share the post “How to make foam glue with your own hands from acetone and gasoline? + Photo and Video" by copying the link: https://kaksdelatsvoimirukami.ru/kak-sdelat-klej-iz-penoplasta-svoimi-rukami-iz-acetona-i-benzina-foto-i-video/
Dextrin glue
This option is suitable for all paper-related activities, be it quilling or origami. They can completely replace PVA glue.
The main ingredient is starch.
How to cook:
- Place the starch in a heated oven. We increase the temperature to 160 degrees and simmer it for about 1.5 hours. Hot air breaks down starch and it turns into dextrin.
- Take 3 tbsp. spoons of dextrin, mix with 5 tbsp. spoons of water and stirring continuously, heat until it is completely dissolved.
- Add glycerin and mix again.
- Let cool.
How to achieve maximum effect when gluing
In order for the plastic to adhere well, you need to carry out the procedure sequentially:
- we determine the markings of the plastic and select the appropriate glue;
- clean the surface of the plastic with acetone or alcohol;
- when gluing from the inside, clean the surface with sandpaper;
- After fastening, wait as long as required according to the instructions.
If you are unable to determine the type of plastic, then drop some glue onto the desired surface and watch the reaction. If the plastic has not dissolved and the glue is firmly attached, then the substance matches the material.
Linoleum and acetone glue
To prepare it we do the following:
- We take old, unnecessary linoleum, cut it into small pieces and place it on the bottom of a deep plate.
- Then we take acetone (in a ratio of 1:2, where 2 parts are acetone) and pour it over the chopped pieces.
- Close the lid tightly and let it brew for 12 hours in a dark place.
It perfectly adheres to products made of metal, wood, leather, porcelain, etc.